
Core ML is an interesting means for adding a pre-trained machine learning model to your app. But one question that nagged me after trying Core ML was—How can I possibly train my own model and integrate it in my apps using Core ML?
Well, after doing some homework, a learned a lot about the possibilities of achieving this. To be honest, all the methods require you to understand and know your math really well! While I was on this roller coaster ride, I came across Custom Vision.
What a relief for developers looking to jump straight into training their own machine learning models. With the help of Custom Vision, developers can easily manifest their machine learning ideas into real mobile apps without diving too deeply into the machine learning waters.
Table of contents
Custom Vision
Microsoft’s Custom Vision allows you to upload images with tags, train your model for image classification with these tags, and then helps you export the trained model in various formats (we’ll be primarily focusing on Core ML in this blog).
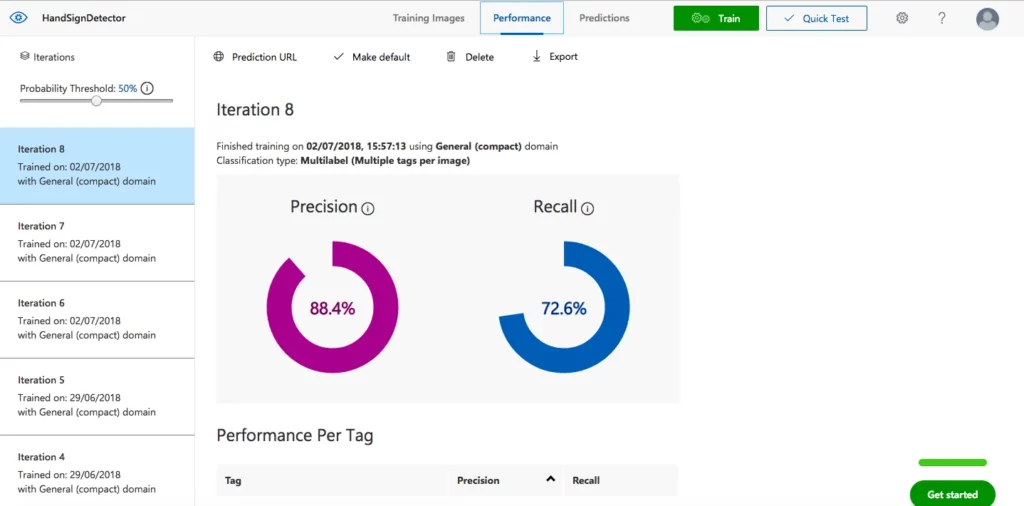
Along with this, Custom Vision gives you a dashboard that shows your trained model’s performance, gauging it on prediction and recall percentages. You can even test your trained model using their interface.
The free trial lets you create two projects and use them to train your models. For anything beyond this, you’d need to buy their services. It’s a great platform for trying your hand at training your own machine learning model.
In this tutorial, I’ll walk you through a basic hand sign detector, which recognizes ROCK, PAPER, and SCISSORS! By that, I mean it recognizes a closed fist, an open palm, and a victory sign. This can even be taken forward to build a sign language interpreter. So here goes! Bon Voyage!
Create a new Custom Vision Project
- Login to Custom Vision or sign up if you don’t have a Microsoft account already.
- Once you sign in, add a new project and add a name and description to your project.
- The next thing you need to select is the project type. Our project type will be classification since we’re building our own model. The other option is to select a prebuilt object detection Custom Vision model.
- Choosing the classification type is use-case dependent. It depends on the number of predictions that will be derived from one input image. One example of this would be whether you want to input a picture of a person and predict their gender, emotion, and age or just the person’s gender. If you wish your model to predict just one thing from one input image then choose Multiclass (single tag per image). Otherwise, choose Multilabel (multiple tags per image). For this tutorial, we’ll choose the former.
- Finally the domain to be chosen is General (compact), which provides a compact model suitable for mobile and gives an option to directly export as a Core ML model.

Train your image classification model
Once you’ve created your project, you need a lot of pictures. And by a lot, I mean a lot! Here’s the deal: for each type of prediction you want your model to make, you need to train it with a bunch of images telling it what is called what. It’s kind of like training a child to associate a word with anything that the child sees, but faster. For my model, I trained it with around 60–70 images each—fist, open palm, victory sign, and no hand. Below is list of things I did to train my model:
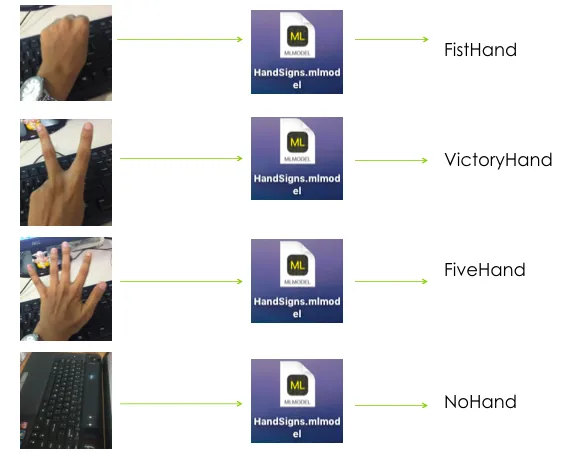
- Collect images! Diversity is the key in this activity. I collected images of all three signs in various lightings, various positions on the phone screen, with different backgrounds, and with a lot of different hands. Many thanks to all my awesome hand modeling volunteers (a.k.a family and friends) This is the most fun part of the voyage. Here are the snapshots of my memories from the voyage! More about them in the following points.
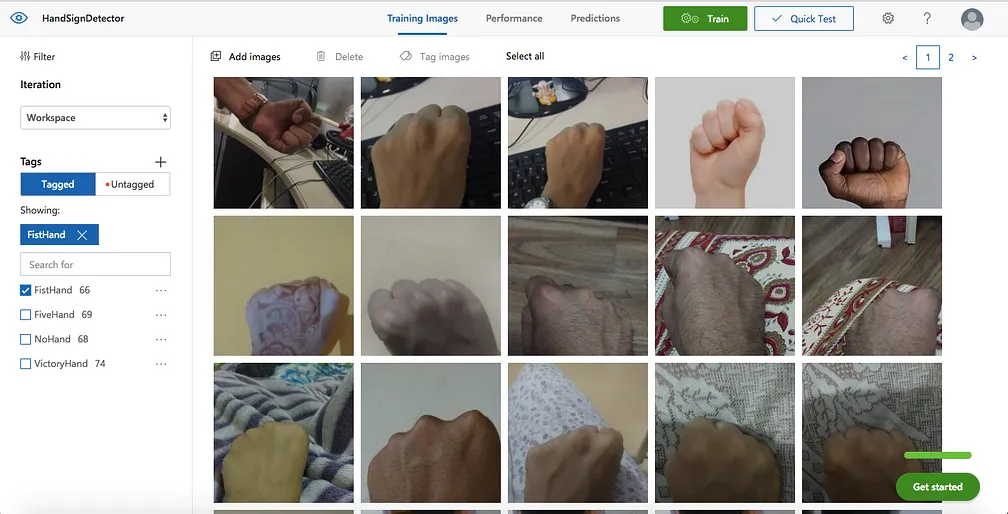
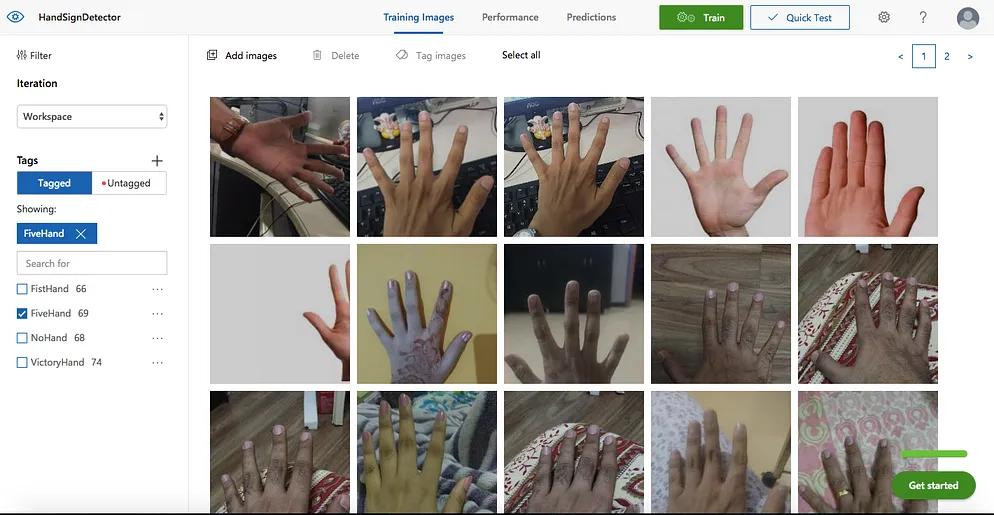
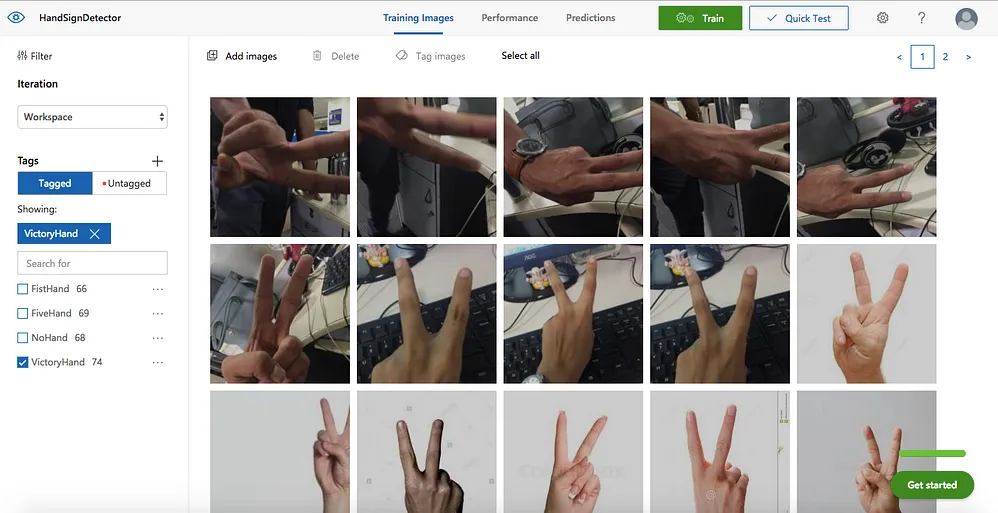
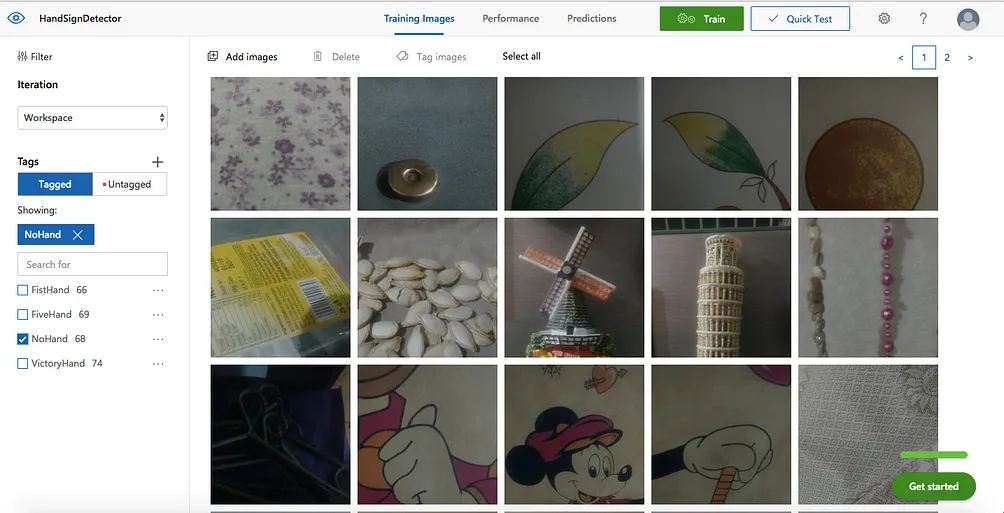
2. Each set of images needs to be tagged with a label that will be the output of your model after prediction. So we need to add these tags first. Add your tags with the ‘+’ button near the Tags label. I added four such tags — FistHand, FiveHand, VictoryHand, NoHand.
3. Once you’re done adding your tags, it’s time to upload your images and tag them up! You need to click on the Add Images option on the top of the screen. Upload all images belonging to one group along with the tag for that group.
4. All image sets have been added and tagged. Now all you need to do to train your model is press a button! Click the Train button at the top. Custom Vision’s wonderful machine learning engine trains a model for you using the images you feed it.
5. After the engine finishes training your model, it opens the performance tab, which shows your model’s performance. Here you’ll see the overall precision and recall percentage of your model along with precision and recall percentages for each tag. Based on how satisfied you are with your model’s performance, you can improve it further or use the same model. To re-train your model, add a few more variants for each tag and hit the Train button again.
6. You can test your model by clicking on the Quick Test button next to train Train button at the top of the dashboard. Here you can upload new pictures and test your model for classification.
Using your trained model in your iOS app
At this point, once you have a trained model you’re satisfied with, you have two options:
- You can use an endpoint provided by Microsoft, which will be hit each time a prediction is to be made. This API will be hit with an input image and it will send back the prediction from our trained model. All of this will happen over the network. To view the endpoint details, go to the Prediction tab and hit the View Endpoint button. Here you’ll get all the details of the API endpoint. This works with both the image url or the actual image file.

2. The other faster and more secure path is using Core ML. You can export your trained model as a Core ML model. This option is on the Performance Tab. Hit the Export button and then select the export type to be iOS — Core ML. And Ta-Da! You have your .mlmodel file ready to be integrated into your iOS project. You’ll have something that does the following:
Set up a live feed capture from your phone’s camera
In this example, I have a live feed capture being sent to the Core ML model in order to output its prediction. So now we need to have a setup in place that will start the camera, begin live capture, and then feed the buffer to our prediction model. This is a pretty straight forward bit of code that will surely look simple once you understand what’s happening.
- For this example, we take a Single Page Application project. It can be any other type depending on your requirements.
- Once in the project, we can build a method to configure our camera. This will be called in the viewDidLoad() method. We will do this with the help of AVCaptureSession, and thus you’ll have to import AVKit.
func configureCamera() {

        //Start capture session
        let captureSession = AVCaptureSession()
        captureSession.sessionPreset = .photo
        captureSession.startRunning()

        // Add input for capture
        guard let captureDevice = AVCaptureDevice.default(for: .video) else { return }
        guard let captureInput = try? AVCaptureDeviceInput(device: captureDevice) else { return }
        captureSession.addInput(captureInput)

        // Add preview layer to our view to display the open camera screen
        let previewLayer = AVCaptureVideoPreviewLayer(session: captureSession)
        view.layer.addSublayer(previewLayer)
        previewLayer.frame = view.frame

        // Add output of capture
        /* Here we set the sample buffer delegate to our viewcontroller whose callback
            will be on a queue named - videoQueue */
        let dataOutput = AVCaptureVideoDataOutput()
        dataOutput.setSampleBufferDelegate(self, queue: DispatchQueue(label: "videoQueue"))
        captureSession.addOutput(dataOutput)
    }
3. As we’re setting the video output buffer delegate to our ViewController, it must extend AVCaptureVideoDataOutputSampleBufferDelegate in order to implement the didOutput sampleBuffer method to catch the sample buffers thrown out from the AVCaptureConnection.
class ViewController: UIViewController, AVCaptureVideoDataOutputSampleBufferDelegate {
...
...
...
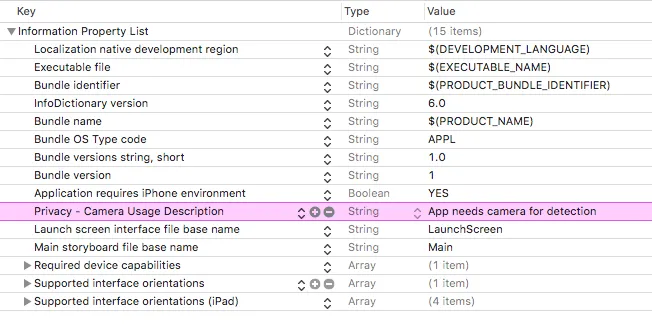
}4. The last thing remaining for this setup is the permission for using the camera, which is listed in Info.plist. Add Privacy Camera Usage Description and add a string value to this key. Something like — App needs camera for detection. Your setup is in place now! Go ahead and try to run it on a device, and the app should open up the camera as it launches.
Integrate your Core ML model in your iOS project
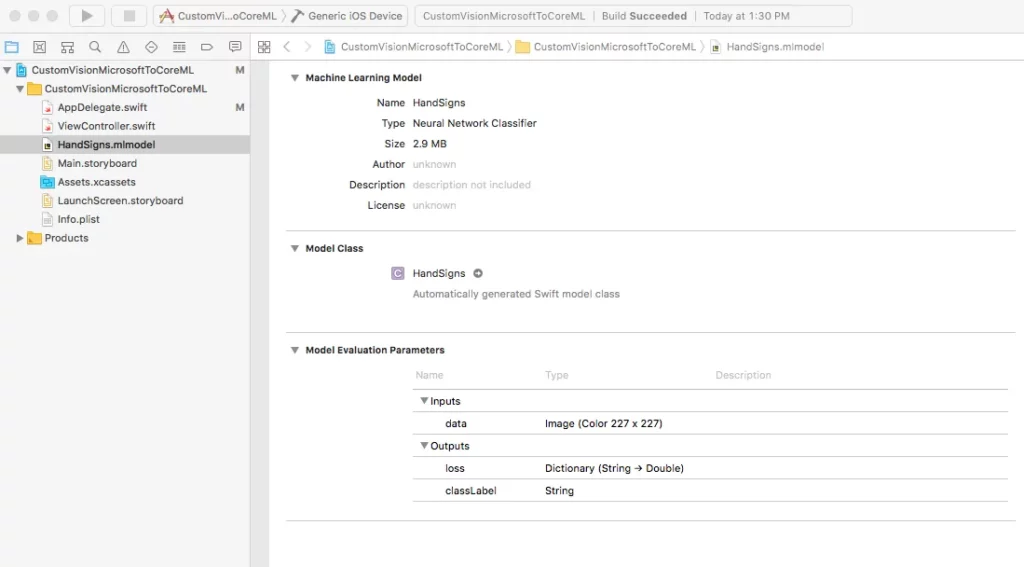
The real fun for which you’ve been undergoing all these efforts begins now. As you might know, including a Core ML model in an iOS project is as simple as dragging and dropping it into your project structure in Xcode. Once you add your downloaded/exported Core ML model, you can analyze it by clicking on it and checking the generated Swift file for your model. Mine looks like this:
The steps below will guide you through this:
- First things first, import the Vision library and import Core ML for this image classification example. We’ll need it while initializing the model and using the Core ML functionalities in our app.
import CoreML
import Vision
2. Now we’ll make an enum for our prediction labels/tags that we added while building our model using Custom Vision.
enum HandSign: String {
    case fiveHand = "FiveHand"
    case fistHand = "FistHand"
    case victoryHand = "VictoryHand"
    case noHand = "NoHand"
}
3. When our model outputs a result, we reduce it to a string type. We’ll need some UI component to display it. For that we’ll add a UILabel in our ViewController through the storyboard file and add the necessary constraints so that it’s set at the bottom of the screen.
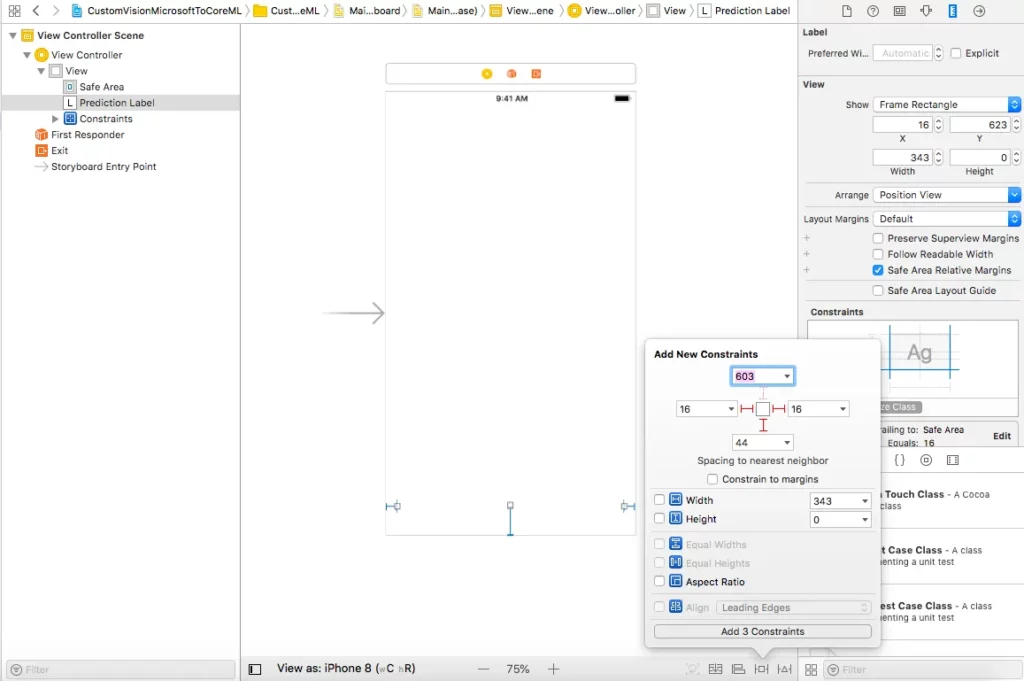
4. Draw an outlet of the UILabel in your viewController. I have named it predicitonLabel.
5. Once we have all of that in place, we can begin with the initialization of our Core ML model — HandSignsModel.mlmodel—and extract the sample buffer input from AVCaptureConnection and then feed it as an input to our hand sign detector model. We’ll then utilize the output of its prediction. To do so we’ll implement the didOutput sampleBuffer method of AVCaptureVideoDataOutputSampleBufferDelegate. A detailed step-by-step explanation of everything happening in this method is in the code comments inline.
// MARK: - AVCaptureVideoDataOutputSampleBufferDelegate

/* This delegate is fired periodically every time a new video frame is written.
    It is called on the dispatch queue specified while setting up the capture session.
*/
func captureOutput(_ output: AVCaptureOutput, didOutput sampleBuffer: CMSampleBuffer, from connection: AVCaptureConnection) {

        /* Initialise CVPixelBuffer from sample buffer
           CVPixelBuffer is the input type we will feed our coremlmodel .
        */
        guard let pixelBuffer: CVPixelBuffer = CMSampleBufferGetImageBuffer(sampleBuffer) else { return }

        /* Initialise Core ML model
           We create a model container to be used with VNCoreMLRequest based on our HandSigns Core ML model.
        */
        guard let handSignsModel = try? VNCoreMLModel(for: HandSigns().model) else { return }

        /* Create a Core ML Vision request
           The completion block will execute when the request finishes execution and fetches a response.
         */
        let request =  VNCoreMLRequest(model: handSignsModel) { (finishedRequest, err) in

            /* Dealing with the result of the Core ML Vision request
              The request's result is an array of VNClassificationObservation object which holds
              identifier - The prediction tag we had defined in our Custom Vision model - FiveHand, FistHand, VictoryHand, NoHand
              confidence - The confidence on the prediction made by the model on a scale of 0 to 1
            */
            guard let results = finishedRequest.results as? [VNClassificationObservation] else { return }

            /* Results array holds predictions iwth decreasing level of confidence.
               Thus we choose the first one with highest confidence. */
            guard let firstResult = results.first else { return }

            var predictionString = ""

            /* Depending on the identifier we set the UILabel text with it's confidence.
               We update UI on the main queue. */
            DispatchQueue.main.async {
                switch firstResult.identifier {
                case HandSign.fistHand.rawValue:
                    predictionString = "Fist👊🏽"
                case HandSign.victoryHand.rawValue:
                    predictionString = "Victory✌🏽"
                case HandSign.fiveHand.rawValue:
                    predictionString = "High Five🖐🏽"
                case HandSign.noHand.rawValue:
                    predictionString = "No Hand ❎"
                default:
                    break
                }
                self.predictionLabel.text = predictionString + "((firstResult.confidence))"
            }
        }

        /* Perform the above request using Vision Image Request Handler
           We input our CVPixelbuffer to this handler along with the request declared above.
        */
        try? VNImageRequestHandler(cvPixelBuffer: pixelBuffer, options: [:]).perform([request])
    }

}
Congratulations! You’ve built your very own machine learning model and integrated it into an iOS app using Microsoft’s Custom Vision and Apple’s Core ML. You can find the entire project with the model and implementation here.
Here’s a working demo of the app I’ve referred to throughout this tutorial:
Discuss this post on Hacker News.

Comments 0 Responses