
I love Swift Playgrounds, I really do. That’s why it was time to pick up my Playgrounds repository again to add some new features (along with adapting it to Swift 4).
This particular Playground is an intro to Microsoft Azure’s Cognitive Services — and I really fell in love with the emotion detection feature 😍. So I decided that it’s time to get my hands dirty with the Custom Vision Service.
The Computer Vision API is already in the Playground, which tells you what’s on a picture and gives you a proper description of it. But the underlying model is trained quite broadly and with general terms, so detecting very specific things is quite difficult…like, for instance, cat emotions!
This was a thought I’d already had in mind for quite some time. Is it possible to detect emotions from animals? Especially cats? The Face API already offers this feature for human faces (which you can find in the Playground also). But no support for animals.

Yes! I found myself a new challenge:
- Use the Custom Vision Service
- to train a custom model
- which will be able to detect the emotion of a cat 🤞
- then use it in the Playground via it’s REST API
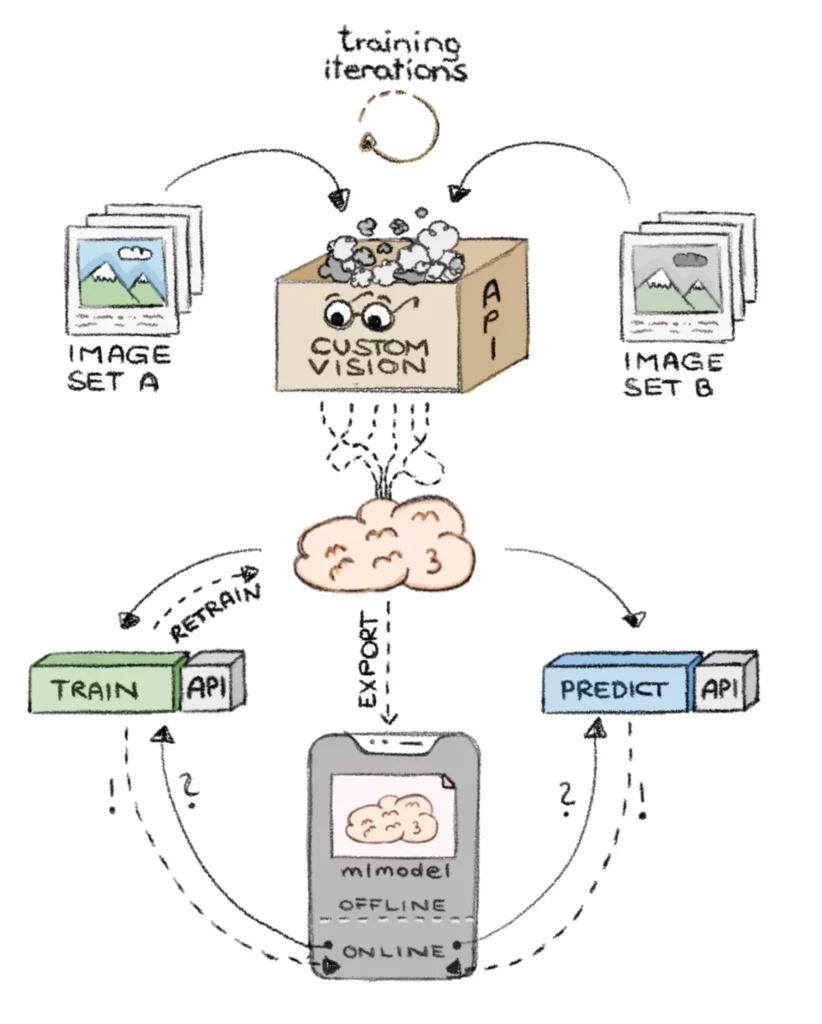
- and offline as a Core ML model
GO!
#1 — The happy/grumpy model
The first task is to access the Custom Vision Portal. There is a separate interface provided by Microsoft to help you get started quickly. Just go to https://customvision.ai and enter your login info (or create a new account).
To create a new project:
- Give the project a name
- Choose Limited trial if you want to use the service completely for free
- For Project Type select Classification
- And for the Domain choose General (compact) (which comes in handy when exporting it to Core ML later)
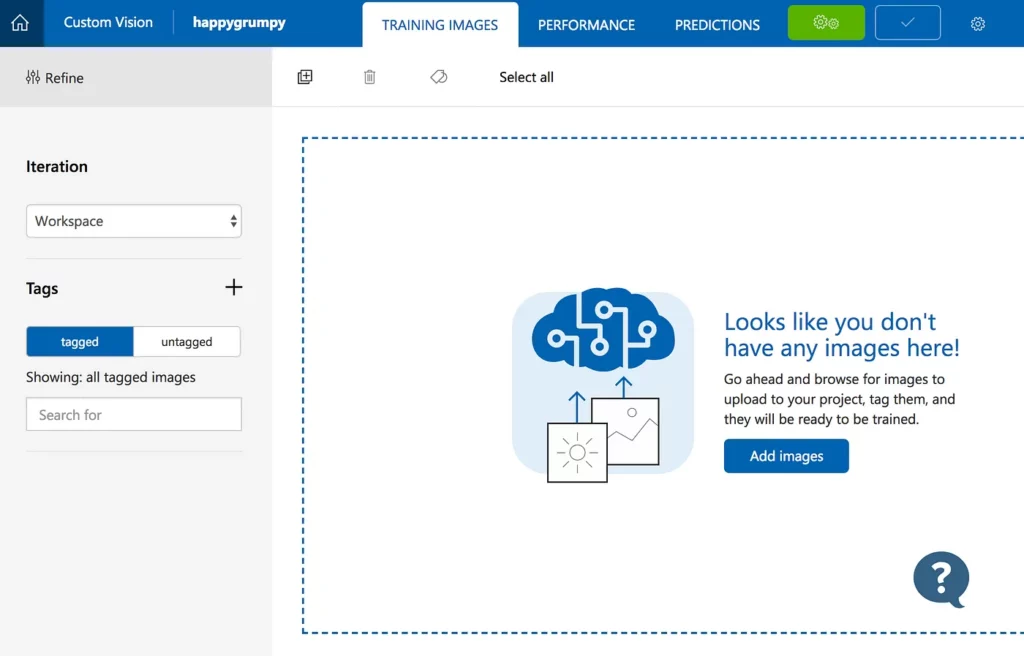
Now we have an empty project that we need to train for our purpose — to detect feline emotions. What we need now is a lot of data to train our model, correct? Nah, not that complicated. We won’t detect ALL emotions of cats. To start, we’ll just distinguish between a HAPPY/SMILING cat and a EVIL/GRUMPY one.
I collected my dataset by searching the web for cat images where the cats are either smiling 😺 or looking like they want you dead 😾.
For the first test I started training with about 35 pictures in each category, which is super low. In an ideal world, you’d have your own cat and could take pictures of it in different moods, in different lighting and then start training the model with a couple of hundred pictures for each emotion.
Keep in mind that training a model doesn’t necessarily follow “more is more and more is better”. You can even overtrain a model! So keep using relevant data for your model training runs. For an in depth look at training a Core ML model, check out this tutorial:
The next thing we have to do is define tags for the images we’ll upload in a moment. I’ve chosen smiling/happy and evil/grumpy. Just hit the “+” button and add the tag titles you fancy. The API will later send this string to you as an image prediction result — so choose wisely.
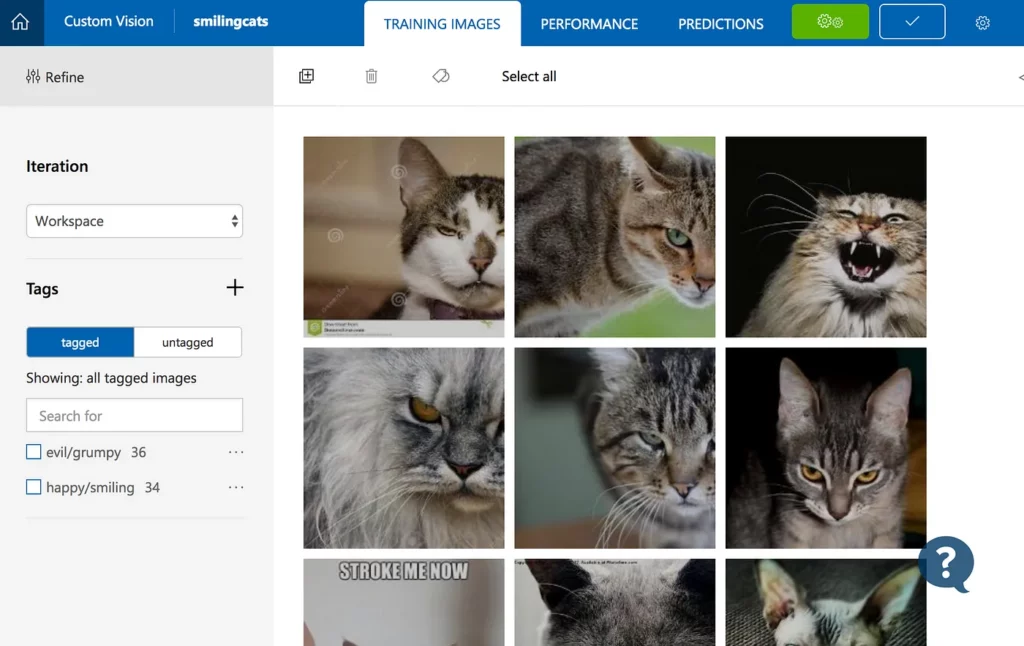
Next, we’ll upload the images we collected in the portal by selecting the Add images button. As soon as they’re uploaded, select the proper tag from the dropdown box (smiling for the good cats, evil for all the others) and press Upload.
So now we have our data (== images) and labels (==tags). We’re good to go and train our classifier now (remember, the project type we selected at the outset).
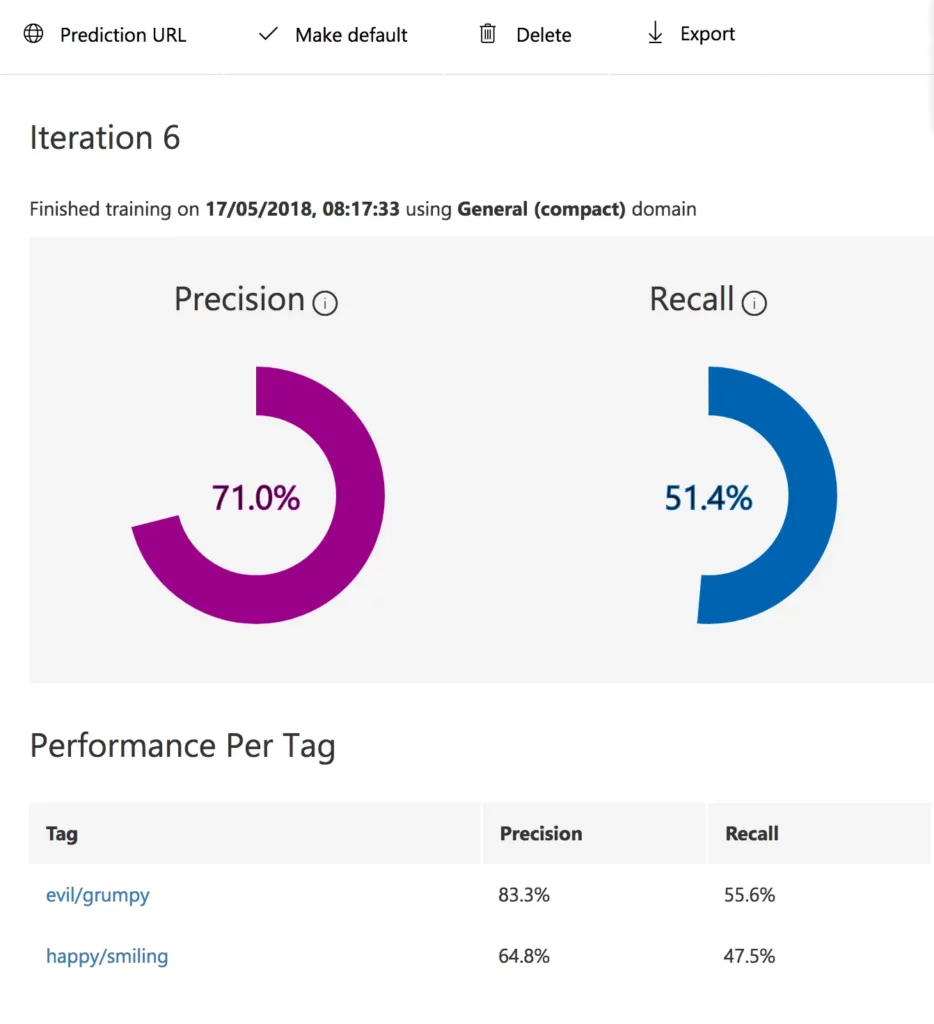
Just hit the green button at the top and start a training iteration. Depending on how many images are now part of the training cycle, this may take a minute or two. After the training is done you get some metrics about the quality of your current model.
The two values —“Precision” and “Recall”—are the quality measures of our model.
- “Precision” gives us feedback on how accurate or relevant a model is. So if our model predicts that a cat on the picture is happy, precision will tell us how likely the prediction is to be right.
- “Recall”, on the other hand, shows how many of the positive predicted values are actually correct. So it tells us how many truly relevant results are returned.
It’s important to note that these two values are always evaluated as a team, as they’re tightly connected with each other. Good (or let’s say useful) models start with values > 0.75 (1 is the best). As you can see, mine isn’t great at all, but it will do a decent job for now. Training on more images and better tagging will improve the model over time.
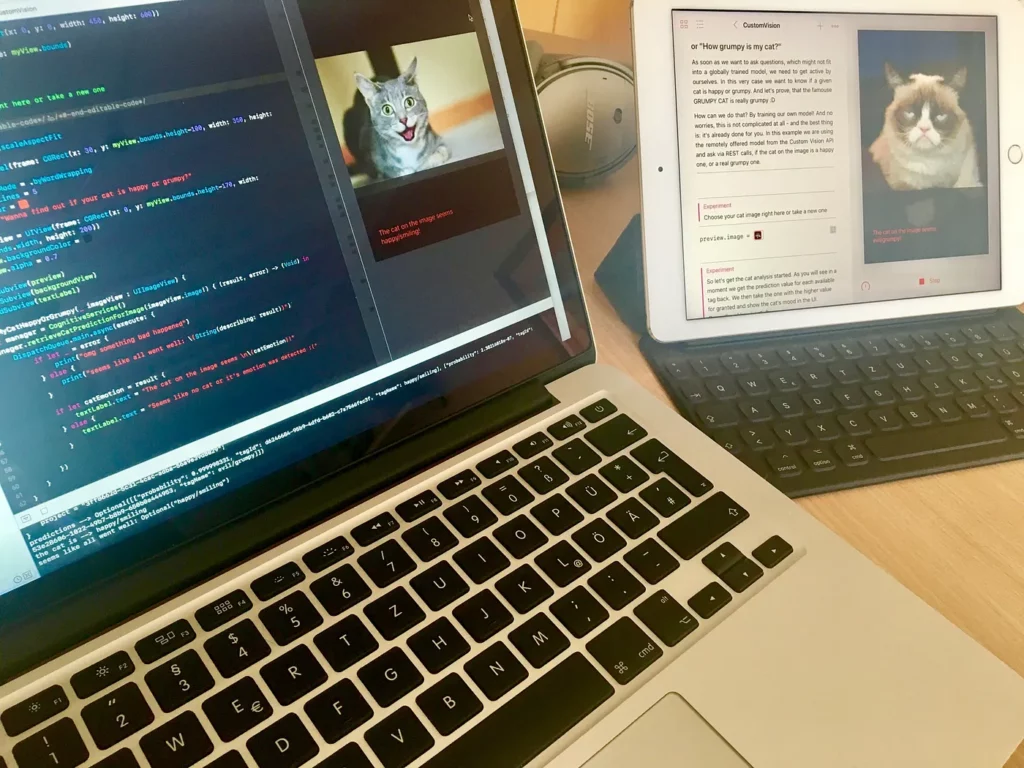
Now that we have a model — which you must admit was more than easy 🤓 — we’ll take it and use it in our Swift Playground.
#2 Cat mood at the Playground
Since the Custom Vision Service offers an API for training and prediction, we can use it like any other REST call of the Cognitive Services. The URL to your own service endpoint where the model is accessible can be found in the Performance tab — Prediction URL.
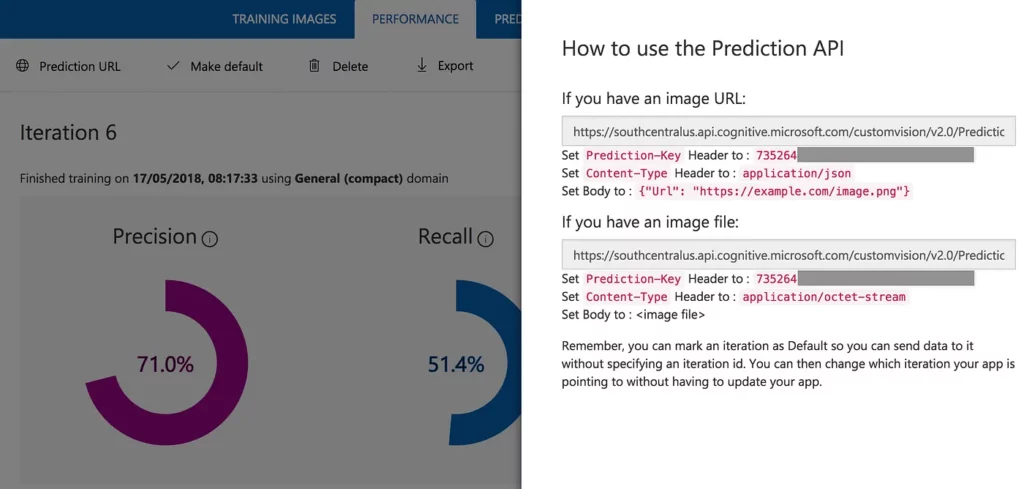
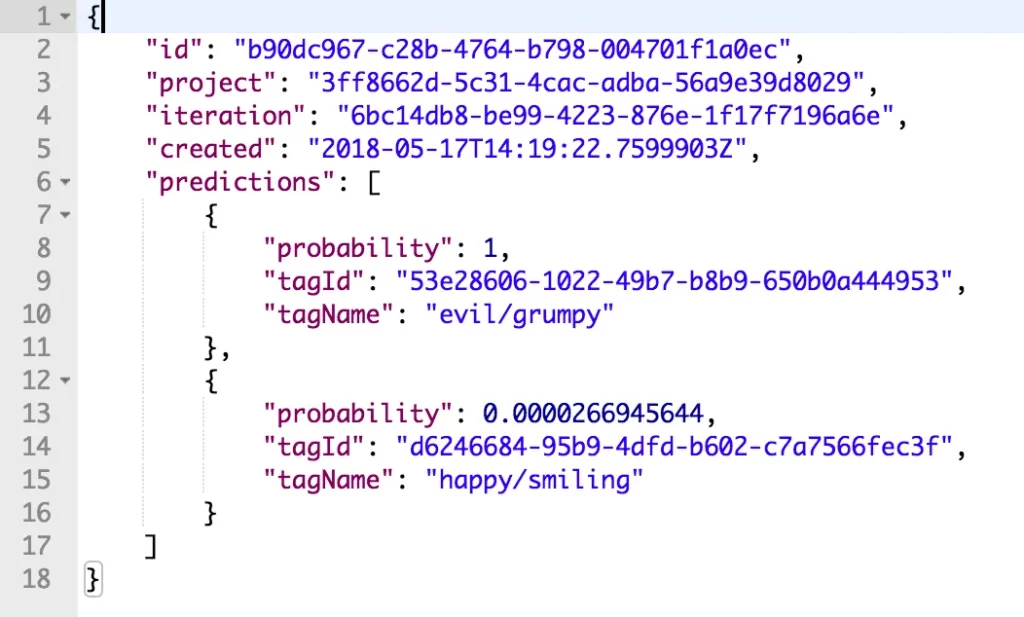
We use the second listed URL with it’s listed header parameters for calling the API. Don’t forget to attach the image to the REST call as a binary to the body. Let’s have a look at what comes back: the cat in the image we sent to the service was definitely grumpy 😀

#3 Offline cat emotion detection — with Core ML
I assumed this would be the most tricky part of the whole challenge. And guess what? It was 😅
But why the hassle of having it packed into the application for offline usage? It’s simple — performance!
As soon as the model is available within the application bundle, we have no REST API roundtrips to wait for, and predictions are provided nearly instantaneously. A downside is the growing application size (e.g. big models can grow to easily over 100MB), but our cat model here just has 3MB at this point. And keep in mind that those models are “read-only”, which means they can’t be further trained in your app.
If the usage for model predictions isn’t time critical in your application, then you can go with the online model as well. Here you’ll have more flexibility because you can continue training your model while providing the new and shiny results immediately via the REST API.
Export the model — The easy part
The model itself can be exported very easily into a Core ML format. Just go to the Performance tab again and choose Export. You can choose between quite a few formats — we’ll be using Core ML for our use case.

Exporting our model in this format will allow us to use it within an iOS app.
Compile the model — because Swift Playground!
Because a Swift Playground isn’t a regular app, we have to take another step and compile the model before we can use it. We do this with the Xcode tools by using the following command in the console:
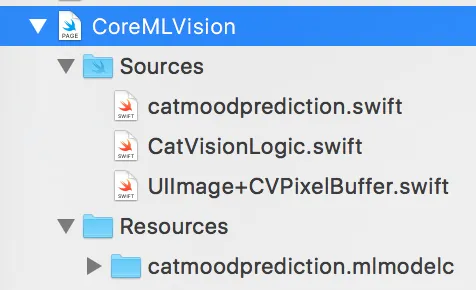
Note the extension mlmodelc at the end of the compiled model name. This is important! The result of the compilation isn’t one single file, it’s a folder with a couple of things in it. But don’t worry about it, we will just drag-&-drop the whole folder into the Swift playground. Be careful to drop it into the Resource folder of the Playground page.
Get the model’s header file
In an iOS app, you won’t even notice that there’s a header file generated and used by Swift for your model — it’s magically happening in the background. You can think of it as the user’s manual for the model, which is needed so that Core ML/Vision can perform predictions on it.
Here are the steps we’ll need to take”
- Create a new single view project in Xcode.
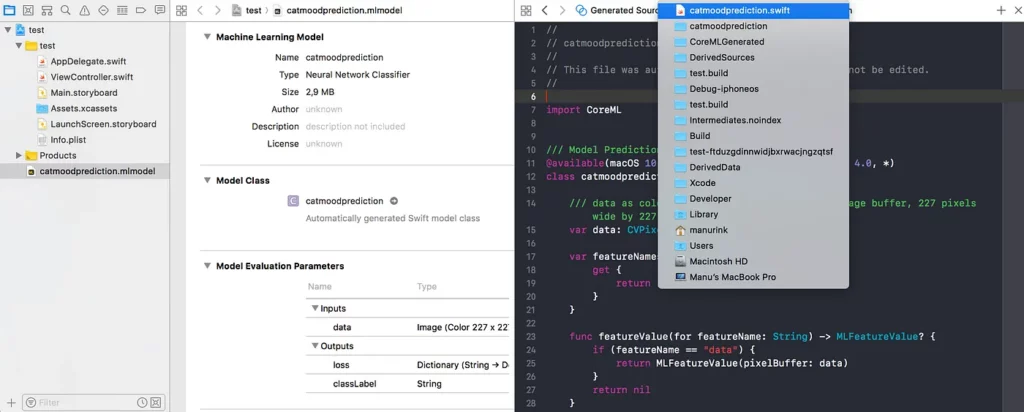
- Drag the model file you downloaded from the Custom Vision portal (the .mlmodel file!)into the new project.
- Select it and open the Assistant Editor for it. The header file is shown in all it’s beauty.
- Have a look at the Assistant Editor’s menu bar. CMD+click the name of the file — in my case catmoodprediction.swift—and see the path of the file displayed.
- Copy the file from the Finder and paste it into the Source folder of your Playground page. Have a look at the image above, which shows how the page’s file structure should look.
- The compiler will now tell us that things aren’t properly accessible. So we need to make the functions in the header file (as well as a couple of variables) public.
Time to start predicting!
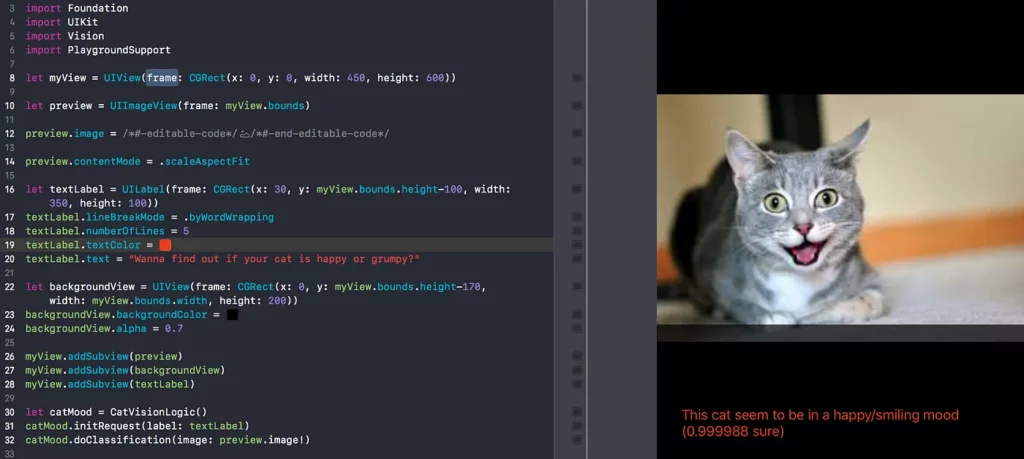
Now we have everything in place 😎 for using the model offline for predictions. This is done via the Vision framework by using VNCoreMLRequest.
First we create the request for our model. Note that the name of the model is exactly the name of the mlmodelc-folder and obviously your model’s header file you added before.
let model = try VNCoreMLModel(for: catmoodprediction().model)
let request = VNCoreMLRequest(model: model, completionHandler: self.handleClassification)
var classificationRequest = [ request ]
Now we can use an image, transform it so that if fits the model’s input, and perform a prediction.
let image = UIImage(named:"catinmood")
do {
  let pixelBuffer = image.pixelBuffer(width: 227, height:227)
  let classifierRequestHandler = VNImageRequestHandler(cvPixelBuffer: pixelBuffer!, options: [:])
  try classifierRequestHandler.perform(classificationRequest!)
} catch {
  print("something went terribly wrong during classification")
}
We handed the request a selector, which should be called as soon as the prediction returns any results. So let’s have a look at them and print the result.
public func handleClassification(request: VNRequest, error: Error?) {
  guard let observations = request.results as? [VNClassificationObservation]
    else { fatalError("unexpected result type from VNCoreMLRequest") }

  guard let best = observations.first else {
    fatalError("classification didn't return any results")
  }

  DispatchQueue.main.async {
    if best.identifier.starts(with: "Unknown") || best.confidence < 0.50 {
      print("Mhm, no cat or absolutely not sure about it's mood")
    } else {
      print("This cat seem to be in a (best.identifier) mood ((best.confidence) sure"
    }
  }
}
And that’s basically it! Done 🤜🤛
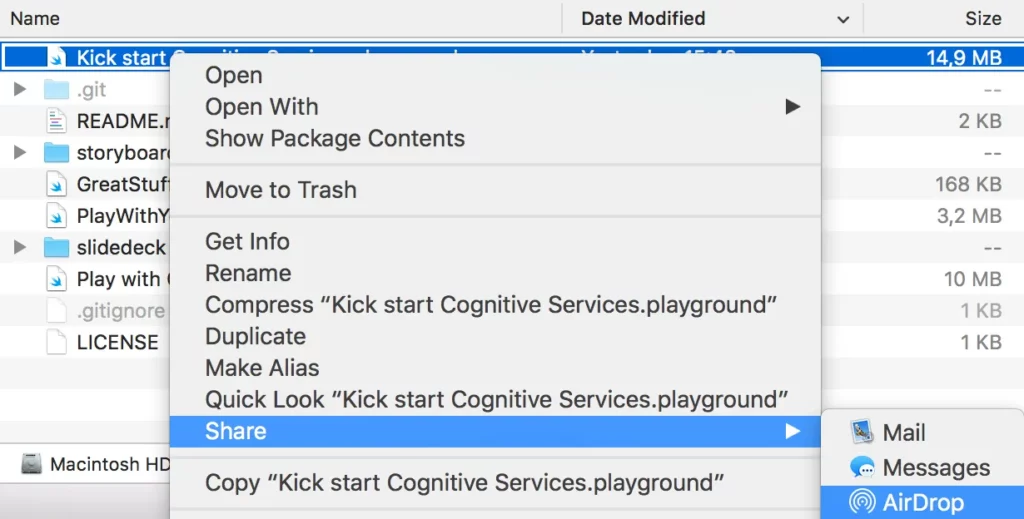
Run it on the iPad? Airdrop to the rescue!
To run this on an iPad, just locate the Playground file in the Finder. Then right click it and choose Share —> AirDrop. Select your iPad and wait a moment. You can directly open the Playground in the Swift Playground app and have fun with it.
Little Recap
It’s not that hard to train your own model by using a service like Custom Vision Service. The option of exporting the model in the .mlmodel format is also great, as it saves a lot of time.
There are a few steps that we need to consider when the model will be used in a Playground—i.e. compiling the model and getting its header file. But once these concerns are addressed, we’re good to go!
And if we want to use the model in a standard iOS application, we simply drag and drop the model into the project and start predicting.
It’s dangerous to….NO!
You now have everything you need to realize your own ideas. Just go and try it out. No better way!
Take the Playground from my GitHub repo as a starting point! I’ve even left my keys in there for the Custom Vision page to make it easy for you to get started. No excuses!
Happy Coding & Predicting!
😺😾😽🙀
Discuss this post on Hacker News.
Comments 0 Responses