
At WWDC 2018, Apple introduced a brand new framework for iOS developers called Natural Language. Simply put, this framework gives apps the ability to analyze natural language text and understand parts of it. Natural Language can perform a variety of tasks on a block of text by assigning tag schemes to the text. What does this mean?
We can think of tag schemes as the tasks we ask a tagger to apply to the text. Here are some common tag schemes you’ll see.
- Token Type: Classifies each character as either a word, punctuation mark, or whitespace.
- Language: Determines the token’s dominant language
- Lexical Class: Classifies each text according to the class it belongs to. For example, it will determine a word’s part of speech, the type of punctuation being used, or the type of whitespace being used.
- Name Type: Looks for words or phrases that are part of a named entity. This means looking for a personal name, an organization name, and a place name. This is what we’ll be focusing on.
Alright, enough theory, let’s start coding!
Named Entity Recognition
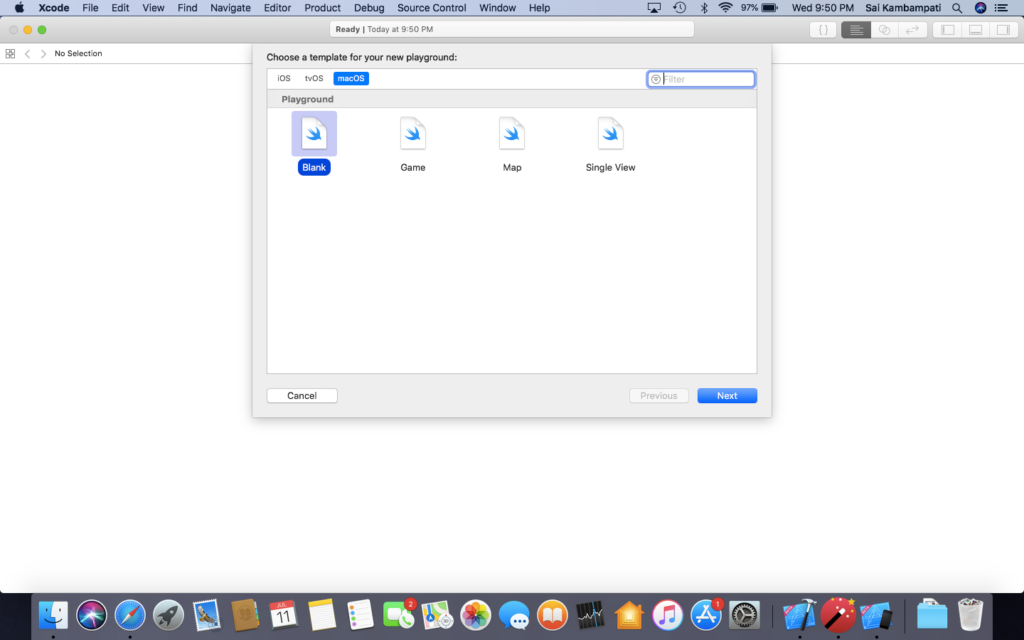
Open Xcode 10 and go to Create New Playground. Make sure to choose the Blank option under macOS!
Name your playground whatever you want and save it. When you’re presented with the playground, delete everything so you have a fresh, blank slate to get started with. Type the following code:
If you can read the above code, great job! If you can’t, don’t worry. Let me explain it for you.
- First, we import the NaturalLanguage framework. This gives us access to all the APIs we need to perform natural language understanding tasks. Then, we define a constant text, which is simply a string. You can make this sentence whatever you want (though for this demo, make sure to include an Apple product — you’ll see why).
- Next, we define our tagger. We ask the tagger to look for names with the nameType option. We then set the tagger to our sentence from above. We also add some options to our tagger. In the above code, we ask our tagger to remove all punctuation, remove all spaces, and join any names together. We do this to help the tagger have less to analyze.
- Finally, we call our enumerateTags() method. We ask the tagger to start at the beginning of text and end all the way at the end. unit refers to where the tagger should find the tasks. We set this to .word since we’re looking for named entities in words, not in characters or passages. We set the options to the ones we previously defined. Then, if the tagger finds a tag (a named entity, in this case), we print the tokenRange, which is the range of the string containing this tag and tag’s name.
You should receive an output like this:
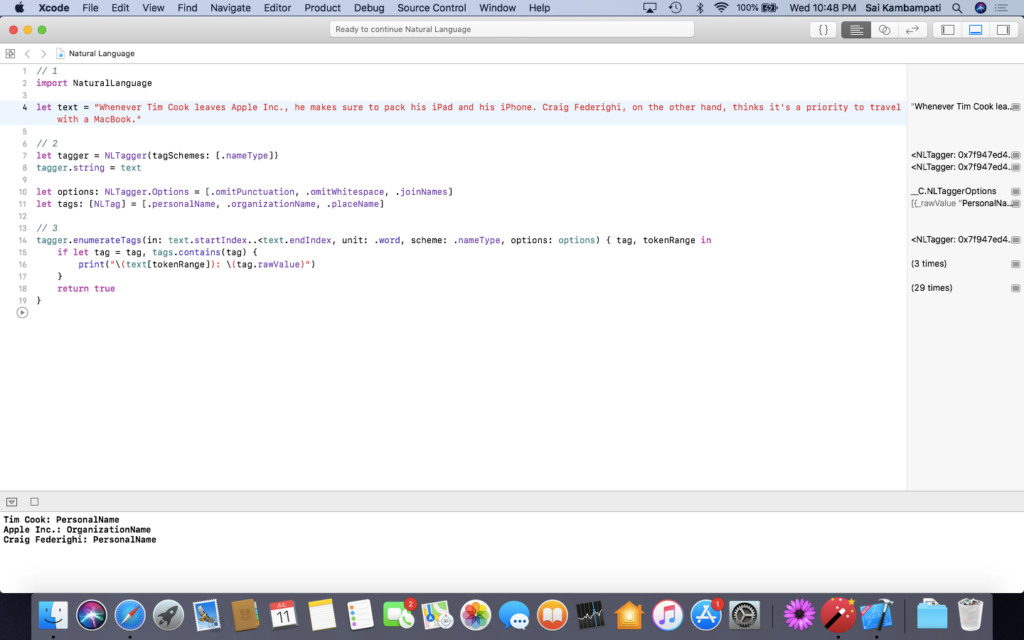
So it works! We were able to detect “Tim Cook”, “Apple Inc.”, and “Craig Federighi”. However, the built-in named entity tags are only limited to names, organizations, and places. What if we want to have our tagger recognize something else? Maybe something like Apple products? 😏
Custom Entity Recognition
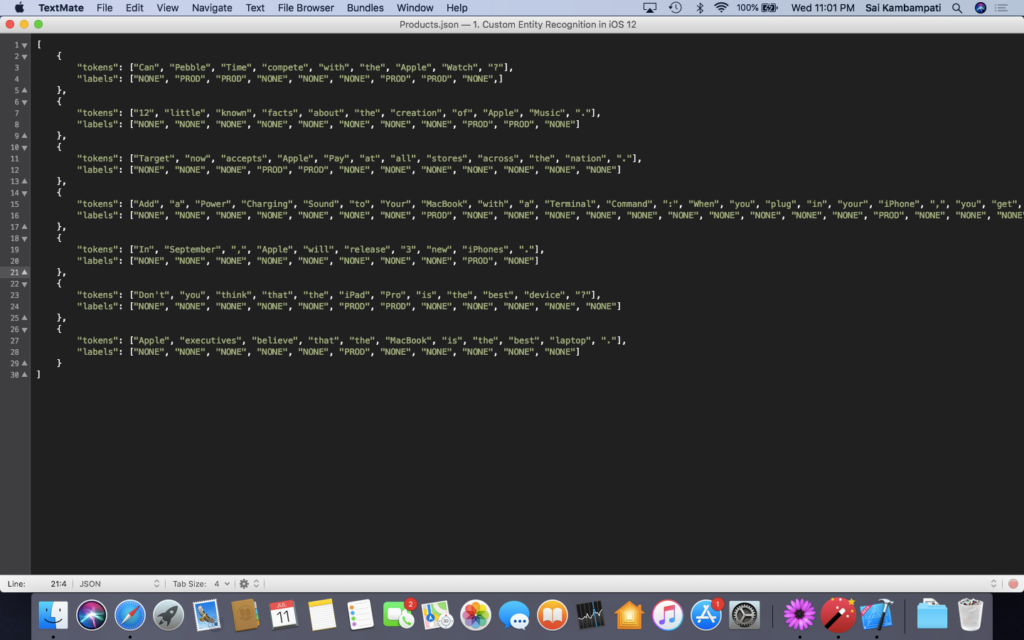
If we want our tagger to recognize Apple product names, we need to create our own tagger with Create ML. First, download the JSON file called Products.json from this repository. Take the file and drag it into the playground’s left sidebar under the folder named Resources.
If you open the file, you can see an array of tokens and labels. Here, tokens are each word/punctuation mark of a sample sentence. Labels are what we define each token as. You can see that words like “Apple Music” and “iPad” correspond to the PROD label.
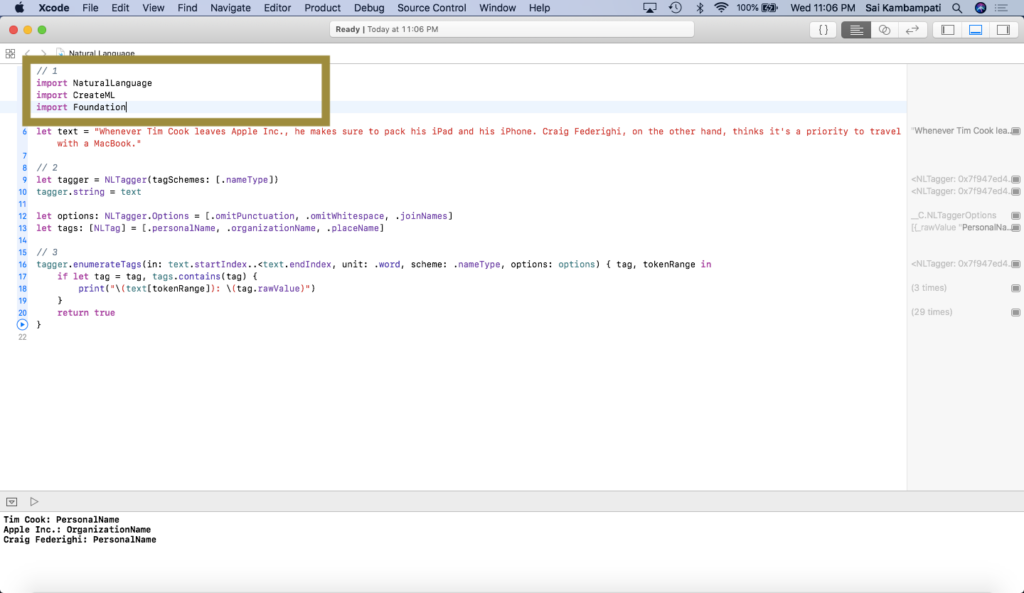
Now that we have this, let’s use Create ML to create our tagger. Head back to the playground. Right under import NaturalLanguage, import the packages we need:
Below the code where we analyze our sentence, type the code that will create our Core ML model based on our Product Tagger.
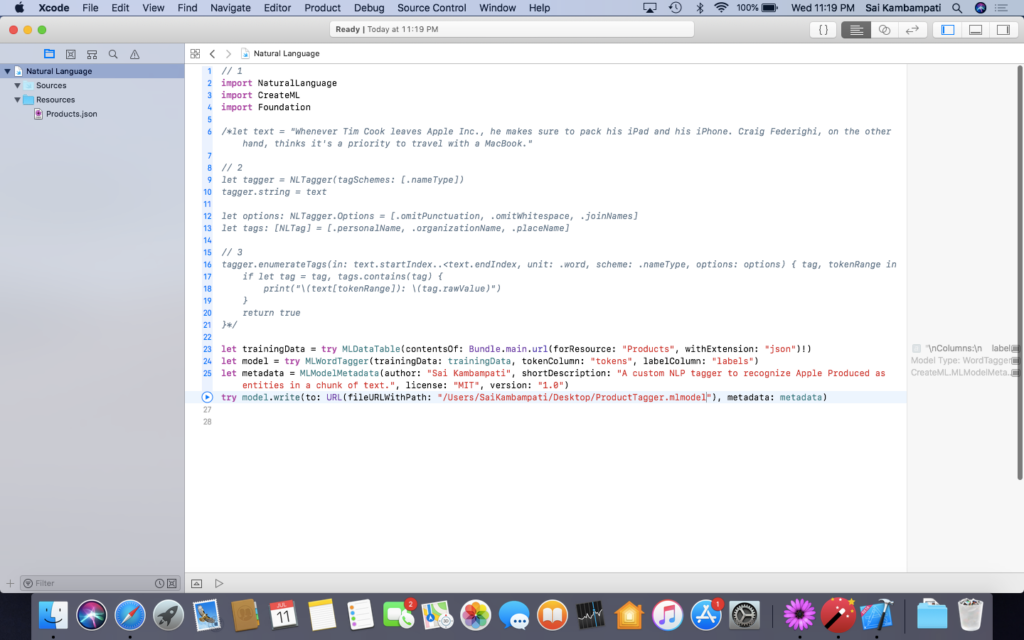
Make sure that Products.json is in the resources folder and that you replace the author name in metadata and path where you write the model to your names and your account. Run the code.

The Core ML model should be saved to your Desktop. Drag it over to the Resources folder in your playground. We’ll now see how the tagger performs.
You may have noticed that our accuracy is quite low: 77%. You can improve this by adding more training data to increase the iteration count, and thus, the overall accuracy.
Head to the playground and change your code to look like the image below.
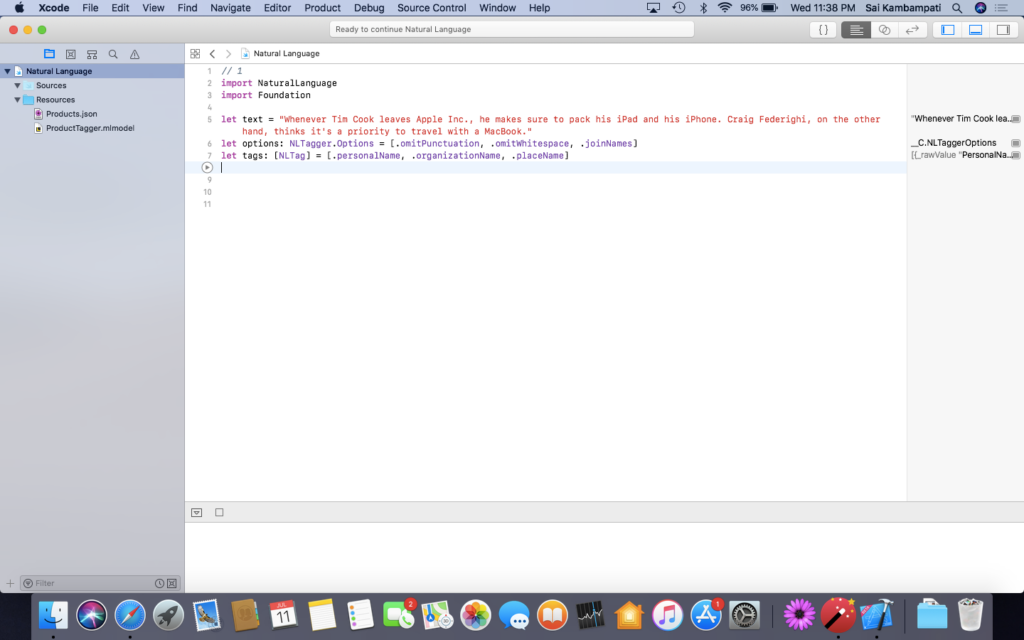
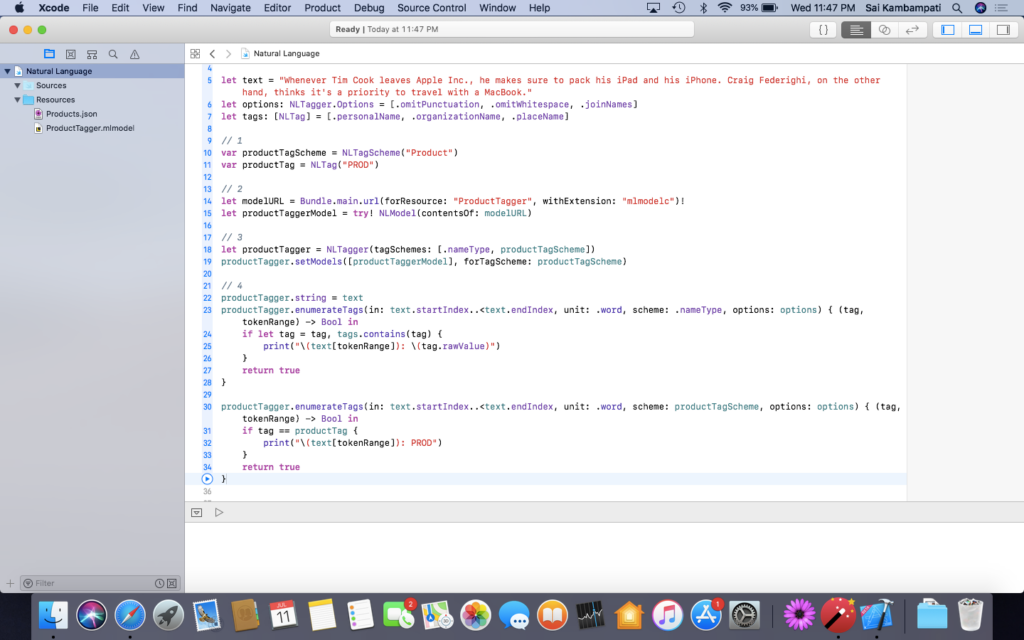
Basically, we’re removing the code we won’t use. Now, time for the magic! Type the following code:
This code should look very familiar since we’re using most of the same code from the previous section. Here’s a quick explanation.
- We define productTagScheme and productTag as the tag schemes and tags of our product tagger.
- We reference the URL where our model exists. Remember to have your Core ML model in the Resources folder of your playground. Also, make sure the model extension reads mlmodelc, as Xcode will produce an error without the ‘c’. We change this Core ML model to be of type NLModel — a machine learning model specifically designed for Natural Language tasks.
- Just like earlier, we create a tagger called productTagger to have schemes of nameType and now productTagSchemes. We assign the model to our productTagger.
- We pass text to our tagger and just like before, we enumerate from start to end. This time, we have two enumerateTags() methods because one method searches for the .nameType tag scheme, and the other searches for the productTagScheme tag scheme.
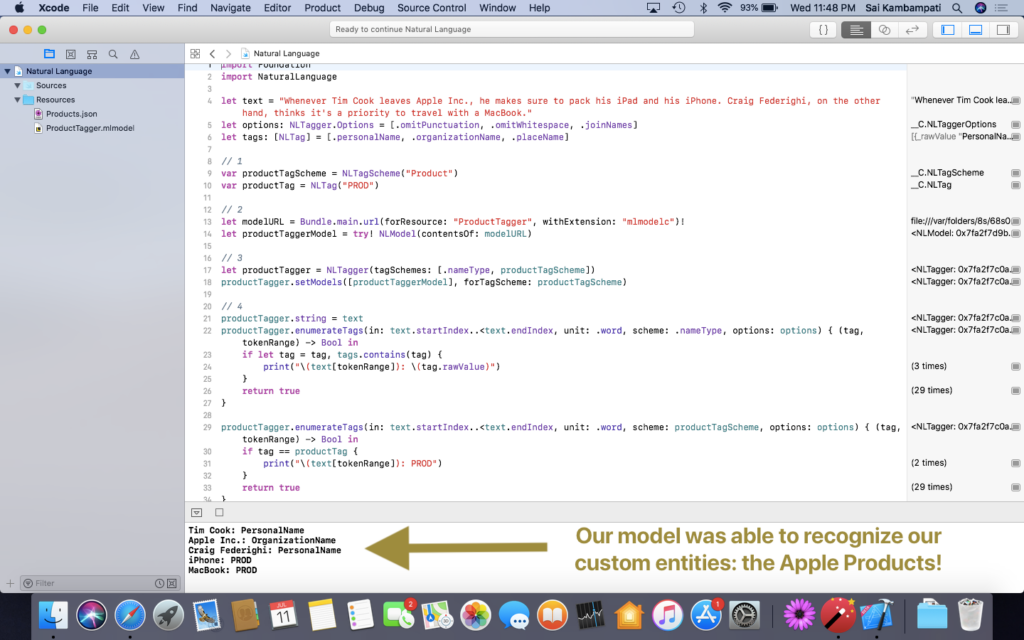
That’s it! Build and run your code to get an output like below!
Conclusion
In this tutorial, we were able to explore Apple’s new NaturalLanguage framework. We were able to perform named entity recognition on a chunk of text, and when we wanted to recognize a particular set of text that wasn’t there, we were able to create our own machine learning model to do it for us.
The applications of this type of technology are endless. One such application is in the development of a chatbot — you can use this technology to have contextual understanding.
I hope you were able to learn from this tutorial, and I highly encourage you to keep playing around and coming up with your own models and taggers! You can download the complete project here.
Discuss this post on Hacker News

Comments 0 Responses