
At I/O 2018, Google announced the release of Firebase’s ML Kit, a developer-friendly software package that allows mobile engineers to quickly integrate Machine Learning features in their applications with just a few lines of code. With ML Kit, we’re able to do amazing things like face detection, text recognition, and landmark recognition, all without needing to have deep knowledge about neural networks or model optimization.
In this article, I’m going to show you how to make a working Snapchat Filter Android application in 7 steps. You can find the example code in this GitHub repo — all PRs are welcomed.
The development environment used in this tutorial is as follows:
- Android Studio 3.1.3
- Kotlin 1.2.41
- MacBook Pro Mid 2015 running macOS High Sierra 10.13.5
Step 1: Prepare the workspace and dependencies
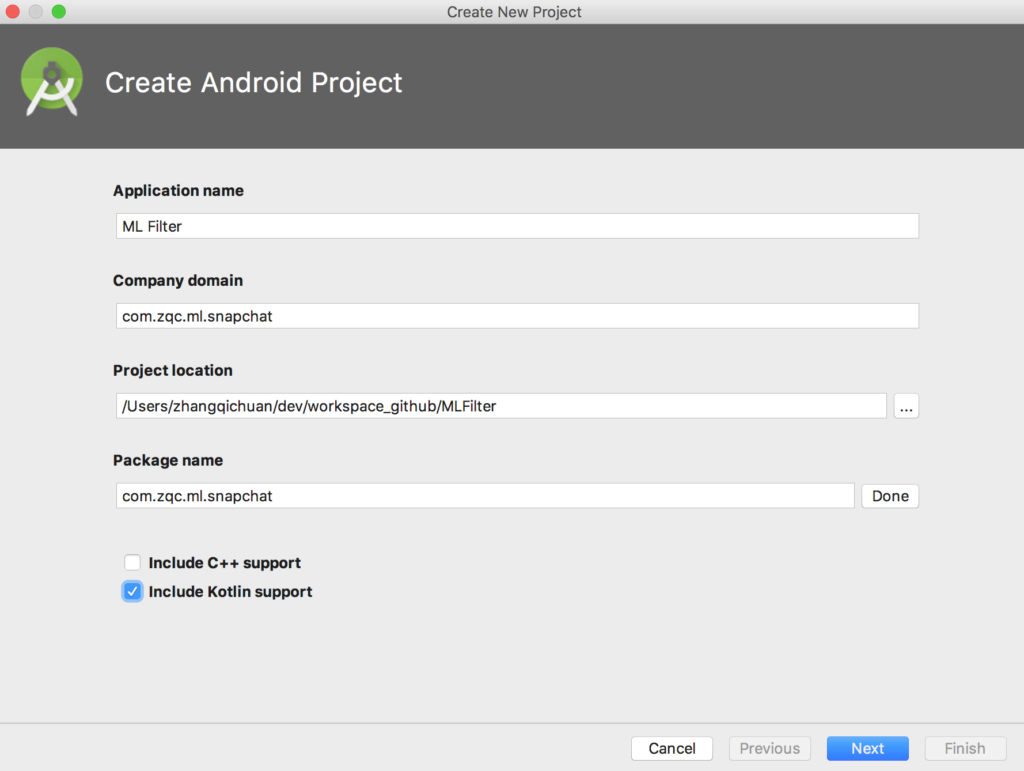
Fire up Android Studio and create a new Android application, tick the Include Kotlin support option in the wizard, and name the project firebase_ml_snapchat_filter. Finally, click Finish to complete the project creation process.
Open the build.gradle file at the root folder, and add the following dependency in the buildscript block:
There is implicit dependency between Firebase and Google services, so we need to use the Google service plugin in our project as well.
Open the app/build.gradle file, and add the following dependencies:
implementation 'com.google.firebase:firebase-core:16.0.1'
implementation 'com.google.firebase:firebase-ml-vision:16.0.0'
implementation "android.arch.lifecycle:extensions:1.1.1"
implementation 'com.otaliastudios:cameraview:1.5.1'
The first two are the Firebase core and ML Kit dependencies. The lifecycle extension is added to handle the activity lifecycle events, and the com.otaliastudios:cameraview library provides a high-level interface that makes the Android camera programming a lot easier. You can, of course, use the official Android camera APIs. IMHO those APIs are for the brave developers.
Now that we have the dependencies in place, we add the following line at the end of the build.gradle file to apply the Google service plugin.
Step 2: Create a Firebase Android app
Open your favorite web browser and navigate to the Firebase console. Click on the Add Project button and give the project a name of your choice if you haven’t yet created one. Alternatively you can create a new Android App on top of an existing Firebase project.
Register your Android package name, app nickname, and debug signing signature. The Firebase console will generate a google-services.json file, of which you can then put it in the app folder of your project.
Step 3: Create the view layout
The main activity of the application consists of two important views. CameraView displays the live camera preview, while OverlayView draws the bitmap objects on top of the CameraView. So let’s create a RelativeLayout in the layout_main.xml file and add in the CameraView and OverlayView sequentially.
<?xml version="1.0" encoding="utf-8"?>
<RelativeLayout xmlns:android="http://schemas.android.com/apk/res/android"
   xmlns:app="http://schemas.android.com/apk/res-auto"
   xmlns:tools="http://schemas.android.com/tools"
   android:layout_width="match_parent"
   android:layout_height="match_parent"
   tools:context=".MainActivity">

   <com.otaliastudios.cameraview.CameraView
       android:id="@+id/camera_view"
       android:layout_width="match_parent"
       android:layout_height="match_parent"
       android:adjustViewBounds="true"
       android:keepScreenOn="true"
       app:cameraFacing="front" />

   <com.zqc.ml.snapchat.OverlayView
       android:id="@+id/overlay_view"
       android:layout_width="match_parent"
       android:layout_height="match_parent" />

</RelativeLayout>
CameraView is obtained from com.otaliastudios:cameraview library. Its cameraFacing flag is set to true since only the front camera is used in this example. The OverlayView is a customized view, and I will explain more about it a bit later.
Step 4: Handle the camera runtime permission and lifecycle
If you’re targeting Android 6.0 devices, chances are you need to request runtime permission to access protected resources, and the camera is one of them. Let’s start by declaring the camera permission in the AndroidManifest.xml file.
And then we need to check and request the permission in our MainActivity. If the camera permission is already granted, we invoke the startFaceProcessor()method.
override fun onCreate(savedInstanceState: Bundle?) {
	…
	checkAndRequestCameraPermission()
}

private fun checkAndRequestCameraPermission() {
   if (ActivityCompat.checkSelfPermission(this, android.Manifest.permission.CAMERA)
           != PackageManager.PERMISSION_GRANTED) {
       ActivityCompat.requestPermissions(this, arrayOf(android.Manifest.permission.CAMERA),
               PERMISION_REQUEST_CODE)
   } else {
       startFaceProcessor()
   }
}
Otherwise, we’ll need to check the request permission result and invoke the startFaceProcesor() method if the user has given the app consent to use the camera.
override fun onRequestPermissionsResult(requestCode: Int, permissions: Array<out String>, grantResults: IntArray) {
   if (requestCode == PERMISION_REQUEST_CODE) {
       if (android.Manifest.permission.CAMERA == permissions[0] &&
               grantResults[0] == PackageManager.PERMISSION_GRANTED) {
           startFaceProcessor()
       }
   }
   super.onRequestPermissionsResult(requestCode, permissions, grantResults)
}
The startFaceProcessor() method configures the cameraView by registering a lifecycle observer to it so appropriate methods are called when activity lifecycle events occur.
lifecycle.addObserver(MainActivityLifecycleObserver(camera_view))

//MainActivityLifecycleObserver.class
class MainActivityLifecycleObserver(private val cameraView: CameraView) : LifecycleObserver {

   @OnLifecycleEvent(Lifecycle.Event.ON_RESUME)
   fun startCamera() {
       cameraView.start()
   }

   @OnLifecycleEvent(Lifecycle.Event.ON_PAUSE)
   fun pauseCamera() {
       cameraView.stop()
   }

   @OnLifecycleEvent(Lifecycle.Event.ON_DESTROY)
   fun destroyCamera() {
       cameraView.destroy()
   }
}
This way, we can put the lifecycle related code in a separate class and keep the code inside the MainActivity view clean.
Step 5: Process the camera frame
Now we have the CameraView ready to display the live preview from the front camera. The live preview is essentially composed of a series of frames captured by the camera. In order to detect a face from the camera live preview, we’re basically processing frames asynchronously and performing the face detection algorithm on each of them.
To start processing the camera frames, we can use the addFrameProcessor() method from CameraView to register a FrameProcessor. Since there is only one method in FrameProcessor, Kotlin allows us to simplify the statement and write the following in Lambda syntax:
cameraView.addFrameProcessor { frame ->
// Processes frame here

}
Step 6: Detect the face from the camera frame
Before we can apply face detection on the camera frame, we need to configure the face detector settings by providing a FirebaseVisionFaceDetectorOptions object.
We need to detect the face landmarks (i.e., eyes and mouth), so the landmark type is set to ALL_LANDMARKS.
// Initialize the face detection option, and we need all the face landmarks
private val options = FirebaseVisionFaceDetectorOptions.Builder()
       .setLandmarkType(FirebaseVisionFaceDetectorOptions.ALL_LANDMARKS)
       .build()
The face detector can then obtained by the following method:
// Obtain the FirebaseVisionFaceDetector instance
private val detector = FirebaseVision.getInstance().getVisionFaceDetector(options)
The camera frames need to converted to a FirebaseVisionImage object that the face detector accepts. We can create the FirebaseVisionImage from camera frame byte array and image metadata.
While the width and height are straightforward, we need to take care of the rotation property of the image metadata. The rotation value obtained from camera frame is a clockwise degree, and the image metadata expects the rotation in quadrants. We need to use the following mathematical formula to obtain the appropriate rotation value for the image metadata:
With all the information in place, let’s create a FirebaseVisionImage:
// Build a image meta data object
val metadata = FirebaseVisionImageMetadata.Builder()
       .setFormat(FirebaseVisionImageMetadata.IMAGE_FORMAT_NV21)
       .setWidth(frame.size.width)
       .setHeight(frame.size.height)
       .setRotation(rotation)
       .build()
// Create vision image object, and it will be consumed by FirebaseVisionFaceDetector
// for face detection
val firebaseVisionImage = FirebaseVisionImage.fromByteArray(frame.data, metadata)
Pass this FirebaseVisionImage to the the detectInImage() method:
// Perform face detection
detector.detectInImage(firebaseVisionImage).addOnSuccessListener { faceList ->
   if (faceList.size > 0) {
       // We just need the first face
       val face = faceList[0]

       // Draw the bitmaps on the detected faces

   }
}
If the face detection is successful, the detected faces are provided in the faceList object. Since we’re only interested in one face in this example, only the first face is going to be processed further.
Step 7: Draw drawables on the detected face
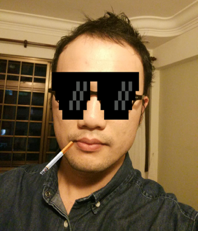
Let’s go back to the OverlayView that we mentioned earlier in view layout section. The OverlayView takes in one FirebaseVisionFace object and draws a bitmap object based on the FirebaseVisionFace information. In this example we’re going to draw sunglasses on the eye area and the cigarette on the left side of the mouth.
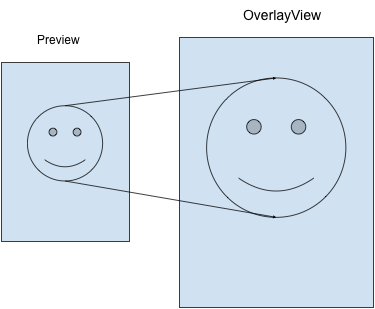
Before drawing anything on the OverlayView, let me explain the difference between the preview coordinate system and the overlay view coordinate system. Due to the camera resolution or screen ratio, the preview we obtain from the camera may not have the same dimensions as the overlay view.
For instance, the camera preview dimension is 1920 x 1080 (16:9), and if the phone screen ratio is not 16:9 (say 18:9), then the overlay view dimension can be 2880 x 1440, which is very different from the original 1920 x 1080. As a result, scaling is necessary in both horizontal and vertical perspectives.
To calculate the scale factor for width and height, we apply the following formulas:
widthScaleFactor = canvas.width.toFloat() / previewWidth.toFloat()
heightScaleFactor = canvas.height.toFloat() / previewHeight.toFloat()
The canvas presents the drawable area in OverlayView, and we obtain the preview width and height from the camera frame object.
We can then use the scale factor values to adjust the coordinate from preview to overlay view. The following are some helper methods to assist with coordinate adjustment:
/**
* Adjusts the x coordinate from the preview's coordinate system to the view coordinate system.
*/
private fun translateX(x: Float): Float {
   return width - scaleX(x)
}

/**
* Adjusts the y coordinate from the preview's coordinate system to the view coordinate system.
*/
private fun translateY(y: Float): Float {
   return scaleY(y)
}

/** Adjusts a vertical value of the supplied value from the preview scale to the view scale. */
private fun scaleX(x: Float): Float {
   return x * widthScaleFactor
}


/** Adjusts a vertical value of the supplied value from the preview scale to the view scale. */
private fun scaleY(y: Float): Float {
   return y * heightScaleFactor
}
Let’s draw the sunglasses first. First we get the positions of both eyes from the FirebaseVisionFace object, calculate the eye distance by finding the x position difference between left and right eyes, and use eye distance as the reference value to determine the size of the sunglasses.
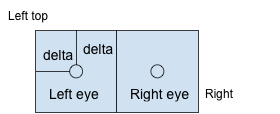
As illustrated in the image below, the value of delta is half of the eye distance, so the rectangle of the sunglasses can be represented by:
- Left top point (leftEye.position.x — delta, leftEye.position.y — delta)
- Right bottom point (rightEye.position.x + delta, rightEye.position.y + delta)
private fun drawGlasses(canvas: Canvas, face: FirebaseVisionFace) {
   val leftEye = face.getLandmark(FirebaseVisionFaceLandmark.LEFT_EYE)
   val rightEye = face.getLandmark(FirebaseVisionFaceLandmark.RIGHT_EYE)

   if (leftEye != null && rightEye != null) {
       val eyeDistance = leftEye.position.x - rightEye.position.x
       val delta = (widthScaleFactor * eyeDistance / 2).toInt()
       val glassesRect = Rect(
               translateX(leftEye.position.x).toInt() - delta,
               translateY(leftEye.position.y).toInt() - delta,
               translateX(rightEye.position.x).toInt() + delta,
               translateY(rightEye.position.y).toInt() + delta)
       canvas.drawBitmap(glassesBitmap, null, glassesRect, null)
   }
}
Similarly, we can calculate the mouth length by finding x position difference between the left and right mouth corner points, and use it as a reference for cigarette length. To draw the cigarette on the left side of the mouth, we represent the rectangle of the cigarette by:
- Left top point (leftMouth.position.x — mouthLength, leftMouth.position.y)
- Right bottom point (leftMouth.position.x, leftMouth.position.y + mouthLength)

/**
* Draw cigarette at the left mouth
*/
private fun drawCigarette(canvas: Canvas, face: FirebaseVisionFace) {
   val rightMouth = face.getLandmark(FirebaseVisionFaceLandmark.RIGHT_MOUTH)
   val leftMouth = face.getLandmark(FirebaseVisionFaceLandmark.LEFT_MOUTH)

   if (leftMouth != null && rightMouth != null) {
       val mouthLength = ((leftMouth.position.x - rightMouth.position.x) * widthScaleFactor).toInt()
       val cigaretteRect = Rect(
               translateX(leftMouth.position.x).toInt() - mouthLength,
               translateY(leftMouth.position.y).toInt(),
               translateX(leftMouth.position.x).toInt(),
               translateY(leftMouth.position.y).toInt() + mouthLength
       )

       canvas.drawBitmap(cigaretteBitmap, null, cigaretteRect, null)
   }
}
Last but not least, let’s override the onDraw() and call the methods we created earlier to draw sunglasses and the cigarette.
override fun onDraw(canvas: Canvas?) {
   super.onDraw(canvas)
  ...
  drawGlasses(canvas, face)
  drawCigarette(canvas, face)

}
Summary
In this article, we’ve walked through the end-to-end process of creating a simple Android application that performs face detection and draws bitmaps on the detected face. There is no complicated deep dive into machine learning required — just some simple math.
With the tools available today, mobile developers with basic knowledge are empowered to implement amazing machine learning features in their projects with minimal amounts of time and work.
For instance, a camera application with face detection capability could notify you when a guest shows up at your doorstep. Or a receipt scanner could expedite your reimbursement process. Or a photo album organizer could even automatically categorize photos according to detected image labels.
I hope you enjoyed this article — feel free to ask any questions in the comments below.
Comments 0 Responses