
Fritz Vision includes a comprehensive API to process pre-recorded video. Some of the things we can do with it include running predictions on every frame, exporting the video as well as extracting individual frames. Fritz Vision also has the power to change old experiences into new ones using machine learning augmentations. In this article, we will see how we can use Fritz to apply filters and perform segmentation of people in a video. This is the result of such an operation.
Getting Started
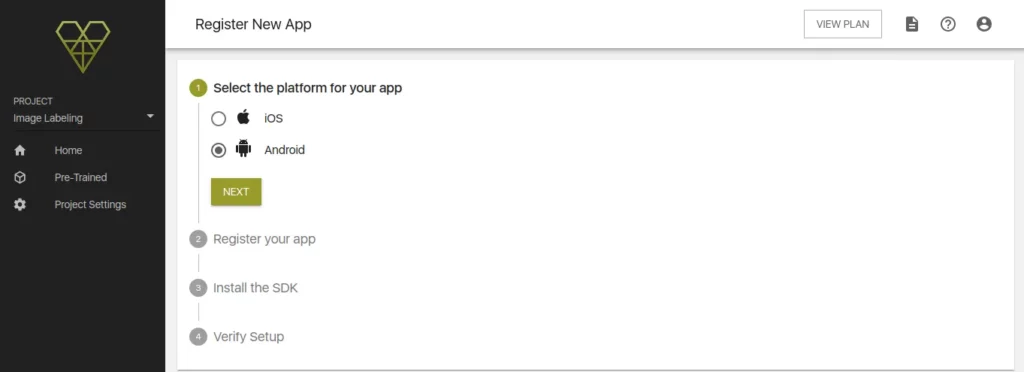
The first step is to create an Android project. Once you do, note the application ID. Next, log into your Fritz account and register the application. This will set up communication between your application and Fritz AI.
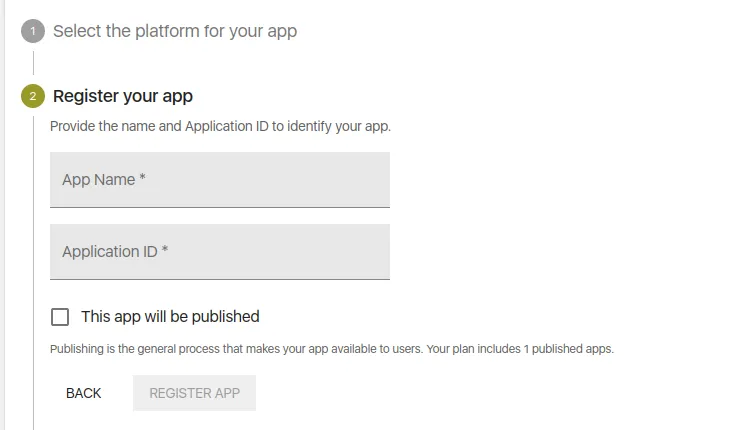
Click on the next button and name your application. While you are there, don’t forget to enter your application ID. You can find the ID in your app’s build.gradle file.
With that out of the way, you can now install the Fritz AI SDK. In your root-level Gradle file (build.gradle) include the Maven repository for Fritz.
allprojects {
    repositories {
        maven { url "https://fritz.mycloudrepo.io/public/repositories/android" }
    }
}
Now add the dependencies for the SDK in app/build.gradle. We add the Fritz Core, Style Transfer, People Segmentation, and Vision dependencies. Including the Style Transfer and People Segmentation models in your application will make your application larger in size. Now that you have changed the Gradle files, ensure that you sync that with your project. That will download all the necessary dependencies.
dependencies {
    implementation 'ai.fritz:vision-people-segmentation-model-fast:+'
    implementation 'ai.fritz:vision-style-painting-models:+'
    implementation 'ai.fritz:vision:+'
    implementation 'ai.fritz:core:+'

    }
Before you close that file add renderscript support to improve image processing performance. Also, specify aaptOptions to prevent compression of TFLite models.
android {
    defaultConfig {
        renderscriptTargetApi 21
        renderscriptSupportModeEnabled true
    }

    // Don't compress included TensorFlow Lite models on build.
    aaptOptions {
        noCompress "tflite"
    }
}
Now register the FritzCustomModelService in the AndroidManifest.
<manifest xmlns:android="http://schemas.android.com/apk/res/android">
    <!-- For model performance tracking & analytics -->
    <uses-permission android:name="android.permission.INTERNET" />

    <application>
        <!-- Register the custom model service for OTA model updates -->
        <service
            android:name="ai.fritz.core.FritzCustomModelService"
            android:exported="true"
            android:permission="android.permission.BIND_JOB_SERVICE" />
    </application>
</manifest>
The next step is to initialize the SDK by calling Fritz.configure() with your API Key.
public class MainActivity extends AppCompatActivity {
    @Override
    protected void onCreate(Bundle savedInstanceState) {
        // Initialize Fritz
        Fritz.configure(this, "YOUR_API_KEY");
    }
}
With that in place, click next to verify that your application is able to communicate with Fritz.
Use Fritz Pre-trained Models
In this piece, we will use pre-built filters from Fritz. However, note that you can create your own filters. The model we will use will work on pre-recorded video, process it, and display the new video.
The App Elements
The application is made up of a video view that will be used to show the result after we have used Fritz to process the video.
<?xml version="1.0" encoding="utf-8"?>
<androidx.constraintlayout.widget.ConstraintLayout xmlns:android="http://schemas.android.com/apk/res/android"
    xmlns:app="http://schemas.android.com/apk/res-auto"
    xmlns:tools="http://schemas.android.com/tools"
    android:layout_width="match_parent"
    android:layout_height="match_parent"
    tools:context=".MainActivity">


    <VideoView
        android:id="@+id/videoView"
        android:layout_width="0dp"
        android:layout_height="0dp"
        app:layout_constraintBottom_toBottomOf="parent"
        app:layout_constraintDimensionRatio="3:4"
        app:layout_constraintEnd_toEndOf="parent"
        app:layout_constraintStart_toStartOf="parent"
        app:layout_constraintTop_toTopOf="parent" />
</androidx.constraintlayout.widget.ConstraintLayout>
Obtaining the Video
We shall use this video that is freely available from Pixaby. The first step is to create a videoView then parse the video link as a Uri.
Uri uri = Uri.parse("https://namespacelabs.com/ml/fritz.mp4");
VideoView videoView = (VideoView) findViewById(R.id.videoView);
Declare the Models
Let’s start by defining the pattern model from the Style Transfer module and the People Segmentation model from the segmentation module. We have already seen how to do this in a previous article. Since we are using an on-device model we can obtain the predictors immediately.
PatternStyleModels patternModels = FritzVisionModels.getPatternStyleModels();
FritzOnDeviceModel styleOnDeviceModel = patternModels.getComic();
FritzVisionStylePredictor stylePredictor = FritzVision.StyleTransfer.getPredictor(styleOnDeviceModel);
SegmentationOnDeviceModel peopleModel = FritzVisionModels.getPeopleSegmentationOnDeviceModel(ModelVariant.FAST);
FritzVisionSegmentationPredictor peoplePredictor = FritzVision.ImageSegmentation.getPredictor(peopleModel);
Define the Filters
The next step is to define the filter that we want to apply to the video. In this case, we declare the style and the people segmentation filter.
 FritzVisionImageFilter[] filters = new FritzVisionImageFilter[]{
                new StylizeImageCompoundFilter(stylePredictor),
                new MaskOverlayFilter(peoplePredictor, MaskClass.PERSON)
        };
Create a FritzVisionVideo
With the filter ready, we now define FritzVisionVideo and pass those filters. Sounds easy, right? That’s because it is.
FritzVisionVideo visionVideo = new FritzVisionVideo(uri, filters);
Display the Processed Video
The final step is to display the processed video. We do that using the videoView that we defined earlier. This is done in a couple of steps:
- First, we register a callback that will be invoked once the video is ready.
- Then, export the video file to a temporary location. You can store it on the user’s device if you so wish. Just note that you will have to get the user’s permission to write to their device.
- Finally, we display the video on the videoView once it’s ready.
 videoView.setOnPreparedListener(new MediaPlayer.OnPreparedListener() {
            @Override
            public void onPrepared(MediaPlayer mediaPlayer) {
                mediaPlayer.setLooping(true);
                mediaPlayer.setVolume(1, 1);
                mediaPlayer.start();
            }
        });


        File exportFile = null;
        try {
            exportFile = File.createTempFile("export",".mp4");
        } catch (IOException e) {
            e.printStackTrace();
        }

        File finalExportFile = exportFile;
        visionVideo.export(exportFile.getAbsolutePath(), new FritzVisionVideo.ExportProgressCallback() {
            @Override
            public void onProgress(Float response) {
                // Show updated progress.
            }

            @Override
            public void onComplete() {
                // when the file has completed, add the video to the view to play it.
                runOnUiThread(new Runnable() {
                    @Override
                    public void run() {
                        Uri uri = Uri.fromFile(finalExportFile);
                        videoView.setVideoURI(uri);
                    }
                });
            }
        });
        MediaController mediaController = new MediaController(this);

        mediaController.setAnchorView(videoView);

        videoView.setMediaController(mediaController);
Conclusion
Hopefully, this piece has shown you how easy it is to process videos in Android using Fritz AI. Check out the full source code in the repo below.

Comments 0 Responses