
Every day, our world is becoming more mobile, with more than 2 billion smartphones circulating globally. As such, mobile development has the potential to reach all corners and aspects of the modern world. This is equally true when it comes to machine learning.
Building machine learning models that we can use on mobile will open endless avenues for creativity, automation, and efficiency. But there’s a significant knowledge gap between mobile development and machine learning.
Not to worry! With a bit of familiarity with TensorFlow and an understanding of how to use tools like Firebase’s ML Kit, you can fairly easily create custom machine learning models for mobile devices.
Imagine in-app stock suggestions, on-device medical imaging, or ML-powered photo/video editors. To unlock these capabilities (and many others, potentially), let’s get started by integrating a machine learning model into a mobile app.
Table of contents
- ML Kit: An Overview
- Integrating machine learning model with mobile apps provides:
- What is TensorFlow Lite?
- What is Transfer Learning?
- Step 1: Downloading the dataset
- Step 2: Retraining the model
- Step 3: Test our model with an image
- Step 4: (Most Important Step) Converting our model to TensorFlow Lite with tflite_convert
- Visualizing Model Performance
- Step 5: Embedding the .tflite/.lite model into our app
- Results and insights I gained while training the model:
ML Kit: An Overview
In 2018, Google released the ML Kit, its framework to support machine learning models for mobile devices. By simply integrating ML Kit, one can fairly easily access capabilities of pre-trained models in both Android and iOS apps.
ML Kit is part of the Firebase ecosystem, and it contains a set of machine learning model APIs that offer out-of-the-box models for face detection, barcode scanning, text recognition, image labeling, smart reply, and language identification. ML Kit also supports custom model integration (TensorFlow Lite models).
All of these APIs are capable of working in an offline mode, which provides you the features of the machine learning model without always being connected to the internet. For a more detailed look at other benefits of on-device machine learning, check out this detailed look:
Even though ML Kit comes with these pre-trained models, there may be some special use cases that you want to implement, or maybe you’ve already trained a model on TensorFlow that you want to deploy to a mobile device.
For example, let’s say you have a health app which collects personal health and diagnostics data, which is stored on the device (as opposed to in the cloud).
We could build a machine learning model that could offer health-related suggestions to the user based on the user’s activity, provide diagnostic information to practitioners and clients, predict better diagnoses, or even automatically recommend precautions.
The uses above are of course hypothetical, but the assistance offered by such an app would greatly benefit from running inference on-device. Of course, there are chances of error, and an on-device model can be (and should) trained and corrected over time.
Machine learning has the power to truly transform the usage of an app (or apps) like this. Before we jump into the code, let’s take a quick look at some of the specific benefits in a bit more detail.
Integrating machine learning model with mobile apps provides:
Lower cost
On-device machine learning can save thousands of dollars for both developers and users. For external health consultation, patients might not have to consult a doctor for certain issues and conditions, which could save lots of money. For a developer, it’s unnecessary to maintain a cloud or server for machine learning processing. It’s a win-win situation.
Data privacy
One of the most important concerns with healthcare AI solutions now is Data Privacy. With on-device data processing, no data is sent to a server or the cloud for processing. Thus fewer chances of data leak and loss. This could be big in ensuring compliance with HIPAA and other privacy regulations.
Lower latency
On the device, a machine learning model can provide faster (and still accurate) results. High latency can reduce an app’s usage with users potentially losing interest.
Because remote model processing can be at times slow, and with something like real-time diagnostics, practitioners might require instantaneous feedback. This combination of accuracy and seamless inference can lead to better UI/UX experience.
No Internet connection required
Using a health app like this in remote areas with low Internet connectivity would provide faster and more accessible medical responses and could save many lives in areas of lower or developing Internet connection.
More current suggestions
We’ve broadly outlined one use case above, but there are quite literally endless use cases that can enable more engaging mobile apps.
For these kinds of custom use cases, developers working with ML Kit can use TensorFlow Lite to integrate custom models in mobile devices. Let’s jump in and build one ourselves.
What is TensorFlow Lite?
TensorFlow Lite is an open source deep learning framework provided by TensorFlow to build lightweight models for mobile devices. It allows you to run trained models on both iOS and Android.
How to train your own custom model
There are a few basic steps to this process that we need to implement in order to build our own custom TensorFlow Lite model.

What is Transfer Learning?
Transfer learning is a machine learning method where a model developed for one task is reused as the starting point for a model on a second task.
Let’s look at an example:
For our use case, we’ll use image classification to predict the breeds of dogs. To do this, we’ll be using a pre-trained model. The MobileNet and InceptionV3 architecture are well-suited for mobile. To train and test our model, I’ll be providing a dataset of dogs downloaded from the Internet.

Prerequisites:
Install TensorFlow in order to run this example. You’ll also need to make sure PILLOW is installed:
Step 1: Downloading the dataset
Luckily, I didn’t need to venture out and take thousands of photos of different dog breeds in order to get started. Instead, I downloaded the dataset from the above URL, which contains 20,850 images of 120 breeds of dogs from around the world. The dataset has been built using images and annotations from ImageNet.
Step 2: Retraining the model
Next, we need to retrain the model with a new set of images. There are various architecture options available, and I’ve used two of the most known architecture models:
- MobileNet_2.0
- Inception_v3
With MobileNet_2.0, it took me around 30 minutes on a MacBook pro with 8GB of RAM, and the model achieved an accuracy of 83%; however, with Inception V3, training took around 45 mins and the accuracy achieved was 89.5%.
The two main scripts we’ll need to retrain and test the model can be found from TensorFlow Hub. Get the scripts by executing the following:
curl -LO https://github.com/tensorflow/hub/raw/master/examples/image_retraining/retrain.pycurl -LO https://github.com/tensorflow/tensorflow/raw/master/tensorflow/examples/label_image/label_image.pyWe’ve got both the scripts, so we’re ready to retrain our MobileNet model and test the newly-generated graph.
python3 -m retrain
--bottleneck_dir=bottlenecks
--how_many_training_steps=500
--model_dir=models/
--summaries_dir=training_summaries/
--output_graph=output/retrained.pb
--output_labels=output/labels.txt
--image_dir=${IMAGES_PATH}
--tfhub_module=https://tfhub.dev/google/imagenet/mobilenet_v2_140_224/classification/2
The tfhub_module specified in command uses the TF-Slim implementation of mobilenet_v2, with a depth multiplier of 1.4 and an input size of 224×224 pixels. Therefore, we’ll be specifying the image size as 224×224 while using the TensorFlow Lite model in our mobile app.
Step 3: Test our model with an image
python3 label_image.py
--graph=output/retrained.pb --labels=output/labels.txt
--input_layer=Placeholder
--output_layer=final_result
--image=/Volumes/MacOS/custom_model_blog/mobile_net_v2_retrain/Images/n02096437-Dandie_Dinmont/n02096437_2309.jpg
--input_height=224 --input_width=224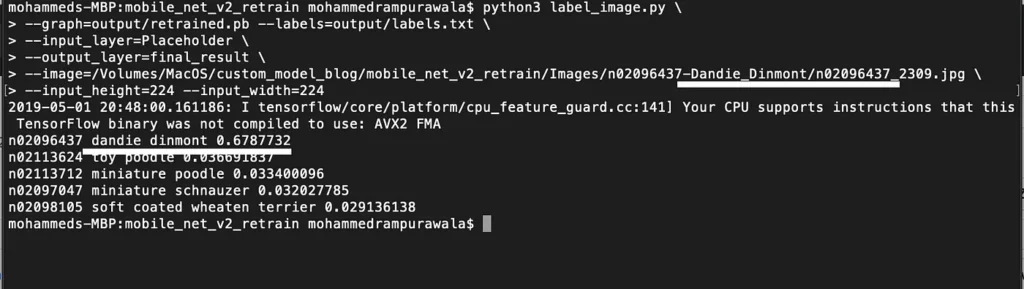
Step 4: (Most Important Step) Converting our model to TensorFlow Lite with tflite_convert
Starting with TensorFlow 1.9, model conversion works through the TFLiteConverter. Before that, it was called TOCO, or “TensorFlow Lite Optimizing Converter”. This tool is used to optimize TensorFlow graphs to run on mobile devices.
TensorFlow models work on protobuff, whereas TensorFlow Lite models work on FlatBuffers. This is why we need a conversion tool.
tflite_convert
  --graph_def_file=output/retrained.pb
  --output_file=output/mobilenet_v2.tflite
  --input_format=TENSORFLOW_GRAPHDEF
  --output_format=TFLITE
  --input_shape=1,${IMAGE_SIZE},${IMAGE_SIZE},3
  --input_array=Placeholder
  --output_array=final_result
  --inference_type=FLOAT
  --input_data_type=FLOAT
There can be two inference types: QUANTIZED_UNIT8 and FLOAT. The flag is typically used for taking a bitmap as input but requiring floating-point inference.
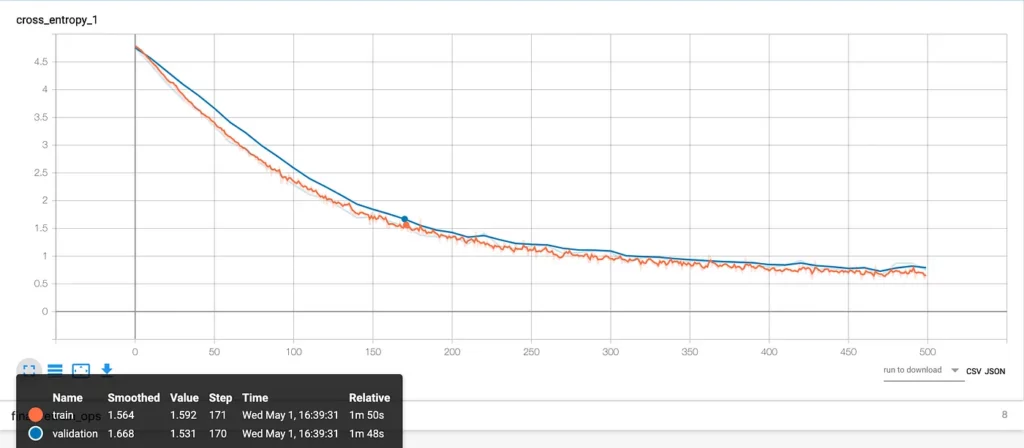
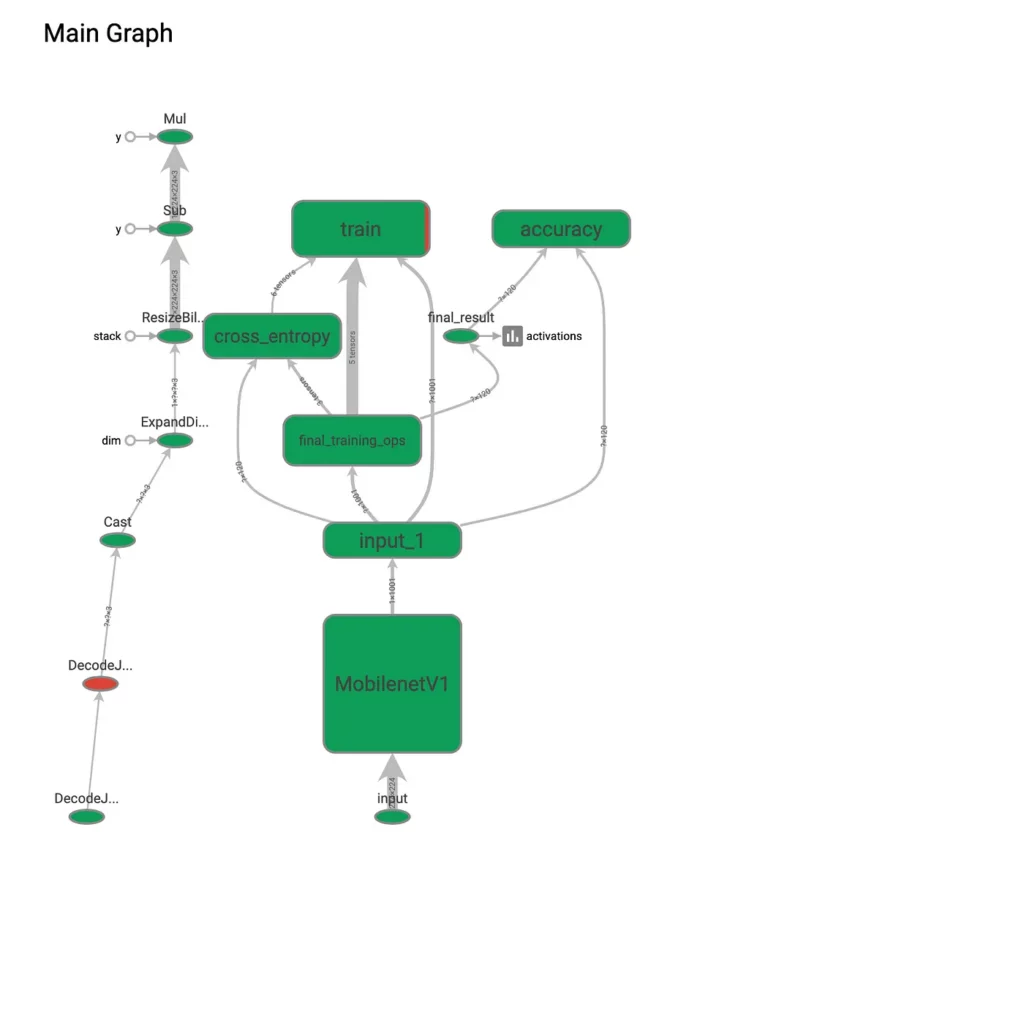
Visualizing Model Performance
Now that our model is ready, let’s visualize how our model performed:
tensorboard ---logdir=$PATH/training_summaries

Step 5: Embedding the .tflite/.lite model into our app
Now that our custom TensorFlow Lite model is ready, let’s integrate it into an Android app and use it with ML Kit. To use ML Kit, we’ll need to create a Firebase project (Firebase console).
To get started with an Android app, we’ll need to follow a few steps:
1. Add google_services.json created from firebase console into an app.
2. Add the following dependencies.
    // ML Kit dependencies
    implementation 'com.google.firebase:firebase-core:16.0.8'
    implementation 'com.google.firebase:firebase-ml-vision:19.0.3'
    implementation 'com.google.firebase:firebase-ml-vision-image-label-model:17.0.2'
    implementation 'com.google.firebase:firebase-ml-vision-face-model:17.0.2'
    implementation 'com.google.firebase:firebase-ml-model-interpreter:18.0.0'
3. Enable the ML Kit API from the Google Cloud Platform for your project.
4. Add mobilenet_v2.tflite and labels.txt into assets directory.
5. Initialize Firebase variables:
 init {
        val localModelName = LOCAL_FLOAT_MODEL_NAME
        val localModelPath = LOCAL_FLOAT_MODEL_PATH
        val modelOptions = FirebaseModelOptions.Builder()
            .setLocalModelName(localModelName)
            .build()
        val localModelSource = FirebaseLocalModel.Builder(localModelName)
            .setAssetFilePath(localModelPath).build()
        val manager = FirebaseModelManager.getInstance()
        manager.registerLocalModel(localModelSource)
        interpreter = FirebaseModelInterpreter.getInstance(modelOptions)
        labelList = loadLabelList(activity)
        Log.d(TAG, "Created a Custom Image Classifier.")
        val inputDims = intArrayOf(DIM_BATCH_SIZE, DIM_IMG_SIZE_X, DIM_IMG_SIZE_Y, DIM_PIXEL_SIZE)
        val outputDims = intArrayOf(1, labelList.size)

        val dataType = FirebaseModelDataType.FLOAT32
        dataOptions = FirebaseModelInputOutputOptions.Builder()
            .setInputFormat(0, dataType, inputDims)
            .setOutputFormat(0, dataType, outputDims)
            .build()
        Log.d(TAG, "Configured input & output data for the custom image classifier.")
    }
6. To classify the image, we need to convert Bitmap into ByteBuffer and pass it to our firebase interpreter we initialized above and then it will process with the local TensorFlow Lite model.


To try out this and other ML Kit features, check out this repository. This code was referenced from Firebase’s quickstart custom classifier.
Results and insights I gained while training the model:
- You should be well aware of the dataset you’ll be classifying. Be sure to pay attention to image size, input type, inference type i.e; FLOAT or QUANTIZED_UINT8.
- Be sure to use the same image size in your app code and while retraining your model.
- Be aware of your tflite_convert path because sometimes it gets conflicted with the previous TensorFlow version (if installed).
- If your model is Inception_v3 then your image size will be 299 and you input_layer will be “Mul”

Comments 0 Responses