
In my last blog, I talked about how devs can use Kotlin coroutines to efficiently handle long-running tasks in their apps:
The method outlined works well when the user is using your app, but as soon as the user exits the app, the system kills the app and all the processes spawned by it. I faced this issue while working on AfterShoot when I had to run my machine learning model through all of a given user’s images.
For users with more than a few thousand images, the model might take 40–50 minutes to go through them all—and I certainly can’t expect the user to stare at an empty loading screen until this long process completes.
Moreover, the app is only useful once all the images have been processed, and I have to wait until it analyzes all the images in order to see the bad images on my device. This doesn’t seem like a good UX, so let’s see how this can be fixed.
Enter Foreground Services
Services have been around in Android since the very first release back in 2007. While they’re extremely useful, developers have been misusing them for secretly running background processes, even after the user has exited the app. To fix this issue, the team working on the Android framework imposed a strict rule on services starting with Android Oreo:
According to these new rules, any service that’s spawned by your app will be killed as soon as your app is killed. And if you want to run a service in the background, you need to display an ongoing notification to the user telling them that your app is running in the background.
This notification is similar to the notification that’s shown by your Music Player app whenever it’s playing any song in the background. You might have noticed you can’t swipe that notification away—that’s what a foreground service is.
In AfterShoot, we’ll be offloading the ML processing that’s happening in our app to a foreground service. This will provide us with 2 benefits:
- Processing will continue to run even if the app is stopped.
- The user is able to view already processed images without having to wait for the process to complete.
Implementing Foreground Service in AfterShoot
Here’s what the current code looks like:
class ProgressActivity : AppCompatActivity() {

    private val uiScope = CoroutineScope(Dispatchers.Main)

    override fun onCreate(savedInstanceState: Bundle?) {
        super.onCreate(savedInstanceState)
        setContentView(R.layout.activity_progress)

        CoroutineScope(Dispatchers.IO).launch {
            val images = dao?.getUnprocessedImage()

            uiScope.launch {
                images?.forEachIndexed { index, image ->
                    processImage(image)
                    tvStatus.text = "Processing : $index out of ${images.size}"
                }
            }
        }
    }

      private suspend fun processImage(image: Image) = withContext(Dispatchers.Default) {
        val inputStream = contentResolver.openInputStream(image.uri)
        val bitmap = BitmapFactory.decodeStream(inputStream)
        // Resize the bitmap so that it's 224x224
        bitmap?.let {
            val resizedImage =
                    Bitmap.createScaledBitmap(bitmap, inputImageWidth, inputImageHeight, true)

            // Convert the bitmap to a ByteBuffer
            val modelInput = convertBitmapToByteBuffer(resizedImage)
            bitmap.recycle()
            exposureInference(modelInput, image)
        }
    }


}
Let’s now see how we can extract this code from our Activity and move it to a foreground service.
Step 1: Create a new service and register it in the AndroidManifest
We’ll first need to create a new class of our own and make it extend the Service base class. Once done, we need to provide the implementation for the onCreate() and onBind() methods from the base class. This is what it looks like:
class ModelRunnerService : Service() {

    // called when an instance of this service is created, if the service is already running; onStartCommand is called instead
    override fun onCreate() {
        super.onCreate()
    }

    // used to communicate between service and the activity, skip for now
    override fun onBind(intent: Intent?) = null

}
Once done, you need to register this service in your AndroidManifest.xml’s <application> tag and also request permission to show a foreground service:
Step 2: Migrate the code from activity into the service
Once we have the service in place, we then need to migrate our code for image processing from the Activity into the service. We’ll be using the onCreate() method for doing this.
This is what the code looks like:
class ModelRunnerService : Service() {

    // called when an instance of this service is created, if the service is already running; onStartCommand is called instead
    override fun onCreate() {
        super.onCreate()
        CoroutineScope(Dispatchers.IO).launch {
            val images = dao?.getUnprocessedImage()

            images?.forEachIndexed { index, image ->
                processImage(image)
            }
            // once the processing completes, stop the foreground service and remove the notification
            stopForeground(true)
        }
    }

    // used to communicate between service and the activity, skip for now
    override fun onBind(intent: Intent?) = null

}
If you try to start the service we’ve created up until now, it will run just fine, but as soon as the app is closed, the service will be killed as well. We have yet to convert it into a foreground service.
The first step in doing so is making a notification that will be displayed by our service when it’s running. We’ll do that next.
Step 3: Creating a notification for our foreground service
Let’s now make a notification object in our service class that will serve as a visual indicator to our users that the service is running.
Before we create a notification, we need to make a channel that we want to display the notification in. Starting with Android Oreo, Android doesn’t allow you to display notifications that don’t belong to a channel. By categorizing notifications into channels, users can disable specific notification channels for your app instead of disabling all notifications. You can read up more on the benefits of having notification channels here:
Here’s how you can make a notification channel:
class ModelRunnerService : Service(){

    // for android version Oreo and above, we first need to create a notification channel
    private fun createNotificationChannel() {
        if (Build.VERSION.SDK_INT >= Build.VERSION_CODES.O) {
            // you can create multiple channels and deliver different type of notifications through different channels
            val notificationChannel = NotificationChannel("progress_channel", "Progress", NotificationManager.IMPORTANCE_DEFAULT)
            val notificationManager = getSystemService(NOTIFICATION_SERVICE) as NotificationManager
            notificationManager.createNotificationChannel(notificationChannel)
        }
    }

}
Once done, we can go ahead and make our notification:
class ModelRunnerService : Service(){

    // for android version Oreo and above, we first need to create a notification channel
    private fun createNotificationChannel() {
        if (Build.VERSION.SDK_INT >= Build.VERSION_CODES.O) {
            // you can create multiple channels and deliver different type of notifications through different channels
            val notificationChannel = NotificationChannel("progress_channel", "Progress", NotificationManager.IMPORTANCE_DEFAULT)
            val notificationManager = getSystemService(NOTIFICATION_SERVICE) as NotificationManager
            notificationManager.createNotificationChannel(notificationChannel)
        }
    }

    private val notification by lazy {
        NotificationCompat.Builder(this, "progress_channel")
                .setSmallIcon(R.drawable.ic_progress)
                .setContentTitle("Processing your images ...")
                .build()
    }

}
And you’re done! Up next, we’ll see how to start this service in foreground mode.
Step 4: Starting the foreground service
In order to start the service in foreground mode, there are 2 things that need to be done:
- Start the ModelRunnerService from our Activity.
- In the onCreate method of the ModelRunnerService, promote it to a foreground service.
The first step is relatively easy and can be done as follows:
class MainActivity : AppCompatActivity() {

  ...
  private fun startModelRunnerService() {
        val intent = Intent(this, ModelRunnerService::class.java)
        startService(intent)
        startResultActivity()
  }

  override fun onCreate(savedInstanceState: Bundle?) {
        super.onCreate(savedInstanceState)
        ContextCompat.startForegroundService(this, intent)

        ...
  }
  ...

}
For the second step, we’ll have to do two things in our ModelRunnerService’s onCreate() method: Create the notification channel and link the notification with the service:
class ModelRunnerService : Service() {

   // a unique ID for our notification
   val notificationId = 12345

   override fun onCreate() {
        super.onCreate()
        // create a notification channel, automatically ignores the creation if the channel is created
        createNotificationChannel()
        startForeground(notificationId, notification)
        CoroutineScope(Dispatchers.IO).launch {
            val images = dao?.getUnprocessedImage()

            images?.forEachIndexed { index, image ->
                processImage(image)
            }
            // stop the foreground service and remove notification
            stopForeground(true)
        }
    }

    // used to communicate between service and the activity, skip for now
    override fun onBind(intent: Intent?) = null

}
As you can see, I’ve also stopped the service once the processing is completed by calling stopSelf() . The true flag passed means that we want to cancel the notification as well.
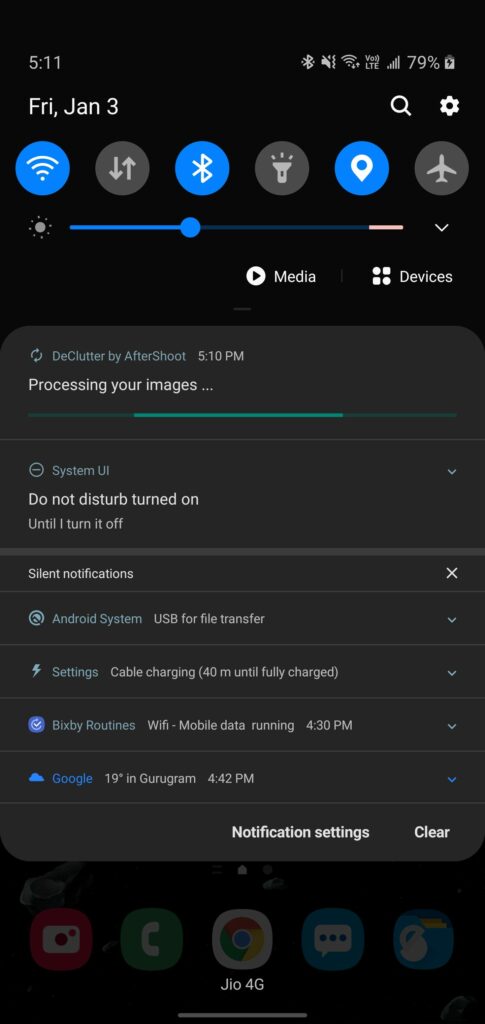
And that’s it! On running the app, I can see a notification as follows:
It’s possible that you might also want to update the progress bar in the notification to reflect the current progress instead of a generic loader—let’s see how this can be done.
Step 5: (Optional) Updating the progress bar in the notification
Updating might be a wrong word here, as you need to create a new notification every time you want to update the existing notification. So let’s do that:
class ModelRunnerService: Service(){
// called when an instance of this service is created, if the service is already running; onStartCommand is called instead
override fun onCreate() {
super.onCreate()
createNotificationChannel()
startForeground(notificationId, notification)
CoroutineScope(Dispatchers.IO).launch {
// get the unprocessed images only
val images = dao?.getUnprocessedImage()
val totalImages = images?.size ?: 0
CoroutineScope(Dispatchers.Main).launch {
images?.forEachIndexed { index, image ->
// set the progressBar to the current Progress
val notification = NotificationCompat.Builder(baseContext, "progress_channel")
.setSmallIcon(R.drawable.ic_progress)
.setContentTitle("Processing image : $index out of $totalImages")
.setProgress(totalImages, index, false)
// setting the notification as ongoing prevents the user from dismissing it
.setOngoing(true)
.build()
// show a new notification with the same ID, it essentially cancels the older one and shows the new notification
val notificationManager = getSystemService(NOTIFICATION_SERVICE) as NotificationManager
notificationManager.notify(notificationId, notification)
processImage(image)
}
}
// stop the foreground service and remove notification
stopForeground(true)
}
}
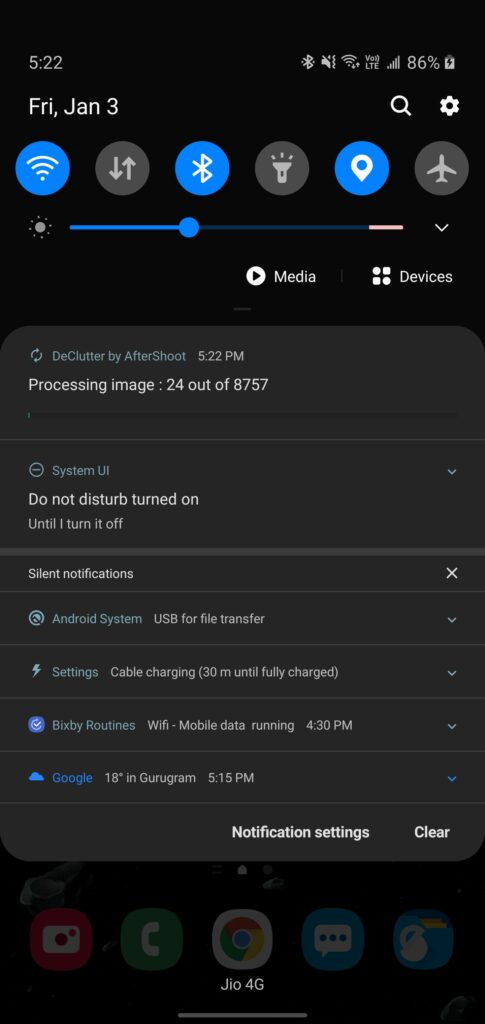
}And that’s it! On running the app now, you should be able to see the following notification instead:

The source code for the code covered in this blog post can be found here:
Specifically, look at the ModelRunnerService.kt file for the relevant source code.
Thanks for reading! If you enjoyed this story, please click the 👏 button and share it to help others find it! Feel free to leave a comment 💬 below.
Have feedback? Let’s connect on Twitter.

Comments 0 Responses