
Very rarely do we find mobile apps that have no connection to a backend of any sort. There are many services and platforms like Azure or AWS, but one Google product stands out as well: Firebase. It’s easy to use, scalable and—most importantly—free. In this tutorial, we’ll explore how to connect our Flutter mobile app to Firebase.

To demonstrate, we will use an app I have created previously, which can be found in the following tutorial:
Step 1 — Creating a Firebase project
All we need to create a Firebase project is a Google account with which to access Firebase. So head on over to the Firebase console to get started. Add a new project, give it a name, agree to all they ask and hit ‘Create Project’. Once the project is successfully created, the Project Dashboard can be accessed.
Firebase has two types of databases:
- Realtime Database — a NoSQL database, that looks like one big JSON Object.
- Cloud Firestore — A collection of documents, which are JSON Objects.
Firestore is the better option, as it has a better structure than Realtime Database. In Realtime Database, rules cascade. This allows easy data manipulation if the reference and permission to the database are both available. This affects all data stored. And for that reason, I picked Firestore as the database.
I created a collection called tasks that contains the title and description of a list of tasks. I also included a few documents as shown below:
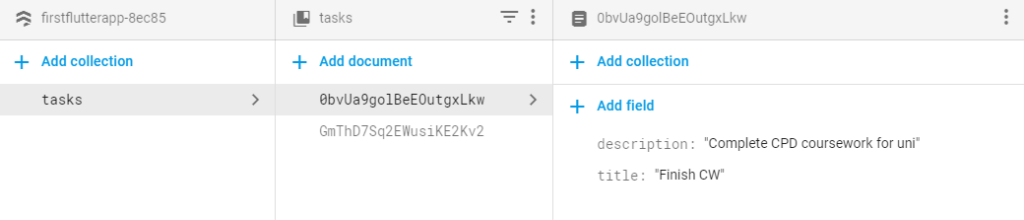
What will be displayed for this tutorial is a list of task titles, each in a separate card. Upon clicking a button on the card, it will direct the user to a new page that displays the description.
Now that we have set up the Firebase dashboard, let’s move on to integrating Firebase into the app.
Step 2 — Integrating Firebase in the app
We must now register both the iOS and Android app in the project overview dashboard.
iOS
To register the iOS app, we will need the Bundle Identifier, which is in ios.Runner/Infoplist, with the key CFBundleIdentifier.
Another way to find it is to search the project.pbxproj for the variable ‘PRODUCT_BUNDLE_IDENTIFIER’. Fill in the remaining information (optional) to register the app.
Once registered, we can download the config file GoogleService-Info.plist and move it into the ios/Runner folder.
Android
To register the Android app, we willl need the Application ID, which is in android/app/build.gradle, inside the tag defaultConfig. Fill in the remaining information (optional) to register the app.
Once registered, we can download the config file google-services.json and move it into the android/app folder.
In comparison to setting up iOS, Android has 3 extra steps. We now need to add the Google Services plugin to the android/build.gradle and check to see if the file looks like this:
Then add the line below after the dependencies object in the android/app/build.gradle.
The final step for the Android setup is to run the command flutter packages get, to install new dependencies.
One last step to configure Firebase for both platforms is to install FlutterFire. FlutterFire is a collection of plugins for each different Firebase service. FlutterFire can be used by both platforms, as it depends on the multi-platform Flutter SDK.
Find the different plugins for each service here:
Since I’m using the Cloud Firestore Database service, I’ll need to install cloud_firestore, the plugin for the Cloud Firestore API.
Update the pubspec.yaml file to include the plugin dependency below, inside dependencies:
Run flutter packages get once more to install the required packages.
Step 3 — Using the cloud_firestore plugin
Home Page
To start using the cloud_firestore package, import it at the top of the page like so:
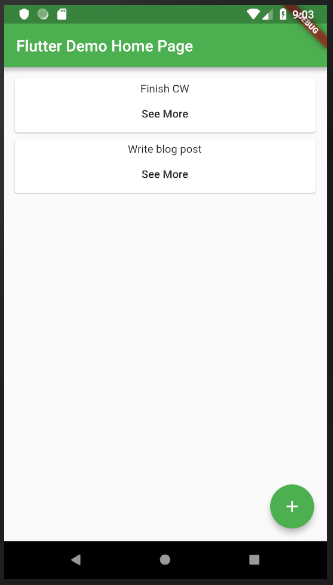
In this page, the collection tasks is queried to return all its values. The titles of each document are then displayed in a list of cards.
To achieve this, the Home page is updated to look as below:
class _MyHomePageState extends State<MyHomePage> {

  @override
  Widget build(BuildContext context) {
    return Scaffold(
      appBar: AppBar(
        title: Text(widget.title),
      ),
      body: Center(
        child: Container(
          padding: const EdgeInsets.all(10.0),
          child: StreamBuilder<QuerySnapshot>(
            stream: Firestore.instance.collection('tasks')
              .snapshots(),
            builder: (BuildContext context,
              AsyncSnapshot<QuerySnapshot> snapshot) {
                if (snapshot.hasError)
                  return new Text('Error: ${snapshot.error}');
                switch (snapshot.connectionState) {
                  case ConnectionState.waiting:
                    return new Text('Loading...');
                  default:
                    return new ListView(
                      children: snapshot.data.documents
                        .map((DocumentSnapshot document) {
                          return new CustomCard(
                            title: document['title'],
                            description: document['description'],
                          );
                      }).toList(),
                    );
                }
              },
            )),
          ),
      floatingActionButton: FloatingActionButton(
        onPressed: _showDialog,
        tooltip: 'Add',
        child: Icon(Icons.add),
      ),
    );
  }

}
StreamBuilder is a widget that builds itself depending on the Stream of data it gets. A Stream is a data source that receives a series of asynchronous events. In this case, an asynchronous event is considered as one document in the task collection, making the collection itself the Stream.
This data stream is passed as the data source to the StreamBuilder. The builder returns a widget depending on the data in the asynchronous stream.
In the above case, it returns:
- A Text containing an error, if the resolved snapshot contains one.
- A Text containing the string “Loading”, if the connection is open to the Stream but waiting for a response.
- A ListView of CustomCard elements if the connection is resolved to give the collection of task documents.
The ListView is a list of widgets arranged as a scrollable list. The data sent to it needs to be in the format of a List. To achieve that, documents of the resolved snapshot are mapped to return a CustomCard element. Each CustomCard element returned contains the mapped documents’ title. All the returned objects are then aggregated into a List.
Now a quick look at this ListView implementation;
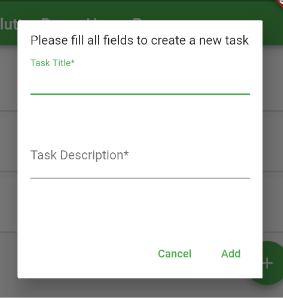
I’ve also changed the functionality of the floating action button on the home page. It now displays an alert that allows the user to enter a task title and description. Clicking the add button adds a new document to the tasks collection. It checks if both text fields contain values before inserting the document. Clicking cancel dismisses the alert and clears the text fields.
TextEditingController taskTitleInputController;
TextEditingController taskDescripInputController;

@override
initState() {
  taskTitleInputController = new TextEditingController();
  taskDescripInputController = new TextEditingController();
  super.initState();
}

_showDialog() async {
  await showDialog<String>(
    context: context,
    child: AlertDialog(
      contentPadding: const EdgeInsets.all(16.0),
      content: Column(
        children: <Widget>[
          Text("Please fill all fields to create a new task"),
          Expanded(
            child: TextField(
              autofocus: true,
              decoration: InputDecoration(labelText: 'Task Title*'),
              controller: taskTitleInputController,
            ),
          ),
          Expanded(
            child: TextField(
              decoration: InputDecoration(labelText: 'Task
                Description*'),
              controller: taskDescripInputController,
            ),
          )
        ],
      ),
      actions: <Widget>[
        FlatButton(
          child: Text('Cancel'),
          onPressed: () {
            taskTitleInputController.clear();
            taskDescripInputController.clear();
            Navigator.pop(context);
          }),
        FlatButton(
          child: Text('Add'),
          onPressed: () {
            if (taskDescripInputController.text.isNotEmpty &&
                taskTitleInputController.text.isNotEmpty) {
              Firestore.instance
                .collection('tasks')
                .add({
                  "title": taskTitleInputController.text,
                  "description": taskDescripInputController.text
              })
              .then((result) => {
                Navigator.pop(context),
                taskTitleInputController.clear(),
                taskDescripInputController.clear(),
              })
              .catchError((err) => print(err));
          }
        })
      ],
    ),
  );
}
AlertDialog is the widget that displays a Material Design Alert. Within the content is the Column containing the TextFields that allow the user to enter the task title and description. Each TextField has its own controller that has access to the text entered into it.
Each TextField also includes an InputDecoration Class. This adds styling to the input; a label in the above code, for example. We also need to pass a list of possible actions (buttons) to the dialog. One such action is ‘cancel’, which closes the dialog and clears the TextFields. The other is ‘add’ to add the document into the collection.
The TextEditingControllers are first queried to check if the TextFields are empty. If both contain a value, the data is inserted into Firestore. To insert a new document, an instance of the Firestore collection is created. Data is then passed to the method as a JSON object. Upon a successful insert, the dialog is dismissed and the TextFields cleared.
A quick view of the alert dialog implemented;
CustomCard Component
import 'package:flutter/material.dart';
import '../secondPage.dart';

class CustomCard extends StatelessWidget {
  CustomCard({@required this.title, this.description});

  final title;
  final description;

  @override
  Widget build(BuildContext context) {
    return Card(
        child: Container(
            padding: const EdgeInsets.only(top: 5.0),
            child: Column(
              children: <Widget>[
                Text(title),
                FlatButton(
                    child: Text("See More"),
                    onPressed: () {
                      Navigator.push(
                          context,
                          MaterialPageRoute(
                              builder: (context) => SecondPage(
                                  title: title, description: description)));
                    }),
              ],
            )));
  }
}
This element is used to display the title of the document inside a Card Widget. It also contains a button that navigates the user to another page, which contains the task description.
SecondPage Component
import 'package:flutter/material.dart';

class SecondPage extends StatelessWidget {
  SecondPage({@required this.title, this.description});

  final title;
  final description;

  @override
  Widget build(BuildContext context) {
    return Scaffold(
        appBar: AppBar(
          title: Text(title),
        ),
        body: Center(
          child: Column(
              mainAxisAlignment: MainAxisAlignment.center,
              crossAxisAlignment: CrossAxisAlignment.center,
              children: <Widget>[
                Text(description),
                RaisedButton(
                    child: Text('Back To HomeScreen'),
                    color: Theme.of(context).primaryColor,
                    textColor: Colors.white,
                    onPressed: () => Navigator.pop(context)),
              ]),
        ));
  }
}
This component displays the title of the task in the header bar and description in the body. Both pieces of data are passed to the page when navigating to it.
The mainAxisAlignment and crossAxisAlignment tags are used to specify the exact location of the elements on the page. In this example, I’m trying to display the elements both vertically and horizontally centered. By default, the Column widget arranges its elements starting at the top of its page.
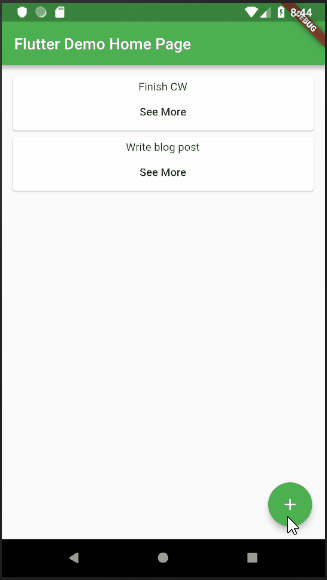
Now to have a look at all the features newly implemented:
To Recap
In this tutorial, we were able to;
- Create a Firebase project,
- Connect it to the Flutter app,
- Display the tasks collection in Cloud Firestore on the app, and
- Add a new document into the tasks collection.
In a similar way, other Firebase services can be used, after installing the corresponding plugin as specified above. Join me next time on introducing Firebase Authentication for Flutter.
Find the code repo, here.
Find the commit for this post, here.

Comments 0 Responses