
Imagine that you have just launched a new advertising campaign, or a new product, just like Disney’s new movie “The Lion King”, and you want to have a clear view of what people think of the movie.
Natural language processing (NLP) can help with that, and specifically the task of sentiment analysis (SA).
In simple terms, this is a technique that allows you to quickly determine if people are responding positively or negatively to a given topic—in this use case movies.
Sentiment analysis would use different techniques to tokenize and analyze every word and sentence and gather as many signals to indicate whether a review is positive, negative, or neutral.
But in order to do that, you have to collect as much raw data as possible and train a model to extract a list of features from a predefined set of positive and negative responses.
To make it more exciting, we’ll try to build a sentiment analysis model without any external resources or libraries and purely with Swift. Surprisingly, there are actually a lot of ways to build a pretty cool NLP model, as long as it’s totally supervised.
Here are the 5 steps we need to take to get a decent result in an iOS app:

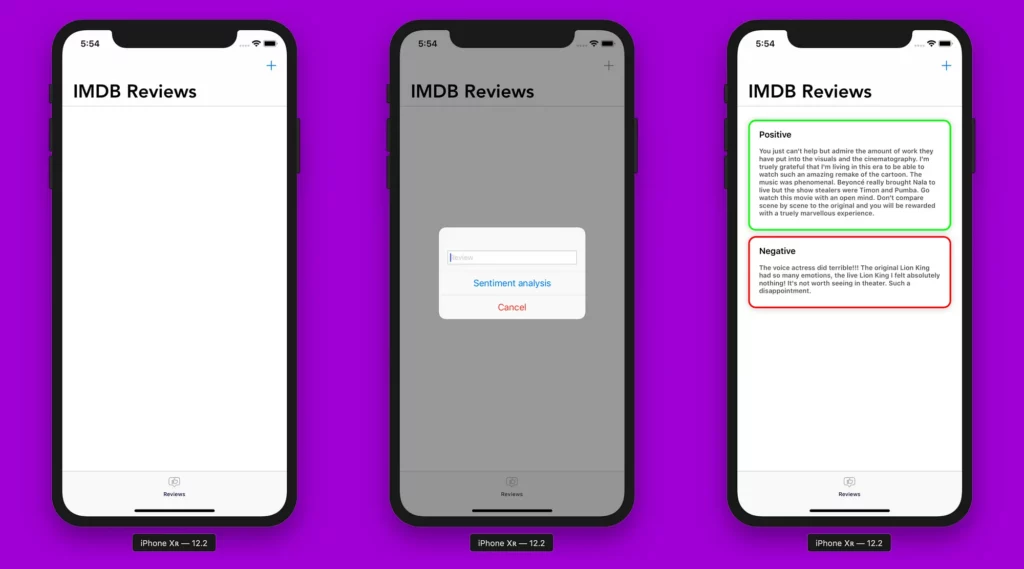
And this is a look at what the final result will look like:
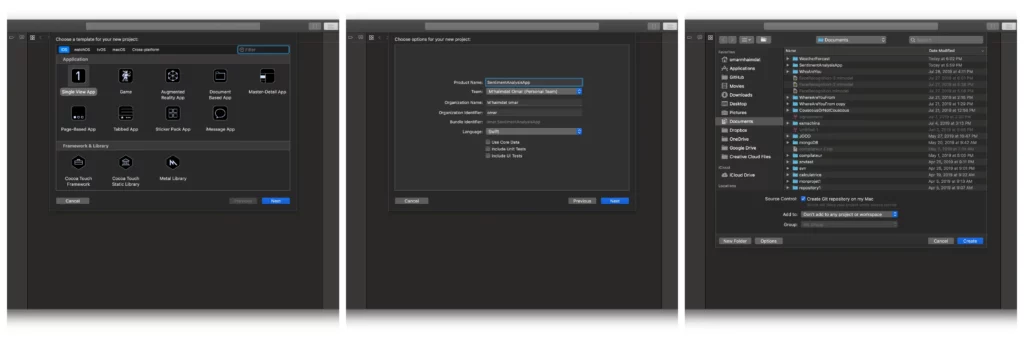
Step 1: create a Single View Application
To begin, we need to create an iOS project with a single view app:
Create View Controller
We only need one View Controllers:
- ViewController():
This is where we’ll set our UICollectionView with all the IMDB reviews and show if the review is positive or negative.
Create a navigation
- MainTabBarController():
This is our main navigation where we’ll create the full navigation structure for our application.
Navigation in iOS is pretty straightforward and easy to implement. Here, I’ve changed some things like the font for the navigation bar, etc. so it looks nice.
class MainTabBarController: UITabBarController {

    override func viewDidLoad() {
        super.viewDidLoad()
        setupTabBar()
        tabBar.backgroundColor = UIColor(red: 239/255, green: 239/255, blue: 244/255, alpha: 0.1)
        tabBar.unselectedItemTintColor = UIColor.lightGray
        tabBar.isTranslucent = true
    }

    func setupTabBar() {

        let vc = ViewController()

        let viewController = UINavigationController(rootViewController: vc)
        viewController.tabBarItem.image = UIImage(named: "review")
        viewController.tabBarItem.imageInsets = UIEdgeInsets(top: 1, left: 0, bottom: -1, right: 0)
        viewController.tabBarItem.title = "Reviews"

        viewControllers = [viewController]

        UITabBar.appearance().tintColor = #colorLiteral(red: 0.06274510175, green: 0, blue: 0.1921568662, alpha: 1)
        let navigation = UINavigationBar.appearance()

        let navigationFont = UIFont(name: "Avenir", size: 20)
        let navigationLargeFont = UIFont(name: "Avenir-Heavy", size: 34)

        navigation.titleTextAttributes = [NSAttributedString.Key.foregroundColor: UIColor.black, NSAttributedString.Key.font: navigationFont!]

        if #available(iOS 11, *) {
            navigation.largeTitleTextAttributes = [NSAttributedString.Key.foregroundColor: UIColor.black, NSAttributedString.Key.font: navigationLargeFont!]
        }
    }
}
Now we have our project ready to go. I don’t like using storyboards myself, so the app is this tutorial is built programmatically, which means no buttons or switches to toggle—just pure code 🤗.
To follow this method, you’ll have to delete the main.storyboard and set your AppDelegate.swift file like so:
func application(_ application: UIApplication, didFinishLaunchingWithOptions launchOptions: [UIApplication.LaunchOptionsKey: Any]?) -> Bool {

      let controller = MainTabBarController()
      window = UIWindow(frame: UIScreen.main.bounds)
      window?.rootViewController = controller
      window?.makeKeyAndVisible()
      return true
}
Make sure to remove the storyboard “Main” from the deployment info.
Step 2: Set pp a UICollectionView — ViewController.swift
Create and setup the collection’s layout
First, instantiate a UICollectionView object and cellId object:
    let cellId = "cellId"

    var newCollection: UICollectionView = {

        let collection = UICollectionView(frame: .zero, collectionViewLayout: UICollectionViewFlowLayout())
        collection.backgroundColor = UIColor.clear
        collection.translatesAutoresizingMaskIntoConstraints = false
        collection.isScrollEnabled = true
        collection.showsVerticalScrollIndicator = false

        return collection
    }()
Then set up the layout and add delegates:
    func setupCollection() {

        self.view.addSubview(newCollection)

        newCollection.centerXAnchor.constraint(equalTo: self.view.centerXAnchor).isActive = true
        newCollection.centerYAnchor.constraint(equalTo: self.view.centerYAnchor).isActive = true
        newCollection.heightAnchor.constraint(equalToConstant: view.frame.height).isActive = true
        newCollection.widthAnchor.constraint(equalToConstant: view.frame.width).isActive = true
        newCollection.topAnchor.constraint(equalTo: self.view.topAnchor).isActive = true
        newCollection.bottomAnchor.constraint(equalTo: self.view.bottomAnchor).isActive = true

    }

    func setupCollectionView() {
        newCollection.backgroundColor = .white
        newCollection.register(ViewControllerCell.self, forCellWithReuseIdentifier: cellId)
        newCollection.alwaysBounceVertical = true
        newCollection.delegate = self
        newCollection.dataSource = self
    }
We also need a CollectionViewCell. I’ve created a custom one that you can find in this GitHub repository.
Populate the collection view
We need a model to host our text and the prediction, so for the sake of simplicity, I’ve created a struct called “Model”:
struct Model {
    var text: String
    var color: UIColor
    var sentiment: String

    init(text: String, color: UIColor, sentiment: String) {
        self.text = text
        self.color = color
        self.sentiment = sentiment
    }
}
We also need to create an array of Models that will be used to populate the UICollectionView:
var cells = [Model]()Now we have an array of models we can use to populate the collection. I prefer to use extensions, so I’ve created a separate file:
import UIKit

extension ViewController: UICollectionViewDataSource, UICollectionViewDelegate, UICollectionViewDelegateFlowLayout {

    func numberOfSections(in collectionView: UICollectionView) -> Int {
        return 1
    }

    func collectionView(_ collectionView: UICollectionView, numberOfItemsInSection section: Int) -> Int {
        return self.cells.count
    }

    func collectionView(_ collectionView: UICollectionView, cellForItemAt indexPath: IndexPath) -> UICollectionViewCell {
        let cell = collectionView.dequeueReusableCell(withReuseIdentifier: cellId, for: indexPath) as! ViewControllerCell

        cell.sentiment.text = "(self.cells[indexPath.row].sentiment)"
        cell.text.text = self.cells[indexPath.row].text
        cell.contentView.layer.borderColor = self.cells[indexPath.row].color.cgColor
        return cell
    }

    func collectionView(_ collectionView: UICollectionView, layout collectionViewLayout: UICollectionViewLayout, sizeForItemAt indexPath: IndexPath) -> CGSize {

        let width = round((view.frame.width - 40) / 2.0)*2

        let height = self.cells[indexPath.row].text.heightWithConstrainedWidth(width: width, font: UIFont.boldSystemFont(ofSize: 12)) + 90

        return CGSize(width: width, height: height)
    }

    func collectionView(_ collectionView: UICollectionView, layout collectionViewLayout: UICollectionViewLayout, insetForSectionAt section: Int) -> UIEdgeInsets {
        return UIEdgeInsets(top: 25, left: 0, bottom: 25, right: 0)
    }
}


extension String {
    func heightWithConstrainedWidth(width: CGFloat, font: UIFont) -> CGFloat {
        let constraintRect = CGSize(width: width, height: .greatestFiniteMagnitude)
        let boundingBox = self.boundingRect(with: constraintRect, options: [.usesLineFragmentOrigin, .usesFontLeading], attributes: [NSAttributedString.Key.font: font], context: nil)
        return boundingBox.height
    }
}
I’ve also added a small extension for the String class so that I can calculate the height of the text and resize the collection view cells dynamically.
Add new text:
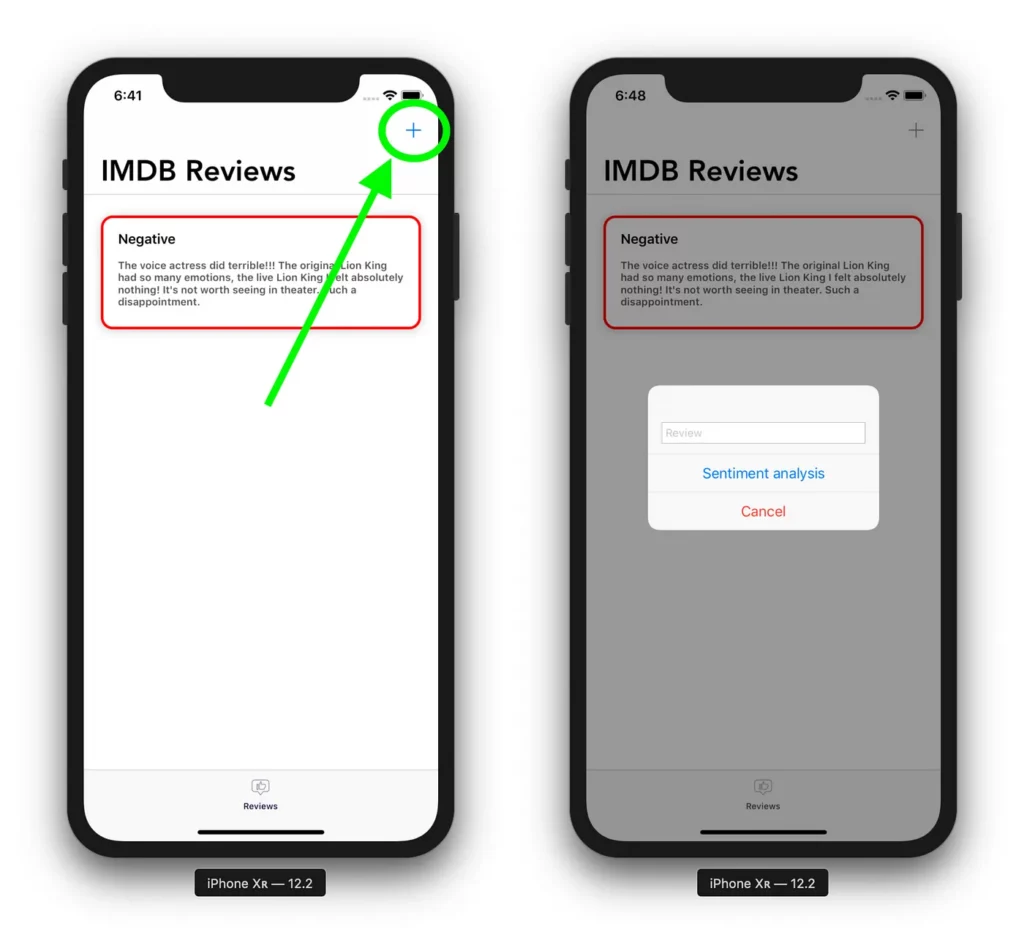
We need to setup the tabBar and add a rightBarButtonItem with a ‘plus’ sign button that will allow our users to add text and predict the sentiment.
This button should also trigger a UIAlertController with a TextField:
func setupTabBar() {
        view.backgroundColor = UIColor.white
        navigationController?.navigationBar.prefersLargeTitles = true
        self.navigationItem.title = "IMDB Reviews"
        self.navigationController?.navigationBar.isHidden = false
        self.navigationController?.navigationBar.barTintColor = .lightText
        self.setNeedsStatusBarAppearanceUpdate()
        self.navigationItem.largeTitleDisplayMode = .automatic
        self.navigationController?.navigationBar.barStyle = .default
        self.tabBarController?.tabBar.isHidden = false
        self.navigationItem.rightBarButtonItem = .init(barButtonSystemItem: .add, target: self, action: #selector(addCell(_:)))
    }
As you can see, the rightBarButtonItem needs a target:
@objc func addCell(_ sender: UIBarButtonItem) {

        let model = IMDBReviewClassifier()

        let alertController = UIAlertController(title: "", message: "", preferredStyle: .alert)
        alertController.addTextField { textField in
            textField.placeholder = "Review"
        }
        let confirmAction = UIAlertAction(title: "Sentiment analysis", style: .default) { [weak alertController] _ in
            guard let alertController = alertController, let textField = alertController.textFields?.first else { return }
        }
        alertController.addAction(confirmAction)
        let cancelAction = UIAlertAction(title: "Cancel", style: .destructive, handler: nil)
        alertController.addAction(cancelAction)
        present(alertController, animated: true, completion: nil)
    }
Step 3: Train the model
There are two ways to train our model. The first is through Xcode, and the second is through a custom Python script (using the turicreate package). The most important part here is to get a .mlmodel file that can be parsed and understood by Xcode. We can take advantage of the way Xcode uses the .mlmodel file to obtain confidence and use it to update our Collection with the appropriate prediction.
I chose to do this with only Swift, which means I’ll be using the CreateML library, which supports some interesting ML algorithms.
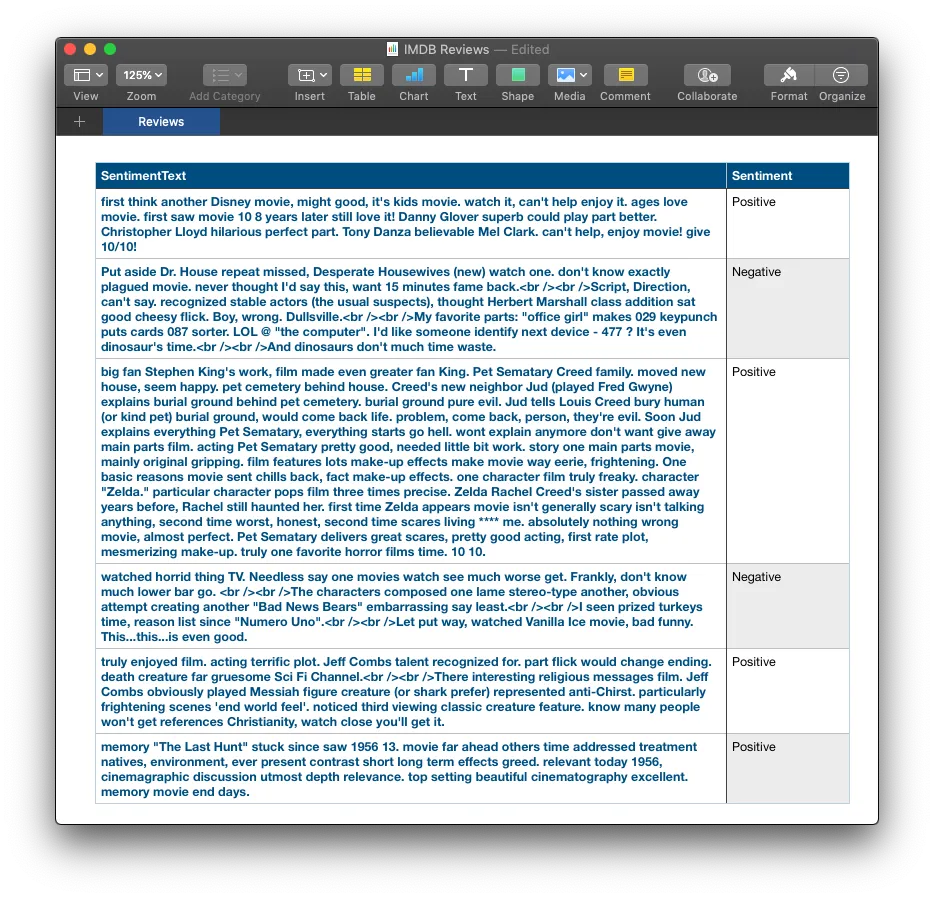
The dataset:
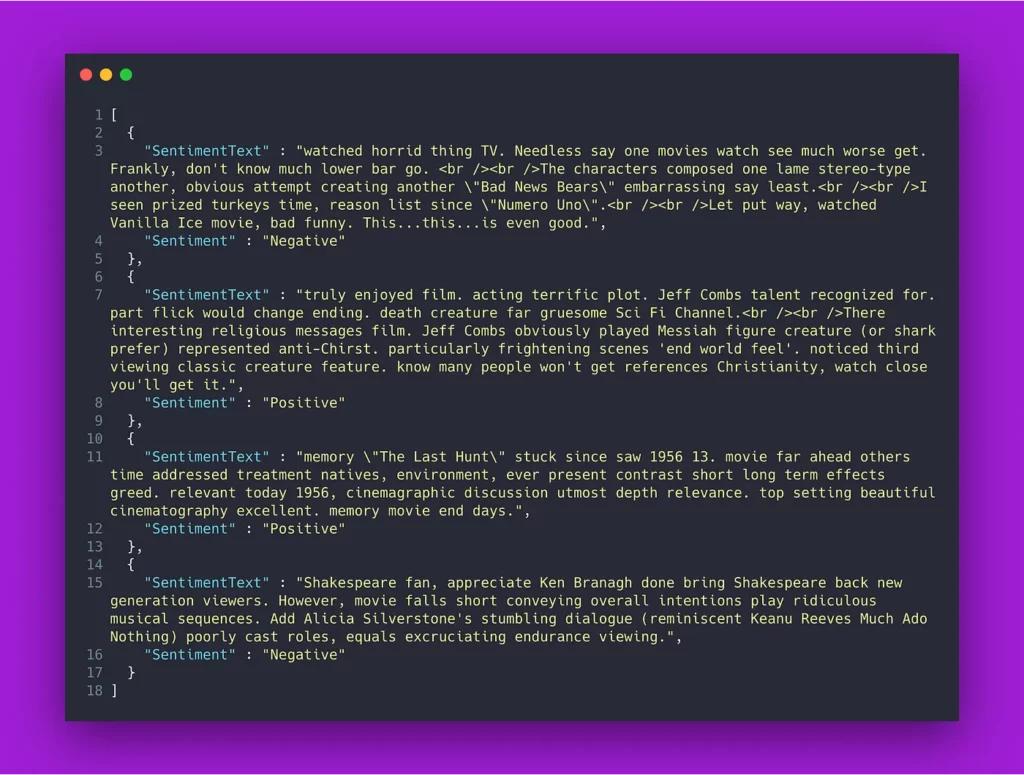
It took me some time to find the right dataset with enough entries to build a robust model. But I finally found the dataset I needed on Kaggle with 25,000 movies reviews from IMDB with binary sentiment classification.
I had some problems with the .CSV file, but when I converted it into a .JSON file, everything worked perfectly. It seems that when you have a large and not that clean dataset, the MLTextClassifier class has difficulties parsing it. (The .JSON file is in the GitHub repository as “imdb.json”)
Let’s start:
Open up the playground and write this code:
import CreateML
import Foundation

//Don't forget to change the path
let myJsonFilePath = "/Users/omarmhaimdat/Documents/SentimentAnalysisApp/imdb.json"

let url = URL(fileURLWithPath: myJsonFilePath)

let trainingData = try MLDataTable(contentsOf: url)

let model = try MLTextClassifier(trainingData: trainingData, textColumn: "SentimentText", labelColumn: "Sentiment")

//You can change where you want to save the model
try model.write(to: URL(fileURLWithPath: "/Users/omarmhaimdat/Desktop/IMDBReviewClassifier"))
The most important line here is the MLTextClassifier where we basically take an MLDataTable that contains all the parsed JSON file data, and convert it into a column spreadsheet with each row representing an entity—in this case an IMDB Review.
Step 4: Test the model
We should always test the model to see how it behaves depending on the text size. Additionally, it would be interesting to see the number of stars associated with each comment as well.
I would suggest getting real IMDB comments with a 50% split of comments under 5 stars and 50% over 5 stars.
To test your model, use the code below:
import NaturalLanguage
import Foundation

let modelPath = "/Users/omarmhaimdat/Desktop/IMDBReviewClassifier.mlmodel"

let url = URL(fileURLWithPath: modelPath)
let urlModel = try MLModel.compileModel(at: url)

let model = try NLModel(contentsOf: urlModel)
let label = model.predictedLabel(for: "The voice actress did terrible!!!
                  The original Lion King had so many emotions, the live Lion King I felt
                  absolutely nothing! It's not worth seeing in theater. Such a disappointment.")
If you get results that aren’t good enough, you may want take a look at the dataset and try to clean it up a bit, or you can create your own dataset by scraping the IMDB page and collecting reviews.
Now that we have a model—and, specifically, the .mlmodel file—we can drag and drop it into our project and Xcode will do the rest (parse the file, etc.).
Step 5: Integrate the model into the app
We need to get the prediction and update the collection view with the proper evaluation and the original text.
To do that, we need to retrieve the text from the TextField and inject it into our model in order to get a prediction. Finally, we need to add an instance of the model to the cells array that contains all the reviews and reload the collection view.
@objc func addCell(_ sender: UIBarButtonItem) {

        let model = IMDBReviewClassifier()

        let alertController = UIAlertController(title: "", message: "", preferredStyle: .alert)
        alertController.addTextField { textField in
            textField.placeholder = "Review"
        }
        let confirmAction = UIAlertAction(title: "Sentiment analysis", style: .default) { [weak alertController] _ in
            guard let alertController = alertController, let textField = alertController.textFields?.first else { return }
            if let text = textField.text {
                do {
                    let prediction = try model.prediction(text: text)
                    if prediction.label == "Positive" {
                        let cell = Model(text: text, color: UIColor.green, sentiment: prediction.label)
                        self.cells.append(cell)
                        self.newCollection.reloadData()
                    } else {
                        let cell = Model(text: text, color: UIColor.red, sentiment: prediction.label)
                        self.cells.append(cell)
                        self.newCollection.reloadData()
                    }
                } catch {
                    print(error)
                }
            }
        }
        alertController.addAction(confirmAction)
        let cancelAction = UIAlertAction(title: "Cancel", style: .destructive, handler: nil)
        alertController.addAction(cancelAction)
        present(alertController, animated: true, completion: nil)
    }
And that’s it! Here’s a look at what you should see when you’ve completed this project.
It’s a pretty simple application for an afternoon on a weekend, but if you want to go beyond that, you would need to create a custom model that would fit a specific need with Turi Create, or you can even create a model with PyTorch and convert it to a .mlmodel file.
To conclude, I would like to point out that with very few lines of code, we can get something that’s decent and perfectly usable (for some contexts), only using Swift.
Thanks for reading. If you have any questions don’t hesitate to send me an email at [email protected].
This project is available to download from my GitHub account:

Comments 0 Responses