
AWS Amplify is a fantastic framework that helps you develop your web or mobile applications quickly. Not only does it enhances your current tech stack, but it actually has many built-in features that you don’t have to worry about, especially when your app is in the development process.
Features include:
- authentication
- GraphQL and REST API support
- storage
- S3 uploads
- a way to manage user pool
- hosting
- notifications
- interactions
- analytics
- compatibility to work with AWS Lambda functions
Beyond these features, Amplify can be integrated with most popular frontend frameworks like React, Vue, Angular, Ionic, React Native, or plain old vanilla JavaScript, if you’d like.
In this tutorial, we’re going to take a look at one of the most important features of an application: authentication. You know the scenario: You need to store some amount of user information (credentials) for them to get back and re-use the application rather creating a new account.
Amplify helps us integrate its authentication component out of the box. Don’t hate me for saying this. Now, if you have developed an application with a proper authentication flow, you know what a pain it is to write that amount of code. With Amplify, you’ll see how easy it is to integrate things like a new user’s email verification.
Enough with the introduction—let’s get started. If this is your first time reading about the Amplify framework and you want to learn more about what it is or how to integrate it with a React Native or Expo application, read my previous post 👇
It will walk you through basics such as What is Amplify?, How to create a new AWS IAM user, creating a GraphQL API with AppAsync, and so on.
Table of Contents
- Requirements
- Creating a new React Native App
- Create a new AWS IAM user
- Initializing & Integrating Amplify SDK
- Enable Amplify Auth Resource
- withAuthenticator: Adding a High Order Component
- Testing the default Amplify auth flow
- Conclusion
Requirements
Here’s a complete list of plugins, packages, and services you’re going to need in order to gain something from this tutorial:
- Nodejs v8.x.x or higher installed along with npm/yarn
- watchman: The file change watcher for React Native projects
- An AWS account
- Amplify CLI
- Expo CLI (previously known as create-react-native-app)
Creating a new React Native App
To get started, make sure you’ve already installed expo-cli. Now, open up a terminal window at a desired directory or location where you keep your demo projects and type the following and then press enter to execute:
expo init customize-amplify-auth-uiThis command will create a new directory called customize-amplify-auth-ui. You can name it whatever you want. Inside this directory, you’ll find a complete react native + expo SDK generated.
On running the above command, you’ll be asked by the CLI to make some choices by prompting some questions. I’ll be leaving them default.
Expo CLI is a command line utility to create React Native apps with no build configuration. The reason we’re relying on it is that, first, it’s an awesome tool for such use cases. Next, it will help us build this React Native app/project much faster for any mobile platform ( iOS or Android) than a traditional React Native project generated with react-native-cli.
This will save us time, but for now, you can go ahead with react-native-cli if you want to—but remember to run react native link when integrating Amplify with your React Native app.
Create a new AWS IAM user
Once you’re signed-in to the AWS console. Remember, you need to create a free AWS account and sign-in. If you haven’t done so already, go ahead do it.
Now, from your terminal window, execute the following command.
amplify configureThis will open up the AWS console dashboard. Go back to the terminal and press enter to continue. This will lead you through a bunch of questions in order to configure a user account to use Amplify with the React Native application. Lastly, it will provide you with a secret key and an access key. Go back to the terminal window and enter those keys.
Here’s a summary of questions prompted by the AWS Amplify CLI:
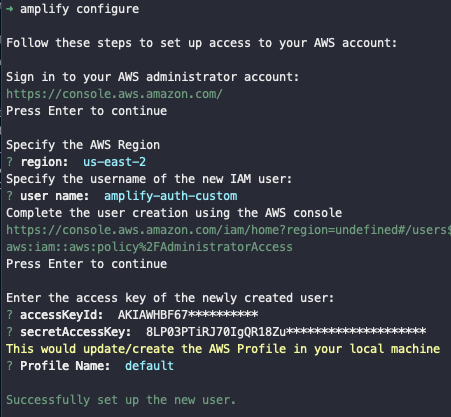
This process is easy, but if you’re going through it for the first time, I’d recommend that you give the below link a visit, and in only a few minutes you’ll realize how easy it is to set up a new IAM user for AWS services.
Initializing & Integrating Amplify SDK
To integrate AWS Amplify with the React Native app, run the following command that in return prompts you for some more questions. Later, in this section, we’ll install dependencies in the React Native app to complete this process.
Make sure you’re inside your React Native project directory and at the root of your project. This is required, as this command will add some configuration files:
amplify initOnce you run this command, you’ll be prompted with the following questions:
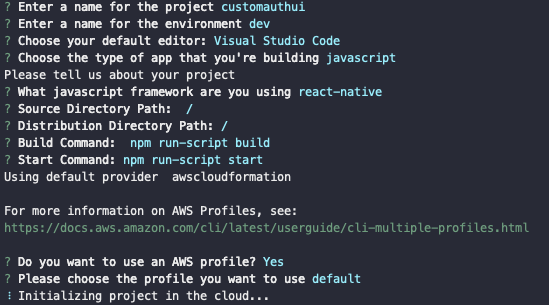
After the Amplify SDK initialization process is complete, you’ll notice there are some new file changes inside the project directory. A new directory amplify/, which stores any local or cloud changes, is added to the configuration files. Also, a new file called aws-exports.js appears at the root that doesn’t need to be committed over your Github account (always remember).
Make sure that the .gitignore file is up to date. Amplify CLI is so good that it will update this file for you and take care of what to commit (or not commit) from the configuration part.
This is just the initialization step. We need to integrate the Amplify SDK in order to tell our React Native app that we’re going to use the Amplify configuration and components in the app. To make this happen, install the following dependencies:
yarn add aws-amplify aws-amplify-react-nativeBoth of these packages are required. The package aws-amplify allows you to make requests to the auth and API services provided by AWS. The other one is framework-specific and contains ready-to-use UI components. After these dependencies are installed, open the App.js file and add the following:
import React from "react"
import { StyleSheet, Text, View } from "react-native"

// --- This is the part to add

import Amplify from "aws-amplify"
import config from "./aws-exports"

Amplify.configure(config)

// ---

export default class App extends React.Component {
	render() {
		return (
			<View style={styles.container}>
				<Text>React Native + Amplify = 💛</Text>
			</View>
		)
	}
}

const styles = StyleSheet.create({
	container: {
		flex: 1,
		backgroundColor: "#fff",
		alignItems: "center",
		justifyContent: "center"
	}
})
To verify that everything is on order and the app works fine, you can go ahead and run the npm start command. Then select which mobile platform you want to run. If there are no errors, you’ll see the following result:

Enable Amplify Auth Resource
To include authentication experiences in your React Native app, Amplify uses Amazon Cognito, which is a fully-featured user directory that handles user registration, login, and account recovery. Amplify interfaces with Cognito User Pools to store user information, including social providers like Facebook, Google, and so on.
Amplify gives you the superpower to generate an authentication flow by executing a command from the terminal window:
amplify add authOn running the above command, you’ll be prompted with the first question, as shown below:

This option is to choose the default authentication and security configuration. The second option to include a social provider like Facebook. Another option to look out for is manual configuration, about which you can read more at the official Amplify docs.

Next, it will prompt you to choose the default sign-in method. Choose Username.
Amplify’s command line interface is so interactive and detailed that it prompts you to provide input fields and select them from your terminal:

Choose Email. Now run the following command to publish all the local changes to AWS in order to create a user pool.
amplify pushYou’ll get the following screen after you execute the above command:
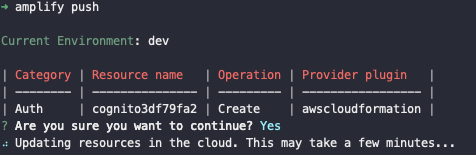
This shows the details of the current working environment (which we manually entered at the time of configuring AWS IAM user) and displays the status of the resource we’re currently using (Auth).
Executing this command to update the resources in order to enable and create a user pool will take some time. So go ahead, pause here, drink a cup of coffee. The user authentication setup is complete for now.
withAuthenticator: Adding a High Order Component
We’re now all set with configuration. Let’s now work with some app code. For React Native apps, the simplest way to add an authentication flow is to use withAuthenticator’s High Order Component.
Open up the file App.js and add the following:
import React from "react"
import { StyleSheet, Text, View } from "react-native"
import Amplify from "aws-amplify"
import config from "./aws-exports"

// New ----
import { withAuthenticator } from "aws-amplify-react-native"

Amplify.configure(config)

class App extends React.Component {
	render() {
		return (
			<View style={styles.container}>
				<Text>React Native + Amplify = 💛</Text>
			</View>
		)
	}
}

const styles = StyleSheet.create({
	container: {
		flex: 1,
		backgroundColor: "#fff",
		alignItems: "center",
		justifyContent: "center"
	}
})

// New ----
export default withAuthenticator(App, true)
This HOC wraps the App component. It automatically detects the authentication state and updates the UI. The withAuthenticator component renders the App component after a successful user sign-in, and it prevents non-sign-in users to interact with your app.
The second argument passed in this HOC is a boolean value that tells whether or not to enable the Sign Out button (once the user is successfully logged-in). You’ll see this in action later once we’ve created the user.
By default, on running npm start, you’ll get the Sign In screen like below:
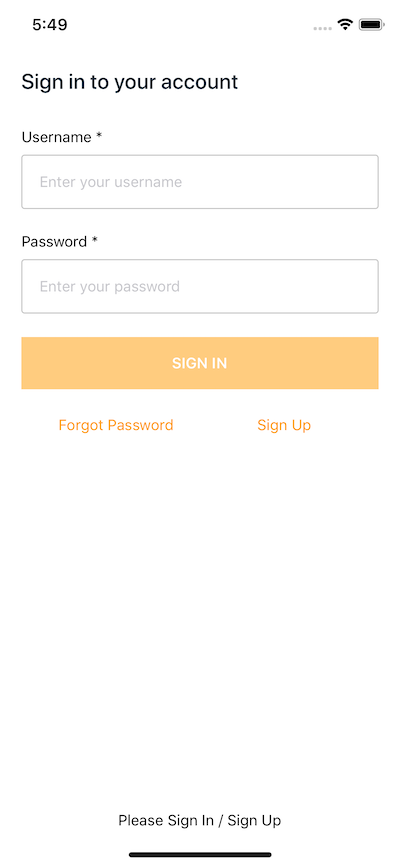
Note that right now, in the above screen, the SIGN IN button is disabled since the input fields are currently empty. These are common (but a good amount of) UI fragments included in the default flow. If you enter a username followed by a password, it even throws an error like below.
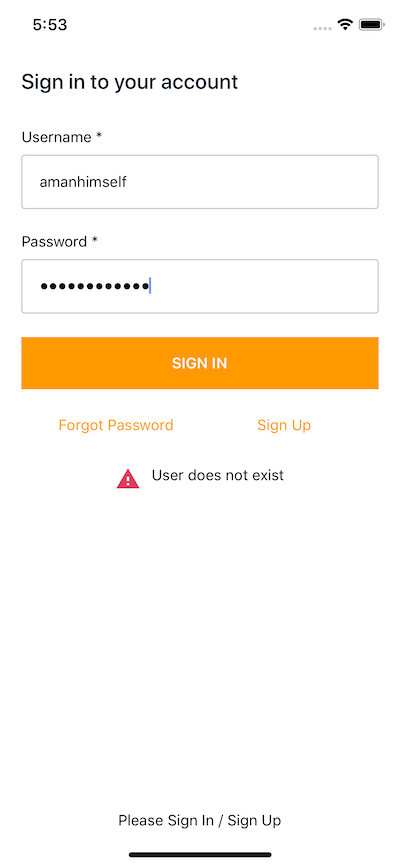
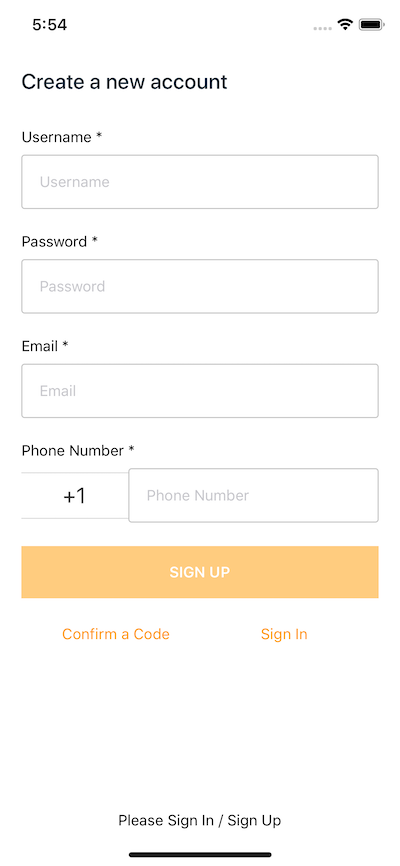
By clicking on the SIGN UP button, you’ll be taken to the registration screen.
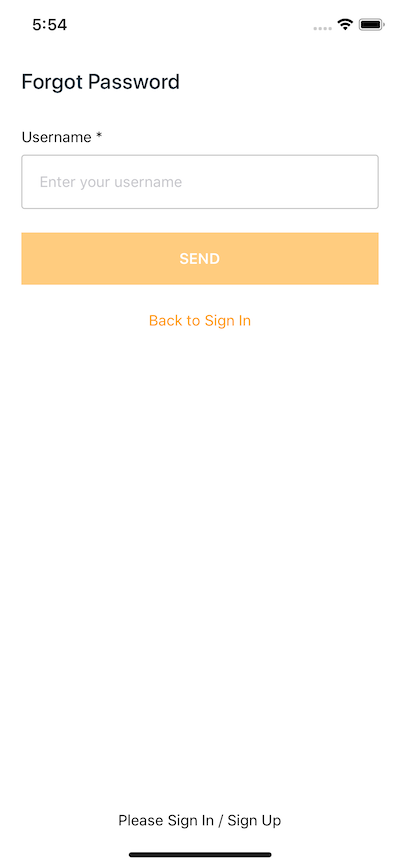
On clicking Forgot Password, you’ll end up at another screen that will ask you for the registered username.
If the user is signed in, the underlying component (in the current scenario, the App component) is displayed; otherwise sign in/signup controls are displayed. Also, did you notice that just by adding two lines of code, you have an authentication flow that looks pretty decent? In the next section, let’s see if it works or not.
Testing the default Amplify auth flow
Currently, there are no users registered to our app. So let’s register one. Create the button Sign Up and enter the details asked. Do note that, enter a valid email address for the AWS cloud service will send you an email to verify your account.
Once you are done, click the SIGN UP button at the end of the registration form. You will get the following screen asking for the confirmation/verification code.
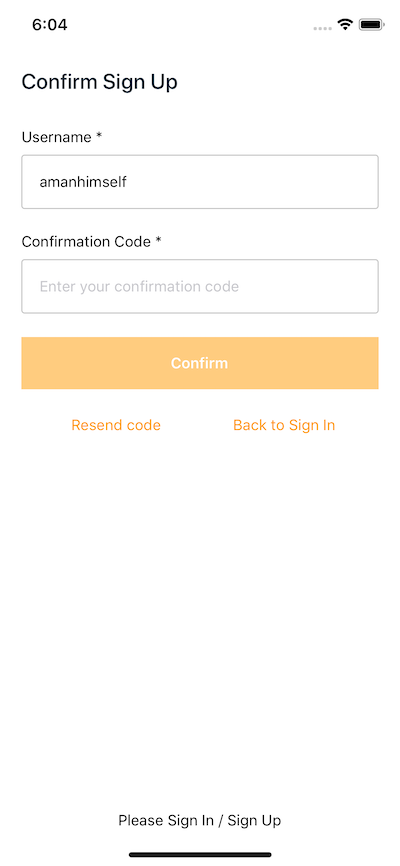
Enter the verification code and click the confirm button. If it’s confirmed, you’ll be directed back to the sign in screen. Enter the credentials to log in inside the app.
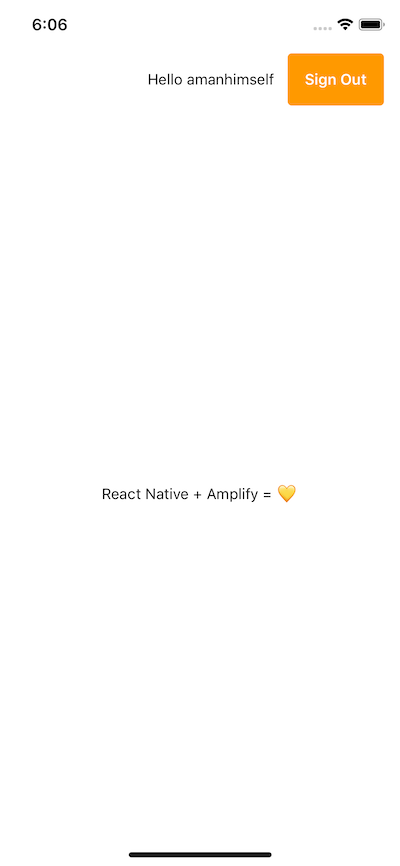
Notice how the Sign Out button appears in the top right corner next to the username. Yes, Amplify greets the user and has the code for it integrated already at withAuthenticator HOC. Do take note in the above screen that the App component is getting rendered now.
Conclusion
You’ve now successfully added an authentication flow with Amplify and used it in a React Native app. Try using the federation or social login flow and compare the similarities or differences between the two.
You can find the complete code for this post in the following GitHub repository.
If you enjoyed reading this tutorial, please leave a 👏. You can always connect with me on Twitter.

Comments 0 Responses