
Mobile devices are limited in their resources compared to PCs. Some calculations can be executed on such limited-resources devices. For example, doing some calculations on an image or a couple of images. As the number of images increases, however, the device may run out of RAM.
If a deep neural network, for example, is to be trained on a large dataset with thousands of images, mobile devices are not a great option for training; rather, we need to us a machine with much more resources.
Through a couple of tutorials, we’ll work through a project in which a pre-trained neural network is deployed to a server. The mobile device simply uploads images to the server to be classified by such a network so the device itself doesn’t have to run inference.
Through this tutorial, a project will be built in which an Android client-side application uploads an image to a server-based application created in Python using Flask. The HTTP requests and responses are handled in Android using OkHttp.
The tutorial starts by building a simple example in which the Android app just makes an HTTP POST message for sending a text. The Flask app receives this request and replies with a confirmation message that the connection is successful.
After that, the Android app is modified to upload an image to the Flask server. An image is selected from Android storage via an Intent. The selected image is converted into a byte array which is then received at the Flask server using its socket information (i.e. IPv4 address and port number). The received byte array is then converted into an image to be saved on the disk.
The implementation of this project is available on GitHub:
The structure of the tutorial is as follows:
- Building the layout of the Android app
- Using OkHttp for building the client-side Android app
- Building the server-side Python app using Flask
- Testing the connection between Android and Flask
- Selecting an image from Android storage
- Modifying the Flask app to save an uploaded image
Let’s get started.
Building the Layout of the Android App
This tutorial uses OkHtpp for establishing an HTTP connection to the Flask server. It’s a simple and recommended library for this purpose. Before talking about using OkHttp, let’s discuss the main activity layout. The Android activity layout XML file is listed below.
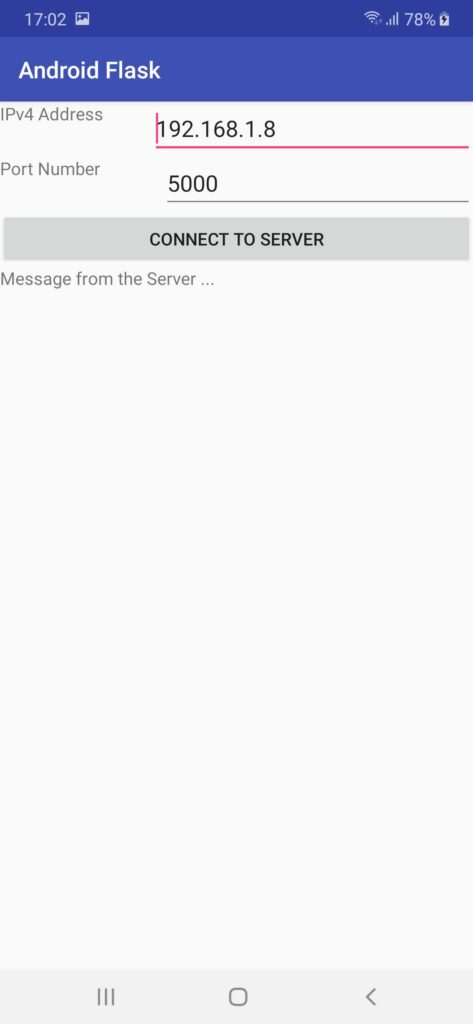
The layout has a total of 6 views (3 TextView, 2 EditText, and 1 Button). This is in addition to 2 LinearLayout views—1 as the layout root, and 2 others that will be discussed shortly.
The 2 EditText views are for receiving the Ipv4 address and port number from the user. The initial value for the Ipv4 address is 192.168.1.8 and 5000 for the port number. You can edit these values to match the ones used on the server. The entered values are accessed within the Java activity for building the URL of the server.
For each EditText view, there is an associated TextView for printing a label to direct the user to enter what’s expected in EditText. Each EditText and its associated TextView are grouped into a LinearLayout.
At the end of the layout, there’s a Button view. When clicked, a callback method named connectServer() is called, which establishes the OkHttp connection. Below this Button, there’s a TextView for displaying the state of the connection with the server. If the connection fails, then a message reflecting the failure is printed, and vice-versa for a successful connection.
<?xml version="1.0" encoding="utf-8"?>
<LinearLayout xmlns:android="http://schemas.android.com/apk/res/android"
    android:layout_width="match_parent"
    android:layout_height="match_parent"
    android:orientation="vertical">

    <LinearLayout
        android:layout_width="match_parent"
        android:layout_height="wrap_content"
        android:orientation="horizontal">
        <TextView
            android:layout_weight="1"
            android:layout_width="wrap_content"
            android:layout_height="match_parent"
            android:text="IPv4 Address" />
        <EditText
            android:layout_weight="4"
            android:layout_width="wrap_content"
            android:layout_height="match_parent"
            android:id="@+id/IPAddress"
            android:text="192.168.1.8" />
    </LinearLayout>

    <LinearLayout
        android:layout_width="match_parent"
        android:layout_height="wrap_content"
        android:orientation="horizontal">
        <TextView
            android:layout_weight="1"
            android:layout_width="wrap_content"
            android:layout_height="match_parent"
            android:text="Port Number" />
        <EditText
            android:layout_weight="4"
            android:layout_width="wrap_content"
            android:layout_height="match_parent"
            android:id="@+id/portNumber"
            android:text="5000"/>
    </LinearLayout>

    <Button
        android:layout_width="match_parent"
        android:layout_height="wrap_content"
        android:text="Connect to Server"
        android:onClick="connectServer"/>

    <TextView
        android:layout_width="match_parent"
        android:layout_height="wrap_content"
        android:text="Message from the Server ..."
        android:id="@+id/responseText" />

</LinearLayout>
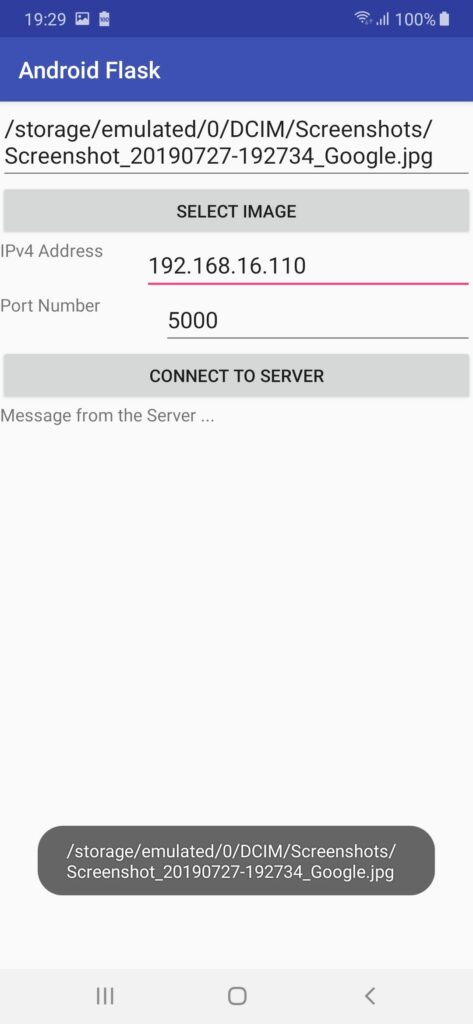
If the layout structure isn’t clear from the above discussion, then surely it will be clear from a screenshot from the Android app, as shown below:
After building the app user interface (UI), the next step is to implement the connectServer() callback method, which is responsible for establishing the connection using OkHttp.
Using OkHttp for building the client-side Android app
Before using OkHttp within the activity class, the project must support using it. To do that, the dependencies section of the build.gradle (app module) have to include the line below. When Gradle builds the project, the OkHttp library will be downloaded and you can start using it.
The implementation of the MainActivity class is listed below, in which OkHttp is used. As normal, the onCreate() method uses the setContentView() method for setting the layout of the activity. After that, the connectServer() callback method is implemented.
It starts by retrieving the IPv4 address and port number entered by the user as String variables. These values are used to create the server’s URL inside the postUrl String variable. Note that the address within this variable points to the homepage of the server.
After building the URL to which the HTTP message will be delivered, the next step is to build the message itself. An instance of the RequestBody class represents the message to be sent. If a new message is to be created, then an instance of this class is created using the RequestBody.create() method. This method accepts 2 arguments, as follows:
- Content type
- Content
The postBodyText String variable holds the content of the message that will be sent to the server. For this example, the content is just text. The type of content to be sent is declared in the mediaType variable, which is an instance of the MediaType class. Because a text message is to be sent, the type is set to “text/plain”.
After preparing the message to be sent, next is to send it to the server. For this purpose, a new method named postRequest() is created. Take note that to send the message to the server, it’s necessary to allow the app to know that the message prepared using the RequestBody class should be sent to the destination URL declared previously. Up to this point, there’s no way for the app to learn that. But don’t worry—the postRequest() method is created for that purpose. It accepts 2 arguments, which are:
- Destination URL
- Request Body
A bit later, these 2 arguments are associated together.
package com.example.dell.androidflask;

import android.support.v7.app.AppCompatActivity;
import android.os.Bundle;
import android.view.View;
import android.widget.EditText;
import android.widget.TextView;

import java.io.IOException;
import okhttp3.Call;
import okhttp3.Callback;
import okhttp3.MediaType;
import okhttp3.OkHttpClient;
import okhttp3.Request;
import okhttp3.RequestBody;
import okhttp3.Response;

public class MainActivity extends AppCompatActivity {

    @Override
    protected void onCreate(Bundle savedInstanceState) {
        super.onCreate(savedInstanceState);
        setContentView(R.layout.activity_main);
    }

    void connectServer(View v){
        EditText ipv4AddressView = findViewById(R.id.IPAddress);
        String ipv4Address = ipv4AddressView.getText().toString();
        EditText portNumberView = findViewById(R.id.portNumber);
        String portNumber = portNumberView.getText().toString();

        String postUrl= "http://"+ipv4Address+":"+portNumber+"/";

        String postBodyText="Hello";
        MediaType mediaType = MediaType.parse("text/plain; charset=utf-8");
        RequestBody postBody = RequestBody.create(mediaType, postBodyText);

        postRequest(postUrl, postBody);
    }

    void postRequest(String postUrl, RequestBody postBody) {

        OkHttpClient client = new OkHttpClient();

        Request request = new Request.Builder()
                .url(postUrl)
                .post(postBody)
                .build();

        client.newCall(request).enqueue(new Callback() {
            @Override
            public void onFailure(Call call, IOException e) {
                // Cancel the post on failure.
                call.cancel();

                // In order to access the TextView inside the UI thread, the code is executed inside runOnUiThread()
                runOnUiThread(new Runnable() {
                    @Override
                    public void run() {
                        TextView responseText = findViewById(R.id.responseText);
                        responseText.setText("Failed to Connect to Server");
                    }
                });
            }

            @Override
            public void onResponse(Call call, final Response response) throws IOException {
                // In order to access the TextView inside the UI thread, the code is executed inside runOnUiThread()
                runOnUiThread(new Runnable() {
                    @Override
                    public void run() {
                        TextView responseText = findViewById(R.id.responseText);
                        try {
                            responseText.setText(response.body().string());
                        } catch (IOException e) {
                            e.printStackTrace();
                        }
                    }
                 });
            }
        });
    }
}
Within the postRequest() method, a new instance of the OkHttpClient class is created. This class is the preferred way to establish HTTP connections for sending requests and reading responses.
According to the documentation of this class, OkHttp works well when a single OkHttpClient instance is created and reused for all HTTP calls. This is because creating a client for each connection wastes resources.
After creating the OkHttpClient instance, the next step is to create the HTTP request that will be sent throughout the HTTP connection. The request is created using the Request.Builder class. This class is responsible for mapping the destination URL with the request body. The url() method accepts the URL and the post() method accepts the request body. Finally, the request is built using the build() method.
After preparing the destination URL, message body, building the request by merging the URL and the message body, and creating an instance of the OkHttpClient for sending requests and receiving responses—the next step is to send the request via the instance of the OkHttpClient using a method called newCall(). It accepts a single argument, which is the request returned by the Request.Builder class. It schedules the request to be sent in the future using the enqueue() method. This is because there may be other requests waiting to be sent.
The newCall() method returns an instance of the Call interface. The Call interface represents a request waiting to be sent over the channel created using OkHttpClient.
There are 2 callback methods that could be called depending on the state of the call:
- onFailure(): Called when the request couldn’t be executed due to cancellation, a connectivity problem, or timeout.
- onResponse(): Called when the HTTP response is successfully returned by the remote server.
These 2 methods are implemented in this example. Both of these methods accept the call as an argument. The onResponse() method accepts another argument, which is the response from the server.
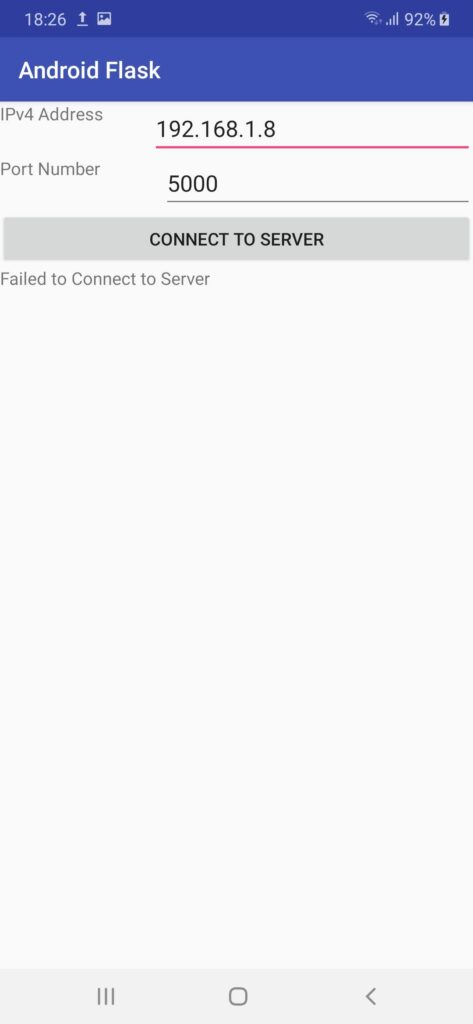
If the request fails, then the onFailure() callback method is called. Within it, the cancel() method is called to cancel the request. When the request fails, the last TextView in the activity layout is fetched, and its text is changed to reflect that there’s a failure.
On the other hand, when the connection is successful, the onResponse() callback method is called. Within it, the response from the server is returned using the body() method. Throughout this tutorial, the response is a text message. For converting the response body to a text message, the toString() method is called. Finally, this string is set as the text of the TextView.
After discussing the implementation of the client-side Android app, the next step is to test whether it works as expected, even before building the server. This is done by trying to send the request when the server is off. The result after clicking the button is shown below. A message reflecting the failure is printed. Great! Let’s continue building the Python HTTP server using Flask.
Building the server-side Python app using Flask
Flask is very simple framework for building an HTTP server. For this tutorial, the server is created in no more than 10 lines of code. For the current example in which a text message is sent from the server, the minimum code for implementing the server is given below.
To start, a Flask app is created as an instance of the Flask() class. The constructor of this call accepts a single argument representing the name of the app’s module. The module name could be returned using the __name__ special variable.
The app.route() decorator function associates a URL with a callback function. The URL entered in the route() function is /, which refers to the homepage of the server. Remember that the Android app requests sent to the homepage of the server.
When the user visits this homepage, the function directly below the route() is executed. In this case, the function is named handle_request(). The route() decorator also supports specifying the type of message to which the handle_request() method is listening to. By default, it just listens to messages of type GET. For our example, the Android app is sending a message of type POST, and thus the method of type POST must also be supported.
The handle_request() method does nothing except return a string. This return message is the response from the server, which will be sent back to the Android client.
import flask

app = flask.Flask(__name__)

@app.route('/', methods=['GET', 'POST'])
def handle_request():
    return "Flask Server & Android are Working Successfully"

app.run(host="0.0.0.0", port=5000, debug=True)
To specify the socket of the server (IPv4 address and port number to which the server listens for requests), the run() method is used. The host argument is used for specifying the IP address. When the host is set to “0.0.0.0”, this means use the current IPv4 address. The port number is specified in the port argument as 5000.
The debug argument is set to True to allow the server to restart itself for each change in the source code. If it’s set to False, then the server won’t be affected by the modifications you make to the code, and you’ll have to restart it manually to apply changes.
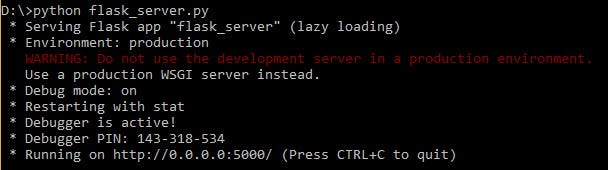
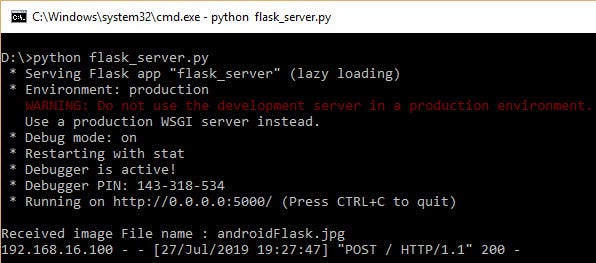
After building the server, the next step is to run it from the command line as shown in the next figure, using the python <file-name>.py command. I named the server file to flask_server.py. When the server prints that it’s Running on …, then it’s working properly and is ready for receiving requests. In the next section, we’re going to check the connection between the client and the server.
Testing the connection between Android and Flask
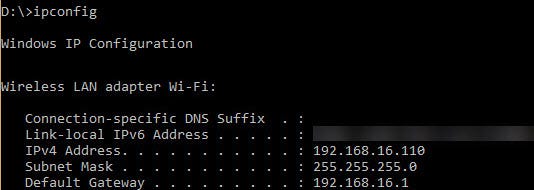
After preparing both the client (Android app) and server (Flask app), next we need to check to make sure they’re working properly. Before creating a request to the server, the client must use the current IPv4 address and port number used by the server. The port number of the server is set to a fixed number (5000), but we don’t know the current IPv4 address.
To determine the current IPv4 address, issue the ipconfig command (from Windows), as shown below. The IPv4 address is 192.168.16.110. It’s very important to make sure that both the Android phone and the development PC are connected to the same network because we’re using local IPv4 addresses. If they are connected to different networks, then the experiment will fail.
For simplicity, you can turn on the Android access point and connect your PC to it.
In the Android screen, take care to edit the IPv4 EditText to the value returned on your side. After making that, click the button to establish the connection and send the request. When the request is sent successfully from the client to the Flask server, the handle_request() function will handle the request and respond with the message in the return statement. The Android app will receive this message and print it, as shown below.
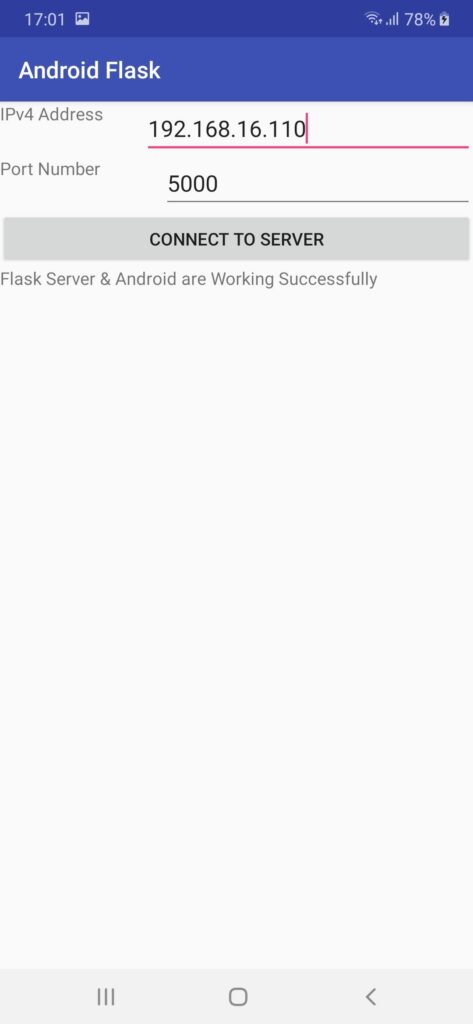
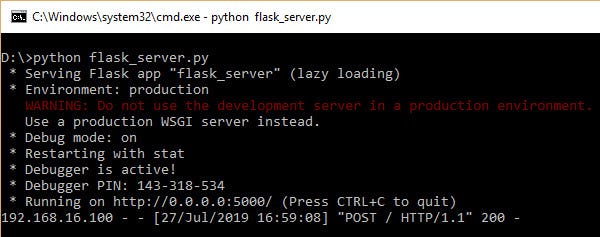
In the server-side Flask app, some information about the received message from the Android app is printed, as shown in the next figure. The information includes the following:
- Client IPv4 address which is 192.168.16.100
- Date and Time
- Message type which is POST
- HTTP version which is 1.1
- Connection status code which is 200, reflecting that the connection is successful
After making sure the channel between the client and the server is operational, next we need to edit both the client and the server to work with images. The client will upload an image rather than sending a text, and the server will be edited to receive an image and save it. The image saved on the server will be classified later after building the artificial neural network (ANN).
Selecting an image from Android storage
Before classifying an image, the image needs to be uploaded from Android and sent to the Flask server. Before uploading the image, it has to be selected from Android storage. This section discusses the implementation of this functionality.
In order to select an image, 2 new views are added at the beginning of the activity layout. The modified layout XML file is listed below.
<?xml version="1.0" encoding="utf-8"?>
<LinearLayout xmlns:android="http://schemas.android.com/apk/res/android"
    android:layout_width="match_parent"
    android:layout_height="match_parent"
    android:orientation="vertical">

    <EditText
        android:layout_width="match_parent"
        android:layout_height="wrap_content"
        android:id="@+id/imgPath"
        android:hint="Image Path Appears Here"/>

    <Button
        android:layout_width="match_parent"
        android:layout_height="wrap_content"
        android:text="Select Image"
        android:onClick="selectImage"/>

    <LinearLayout
        android:layout_width="match_parent"
        android:layout_height="wrap_content"
        android:orientation="horizontal">
        <TextView
            android:layout_weight="1"
            android:layout_width="wrap_content"
            android:layout_height="match_parent"
            android:text="IPv4 Address" />
        <EditText
            android:layout_weight="4"
            android:layout_width="wrap_content"
            android:layout_height="match_parent"
            android:id="@+id/IPAddress"
            android:text="192.168.1.8" />
    </LinearLayout>

    <LinearLayout
        android:layout_width="match_parent"
        android:layout_height="wrap_content"
        android:orientation="horizontal">
        <TextView
            android:layout_weight="1"
            android:layout_width="wrap_content"
            android:layout_height="match_parent"
            android:text="Port Number" />
        <EditText
            android:layout_weight="4"
            android:layout_width="wrap_content"
            android:layout_height="match_parent"
            android:id="@+id/portNumber"
            android:text="5000"/>
    </LinearLayout>

    <Button
        android:layout_width="match_parent"
        android:layout_height="wrap_content"
        android:text="Connect to Server"
        android:onClick="connectServer"/>

    <TextView
        android:layout_width="match_parent"
        android:layout_height="wrap_content"
        android:text="Message from the Server ..."
        android:id="@+id/responseText" />

</LinearLayout>
The activity screen is also shown below:
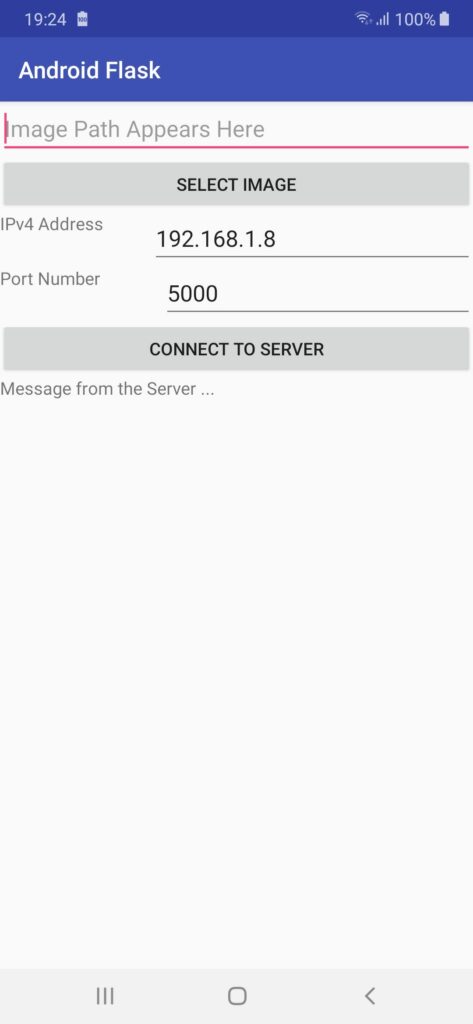
The first widget is an EditText view which allows the user to enter the absolute image path. To do that, you can use the File Explorer app, locate a target image, and then open its properties to find its path. The copied path is then pasted in EditText. For me, I won’t do that. Rather, I’ll use the new Button view added directly after the EditText view.
Clicking on that Button will call a method named selectImage(). The implementation of this method is listed below. It simply starts an Intent to select a file.
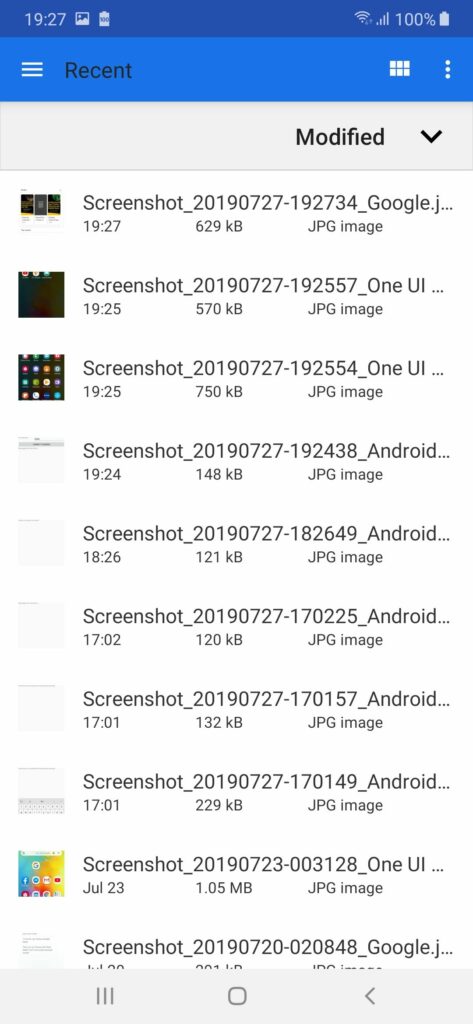
When the Intent starts, the File Explorer will be opened for selecting an image file, as shown below.
After selecting the image, the Intent makes a call to a callback method named onActivityResult(), which is implemented below. The URI of the selected image is retrieved and then passed to a method named getPath(). The implementation of this method is available on Stack Overflow.
The path of the selected file will be automatically printed in the EditText view, as given in the screenshot below. The path is saved into a class String variable named selectedImagePath. Once the “connect to server” button is clicked, the connectServer() method previously implemented will be called. But now, it’s been modified to upload an image rather than a text message.
The complete modified activity code is listed below. This includes the implementation of the getPath() method and the modified connectServer() method.
The difference between the modified connectServer() method and the previous one is building the request body. Rather than building the request body, everything is identical.
The selected image is read as a Bitmap using the BitmapFactory.decodeFile() method. To allow such a Bitmap to be sent in the HTTP message, it will be converted into a byte array. How do we do that conversion?
First, the Bitmap is converted into a byte stream (not array) using the ByteArrayOutputStream class. A stream of bytes is uploaded into chunks of 1024 bytes each. This method avoids storing all of the data into memory and just stores 1024 bytes at a time.
In our case, the entire byte stream is already stored in memory, and thus, using a byte stream isn’t useful. Remember that using a byte stream helps to avoid storing all of the data into memory when uploading it. Thus, we don’t need to upload the image as a byte stream but as a byte array to be sent as a whole part. To convert the byte stream into a byte array, the toByteArray() method is used.
After that, an instance of the RequestBody class is created. In the previous example, the request body was created using the RequestBody class. In this example, it will be created using the MultipartBody class, which supports sending multi-part data in the HTTP.
The type of the MultipartBody instance is set to MultipartBody.FORM, which makes it a regular form in HTML pages. That is, the form will have several fields, with each field having a unique name. To add a multipart object, the addFormDataPart() method is used. The addFormDataPart() method used in our example is a version that accepts 3 arguments:
- Field name: Field name that will be used at the server to retrieve the file.
- Filename: The filename of the uploaded file.
- Body: The content of the body as a RequestBody instance.
In our example, the field name is set to image and the file name is androidFlask.jpg. The RequestBody instance is created using the RequestBody.create() method, which accepts 2 arguments:
- Content type: Which is set to “image/*jpg” because we’re uploading a JPG image.
- Content: The image after being converted into a Byte array.
After preparing the request body using the MultipartBody class, everything else will be identical to the previous example. Specifically, the postRequest() method is called, an instance of the OkHttpClient class is created, the request is created using the Request class, a new call is created using the newCall() method, and finally the response from the server is received in the onResponse() callback method if the request is successful.
At this point, the Android app is ready, and we can move to the Flask app to modify it to accept an image.
package com.example.dell.androidflask;

import android.content.ContentUris;
import android.content.Context;
import android.content.Intent;
import android.database.Cursor;
import android.graphics.Bitmap;
import android.graphics.BitmapFactory;
import android.net.Uri;
import android.os.Build;
import android.os.Environment;
import android.provider.DocumentsContract;
import android.provider.MediaStore;
import android.support.v7.app.AppCompatActivity;
import android.os.Bundle;
import android.view.View;
import android.widget.EditText;
import android.widget.TextView;
import android.widget.Toast;

import java.io.ByteArrayOutputStream;
import java.io.IOException;
import okhttp3.Call;
import okhttp3.Callback;
import okhttp3.MediaType;
import okhttp3.MultipartBody;
import okhttp3.OkHttpClient;
import okhttp3.Request;
import okhttp3.RequestBody;
import okhttp3.Response;

public class MainActivity extends AppCompatActivity {
    String selectedImagePath;

    @Override
    protected void onCreate(Bundle savedInstanceState) {
        super.onCreate(savedInstanceState);
        setContentView(R.layout.activity_main);
    }

    void connectServer(View v){
        EditText ipv4AddressView = findViewById(R.id.IPAddress);
        String ipv4Address = ipv4AddressView.getText().toString();
        EditText portNumberView = findViewById(R.id.portNumber);
        String portNumber = portNumberView.getText().toString();

        String postUrl= "http://"+ipv4Address+":"+portNumber+"/";

        ByteArrayOutputStream stream = new ByteArrayOutputStream();
        BitmapFactory.Options options = new BitmapFactory.Options();
        options.inPreferredConfig = Bitmap.Config.RGB_565;
        // Read BitMap by file path
        Bitmap bitmap = BitmapFactory.decodeFile(selectedImagePath, options);
        bitmap.compress(Bitmap.CompressFormat.JPEG, 100, stream);
        byte[] byteArray = stream.toByteArray();

        RequestBody postBodyImage = new MultipartBody.Builder()
                .setType(MultipartBody.FORM)
                .addFormDataPart("image", "androidFlask.jpg", RequestBody.create(MediaType.parse("image/*jpg"), byteArray))
                .build();

        TextView responseText = findViewById(R.id.responseText);
        responseText.setText("Please wait ...");

        postRequest(postUrl, postBodyImage);
    }

    void postRequest(String postUrl, RequestBody postBody) {

        OkHttpClient client = new OkHttpClient();

        Request request = new Request.Builder()
                .url(postUrl)
                .post(postBody)
                .build();

        client.newCall(request).enqueue(new Callback() {
            @Override
            public void onFailure(Call call, IOException e) {
                // Cancel the post on failure.
                call.cancel();

                // In order to access the TextView inside the UI thread, the code is executed inside runOnUiThread()
                runOnUiThread(new Runnable() {
                    @Override
                    public void run() {
                        TextView responseText = findViewById(R.id.responseText);
                        responseText.setText("Failed to Connect to Server");
                    }
                });
            }

            @Override
            public void onResponse(Call call, final Response response) throws IOException {
                // In order to access the TextView inside the UI thread, the code is executed inside runOnUiThread()
                runOnUiThread(new Runnable() {
                    @Override
                    public void run() {
                        TextView responseText = findViewById(R.id.responseText);
                        try {
                            responseText.setText(response.body().string());
                        } catch (IOException e) {
                            e.printStackTrace();
                        }
                    }
                 });
            }
        });
    }

    public void selectImage(View v) {
        Intent intent = new Intent();
        intent.setType("*/*");
        intent.setAction(Intent.ACTION_GET_CONTENT);
        startActivityForResult(intent, 0);
    }

    @Override
    protected void onActivityResult(int reqCode, int resCode, Intent data) {
        if(resCode == RESULT_OK && data != null) {
            Uri uri = data.getData();

            selectedImagePath = getPath(getApplicationContext(), uri);
            EditText imgPath = findViewById(R.id.imgPath);
            imgPath.setText(selectedImagePath);
            Toast.makeText(getApplicationContext(), selectedImagePath, Toast.LENGTH_LONG).show();
        }
    }

    // Implementation of the getPath() method and all its requirements is taken from the StackOverflow Paul Burke's answer: https://stackoverflow.com/a/20559175/5426539
    public static String getPath(final Context context, final Uri uri) {

        final boolean isKitKat = Build.VERSION.SDK_INT >= Build.VERSION_CODES.KITKAT;

        // DocumentProvider
        if (isKitKat && DocumentsContract.isDocumentUri(context, uri)) {
            // ExternalStorageProvider
            if (isExternalStorageDocument(uri)) {
                final String docId = DocumentsContract.getDocumentId(uri);
                final String[] split = docId.split(":");
                final String type = split[0];

                if ("primary".equalsIgnoreCase(type)) {
                    return Environment.getExternalStorageDirectory() + "/" + split[1];
                }

                // TODO handle non-primary volumes
            }
            // DownloadsProvider
            else if (isDownloadsDocument(uri)) {

                final String id = DocumentsContract.getDocumentId(uri);
                final Uri contentUri = ContentUris.withAppendedId(
                        Uri.parse("content://downloads/public_downloads"), Long.valueOf(id));

                return getDataColumn(context, contentUri, null, null);
            }
            // MediaProvider
            else if (isMediaDocument(uri)) {
                final String docId = DocumentsContract.getDocumentId(uri);
                final String[] split = docId.split(":");
                final String type = split[0];

                Uri contentUri = null;
                if ("image".equals(type)) {
                    contentUri = MediaStore.Images.Media.EXTERNAL_CONTENT_URI;
                } else if ("video".equals(type)) {
                    contentUri = MediaStore.Video.Media.EXTERNAL_CONTENT_URI;
                } else if ("audio".equals(type)) {
                    contentUri = MediaStore.Audio.Media.EXTERNAL_CONTENT_URI;
                }

                final String selection = "_id=?";
                final String[] selectionArgs = new String[] {
                        split[1]
                };

                return getDataColumn(context, contentUri, selection, selectionArgs);
            }
        }
        // MediaStore (and general)
        else if ("content".equalsIgnoreCase(uri.getScheme())) {
            return getDataColumn(context, uri, null, null);
        }
        // File
        else if ("file".equalsIgnoreCase(uri.getScheme())) {
            return uri.getPath();
        }

        return null;
    }

    public static String getDataColumn(Context context, Uri uri, String selection,
                                       String[] selectionArgs) {

        Cursor cursor = null;
        final String column = "_data";
        final String[] projection = {
                column
        };

        try {
            cursor = context.getContentResolver().query(uri, projection, selection, selectionArgs,
                    null);
            if (cursor != null && cursor.moveToFirst()) {
                final int column_index = cursor.getColumnIndexOrThrow(column);
                return cursor.getString(column_index);
            }
        } finally {
            if (cursor != null)
                cursor.close();
        }
        return null;
    }

    public static boolean isExternalStorageDocument(Uri uri) {
        return "com.android.externalstorage.documents".equals(uri.getAuthority());
    }

    public static boolean isDownloadsDocument(Uri uri) {
        return "com.android.providers.downloads.documents".equals(uri.getAuthority());
    }

    public static boolean isMediaDocument(Uri uri) {
        return "com.android.providers.media.documents".equals(uri.getAuthority());
    }
}
Modifying the Flask app to save an uploaded image
The modified Flask app is listed below. Inside the handle_request() function, the uploaded image can be retrieved from the MultipartBody form sent from the Android app. The uploaded files are stored into the “files” dictionary, which can be accessed using flask.request.files. The filename specified in the Android app, which is “image”, will be used to index this dictionary and return the uploaded image file.
The preferred way to return the file name associated with the file is to use the werkzeug.utils.secure_filename() method. The file name will be printed and then can be saved using the save() function. The file will be saved in the current directory. Finally, a message is sent back to the Android app using the return statement.
import flask
import werkzeug

app = flask.Flask(__name__)

@app.route('/', methods = ['GET', 'POST'])
def handle_request():
    imagefile = flask.request.files['image']
    filename = werkzeug.utils.secure_filename(imagefile.filename)
    print("nReceived image File name : " + imagefile.filename)
    imagefile.save(filename)
    return "Image Uploaded Successfully"

app.run(host="0.0.0.0", port=5000, debug=True)
Note that there’s much more to do, such as making sure there’s a valid file sent from the client to be uploaded. You can look for such extensions to make your app more powerful.
After completing the Flask app implementation, it’s now ready to receive files from the Android app to be uploaded. Let’s test both apps.
The user clicks the “Connect to Server” button, which establishes a connection with the Flask app. Remember to enter the IPv4 address and port number to match those used by the server.
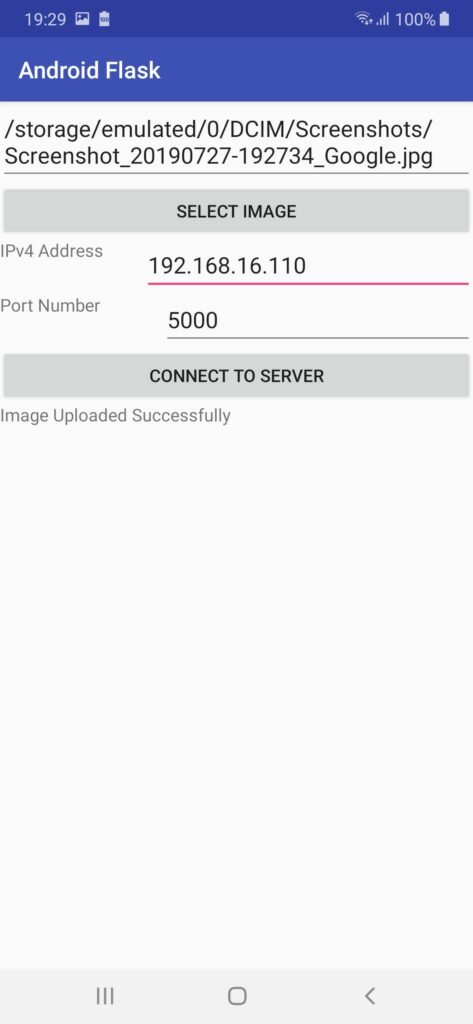
After the connection is established, an HTTP POST message is sent by the Android app with the target image to be uploaded. If the file is uploaded successfully, then a confirmation message will be printed in the TextView, as shown in the next figure.
In the server-side Flask app, the next figure confirms that a message from the client is received successfully, because the status code is 200. Also, the file name is printed, which is flaskAndroid.jpg. Remember that this is the file name specified in the form created within the Android app using the MultipartBody class. Because the same name is used for every image being uploaded, the uploaded image will overwrite the previously uploaded one.
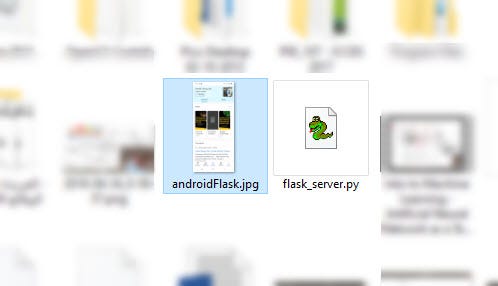
Checking the directory in which the Python file of the Flask app resides (flask_server.py in my case), you can find the uploaded image, as shown in the next figure:
Conclusion
This tutorial discussed how to upload an image from an Android client app to a Python server created using Flask. For managing HTTP connections in Android, the OkHttp library is used.
By being able to send and receive data between a client with limited resources to a server with better resources, it’s possible to allow the server to make calculations that require intensive processing and simply return the result to the client. For example, a pre-trained ANN can run on the server and classify images received from the client. This will be demonstrated in another tutorial.

Comments 0 Responses