
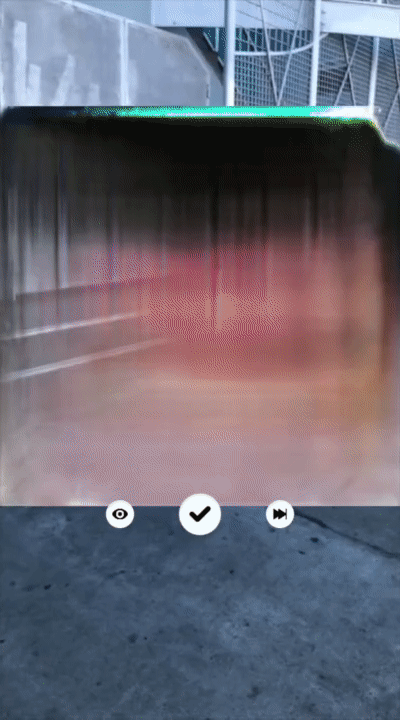
Cat Face is the latest SnapML-powered Lens built by the team at Fritz AI. The Lens lets users draw photo-realistic cats and wear the result like a mask. If you haven’t already, try it out for yourself here:

Introduction: Model and Deployment Target
In this post, I’ll cover the process I went through to train a modified Pix2Pix GAN and publish it in a Snapchat Lens. I modified the model architecture to satisfy a set of constraints unique to Snapchat, cleaned a dataset of cat face images that I used to train the model, and ran the model in an ML Component in a Snapchat Lens.
The Pix2Pix Model
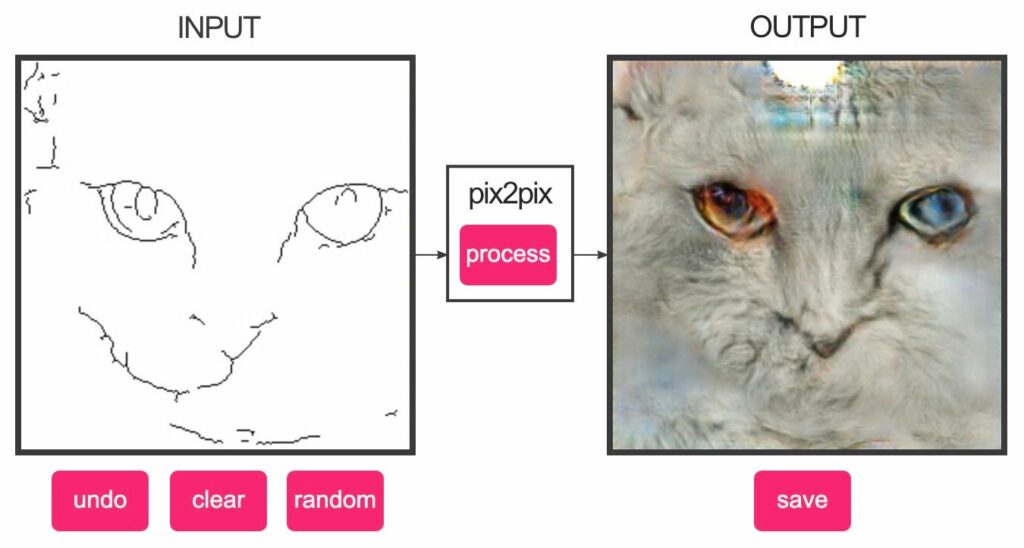
I was inspired to reproduce this interactive cat generator made with the Pix2Pix model described in the paper titled Image-to-Image Translation with Conditional Adversarial Nets. The model takes a sketch of a cat and produces a photo-realistic version as output.
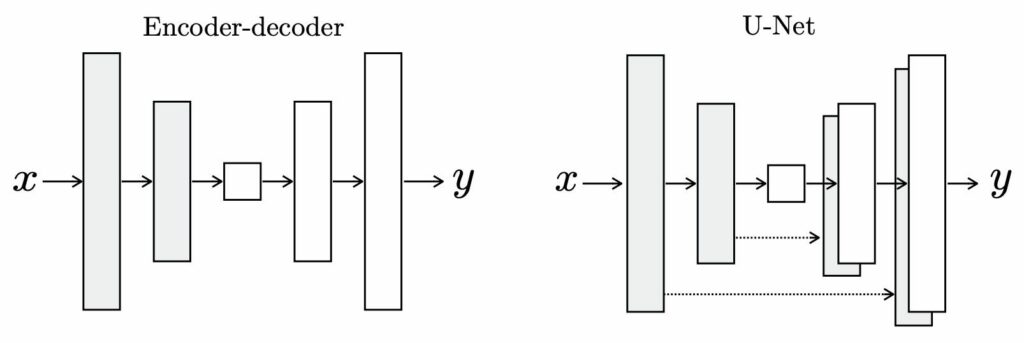
The Pix2Pix generator architecture is similar to the U-Net architecture. It features an encoder/decoder network with skip connections. I implemented Pix2Pix in Keras because ultimately we need to convert it to TensorFlow Lite to import it into Lens Studio and put it in a Snapchat Lens. I found this official TensorFlow tutorial to be a useful reference while implementing the model, although I ended up making quite a few modifications, which I’ll get into later.
SnapML Constraints
SnapML places a few constraints on the Pix2Pix GAN architecture. Only certain layer types and operations are supported and the final model needs to be small enough and fast enough for use in a Snap Lens.
Model File Format
There are a few supported file formats for SnapML: Open Neural Network Exchange (.onnx), TensorFlow Frozen Graph (.pb), and TensorFlow Lite (.tflite). Of those, TensorFlow Lite is the easiest to work with in my opinion, but if you are developing a model in pytorch, ONNX may be the way to go.
Model File Size
The model file (architecture and weights) must be less than 10 MB. Other Lens assets (e.g. textures, 3D models) do not contribute to this limit.
Frame Rate
According to the official performance requirements, iOS Lenses should run at 27 FPS at a minimum on iPhone 6 and higher, and Android Lenses should run at 15 FPS at a minimum on Samsung Galaxy S6 and higher.
Neural Network Layer Restrictions
Not all neural network layers are supported in SnapML, and some layers are only supported for certain hardware like the CPU or GPU. Sometimes there are issues with importing models into Lens Studio even though all the layers are supposed to be supported — you might have to hack around some unexpected compatibility issues (more on that later).
Compatibility Drift
Unfortunately, Lens Studio updates are not consistently backwards compatible with respect to SnapML — the same model that imports into the current version of LS might not import after updating, so be careful if your project timeline spans Lens Studio releases.
Model Architecture
In this section, I’ll go over the modifications I made to the Pix2Pix generator architecture to satisfy the model size and neural network layer constraints outlined in the previous section.
Alpha Hyperparameter
The Pix2Pix model as described in the paper ends up being about 200 MB, which is 20x too big for Snapchat. As a first step towards reducing the model size, I borrowed the concept of a model shrinking factor (called alpha) from MobileNet. This parameter controls the number of filters used in a convolution layer. For example, if the default number of filters for the first three layers were 32, 64, and 128, an alpha value of 0.5 would mean that those layers would instead use 16, 32, and 64 filters, respectively. By reducing the number of filters in the convolution layers, the number of parameters in the model decreases, and that will help us get the model size closer to the required 10 MB from the original 200 MB. In my early experiments, I found that the alpha parameter alone was not enough to produce a flexible model under the 10 MB limit, so I looked for other opportunities to squeeze performance out of the model while shrinking it. It turns out that separable convolutions help a lot in that regard.
Separable Convolutions
There are two types of convolutions used in Pix2Pix. The encoder portion of the network uses regular convolutions with a stride of 2 for downsampling the input image. The decoder uses transposed convolutions to upsample the encoder output. Separable convolutions — a factorized type of convolution layer that cuts down on the number of parameters needed — can be used in place of both regular and transposed convolutions. For regular convolutions, separable convolutions are a drop-in replacement, and in the Pix2Pix case, we just need to make sure the stride is set to 2 to perform the downsampling properly. For transposed convolutions, which are essentially an upsampling layer with learned weights, we can replace them with a nearest-neighbor upsampling layer followed by a separable convolutional layer. The end result is a network with a much smaller number of parameters that still retains enough flexibility to learn what a cat looks like. By using separable convolutions in place of regular convolutions and transposed convolutions, I was able to shrink the model down to 20 MB.
One other benefit of using separable convolutions in this model is that I was able to sidestep an unexpected layer compatibility issue. According to this list of compatible layers, I should be able to use transposed convolutions in the model, but this was broken for me. Sometimes the low-level representation of neural network operations in the model file (.tflite in this case) are different from what Lens Studio is expecting. These representations are difficult to modify and debug. Lens Studio could be more flexible in handling issues like these to ensure a robust and complete compatibility with the layers they claim to support, but alas, separable convolutions are a good workaround for this model.
Weight Quantization
Finally, another technique that is useful for shrinking models is weight quantization. Typically, each weight and bias in a neural network is stored as a 32-bit floating point number, which is often way more precise than necessary. Converting the weights to 16-bit floats cuts the size of the network in half, while usually preserving the predictive performance very well. That takes us from 20 MB down to 10 MB, which is the largest the model can be in a Snapchat Lens. In the case of SnapML, we actually get the weight quantization for free when the model is imported into Lens Studio.
Training Data
Pix2Pix requires paired training data where each example consists of one image from domain A and a corresponding image from domain B. The model’s task is to translate an input image from domain A into domain B. In general, there is a wide range of choices for these two domains, but the output domain often consists of real images.

When the output domain is made up of real images, you may be able to generate the corresponding image in the input domain without human labeling. For example, if you were trying to train a model to translate a black-and-white image to a color image, you could start with a dataset of full color images and convert them to grayscale to generate the image pairs. In our case, we want to generate realistic cat faces from a simple outline. I’ll describe how I built that dataset in the following sections.
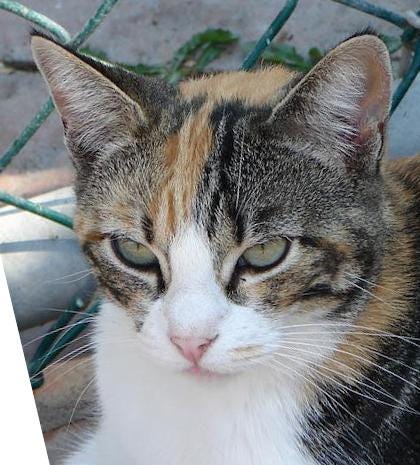
Images of Cat Faces (Output Domain)
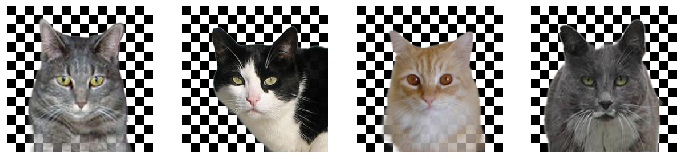
For training data, I used this Kaggle dataset of annotated cat images with nine keypoint annotations per cat: left eye, right eye, mouth, and three keypoints for each ear.
Here are the automated preprocessing steps I followed:
- Rotate the image so that they eyes lie on a horizontal line
- Crop the image to the cat’s face (discard if the face is too small)
- Pass the image through a pre-trained salient object detection model to remove the background (discard if two few pixels are segmented)

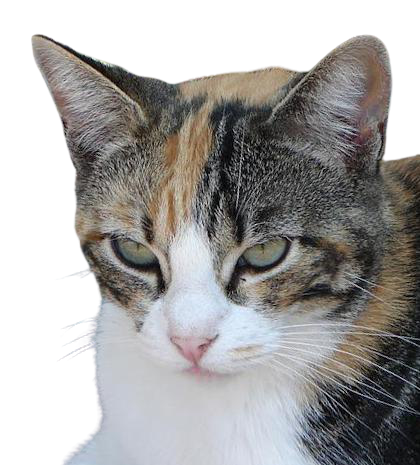
The third step is necessary because we are training a tiny model and we want it to focus its limited resources on generating cat faces, not cat faces and backgrounds. This is different from models like the one used to make thispersondoesnotexist.com because those models have a much higher capacity and are trained with much larger datasets so they have no problem generating a background behind the face.
After going through these automated data processing steps, I manually inspected the remaining images and removed any undesirable images — ones that are blurry, have bad segmentation masks, closed eyes, objects in front of the cat, etc.
Edge Images (Input Domain)
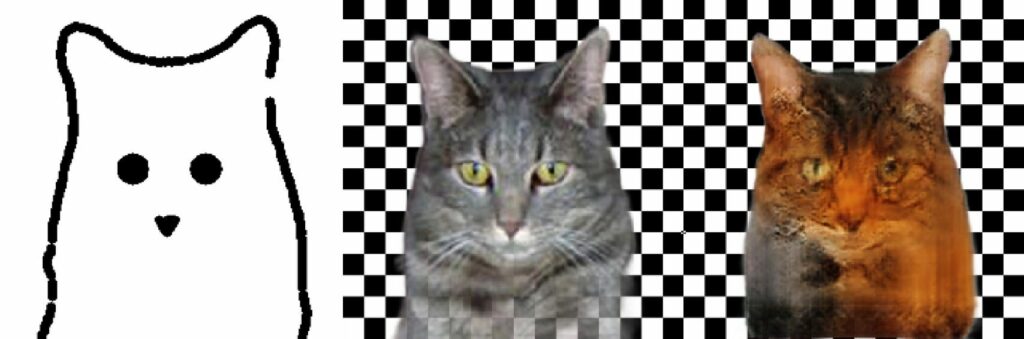
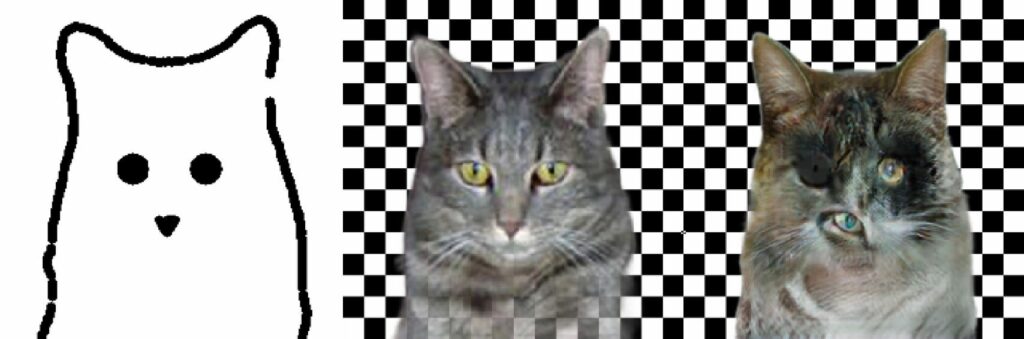
The edge images from the applications in the Pix2Pix paper are quite intricate. The authors use Holistically-Nested Edge Detection (HED) with some additional post-processing steps to reduce RGB images to black-and-white edge images. For the cat-generating Lens, the inference-time edge images are going to be hand-drawn by Snapchat users, so we want the training edge images to mimic something that can be easily drawn with a finger.
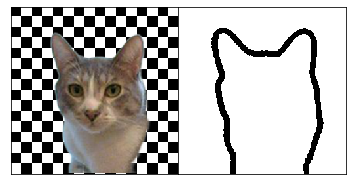
To generate edge images with the outline of the cat, I first performed Holistically-Nested Edge Detection followed by Canny edge detection on the HED output. There is probably a less computationally expensive way to get similar output, but my dataset was small enough that I could run this on my laptop in a reasonable amount of time. Once I had outlines of the cats, I used the eyes and mouth keypoint annotations to draw circles for the eyes and a triangle for the nose.
Data Augmentation
There are a few important considerations regarding data augmentation for Pix2Pix. The first is that you should make sure that geometric augmentations (e.g. cropping, flipping, rotating, etc.) are applied to pairs of images so that real images and the corresponding edge images are augmented in the same way. The second is that you shouldn’t perform augmentations that produce examples outside of the distribution that you want to generate — augmentations such as aggressive color shifts, brightness adjustments, or blurring may be beneficial for other types of computer vision models, but we don’t want the generator to learn to produce images with those qualities.
Model Training
In this section, I’ll cover an assortment of hyperparameter adjustments, “GAN hacks”, and other model training considerations that were interesting to me.
Generator Encoder/Decoder and Discriminator Alpha Values
Earlier, I described the alpha hyperparameter that we can use to control the number of filters used in the convolutional layers of the network. After switching to separable convolutions, I found that I could use an alpha value as high as 1.2 while remaining under the 10 MB limit. The separable convolutions aren’t as flexible as the regular convolutions and transposed convolutions they are replacing, so I still needed to squeeze out more performance. I ended up configuring the model in a way where I could specify a one alpha value for the encoder portion of the generator and another for the decoder portion. I settled on an alpha of 0.4 for the encoder (based on the assumption that the model would need fewer parameters to encode the simpler edge images) which left me with an alpha of 2.0 for the decoder. The architecture doesn’t break with these asymmetric alpha values because the resolution of the feature maps connected by the skip connections does not change. It’s also worth noting that since I restricted the generator by using separable convolutions and making it smaller, the discriminator also needs to be restricted to help keep the GAN balanced. I settled on an alpha of 1.0 for the discriminator.
Loss Functions
I experimented with a couple different loss functions: binary cross-entropy (BCE), and Wasserstein loss (W-loss). The Pix2Pix paper uses BCE loss, but GANs trained with BCE loss are susceptible to vanishing gradients which occur when the discriminator is too confident (i.e. when it predicts values close to 0 or 1). Using W-loss can help with the vanishing gradient problem because, unlike BCE loss, it does not require the discriminator to have a sigmoid output activation function (which is flat at the extremes, hence the vanishing gradients). I tried training the Pix2Pix model with W-loss, but it was still unstable so I decided to stick with BCE and implement some other gan hacks instead.
GAN Hacks
GANs are made up of two models — a generator and a discriminator — that compete with one another. Initially, the generator produces random noise, and the discriminator makes a random guess as to whether an image is real or fake. In theory, both models should eventually improve to the point where the generator can produce realistic looking examples. In practice however, training GANs is difficult in part because the generator and discriminator can easily become unbalanced with respect to one another. If the discriminator becomes too strong relative to the generator, it can no longer pass useful feedback to the generator (in the form of gradients), so the training plateaus.
My training runs weren’t producing good output, so I tried to slow down the discriminator by adding noise to the images and the labels as recommended in this collection of GAN hacks.
Add Noise to Real and Fake Images
If the discriminator learns too quickly, that means it can easily separate the distribution of fake images produced by the generator from the distribution of real training images. The intuition behind adding noise to the images is that it makes those two distributions more similar, which makes the discriminator’s job harder and buys time for the generator to catch up. I experimented with adding random normal noise (that linearly annealed to no noise after 100 epochs or so) to the images before feeding them into the loss functions, and while that did stop the discriminator from dominating early on, the resulting cats didn’t look great and the model suffered from mode collapse. However, I had better luck with label smoothing.
Label Smoothing
The idea behind label smoothing is to discourage the discriminator from being too confident with its predictions. If the discriminator is too confident, you will run into vanishing gradients, the generator will stop learning, and the discriminator loss will drop close to 0. The discriminator is typically trained on batches of real images with a label of 1.0 and fake images with a label of 0.0. When applying label smoothing, we soften the binary labels by sampling a random float from a range instead (e.g. 0.0–0.3 for fake images, 0.7–1.0 for real images). I found that performing one-sided label smoothing worked best to stabilize training for the task at hand. I kept the fake cat labels at 0.0, and sampled from 0.8–1.0 for the real cats. This did stop the discriminator loss from going to 0, but that doesn’t guarantee that the generator is learning (although, it turns out it was). Ultimately, I found visualizing model output during training to be more helpful than looking at loss curves to monitor training progress.
Visualization in TensorBoard
Watching the values of the loss functions of a GAN during training can offer some insight, but the actual values depend on the changing state of the generator and discriminator so there isn’t really a concept of a “good” loss value. Visualizing the model output is a good idea in general, but especially for GANs whose loss values are not highly interpretable.
Building a Lens
Once I had a model that would load and run in an ML Component in Lens Studio, the next task was to build a Lens that would allow Snapchat users to interact with the model. At Fritz AI, we already built a Clone to Face Lens (that extended our Clone Lens) that creates a cutout of an object and puts it on your face. I decided to go with a similar UX, so that meant I just needed to implement the user input part of the Lens (i.e. enable users to draw edge images that the model will turn into realistic cats). A user starts out by drawing the outline of a cat head, and once they are happy with the model output, they can turn it into a sticker and put it on a human face. I won’t get into too much detail on how I built the Lens, but I’ll go over a few design choices I made.
Design Choices
Inference Frequency
Initially, I planned to have the Lens run the model only once when the user was done editing the cat outline, but when I first tested the model, I forgot to configure that and the model ran on every frame by default. This ended up being a happy accident — it was interesting to see the model run in real time while editing the cat head outline, eyes, and nose. The Lens did not pass the FPS requirements on lower-end phones, so I lowered the inference frequency to 8 Hz which was close enough to real-time without being too choppy.
RGB vs. RGBA
Pix2Pix outputs 3-channel RGB images by default. I was able to train a model that produced RGB cat faces with white backgrounds, but I didn’t want the white background to show up in the Lens. To get rid of the background, I used a chroma key shader, but that either left too many white pixels near the edge of the cat or removed details within the cat (like reflections in the eyes and white fur). To get around this, I modified the model architecture to produce 4-channel RGBA images and trained a new model using images of cats with transparent backgrounds.
Trace vs. Freehand
Once the model was in a working version of the Lens, I personally was able to draw edges that resulted in realistic-looking cats, but other people that tested it for me had difficulty. I realized that I wasn’t really a typical user of the Lens because I had been staring at the training data so I knew what types of edges to draw to get the model to work well. Perhaps a larger model would have been able to generate high quality cats on a wider range of inputs, but that was not an option because of the strict 10 MB limit, so I opted for a UX change to make the model more user-friendly. I gave users the option to trace some example edges to point them in the right direction. This ended up helping a lot because the edges the model was trained on are quite different from what a typical person would draw if you asked them to sketch a cat (as you can see in Google’s Quick, Draw! dataset).
Future Iterations
CycleGAN
One could potentially leverage the Quick, Draw! dataset to build a similar model using CycleGAN. Like Pix2Pix, CycleGAN performs image-to-image translation, but unlike Pix2Pix, CycleGAN does not require paired images for training examples. Instead, CycleGAN makes use of two “piles” of images, so we could reuse the cat images I already have for one domain, and sketches of cats from Quick, Draw! for the other domain.
User Input Mechanism
The method I went with to capture user input (i.e. the edges they drew) involves moving a sphere around based on where they touch the screen. The sphere is invisible to the user but visible to a camera within the Lens, which allows the path that the user traced to be rendered to a texture that is ultimately used as input for the model. The drawback to this method is that if the user moves their finger too quickly across the screen, there will be gaps in the curve they make. Another method that I explored briefly was to create a procedural mesh. Using a procedural mesh would solve the gap problem associated with the other method I described, but the procedural mesh method is much more complicated to implement and comes with problems of its own. I wish Snap would make the marker/pen drawing UI accessible to Lens Creators — that would make the process of capturing a user’s drawing input a whole lot less painful.
Conclusion
I hope you enjoyed this post! I ended up in a different place than I thought I would at the beginning, but I’m happy with how things turned out. The problems on the ML engineering side of things were the most interesting and fun to work on for me. If you are a data scientist or ML engineer looking to do something similar, I recommend pairing up with someone who has experience building Lenses, or at least checking out this list of Lens Studio resources. I was lucky enough to have some teammates that helped me a lot in that part of the process. Happy coding, and be patient with your GANs!

Comments 0 Responses