
In this series, we’re learning about SwiftUI by making a profile page. And so far, we’ve accomplished a very simple—yet stylish—profile for ourselves in just a few paragraphs of code!
To get caught up, you can check out parts 1 and 2 of the series here:
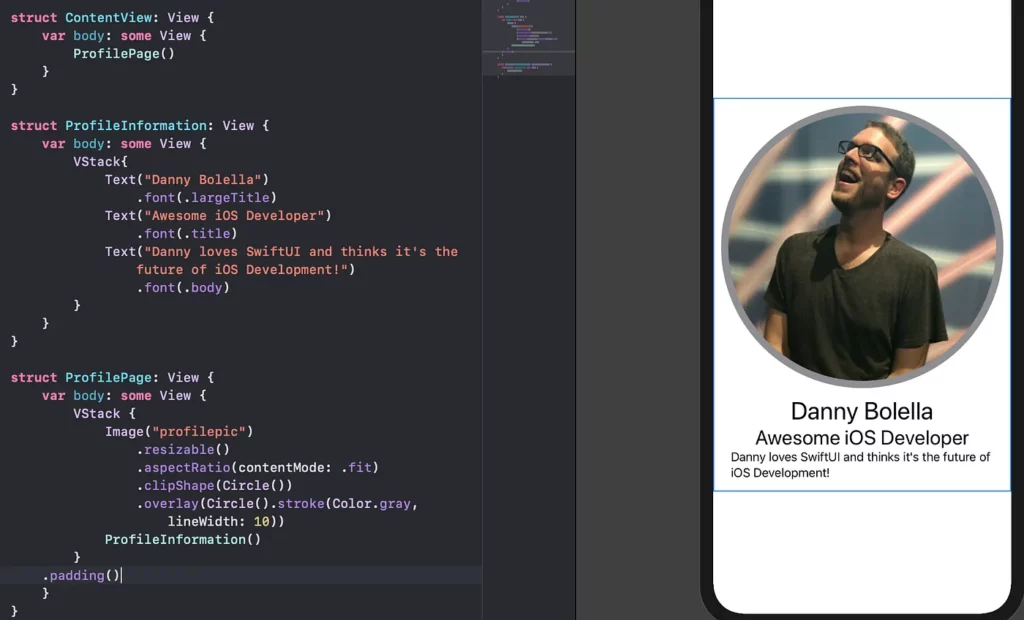
Returning to the screenshot of our profile page above— this is just a static profile page for ourselves. Today, we’ll cover how we can make our UI more dynamic by allowing it to take in parameters and Bindings so we can make it work for any person we pass in!
Parameterizing our Custom View
First, let’s identify the areas we want to parameterize:
- Name
- Subtitle
- Description
- Picture
Knowing that, let’s pull out the currently hardcoded values and replace them with variables/parameters:
And:
Then, we swap out our hardcoded values in our views (e.g. Text(name)). After we do all of this, we should see that nothing has changed in our live preview. Great!
Passing Down Values
Ultimately, we want to make our ProfilePage reusable, which means passing our dynamic information into the View. Let’s see how we can do this by passing in our profile picture name from ContentView.
First, remove the value of profilepic in ProfilePage and declare it as a String: var profilepic: String
Then, in our ContentView, you’ll see we have an error in our ProfilePage() declaration. It’s expecting a value to be passed in for profilepic. So let’s change it to: ProfilePage(profilepic: “profilepic”). Running in live preview should again yield no new results, but no errors either.
We’ve officially set up the dynamic parts of our app with variables/parameters and have even set up a mechanism for passing values from one View to another. As we look at ProfileInformation though, we see that to achieve our goal, we’d need to pass 3 variables through 2 levels ofour View hierarchy. This could lead to duplicate code. The solution to this problem? Classes.
Creating a Class
Using a class will help us model the data we want to use in our views. It will group our information, which will allow us to create multiple instances of our class, allowing us to easily set up multiple profiles.
So let’s get started by right-clicking our AwesomeSwiftUI folder in the Project Navigator and adding a new Swift file. Let’s name it “Profile”. Once the file opens, let’s create a new class called Profile and give it our 4 variables:
While we’re at it, let’s also make a quick constructor so we can easily make Profiles:
Now, let’s head back to our ContentView. There, let’s declare a new Profile using our initializer:
In ProfilePage, let’s replace var profilepic: String with var profile: Profile. This means we’ll need to change our declaration to ProfilePage(profile: profile). Lastly, where we were calling profilepic, we simply add profile before it, like this: Image(profile.profilepic).
Running our live preview, again we should see no changes to our UI, but also no errors.
Now, to pass our info down to ProfileInformation, we can either pass the info from our profile into the params we already have set up:ProfileInformation(name: profile.name, …).
Or we could remove those and continue passing our Profile in, having ProfileInformation accept Profile instead and adding profile, where we called our variables:
Yet again, running our live preview should result in no UI changes, but also no errors.
Testing Reusability
Now that we have a flow of values going down through the hierarchy of our views, lets test it’s reusability! And what better way than by creating another Profile… in the same view!
That’s right! Create a new profile in ContentView called profile2 and fill it out with new data (note: unless you add another picture to our Assets.xcassets, then just use the same String as our other profiles picture).
Then, in our body, wrap our ProfilePage(profile: profile) in a VStack, and then add ProfilePage(profile: profile2) inside the stack!
Behold! We see double!
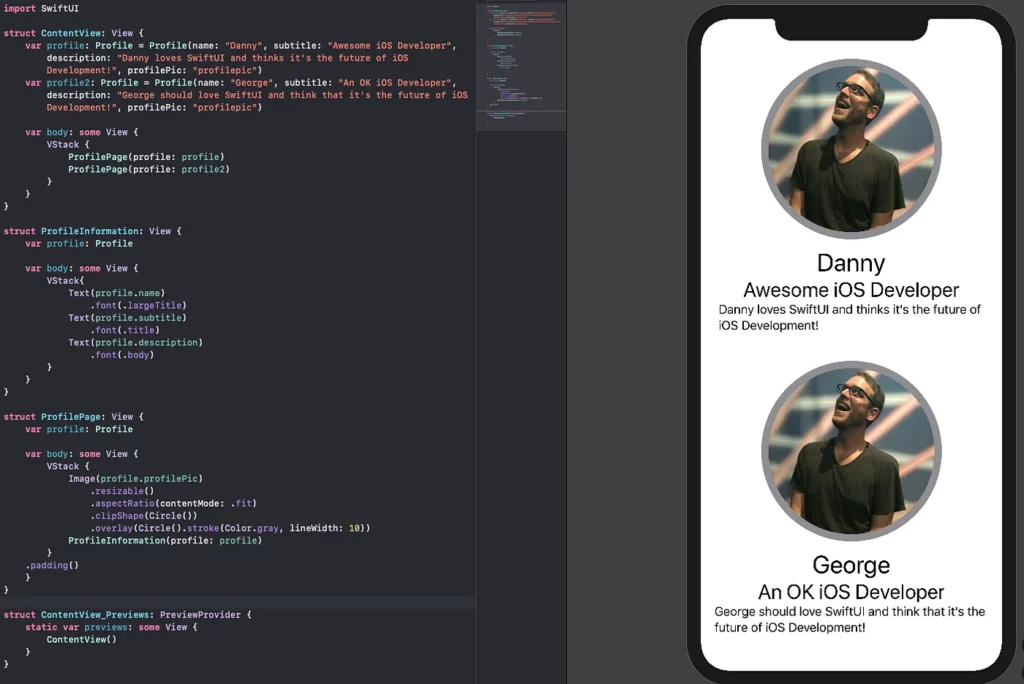
This shows just a taste of how incredibly flexible and reusable SwiftUI can be. If we simply provide the data, using a view over and over is as simple as feeding it that data. We’ll show how that becomes even more powerful when we talk about lists, navigation, and detail views!
Here’s the completed code for this tutorial:
import SwiftUI

struct ContentView: View {
    var profile: Profile = Profile(name: "Danny", subtitle: "Awesome iOS Developer", description: "Danny loves SwiftUI and thinks it's the future of iOS Development!", profilePic: "profilepic")
    var profile2: Profile = Profile(name: "George", subtitle: "An OK iOS Developer", description: "George should love SwiftUI and think that it's the future of iOS Development!", profilePic: "profilepic")

    var body: some View {
        VStack {
            ProfilePage(profile: profile)
            ProfilePage(profile: profile2)
        }
    }
}

struct ProfileInformation: View {
    var profile: Profile

    var body: some View {
        VStack{
            Text(profile.name)
                .font(.largeTitle)
            Text(profile.subtitle)
                .font(.title)
            Text(profile.description)
                .font(.body)
        }
    }
}

struct ProfilePage: View {
    var profile: Profile

    var body: some View {
        VStack {
            Image(profile.profilePic)
                .resizable()
                .aspectRatio(contentMode: .fit)
                .clipShape(Circle())
                .overlay(Circle().stroke(Color.gray, lineWidth: 10))
            ProfileInformation(profile: profile)
        }
    .padding()
    }
}

struct ContentView_Previews: PreviewProvider {
    static var previews: some View {
        ContentView()
    }
}
Tip for the Road: Utilizing PreviewProvider
Let’s say we wanted to make our view totally dynamic by not having ANY hardcoded values inside our UI code (e.g. the way we have profile initialized in ContentView). This is where the PreviewProvider struct that we’ve been ignoring down in the bottom of our code comes into play.
The sole purpose of the PreviewProvider is to feed any necessary parameters into our view so the live preview can render using that data (even if the source of data changes in our actual application code. We’ll get into that in the future.).
To demonstrate, copy profile along with its instantiation and paste it into ContentView_Previews. Then remove the instantiation in ContentView. This will produce an error back in the PreviewProvider because it’s expecting you to pass a Profile into ContentView. Do so by adding profile as the parameter: ContentView(profile: profile).
One more time, our live preview should look exactly the same with no build errors. The major difference now is no data lives inside any of our Views, making them truly dynamic.

Comments 0 Responses