
If you’re just getting started with machine learning in Lens Studio — and especially if you don’t have much in the way of previous ML experience — then working with SnapML can be quite intimidating.
In this post, I want to offer some basic tips to help you get up and running, or to troubleshoot if you’re having difficulties getting your ML Component (the Lens Studio Object that holds and and allows you to configure AI models) working.
Model Compatibility
First things first, in order to get an ML model inside Lens Studio that you’ll be use creatively, you’ll need to ensure that the model is compatible with SnapML. But what does this mean, how can you tell if your model is incompatible, and what can you do to fix it?
In essence, there are two parts of model compatibility that you need to be aware of: model file format, and model layer compatibility.
Model File Format
Machine learning models can take many different forms. There are model file formats that are broadly compatible across server-side deployment targets (cloud servers, on-premise servers, etc), and then others that are designed for mobile or embedded devices (i.e. smartphones, dev boards like Raspberry Pi’s, other AI-capable “smart” devices).
These file formats all depend on what the target platform or device accepts. For instance, for iOS native applications, Core ML (.mlmodel) is the model framework and type you’d need to work with. For native Android, you’d use a TensorFlow Lite model type (.tflite).
For SnapML, there are two ML model types that are compatible: Protobuf files (.pb) and ONNX files (.onnx). These model types can be created by converting from TensorFlow and/or PyTorch, which are the two primary deep learning frameworks/libraries for ML engineers and researchers.
While the Lens Studio team might add new model types to support in the future (fingers crossed for .tflite), currently, your model will need to be successfully converted to either .pb or .onnx.
The Lens Studio team has recently updated their SnapML docs to include instructions for exporting your ML models from both TensorFlow and PyTorch into formats compatible with SnapML.
Model Layer Compatibility
Though model conversion can be a bit fraught, there are clear and known methods for doing so. A more ongoing and iterative concern that Lens Creators will need to grapple with is the compatibility of the “layers” that make up their models.
Broadly speaking, an ML model layer (or more specifically, a neural network model layer) is a set of mathematical operations that take the data you feed into said model and help produce the intended output. For instance, many computer vision neural networks contain “convolutional layers”, which can be visualized in the image below:
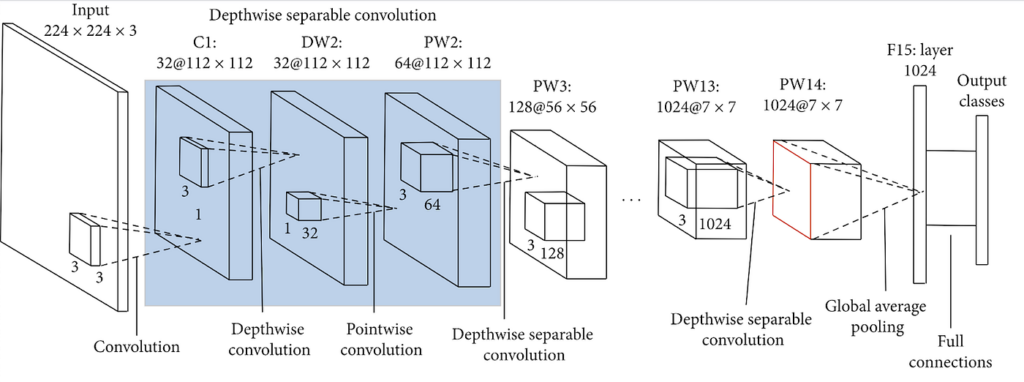
While the technical specifics are a bit outside the scope of this post, you can imagine neural network layers as mathematical layers through which data passes and is processed, all in order to produce the desired output (i.e. an accurate prediction).
So if you’re building your own models, whether from scratch in TensorFlow or PyTorch or from other existing pre-trained models, you’ll need to regularly consult with this layer compatibility chart in the SnapML docs:
What’s more, this compatibility is broken down by mobile device platform (iOS, Android) and by processor. To get the most out of your ML-powered Lenses, and to ensure they work properly, you’ll want to work with model layers that are compatible with at least the CPU, and, if possible, the GPU/NPU (the use of advanced hardware will generally lead to better model performance).
This is something to pay particular attention to when working with pre-trained models and Notebooks you pull from external sources or from locations where you can’t immediately verify compatibility — some of these pre-trained models, though optimized for mobile platforms, might need to have some layers removed/adjusted if they aren’t supported by Lens Studio. This can then lead to the need to retrain models, as removing network layers can significantly (and adversely) affect performance.
Model Import
Once you have a model built and exported with both supported layers and in a compatible format, you’ll need to import it into Lens Studio. If you import a model into a completely blank project, you’ll need to do quite a bit of manual work (including material graphing, scripting, etc).
So if possible, we’d recommend starting with a template project that most closely matches your use case. We have a number of [specific pre-trained templates] at Fritz AI, and any custom models trained will already be configured. Lens Studio also offers a number of helpful templates that make it easier to import custom ML models built with their provided Python Notebooks (typically iPython or Jupyter Notebooks, to be precise).
When you create an ML Component Object (from the top left Objects panel), you’ll automatically be prompted to import your trained model file — in my case, as you can see below, through Finder on my MacBook.
Because I trained my model using Fritz AI, I didn’t have to worry about configuring the import — as mentioned above, Fritz AI does all that work under the hood.
But if you’re bringing in your own custom model, the best thing you can do to ensure that your model makes it into Lens Studio unscathed is to make sure everything is compatible up front as you’re training it — with supported layers, a model architecture supported by and optimized for SnapML, the expected number of channels, etc.
ML Component Input/Output Configuration
Once you have a trained, compatible model successfully imported into Lens Studio and contained in an ML Component, the real work starts — actually configuring this Component to have the intended effect(s) on your Lens.
While there are far too many possibilities to reasonably cover here (such as working with multiple ML Components, using ML Components inside of other templates, etc), it’s worth looking closer at a couple of the more basic parts of this configuration.
Input, Output, and Crop Textures
When first implementing and testing custom ML features inside Lens Studio, it helps to first connect the model to the camera feed.
In SnapML, for most ML models, this means configuring Textures for both what the model sees (input) and what it produces (output). To configure the input texture so that the model is running predictions on the primary camera feed, select “Device Camera Texture” as the Input Texture from the Default Textures Folder.
Based on the shape and parameters of your ML model, Lens Studio will automatically generate an output Texture. I’d recommend renaming this Texture, as it will be added to your Resources folder, and depending on your use case, might come in handy later.
Additionally, there are times where you might need to only feed input data into your model that comes from a specific part of the camera feed. This is where Crop Textures come into play — and there are two of them you can work with: Screen Crop Textures and Face Crop Textures. You’ll need to consider both your use case and the specifications of your model (i.e. what it can accept as input) when working with Crop Textures.
With this, your ML Component should be configured to take what the camera sees as input and apply its predictions as output (as a Texture). However, if you’ve started from scratch with a blank project, you’ll likely need to do some more work — and specifically with scripting any tweaking or fine-tuning that needs to be done.
ML Component Scripting
Scripting is a huge part of taking what Lens Studio offers out-of-the-box and making those features work the way you want them to.
The same can be said for scripting when it comes to working with ML Components. Essentially scripting can help models work more effectively within your lenses by adding logic that post-processes their output — in other words, when your ML model makes predictions, you can control how your Lens interacts with those predictions.
To help explain this, I’ll quickly present an example that our team worked through. We were trying to train a Classification Lens that would recognize whether a given room was clean or messy.
We trained a model that was generating a bunch of predictions every second (let’s say 30). If we were to simply import that model into Lens Studio, hook it up as is, and run an AR effect on top of it, that AR effect would likely re-trigger constantly — in fact, every time a prediction crosses a defined accuracy threshold.
This would result in an incredibly inconsistent, jittery experience. To solve this, we used scripting to create a Classification Controller that smoothes out how these rapid, constant predictions were being communicated to our Lens. Specifically, we implemented a kind of moving average to group predictions together, so that individual outliers wouldn’t interrupt the user experience.
This kind of fine-grained control over a model’s inputs and outputs becomes incredibly important when you’re trying to tell your model how (and when) it should interact with other Lens components, objects, etc.
Getting Started
Even though SnapML is an incredible advancement and groundbreaking platform for ML-powered experiences on mobile, there’s still a bit of a difficult pill to swallow—machine learning is hard.
However, we expect that machine learning in Lens Studio will continue to become easier to use and more versatile as time goes on—and we’re hard at work trying to make SnapML as accessible and powerful for Creators as possible.
If you’re looking to learn more about SnapML in Lens Studio, we have a wide range of tutorials, overviews, spotlights, and more on Heartbeat, as well as a free-to-download guide covering all we’ve learned so far about these new ML capabilities in Lens Studio.
Or if you’d like to jump in and start creating with ML, we have a pre-trained model zoo as well as a no-code model building platform that lets you build something custom from end-to-end, without needing any in-depth knowledge of machine learning. These capabilities are currently free and in beta.

thanks for the detailed blog!
I would like to try the ML training model for snap but I am unable to find it anywhere on your website. please help me redirect to it so that I can try it and possibly use it on one of our commercial projects.
You’re welcome Sumeet, maybe this is the article you’re looking for?