
I was working on a personal project on tumor detection and recognition and decided to us some image segmentation tools and techniques to refine my recognition model.
As I was working on this project, I found myself wondering—is it possible to do this on mobile? The answer is YES, and so I decided to give it a shot.
Here, I won’t use a custom model but rather briefly explain the different techniques. Then, I’ll apply a model offered by Apple that can segment objects in an image and implement it in an iOS application.
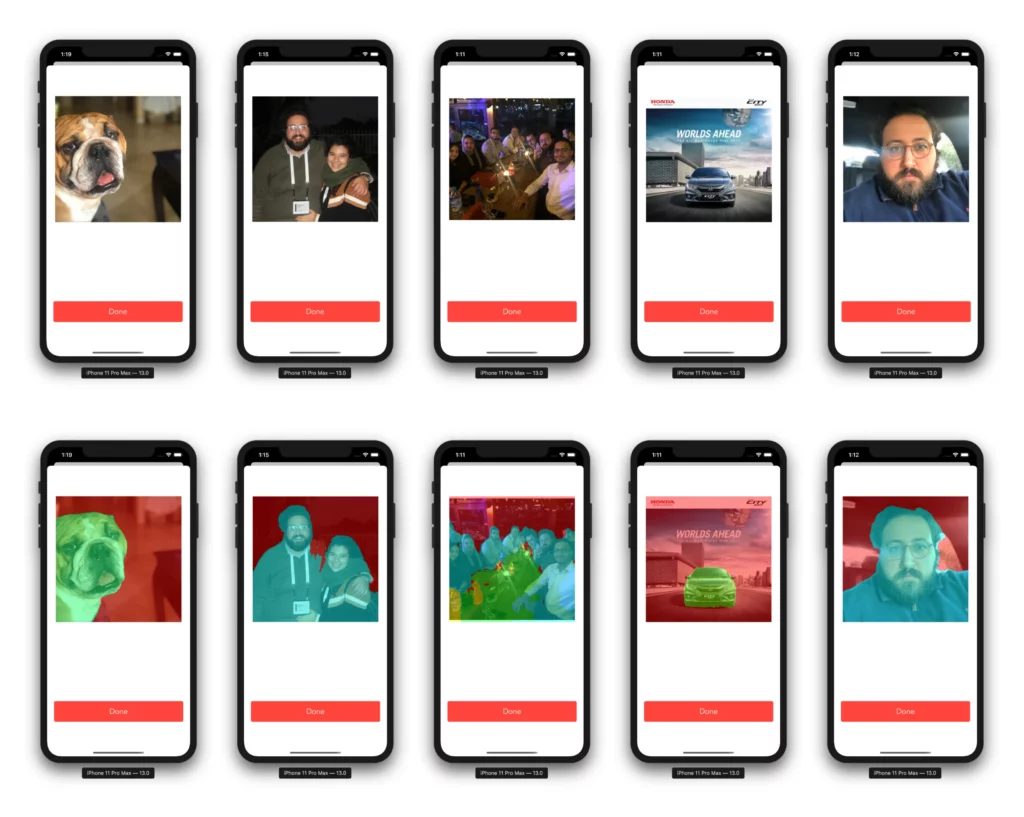
Final result:
1. What is Image Segmentation?
Before the relatively recent progress of convolutional neural networks, one of the most-used computer vision techniques was “The segmentation of a color image”, which consists of partitioning the image into regions in order to extract the different objects present in the image.
Segmentation methods can be divided into two families: analyzing the color distribution of pixels in the image plane or in a color space.
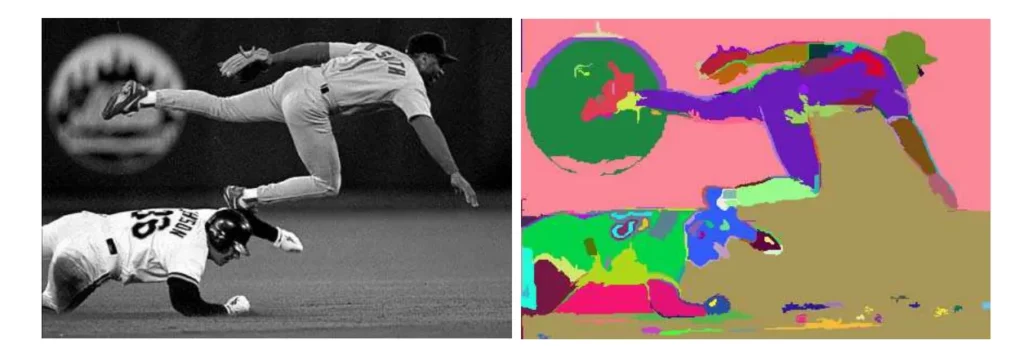
Methods that analyze the color distribution of pixels in a color space consider that each pixel in the image is represented by a color point in a color space. The most used color space is the RGB space, in which the coordinates of a color point are the levels of the colors red, green, and blue in a corresponding pixel.
Other color spaces can be used, and the performance of an image segmentation process depends on the choice of color space. Several authors have attempted to determine which color spaces are best suited to their specific image segmentation problems.
Unfortunately, there is no single color space that provides satisfactory results for the segmentation of all types of images. It’s generally assumed that regions of the image with homogeneous colors constitute color-point clouds in the color space, with each cloud corresponding to a class of pixels that share similar colorimetric properties.
Classes are constructed by a cloud identification process that’s performed either by a color histogram analysis or by a cloud analysis. When classes are built, the pixels are assigned to one of them by a decision rule. Region labels are assigned to related pixels that are assigned to the same classes in order to construct the segmented image.
Semantic Segmentation
Semantic segmentation is a basic building block for scene comprehension. By classifying all the pixels of an image in a dense way, it’s then possible to construct abstract representations interested in the objects and their forms.
Fully convolutional networks (FCNs) are a particularly effective tool for semantic segmentation for many types of images: multimedia, aerial, medical, or autonomous vehicles.
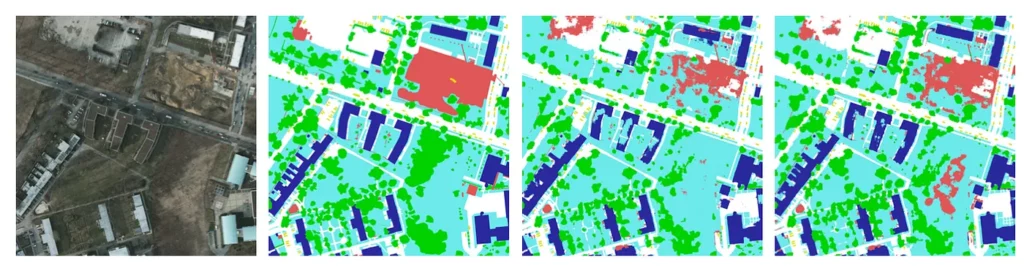
However, the literature regularly encounters problems of imprecise inter-class boundaries or noisy segmentation, requiring the use of post-event regularizations to smooth segmentation. The community has thus looked at different post-treatments to improve the sharpness of the contours and to constrain the segmentations to respect the same topology as the ground truth. Often, these are graphical models added at the end of the network or using a specific knowledge a priori.
2. Applications of Image Segmentation:
Image segmentation is widely used nowadays, even in your regular phone camera—in portrait mode, where the post processing of the image blurs the background and concentrates on the person.
For this tutorial, I’ll focus on a specific (and probably the most promising) use of image segmentation, which is in medical imaging.
Medical imaging:
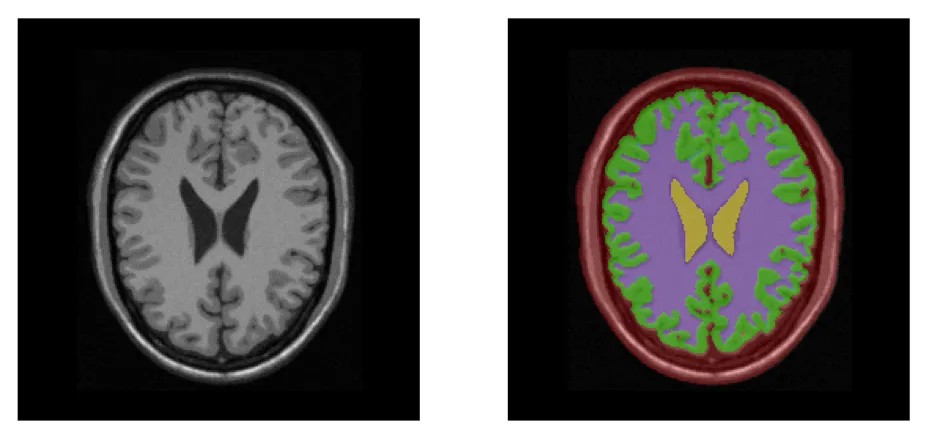
Since the discovery of X-rays, medical imaging has become an incredibly active field of research. The invention and development of various imaging modalities (ultrasound, magnetic resonance, scanner) have led to many advances in medical research, but have also revolutionized clinical practice.
These different techniques provide clinicians with anatomical and functional information about the human body. The constant increase in the volume of these data makes it necessary to develop computer tools for image processing.
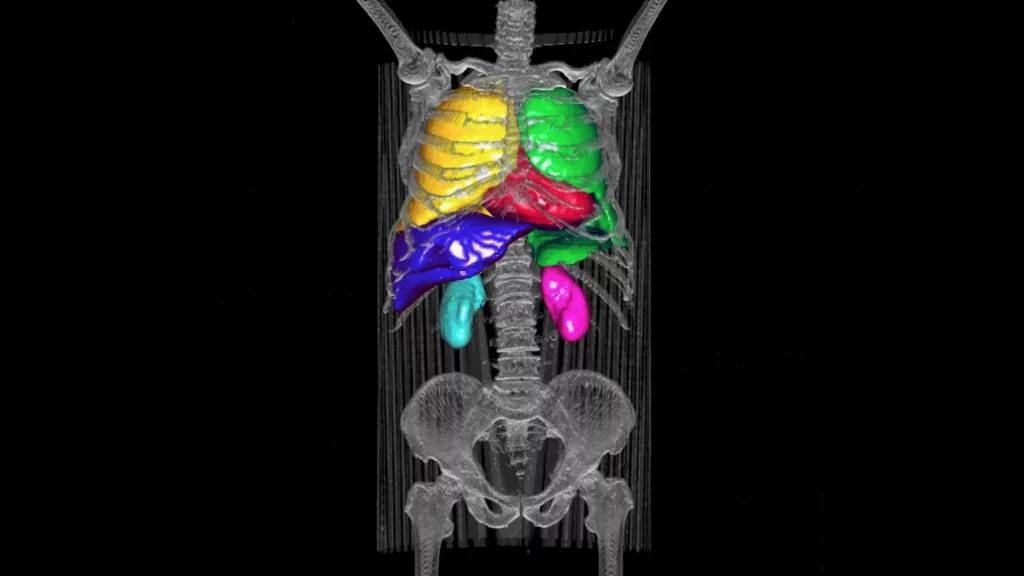
Among the different tasks of medical image processing, organ segmentation was one of the first and most important. Being able to recover the shape of an organ is very interesting from a clinical point of view and has many applications: precise measurement of the volume, estimation of statistics on the form, guidance of image registration algorithms, planning of operations surgical.
However, in practice, it’s very difficult to build such algorithms, given a few factors, such as acquiring enough high-quality data with significant volume effects to create a unified diagnostic system that accounts for pathology. These information gaps and image corruptions can be partially compensated for by the use of prior information on the organ to be segmented.
3. DeepLabV3:
Google AI announced the release of its DeepLabV3 neural network architecture back in 2018 in its TensorFlow framework and open sourced it on GitHub.
DeepLab is a semantic image segmentation model that has been used in the creation of the ‘portrait’ modes of Pixel 2 and Pixel 2 XL smartphones. This technology developed by Google allows us to assign an identification tag to each pixel of an image containing elements such as the sky, a dog, or a person.
The applications of this technology are therefore multiple because it can, for example, be used to identify a person, a detour, or to blur the rest of an image to simulate a photo taken on a device with a large aperture (producing a bokeh effect).

In addition, this technology is also used in the segmentation of real-time mobile video thanks to its particularly strict localization accuracy, as compared to other visual recognition tasks like, among others, image classification.
DeepLabV3 with Core ML:
Apple offers an already-converted version of DeepLabV3, but you can train your own using the official GitHub repository with TensorFlow and convert it to a Core ML file compatible with iOS using coremltools
4. Build the iOS Application
Create a new project:
To begin, we need to create an iOS project with a single view app. Make sure to choose Storyboard in the “User interface” dropdown menu (Xcode 11 only):
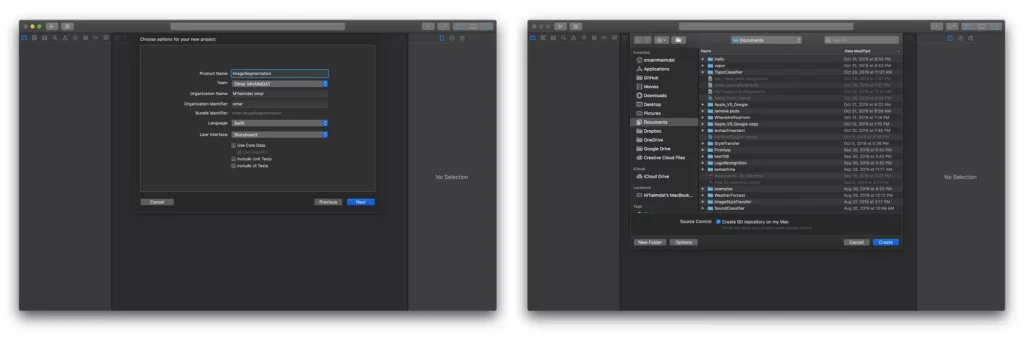
Now we have our project ready to go. I don’t like using storyboards myself, so the app in this tutorial is built programmatically, which means no buttons or switches to toggle — just pure code 🤗.
To follow this method, you’ll have to delete the main.storyboard and set your SceneDelegate.swift file (Xcode 11 only) like so:
func scene(_ scene: UIScene, willConnectTo session: UISceneSession, options connectionOptions: UIScene.ConnectionOptions) {
        // Use this method to optionally configure and attach the UIWindow `window` to the provided UIWindowScene `scene`.
        // If using a storyboard, the `window` property will automatically be initialized and attached to the scene.
        // This delegate does not imply the connecting scene or session are new (see `application:configurationForConnectingSceneSession` instead).
        guard let windowScene = (scene as? UIWindowScene) else { return }

        window = UIWindow(frame: windowScene.coordinateSpace.bounds)
        window?.windowScene = windowScene
        window?.rootViewController = ViewController()
        window?.makeKeyAndVisible()
    }
With Xcode 11, you’ll have to change the Info.plist file like so:
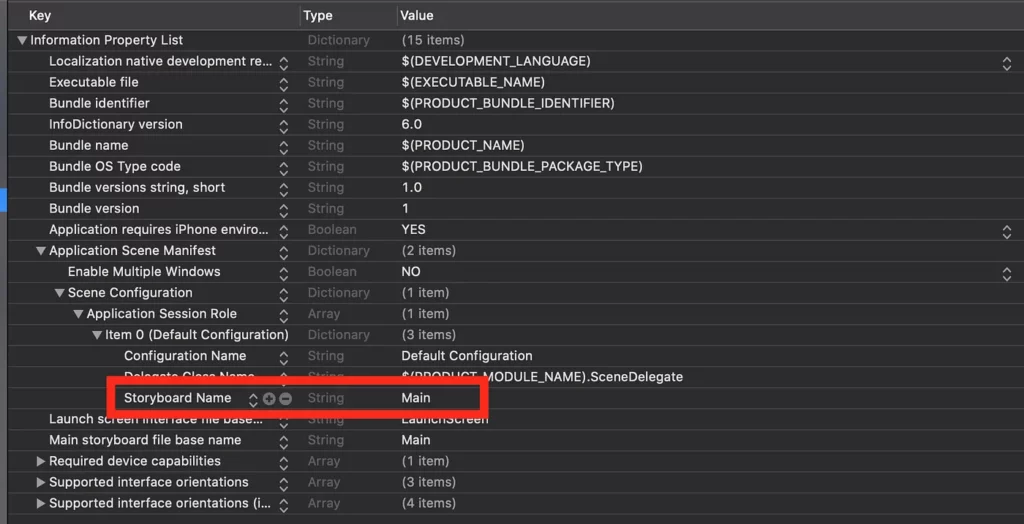
You need to delete the “Storyboard Name” in the file, and that’s about it.
Main ViewController
Now let’s set our ViewController with the buttons and a logo. I used some custom buttons in the application — you can obviously use the system button.
First, you need to inherit from UIButton and create your own custom button — we inherit from UIButton because the custom button ‘is’ a UIButton, so we want to keep all its properties and only inherit to change the look of it:
import UIKit

class Button: UIButton {
    override func awakeFromNib() {
        super.awakeFromNib()
        titleLabel?.font = UIFont(name: "Avenir", size: 12)
    }
}
import UIKit
class BtnPlein: Button {
override func awakeFromNib() {
super.awakeFromNib()
}
var myValue: Int
///Constructor: - init
override init(frame: CGRect) {
// set myValue before super.init is called
self.myValue = 0
super.init(frame: frame)
layer.borderWidth = 6/UIScreen.main.nativeScale
layer.backgroundColor = UIColor(red:0.24, green:0.51, blue:1.00, alpha:1.0).cgColor
setTitleColor(.white, for: .normal)
titleLabel?.font = UIFont(name: "Avenir", size: 22)
layer.borderColor = UIColor(red:0.24, green:0.51, blue:1.00, alpha:1.0).cgColor
layer.cornerRadius = 5
}
required init?(coder aDecoder: NSCoder) {
fatalError("init(coder:) has not been implemented")
}
}import UIKit
class BtnPleinLarge: BtnPlein {
override func awakeFromNib() {
super.awakeFromNib()
contentEdgeInsets = UIEdgeInsets(top: 0, left: 16, bottom: 0, right: 16)
}
}BtnPleinLarge is our new button, and we use it to create our main two buttons for ViewController.swift, our main view.
I have two options in my application, so I’ll make one button to upload an image from the image library and another to take a picture directly from the camera.
Now set the layout and buttons with some logic as well:
let upload: BtnPleinLarge = {
        let button = BtnPleinLarge()
        button.translatesAutoresizingMaskIntoConstraints = false
        button.addTarget(self, action: #selector(buttonToUpload(_:)), for: .touchUpInside)
        button.setTitle("Upload", for: .normal)
        let icon = UIImage(named: "upload")?.resized(newSize: CGSize(width: 50, height: 50))
        button.addRightImage(image: icon!, offset: 30)
        button.backgroundColor = #colorLiteral(red: 0.1399718523, green: 0.4060479403, blue: 0.3119114339, alpha: 1)
        button.layer.borderColor = #colorLiteral(red: 0.1399718523, green: 0.4060479403, blue: 0.3119114339, alpha: 1)
        button.layer.shadowOpacity = 0.3
        button.layer.shadowColor = #colorLiteral(red: 0.1399718523, green: 0.4060479403, blue: 0.3119114339, alpha: 1)
        button.layer.shadowOffset = CGSize(width: 1, height: 5)
        button.layer.cornerRadius = 10
        button.layer.shadowRadius = 8
        button.layer.masksToBounds = true
        button.clipsToBounds = false
        button.contentHorizontalAlignment = .left
        button.layoutIfNeeded()
        button.contentEdgeInsets = UIEdgeInsets(top: 0, left: 0, bottom: 0, right: 20)
        button.titleEdgeInsets.left = 0

        return button
    }()

    let camera: BtnPleinLarge = {
        let button = BtnPleinLarge()
        button.translatesAutoresizingMaskIntoConstraints = false
        button.addTarget(self, action: #selector(buttonToCamera(_:)), for: .touchUpInside)
        button.setTitle("Camera", for: .normal)
        let icon = UIImage(named: "camera")?.resized(newSize: CGSize(width: 50, height: 50))
        button.addRightImage(image: icon!, offset: 30)
        button.backgroundColor = #colorLiteral(red: 0.3344218731, green: 0.7652652264, blue: 0.5346129537, alpha: 1)
        button.layer.borderColor = #colorLiteral(red: 0.3344218731, green: 0.7652652264, blue: 0.5346129537, alpha: 1)
        button.layer.shadowOpacity = 0.3
        button.layer.shadowColor = #colorLiteral(red: 0.3344218731, green: 0.7652652264, blue: 0.5346129537, alpha: 1)
        button.layer.shadowOffset = CGSize(width: 1, height: 5)
        button.layer.cornerRadius = 10
        button.layer.shadowRadius = 8
        button.layer.masksToBounds = true
        button.clipsToBounds = false
        button.contentHorizontalAlignment = .left
        button.layoutIfNeeded()
        button.contentEdgeInsets = UIEdgeInsets(top: 0, left: 0, bottom: 0, right: 20)
        button.titleEdgeInsets.left = 0

        return button
    }()
We now need to set up some logic. It’s important to change the Info.plist file and add a property so that an explanation of why we need access to the camera and the library is given to the user. Add some text to the “Privacy — Photo Library Usage Description”:
@objc func buttonToUpload(_ sender: BtnPleinLarge) {
        if UIImagePickerController.isSourceTypeAvailable(.photoLibrary) {
            let imagePicker = UIImagePickerController()
            imagePicker.delegate = self
            imagePicker.sourceType = .photoLibrary
            imagePicker.allowsEditing = true
            self.present(imagePicker, animated: true, completion: nil)
        }
    }

    @objc func buttonToCamera(_ sender: BtnPleinLarge) {
        if UIImagePickerController.isSourceTypeAvailable(.camera) {
            let imagePicker = UIImagePickerController()
            imagePicker.delegate = self
            imagePicker.sourceType = .camera
            imagePicker.allowsEditing = true
            self.present(imagePicker, animated: true, completion: nil)
        }
    }
Now, you’ll need to set up the layout and add the subviews to the view, too. I’ve added a logo on top of the view, as well:
override func viewDidLoad() {
        super.viewDidLoad()

        view.backgroundColor = #colorLiteral(red: 1, green: 1, blue: 1, alpha: 1)
        addSubviews()
        setupLayout()
    }

    func addSubviews() {
        view.addSubview(logo)
        view.addSubview(upload)
        view.addSubview(camera)
    }

    func setupLayout() {

        logo.centerXAnchor.constraint(equalTo: self.view.centerXAnchor).isActive = true
        logo.topAnchor.constraint(equalTo: self.view.safeTopAnchor, constant: 20).isActive = true

        upload.centerXAnchor.constraint(equalTo: view.centerXAnchor).isActive = true
        upload.widthAnchor.constraint(equalToConstant: view.frame.width - 40).isActive = true
        upload.heightAnchor.constraint(equalToConstant: 80).isActive = true
        upload.bottomAnchor.constraint(equalTo: camera.topAnchor, constant: -40).isActive = true

        camera.centerXAnchor.constraint(equalTo: view.centerXAnchor).isActive = true
        camera.widthAnchor.constraint(equalToConstant: view.frame.width - 40).isActive = true
        camera.heightAnchor.constraint(equalToConstant: 80).isActive = true
        camera.bottomAnchor.constraint(equalTo: view.bottomAnchor, constant: -120).isActive = true
    }
Output ViewController: Where We Show Our Result
Here, we need four elements:
- Our original image:
let inputImage: UIImageView = {
        let image = UIImageView(image: UIImage())
        image.translatesAutoresizingMaskIntoConstraints = false
        image.contentMode = .scaleAspectFit
        return image
    }()
That’s the image we got from either the ‘photo library’ or the ‘camera’.
2. A custom UIView to show the segmentation:
This view will show segments or regions with different colors.
class DrawingSegmentationView: UIView {

    static private var colors: [Int32: UIColor] = [:]

    func segmentationColor(with index: Int32) -> UIColor {
        if let color = DrawingSegmentationView.colors[index] {
            return color
        } else {
            let color = UIColor(hue: CGFloat(index) / CGFloat(30), saturation: 1, brightness: 1, alpha: 0.5)
            print(index)
            DrawingSegmentationView.colors[index] = color
            return color
        }
    }

    var segmentationmap: SegmentationResultMLMultiArray? = nil {
        didSet {
            self.setNeedsDisplay()
        }
    }

    override func draw(_ rect: CGRect) {

        if let ctx = UIGraphicsGetCurrentContext() {

            ctx.clear(rect);

            guard let segmentationmap = self.segmentationmap else { return }

            let size = self.bounds.size
            let segmentationmapWidthSize = segmentationmap.segmentationmapWidthSize
            let segmentationmapHeightSize = segmentationmap.segmentationmapHeightSize
            let w = size.width / CGFloat(segmentationmapWidthSize)
            let h = size.height / CGFloat(segmentationmapHeightSize)

            for j in 0..<segmentationmapHeightSize {
                for i in 0..<segmentationmapWidthSize {
                    let value = segmentationmap[j, i].int32Value

                    let rect: CGRect = CGRect(x: CGFloat(i) * w, y: CGFloat(j) * h, width: w, height: h)

                    let color: UIColor = segmentationColor(with: value)

                    color.setFill()
                    UIRectFill(rect)
                }
            }
        }
    } // end of draw(rect:)
}
3. A button to dismiss the view:
let dissmissButton: BtnPleinLarge = {
        let button = BtnPleinLarge()
        button.translatesAutoresizingMaskIntoConstraints = false
        button.addTarget(self, action: #selector(buttonToDissmiss(_:)), for: .touchUpInside)
        button.setTitle("Done", for: .normal)
        button.backgroundColor = .systemRed
        button.layer.borderColor = UIColor.systemRed.cgColor
        return button
    }()
And finally we set up the layout by adding all the elements to the subview and setting the constraints:
  override func viewDidLoad() {
        super.viewDidLoad()
        view.backgroundColor = #colorLiteral(red: 1, green: 1, blue: 1, alpha: 1)
        addSubviews()
        setupLayout()
    }
  func addSubviews() {
        view.addSubview(dissmissButton)
        view.addSubview(inputImage)
    }

  func setupLayout() {

        dissmissButton.centerXAnchor.constraint(equalTo: view.centerXAnchor).isActive = true
        dissmissButton.heightAnchor.constraint(equalToConstant: 60).isActive = true
        dissmissButton.widthAnchor.constraint(equalToConstant: view.frame.width - 40).isActive = true
        dissmissButton.bottomAnchor.constraint(equalTo: view.bottomAnchor, constant: -100).isActive = true

        inputImage.centerXAnchor.constraint(equalTo: view.centerXAnchor).isActive = true
        inputImage.centerYAnchor.constraint(equalTo: view.centerYAnchor, constant: -150).isActive = true
        inputImage.widthAnchor.constraint(equalToConstant: view.frame.width - 50).isActive = true

    }
4. Adding the Segmentation View:
I have added an extension to the output view controller:
The first one is a function to handle the prediction with the Vision API, and the second extracts the results and adds the view to the subview:
extension OutputViewController {

    func predict(with cgImage: CGImage) {
        guard let request = request else { fatalError() }

        let handler = VNImageRequestHandler(cgImage: cgImage, options: [:])
        try? handler.perform([request])
    }

    func visionRequestDidComplete(request: VNRequest, error: Error?) {
        if let observations = request.results as? [VNCoreMLFeatureValueObservation],
            let segmentationmap = observations.first?.featureValue.multiArrayValue {
            let segmentationView = DrawingSegmentationView(frame: CGRect(x: 0, y: 0, width: screenWidth, height: screenWidth))
            segmentationView.backgroundColor = UIColor.clear
            segmentationView.translatesAutoresizingMaskIntoConstraints = false
            view.addSubview(segmentationView)
            segmentationView.centerXAnchor.constraint(equalTo: view.centerXAnchor).isActive = true
            segmentationView.centerYAnchor.constraint(equalTo: view.centerYAnchor, constant: -150).isActive = true
            segmentationView.widthAnchor.constraint(equalToConstant: view.frame.width - 50).isActive = true
            segmentationView.heightAnchor.constraint(equalToConstant: view.frame.width - 50).isActive = true
            segmentationView.segmentationmap = SegmentationResultMLMultiArray(mlMultiArray: segmentationmap)
            print(segmentationmap)
        }
    }

}
5. Conclusion
I think computer vision is probably the field of artificial intelligence with the most potential. I can almost picture the future — mobile applications with similar technology that can in real time detect and recognize skin cancer, for example.
You can take advantage of so many free and powerful resources to accomplish so many interesting tasks. Google’s DeepLab is one of them—you can find a dataset and train it on specific segmentations, as the repository is accessible to every developer, even to those who might be reluctant to jump in.
If you liked this tutorial, please share it with your friends. If you have any questions, don’t hesitate to send me an email at [email protected].
This project is available to download from my GitHub account.

Comments 0 Responses