
Computer Vision — iOS
Introduction
Let say you have an image, and you want to distinguish objects of interest— or in other words, find suitable local characteristics to distinguish them from other objects or from the background. This is called image segmentation or semantic segmentation.
When we segment a target object, we know which pixel belongs to which object. The image is divided into regions and the discontinuities serve as borders between the regions. One can also analyze the shape of objects using various morphological operators.
To put it simply, segmentation consists of dividing a given image into regions having homogeneity according to a predefined criterion (gray level, colors, edges, classification, etc.). The objective of segmentation is to establish a compact description representative of an image’s content.
This involves extracting visual clues relevant, sufficiently correlated with the entities that make up the scene from which the image is taken.
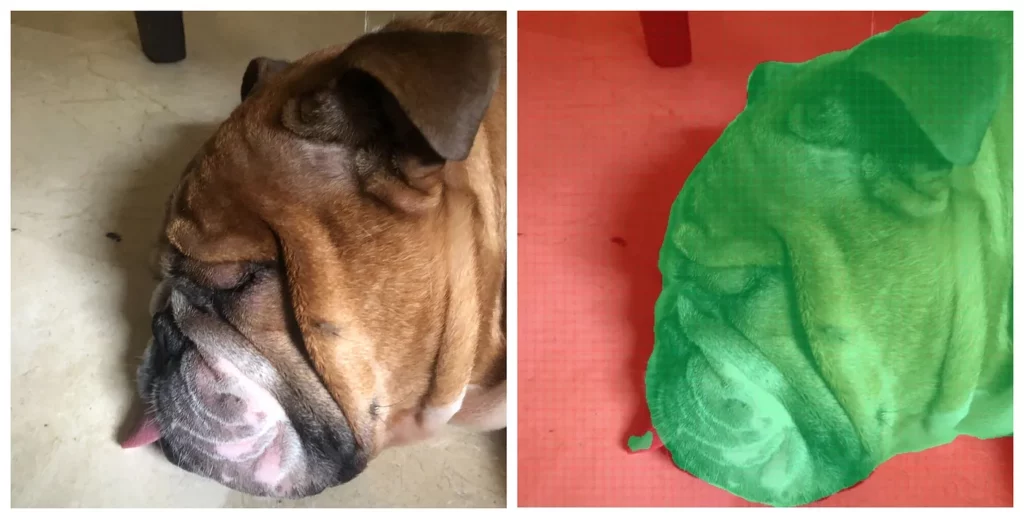
For example, we know the image above contains two distinct “objects” — a dog in green and a background in red. I can then isolate and extract a portion of the image (i.e. remove the background), or I can blur a portion of the background — (i.e. portrait mode).
In this article, I’ll create an API that will process an image and produce a pixel-level segmentation mask using instance and semantic segmentation. Then, I’ll create an iOS application that will consume the API.
Overview:
- Why segmentation?
- Create the Flask API
- Create the iOS application
- Handle the API callbacks in the iOS application
- Test and evaluate
- Conclusion
I have included code in this article where it’s most instructive. Full code and data can be found on my GitHub page. Let’s get started.
1. Why segmentation?
Let’s say you have a portrait image and you don’t particularly like the background, or you want to add something specific to the image—say some fun digital goggles, for example. In order to do so, you need to identify those regions and classify them, and segmentation does just that. Multiple techniques exist to tackle these kinds of problems, but the most common one these days is semantic segmentation.


Once you can identify the background region, you can do whatever you want with it—in this case, we’ll edit the portrait by changing the photo’s background 😅.
For more details on image segmentation’s applications, I wrote an article a few weeks back on Heartbeat:
2. Create the Flask API
Flask is a Python web application micro-framework built on the WSGI library of Werkzeug. Flask can be “micro”, but it’s ready for use in production for a variety of needs.
The “micro” in the micro-frame means that Flask aims to keep the kernel simple but expandable. Flask won’t make many decisions for you, like which database to use, but the decisions made are easy to change. Everything is yours, so Flask can be everything you need and nothing else.
I prefer to use a library called Flask-RESTful made by Twilio that encourages best practices when it comes to APIs.
Segmentation inference:
The segmentation API will use Ayoola Olafenwa’s newly published Python package. The package is pretty simple and straightforward, two types of segmentation are currently supported:
- Semantic segmentation: Classify each and every pixel and assign it to a specific class of objects. Let’s say you have multiple cars in a given image—they will all be classified as the same object and will share the same colormap.
- Instance segmentation: Contrary to semantic segmentation, all objects are treated separately, even if they are of the same class.
For more details, Ayoola Olafenwa wrote an excellent article on the matter.
Set up a Python environment:
Create a Python environment using your favorite method, and install the following packages:
You’ll also need to download the models with preloaded weights using bash commands. They’re all Keras models, so you should expect .h5 files:
Build the API:
Install Flask and Flask-RESTful packages:
We first need to create a set of constants, which will contain the model’s path, as well as the path where the images will be saved:
SEMANTIC_MODEL = "./models/deeplabv3_xception_tf_dim_ordering_tf_kernels.h5"
INSTANCE_MODEL = "./models/mask_rcnn_coco.h5"

INPUT_IMAGE = "./images/input.jpg"
OUTPUT_IMAGE = "./output_images/output.jpg"
Then we need to create an instance of the Flask app and create an Api object:
app = Flask(__name__)
api = Api(app)
Create our classes and POST methods:
Semantic Segmentation
class SemanticSegmentation(Resource):

  def post(self):
      if request.json:
          image = request.json['image']
          image_string = base64.b64decode(image)
          image_data = BytesIO(image_string)
          img = Image.open(image_data)
          img.save(INPUT_IMAGE)
          semantic_segment_image = semantic_segmentation()
          semantic_segment_image.load_pascalvoc_model(SEMANTIC_MODEL)
          semantic_segment_image.segmentAsPascalvoc(INPUT_IMAGE, output_image_name=OUTPUT_IMAGE)

          with open(OUTPUT_IMAGE, "rb") as img_file:
              my_string = base64.b64encode(img_file.read())
              final_base64_image_string = my_string.decode('utf-8')
return {"output_image": final_base64_image_string}- Create a class SemanticSegmentation
- Create a method post
- Parse the request (from the iOS application) and extract the base64 image string
- Decode the base64 string and save the image in the directory using the native base64 Python module
- Instantiate an object of type semantic_segmentation() using pixellib
- Load the model
- Perform segmentation and save the segmented image
- Encode the image to a base64 format
- Send a dictionary with a final base64 image string
Instance Segmentation
class InstanceSegmentation(Resource):

  def post(self):
      if request.json:
          image = request.json['image']
          image_string = base64.b64decode(image)
          image_data = BytesIO(image_string)
          img = Image.open(image_data)
          img.save(INPUT_IMAGE)
          instance_segment_image = instance_segmentation()
          instance_segment_image.load_model(INSTANCE_MODEL)
          instance_segment_image.segmentImage(INPUT_IMAGE, output_image_name=OUTPUT_IMAGE, show_bboxes=True)

          with open(OUTPUT_IMAGE, "rb") as img_file:
              my_string = base64.b64encode(img_file.read())
              final_base64_image_string = my_string.decode('utf-8')
return {"output_image": final_base64_image_string}- Create a class InstanceSegmentation
- Create a method post
- Parse the request (from the iOS application) and extract the base64 image string
- Decode the base64 string and save the image in the directory using a native base64 Python module.
- Instantiate an object of type instance_segmentation() using pixellib
- Load the model
- Perform segmentation and save the segmented image
- Encode the image to a base64 format
- Send a dictionary with final base64 image string
Run the Flask API
Finally, you need to add the classes to the Flask-RESTful resource and set the entry point for each class like so:
api.add_resource(SemanticSegmentation, '/semantic')
api.add_resource(InstanceSegmentation, '/instance')
Flask’s default port is 5000 , which means you can call POST methods using the following URL:
- Semantic: http://127.0.0.1:5000/semantic
- Instance: http://127.0.0.1:5000/instance
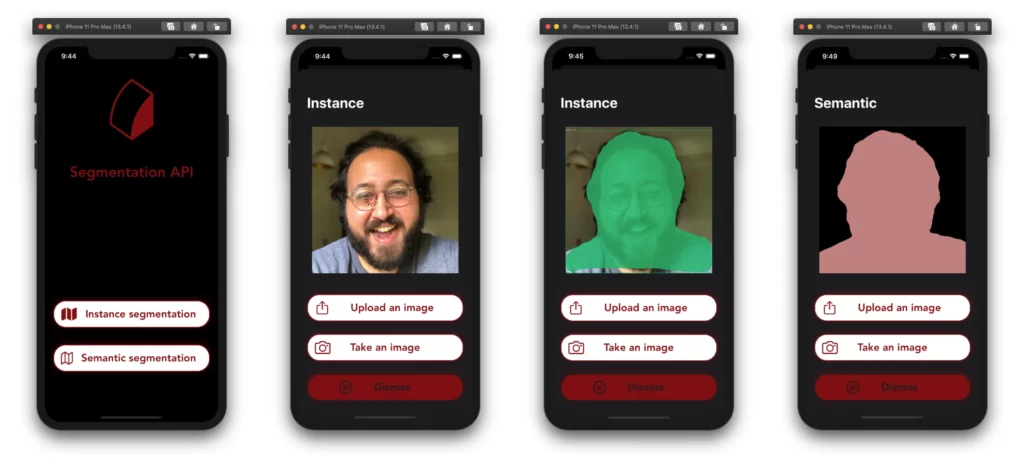
3. Create the iOS application
Create a new “Single View Application” and make sure you choose Storyboard as User Interface.

Now we have our project ready to go. I don’t like using storyboards myself, so the app in this tutorial is built programmatically, which means no buttons or switches to toggle — just pure code.
To follow this method, you’ll have to delete the main.storyboard file and set your SceneDelegate.swift file (Xcode 11 only).
With Xcode 11, you’ll have to change the Info.plist file like so:
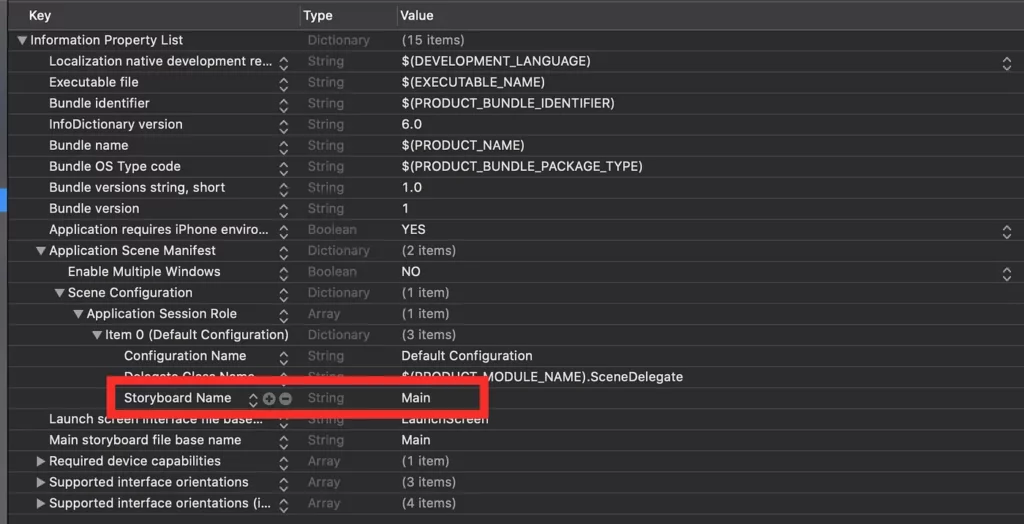
You need to delete the “Storyboard Name” in the file, and that’s about it.
Change the SceneDelegate with the following code:
var window: UIWindow?

func scene(_ scene: UIScene, willConnectTo session: UISceneSession, options connectionOptions: UIScene.ConnectionOptions) {
    guard let windowScene = (scene as? UIWindowScene) else { return }
    window = UIWindow(frame: windowScene.coordinateSpace.bounds)
    window?.windowScene = windowScene
    window?.rootViewController = ViewController()
    window?.makeKeyAndVisible()
}
Create View Controllers
We need two ViewControllers:
- ViewController():
This is where we’ll set our application entry point and set the buttons that lead to the appropriate segmentation.
- OutputViewController():
This controller will be used to select the image in order to send it to the API and receive the API callback as well.
Setup ViewController():
Label
lazy var name: UILabel = {
   let text = UILabel()
    text.translatesAutoresizingMaskIntoConstraints = false
    text.font = UIFont(name: "Avenir-Heavy", size: 35)
    text.text = "Segmentation API"
    text.textColor = #colorLiteral(red: 0.4980392157, green: 0.05882352941, blue: 0.07843137255, alpha: 1)
    return text
}()- Instantiate a UILabel object
- Set the font type (Avenir-heavy) and size
- Set the label string—I chose to call the application “Segmentation API”, but that’s up to you to change it
- Set the text color
Logo
lazy var logo: UIImageView = {
    let image = UIImageView(image: #imageLiteral(resourceName: "profile"))
    image.translatesAutoresizingMaskIntoConstraints = false
    return image
}()- Instantiate a UIImageView and pick the image using the “image literal” function
- Enable auto layout
Buttons
ViewController() has two buttons, one for “Semantic segmentation” and the other one for “Instance segmentation”. I also created a custom Button called MyButton() to increase code reusability (available in the GitHub repository).
lazy var semanticBtn : MyButton = {
   let btn = MyButton()
    btn.translatesAutoresizingMaskIntoConstraints = false
    btn.addTarget(self, action: #selector(buttonToSemanticSegmentation(_:)), for: .touchUpInside)
    btn.setTitle("Semantic segmentation", for: .normal)
    let icon = UIImage(systemName: "map")?.resized(newSize: CGSize(width: 35, height: 35))
    let finalIcon = icon?.withTintColor(#colorLiteral(red: 0.5, green: 0.06049922854, blue: 0.07871029526, alpha: 1))
    btn.setImage(finalIcon, for: .normal)
    btn.imageEdgeInsets = UIEdgeInsets(top: 0, left: 15, bottom: 0, right: 100)
    btn.layoutIfNeeded()
    return btn
}()
Only the button title and target change, the rest is identical:
- Instantiate a MyButton() object
- Enable auto layout
- Set the title string
- Add an icon using SF Symbols
- Add a target that will lead to OutputViewController()
Set up the layout
fileprivate func addElementsToSubview() {
    view.addSubview(name)
    view.addSubview(logo)
    view.addSubview(semanticBtn)
    view.addSubview(instanceBtn)
}

fileprivate func setupView() {

    logo.centerXAnchor.constraint(equalTo: self.view.centerXAnchor).isActive = true
    logo.topAnchor.constraint(equalTo: self.view.topAnchor, constant: 50).isActive = true
    logo.widthAnchor.constraint(equalToConstant: 200).isActive = true
    logo.heightAnchor.constraint(equalToConstant: 200).isActive = true

    instanceBtn.centerXAnchor.constraint(equalTo: view.centerXAnchor).isActive = true
    instanceBtn.widthAnchor.constraint(equalToConstant: view.frame.width - 40).isActive = true
    instanceBtn.heightAnchor.constraint(equalToConstant: 65).isActive = true
    instanceBtn.bottomAnchor.constraint(equalTo: semanticBtn.topAnchor, constant: -40).isActive = true

    semanticBtn.centerXAnchor.constraint(equalTo: view.centerXAnchor).isActive = true
    semanticBtn.widthAnchor.constraint(equalToConstant: view.frame.width - 40).isActive = true
    semanticBtn.heightAnchor.constraint(equalToConstant: 65).isActive = true
    semanticBtn.bottomAnchor.constraint(equalTo: view.bottomAnchor, constant: -120).isActive = true

    name.topAnchor.constraint(equalTo: view.topAnchor, constant: 250).isActive = true
    name.heightAnchor.constraint(equalToConstant: 100).isActive = true
    name.centerXAnchor.constraint(equalTo: view.centerXAnchor).isActive = true
    name.numberOfLines = 1
}- Add all the elements to the ViewController’s subview
- Set up constraints for each element
Setup OutputViewController():
- Output Image
lazy var outputImage: UIImageView = {
    let image = UIImageView()
    image.translatesAutoresizingMaskIntoConstraints = false
    image.contentMode = .scaleAspectFit
    image.layer.masksToBounds = true
    return image
}()- Instantiate an empty UIImageView object
- Enable auto layout
- Select the content mode—I chose .scaleAspectFit
- Enable masksToBounds in order to clip any layer bit outside the view boundaries
2. Upload and camera button
 lazy var cameraBtn : MyButton = {
   let btn = MyButton()
    btn.translatesAutoresizingMaskIntoConstraints = false
    btn.addTarget(self, action: #selector(buttonToCamera(_:)), for: .touchUpInside)
    btn.setTitle("Take an image      ", for: .normal)
    let icon = UIImage(systemName: "camera")?.resized(newSize: CGSize(width: 45, height: 35))
    let finalIcon = icon?.withTintColor(#colorLiteral(red: 0.5, green: 0.06049922854, blue: 0.07871029526, alpha: 1))
    btn.setImage(finalIcon, for: .normal)
    btn.imageEdgeInsets = UIEdgeInsets(top: 0, left: 15, bottom: 0, right: 100)
    btn.layoutIfNeeded()
    return btn
}()
The logic is the same as the buttons in ViewController() , the only important change is the target function.
3. Set up the target function for the buttons
The function will be triggered when we click the button. The function is pretty simple, but you’ll need to add a description in the info.plist file and explain to the user why you need to use the camera or access the media library (The application will crash if you don’t specify it).
@objc func buttonToUpload(_ sender: MyButton) {
    if UIImagePickerController.isSourceTypeAvailable(.photoLibrary) {
        let imagePicker = UIImagePickerController()
        imagePicker.delegate = self
        imagePicker.sourceType = .photoLibrary
        imagePicker.allowsEditing = true
        self.present(imagePicker, animated: true, completion: nil)
    }
}- Instantiate a UIImagePickerController()
- Choose the source type—either the media library or the camera
- Set the editing to true if you want to crop the image before sending it to the API
- Present the UIImagePickerController() view
4. Setup the layout
Add the elements to the subview and set the constraints.
4. Handle the API callbacks in the iOS application
The API expects a dictionary of type [String: String]—the key being “image” and the value being the image in the format of a base64String .
I’m using the widely-used Swift package called Alamofire, which is excellent for handling HTTP networking with Swift. Install the package (I used pod) using your preferred method:
func imagePickerController(_ picker: UIImagePickerController, didFinishPickingMediaWithInfo info: [UIImagePickerController.InfoKey : Any]) {
    // your chosen image
    let pickedImage = info[UIImagePickerController.InfoKey.editedImage] as! UIImage
    self.outputImage.image = pickedImage.resized(newSize: CGSize(width: 350, height: 350))
    self.outputImage.showSpinner()

    // convert the UIImage to base64 encoding
    let imageDataBase64 = pickedImage.jpegData(compressionQuality: 0.2)!.base64EncodedString(options: .lineLength64Characters)

    let parameters: Parameters = ["image": imageDataBase64]

    AF.request(URL.init(string: self.apiEntryPoint)!, method: .post, parameters: parameters, encoding: JSONEncoding.default, headers: .none).responseJSON { (response) in
    print(response.result)

    switch response.result {
        case .success(let value):
                if let JSON = value as? [String: Any] {
                    let base64StringOutput = JSON["output_image"] as! String
                    let newImageData = Data(base64Encoded: base64StringOutput)
                    if let newImageData = newImageData {
                       let outputImage = UIImage(data: newImageData)
                        let finalOutputImage = outputImage!.resized(newSize: CGSize(width: 350, height: 350))
                        self.outputImage.removeSpinner()
                        self.outputImage.image = finalOutputImage
                    }
                }
            break
        case .failure(let error):
            print(error)
            break
        }
    }
    picker.dismiss(animated: true, completion: nil)
}
Everything is happening in the image picker delegate implementation. Many things are happening here, so let’s break it down:
- Create an object of the picked image and parse it as a UIImage object
- Convert the UIImage to a base64 encoding with a significant compression ratio of 20%. You don’t have to do it, but it does improve the performance of the API
- Create the parameter that will be used to send the POST request value to be encoded into the URLRequest
- Perform the request using the Alamofire request method. Pass the API entry point, the type of method ( POST in our case), and the parameters
- Handle the API response result. If successful, we’ll parse the API response as a JSON object and convert the image from a base64 format to a UIImage object
- Update the UIImageView with the segmented image
5. Test and evaluate the results
When preparing to send the image to the API, we need to encode it as a base64 object, but we also need to specify the compression ratio as well. This is an important element of the application—you need to evaluate and understand the limits of the API, and consequently the model’s limits, as well.
My small testing sample concludes that the compression ratio has little to no effect on the segmentation quality.
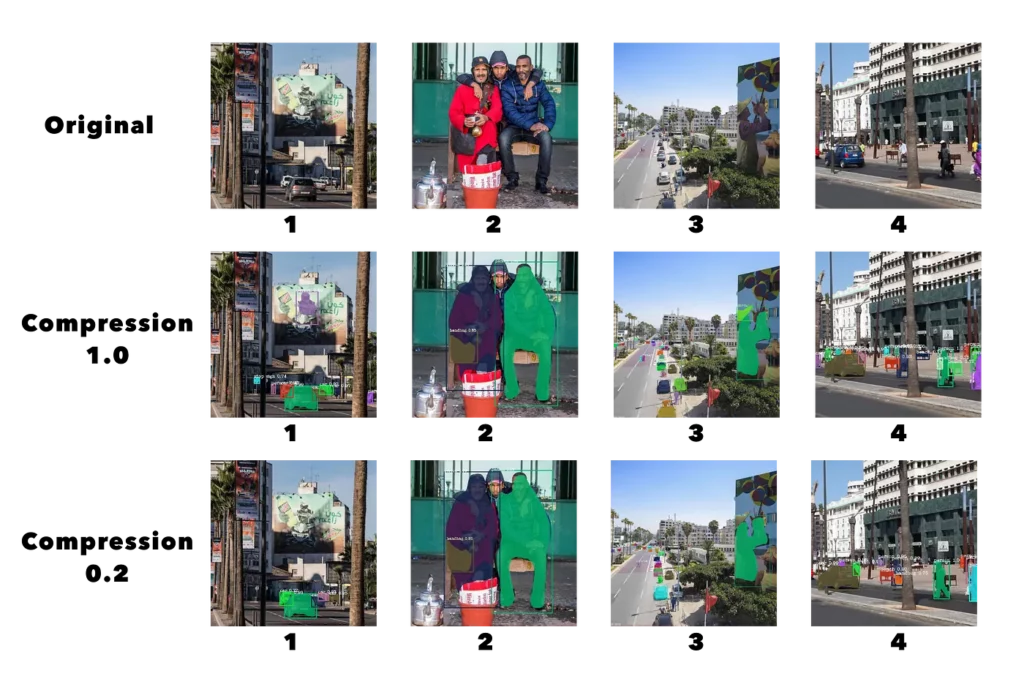
Considering that some of these images are not easy to segment (1 and 3)— mainly because you have a large variety of objects, shadows and lighting conditions—the model did a good job of grasping the objects, as well as creating most of the segmentation masks correctly.
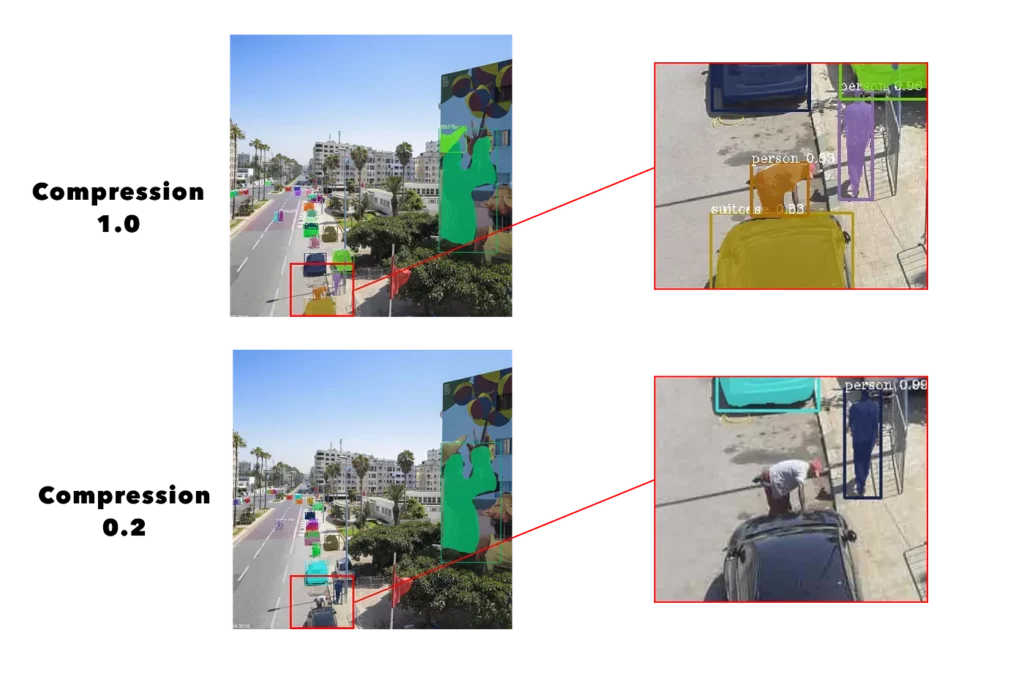
Some accuracy issues appear when the compression rate is important—the figure above is a very complex image with multiple objects of the same class, too. The model did a great job of segmenting most of the objects with relatively good accuracy, but a significant portion of the image was not detected by the model. I even ran the inference a couple of times just to make sure it was a compression issue.
These issues are common in computer vision—you have to control your environment in order to get the best “expected” result, the word “expected” being very important. It can be easy to compromise accuracy for the sake of speed or latency. You have to make those choices and decide what suits your use case best.
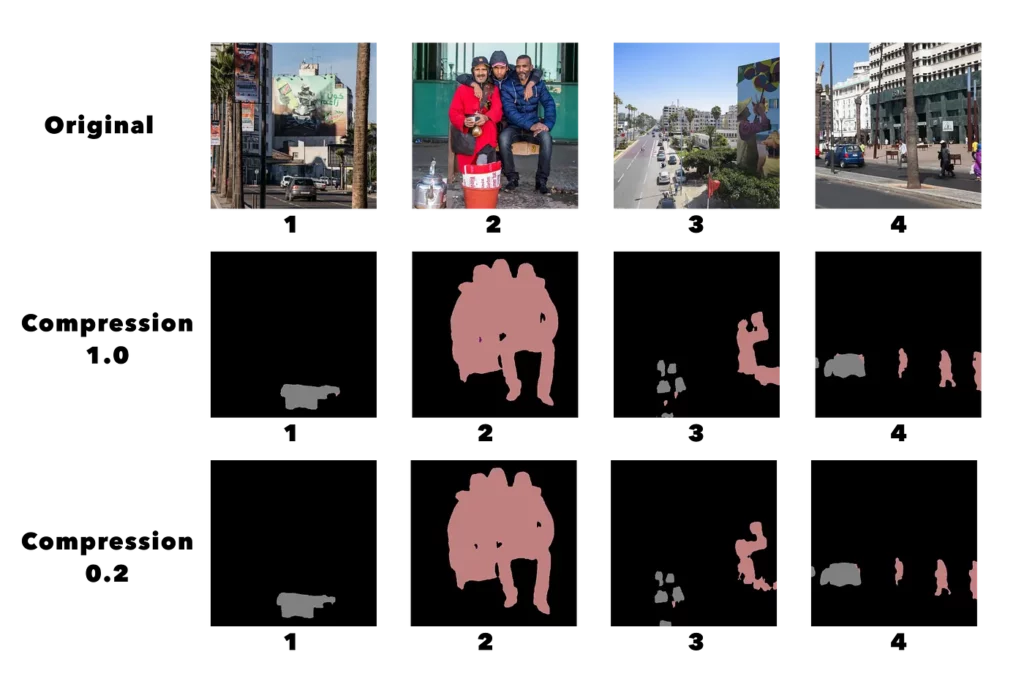
As for semantic segmentation, the model did just ok for pretty much any tested level of compression. This is purely a limitation of the model. By comparison to instance segmentation, compression didn’t have a noticeable effect on the accuracy.
6. Conclusion
The library is great for a fast and easy segmentation, but it does lack very important elements:
- Integrate custom models
- Train and evaluate custom models
- The inference time for both supported models is not optimal (to say the least)
- In order to start segmenting, you have to manually download the models and add them to your project structure
Overall, the library is at its genesis, and Ayoola Olafenwa did a great job at making it easy to get going and start segmenting. I’m hoping she will continue to improve the library by continuing to add new features like the ones mentioned above. In my opinion, custom models (training and inference) should be a priority.
Thank you for reading this article. If you have any questions, don’t hesitate to send me an email at [email protected].

Comments 0 Responses