
Google’s on-device ML Kit recently introduced another API for barcode scanning. It can read and scan almost a dozen different types of barcodes including Codabar, Code 39, Code 93, EAN-8, EAN-13, QR code, PDF417, and more.
The barcode scanning API also tells you the scanned format and it will automatically detect the formats. The other main feature of this API is that you can use it in your application without a network connection and it will support the different orientation.
In this article, we’ll do just that on Android with the help of Google ML Kit’s Barcode Scanning API.
What is ML Kit?
ML Kit is a cross-platform mobile SDK (Android and iOS) developed by Google that allows developers to easily access on-device mobile machine learning models.
All the ML Kit’s APIs run on-device, allowing real-time and offline capabilities.
To use the standalone ML Kit on-device SDK, we can just implement it directly — we don’t need to create a project on Firebase or an accompanying google.json file.
If you’re using Firebase Machine Learning, then you can check this link to help migrate.
What You’ll Build
In this article, we’re going to build a simple Android app that shows you how to implement ML Kit’s Scan Barcode on-device API.
There are two ways to integrate Scan Barcode in Android
- bundled model (which is the part of your application)
- unbundled model (which depends on Google Play Services)
For the purposes of this demo project, I’ve just implemented the unbundled model, which depends on and will be dynamically downloaded via Google Play Services.
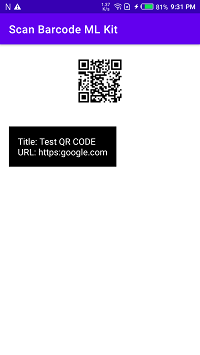
By the end of this tutorial, you should see something similar to the screenshot below:
Step 1: Add Dependency
First off, we need to add a mlkit:barcode-scanning dependency to our Android project in the app/build.gradle file.
For bundling the model in your app:
For using the model within Google Play Services:
Note: At the time of writing, the latest com.google.mlkit:barcode-scanning version was 16.1.1, but you can use any of the latest stable releases you want from the ML Kit Release Notes.
Sync the Project
After successfully adding the dependency, just sync the project, as shown in the screenshot below:
Step 2: Configure the Barcode Scanner
To configure the barcode scanner default settings, we have a number of format settings for barcode and, if we know which barcode format we need to read, then we can simply add that format to the barcode ScannerOption using the setBarCodeFormat method.
You can see the complete list of supported Barcode formats here.
Now let’s jump into some code to see how these above steps look in practice:
Step 3: Prepare the Input Image
To scan a barcode in an image, we need to prepare the input image. We have a few different options to do this.
- Bitmap
- media.Image
- ByteBuffer
- ByteArray
- File
media.Image:
This is used when capturing an image from the device’s camera.
ByteBuffer or ByteArray
We can also create an input image using byteBuffer or ByteArray — to do so we need to create the InputImage object with the buffer or array, together with the image’s height, width, color encoding format, and rotation degree:
File
To create an instance of an input image, we need to pass the app context and file URI to InputImage.fromFilePath
For this demo, I’m using a Bitmap to prepare the input image — let’s jump to the code how it looks.
Note: The input image needs dimensions of at least 480×360 pixels for Barcode Scanning
Step 4: Create an Instance of a BarcodeScanner
In step 4, we create an instance of a BarcodeScanning using the BarcodeScanning.getClient method, and pass the BarcodeScannerOptions instance as a parameter. Or, if you want to use default settings, then there’s no need to pass the BarcodeScannerOptions instance as a parameter.
Now let’s jump into some code to see how these above steps look in practice:
With BarcodeScannerOptions:
Without BarcodeScannerOptions:
Step 5: Send Image to the Barcode Scanner and Process the Image
In step 5, we need to pass an image to the barcode Scanner via process().
After that, we call process on the barcode scanner, which passes the input image as a parameter. We also use the onSuccessListener to determine when the barcode scanner is complete. If successful, we can access the list barcodes and draw the Rect (the bounding box) on the detected barcode.
After that, we check the valueType for barcode using barcode.valueType
In this demo we use ValueType = “URL” so after success, we checked which type the barcode is, and if the type is URL then we simply get the title and URL from the barcode and print the result.
We also add an OnFailureListener—if barcode image scanning processing fails, we’ll be able to show the user an error.
Now let’s jump into some code to see how these above steps look in practice:
Result
Let’s build and run the application to see our barcode Scanning model in practice:
Conclusion
This article taught you how to implement ML Kit’s on-device Barcode Scanning API on Android. To do this, we learned how to configure BarcodeScannerOptions, prepare an input image, create a BarcodeScanning instance, and finally processing the selected image.
We also created a simple application that can pull images locally from the assets folder i.e. (drawable folder) and pass that bitmap image to InputImage.fromBitmap(bitmap, 0). After scanning the barcode from the API, we then showed the result of the barcode, title, and URL.
If you want to explore barcode scanning in more detail, check out the official docs:
I hope this article was helpful. If you think something is missing, have questions, or would like to offer any thoughts or suggestions, go ahead and leave a comment below. I’d appreciate the feedback.
I’ve written some other Android-related content, and if you liked what you read here, you’ll probably also enjoy other my Medium page.
Sharing (knowledge) is caring 😊 Thanks for reading this article. Be sure to clap or recommend this article if you found it helpful. It means a lot to me.
If you need any help, join me on Twitter, LinkedIn, GitHub, and subscribe to my YouTube Channel.

Comments 0 Responses