
Following up on my earlier blogs on running edge models in Python, this fifth blog in the series of Training and running Tensorflow models will explore how to run a TensorFlow Lite image classification model in Python.
While the previous blog covered building and preparing this model, this blog will look at how to run this TensorFlow Lite model in Python.
TensorFlow Lite models have certain benefits when compared to traditional TensorFlow models—namely, they’re typically smaller in size and have lower inference latency.
However, this comes with a slight tradeoff as far as model accuracy goes; but if your use-case allows for this tradeoff, then you’re golden!
In this blog, I’ll be using a classification model that I trained earlier.
If you don’t know what an image classification model is/does, or if you want to train your own model, feel free to read this blog here in which I outline how to do so:
Table of contents:
Step 1: Downloading the TensorFlow Lite model
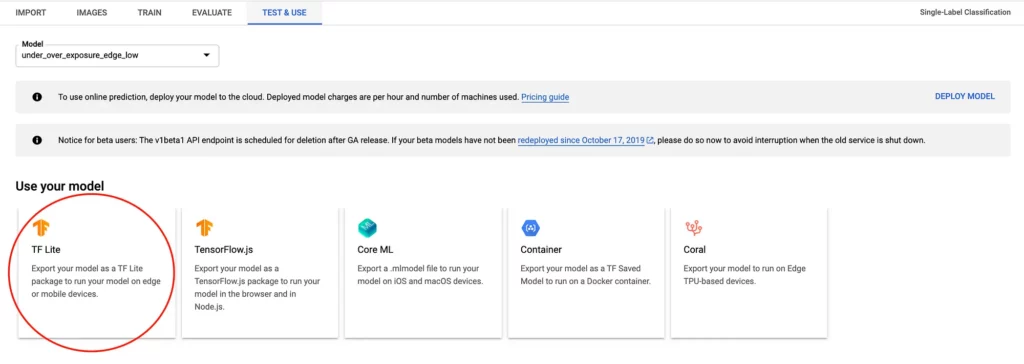
Assuming that you’ve trained your TensorFlow model with Google Cloud, you can download the model from the Vision dashboard as shown in the screenshot here:
Once downloaded, we’re ready to set up our environment and proceed with the next steps.
Step 2: Installing the required dependencies
Before we go ahead and write any code, it’s important that we first have all the required dependencies installed on our development machine.
For the current example, these are the dependencies we’ll need:
We can use pip to install these dependencies with the following command:
Step 3: Loading the model and studying its input and output
Now that we have the model and our development environment ready, the next step is to create a Python snippet that allows us to load this model and run inferencing with it.
Here’s what such a snippet might look like:
import numpy as np
import tensorflow as tf

# Load TFLite model and allocate tensors.
interpreter = tf.contrib.lite.Interpreter(model_path="exposure.tflite")

# Get input and output tensors.
input_details = interpreter.get_input_details()
output_details = interpreter.get_output_details()

interpreter.allocate_tensors()

# input details
print(input_details)
# output details
print(output_details)
Here, we first load the downloaded model and then get the input and output tensors from it.
Next, we print the input and outputs tensors we obtained earlier.
If you run the code, this is what the output might look like:
Here, the model takes the input at index 0, and the type of input is an array of shape [1,224,224,3], which basically means that it takes a single image of size 224 x 224 in RGB format.
The model gives the output at index 173, and the shape of the output array is [1,3], which essentially means we’ll be getting the scores for each of our labels. For the purposes of my project, I’ve trained the model to classify an input image as underexposed, overexposed, or good—so the output has the shape [1,3].
If I trained my model to detect n labels, then the output shape would have been [1,n].
Now that we have the input and output type and shapes of the model, let’s load an image and run it through the TensorFlow Lite model.
Step 4: Reading an image and passing it to the TFLite model
Up next, we’ll use Pathlib to iterate through a folder containing some images that we’ll be running inference on. We’ll then read each image with OpenCV, resize it to 224×224, and pass it to our model.
Once done, we’ll print the file name and the output for that file:
import numpy as np
import tensorflow as tf
import cv2
import pathlib

# Load TFLite model and allocate tensors.
interpreter = tf.contrib.lite.Interpreter(model_path="exposure.tflite")

# Get input and output tensors.
input_details = interpreter.get_input_details()
output_details = interpreter.get_output_details()

interpreter.allocate_tensors()

# input details
print(input_details)
# output details
print(output_details)

for file in pathlib.Path(folder_path).iterdir():

    # read and resize the image
    img = cv2.imread(r"{}".format(file.resolve()))
    new_img = cv2.resize(img, (224, 224))

    # input_details[0]['index'] = the index which accepts the input
    interpreter.set_tensor(input_details[0]['index'], [new_img])

    # run the inference
    interpreter.invoke()

    # output_details[0]['index'] = the index which provides the input
    output_data = interpreter.get_tensor(output_details[0]['index'])

    print("For file {}, the output is {}".format(file.stem, output_data))
Upon running this code, here’s what the output might look like:
As you can see, the output contains 3 values, which add up to 256. These represent the scores for the image, which indicate whether it’s underexposed, good, or overexposed, respectively.
To get your model’s predicted output, simply fetch the index with the greatest score and map it with your label.
For example, in the first image in the output above, the highest score is the second element in the array, which maps with the label “good”; whereas, the second image is “underexposed” and the second to last is “overexposed”.
To further improve model performance, you can batch the requests as well. Let’s see how to do this.
Step 5: Batching requests for better performance
Batching with TensorFlow essentially means running a bunch of inference requests at once instead of running them one by one.
This will result in a reduced latency in our model.
Before we go ahead and batch the requests, we need to decide upon the batch size. This might vary from machine to machine, and setting a very large batch size might result in an out of memory exception.
To make things simple, we will set the batch size as 50. Here’s what the above example with batching looks like:
import numpy as np
import tensorflow as tf
import cv2
import pathlib

# Load TFLite model and allocate tensors.
interpreter = tf.contrib.lite.Interpreter(model_path="exposure.tflite")

# Get input and output tensors.
input_details = interpreter.get_input_details()
output_details = interpreter.get_output_details()

interpreter.allocate_tensors()

# input details
print(input_details)
# output details
print(output_details)

images = []

for index, file in enumberate(pathlib.Path(folder_path).iterdir()):

    # read and resize the image
    img = cv2.imread(r"{}".format(file.resolve()))
    new_img = cv2.resize(img, (224, 224))

    images.append(new_img)

    if index == 49:
        interpreter.set_tensor(input_details[0]['index'], images)
        # run the inference
        interpreter.invoke()
        # output_details[0]['index'] = the index which provides the input
        output_data = interpreter.get_tensor(output_details[0]['index'])
        # clear the list
        images.clear()
But upon running the code above, you might see an error, which looks as follows:
The reason for this is a mismatch in the shape of the input tensor vs the shape of the input that we’re providing.
The input that the model accepts is [1, 224, 224, 3], whereas the input we’re providing is [50, 224, 224, 3]. To fix this, we can simply resize our input before running inference on it.
Here’s what the code for doing so looks like:
import numpy as np
import tensorflow as tf
import cv2
import pathlib

# Load TFLite model and allocate tensors.
interpreter = tf.contrib.lite.Interpreter(model_path="exposure.tflite")

# Get input and output tensors.
input_details = interpreter.get_input_details()
output_details = interpreter.get_output_details()

# input details
print(input_details)
# output details
print(output_details)

images = []

for index, file in enumberate(pathlib.Path(folder_path).iterdir()):

    # read and resize the image
    img = cv2.imread(r"{}".format(file.resolve()))
    new_img = cv2.resize(img, (224, 224))

    images.append(new_img)

    if index == 49:
        # resize the input tensor
        interpreter.resize_tensor_input(input_details[0]['index'],[len(images), 224, 224, 3])
        interpreter.allocate_tensors()
        interpreter.set_tensor(input_details[0]['index'], images)
        # run the inference
        interpreter.invoke()
        # output_details[0]['index'] = the index which provides the input
        output_data = interpreter.get_tensor(output_details[0]['index'])
        # clear the list
        images.clear()
Before running inference, we can also resize the input so that it accepts as many images as there are in the current batch of images.
On running the code above, this is what you might get as the output:
The length of this array would be the same as your batch size (here 50); so if you maintain another list of file names, you can reference the score for each image easily!
And that’s it! While not always the model effective solution, TFLite models are nonetheless an extremely viable alternative when it comes to running your models on edge hardware, or if the model’s latency is a core concern for your app!
In the next part of this series, I’ll be covering how we can do the same for object detection TF Lite models, in order to locate and track detected objects in an image. Stay tuned for that!
Thanks for reading! If you enjoyed this story, please click the 👏 button and share it to help others find it! Feel free to leave a comment 💬 below.
Have feedback? Let’s connect on Twitter.

Comments 0 Responses