
This tutorial discusses running the popular Python library NumPy (Numerical Python) in Android devices on top of the Kivy framework. The tutorial covers the Kivy installation, a brief introduction to Kivy, installation of python-4-android and Buildozer for building Android applications, and finally running NumPy in Android.
Introduction
Python is one of the most popular data science tools due to the availability of powerful libraries that make building applications much easier. Some tasks, such as image classification, require writing many lines of code in programming languages such as C or Java, but Python decouples the user from many unnecessary details. It provides a simpler interface to do complex tasks. The simplicity extends to building machine learning models using a few lines of code. This makes Python a key tool for data scientists.
Some people decouple their data science projects from previous applications. For example, they might have previously used a library such as NumPy for building and training a model. They might also have built Android applications—but then there’s the issue of figuring out how to merge Android development with ML. It can be a struggle to navigate the bridge between building a machine learning model and using it within mobile applications.
The good news is that Python isn’t just an environment for building data science and ML projects, but it’s also a cross-platform programming language that allows you to build complex applications. This tutorial explores the advantages of using Python for cross-platform programming.
Luckily, there’s a cross-platform Python framework called Kivy that supports packaging Python libraries in mobile devices (iOS and Android). The Kivy project is available on GitHub:
In order to build an Android application with Kivy, there are two specific projects that’ll help serve this purpose: python-4-android and Buildozer. They’ll be discussed later.
The tutorial is organized according to the following points:
- Kivy installation for Linux
- Installing Kivy in a Virtual Environment
- Importing Kivy
- Creating a Basic Application
- Python for Android
- Installing Buildozer
- Preparing buildozer.spec
- Building Android Application using Buildozer
You can read more about Kivy in chapter 8 of my book cited as “Ahmed Fawzy Gad ‘Practical Computer Vision Applications Using Deep Learning with CNNs’. Dec. 2018, Apress, 978–1–4842–4167–7.” The book is available at Springer at this link. It is also available at Amazon at the link below.
Kivy Installation for Linux
For this tutorial, you’ll need to install Kivy in a virtual environment. The platform used in this tutorial is Linux Ubuntu. When building a desktop application, you can either install Kivy for any platform (Windows, Linux, or Mac). But for building mobile applications, the necessary tools (Buildozer and python-4-android) are only supported in Linux. This is why Linux is used.
The backend library for drawing the Kivy user interface is SDL. In order to install it, some dependencies must be installed. Based on the Kivy Linux installation instructions, the following Linux command prepares such requirements.
Installing Kivy in a Virtual Environment
After preparing the Kivy dependencies, we can start installing Kivy by creating its virtual environment. It isn’t required to use a virtual environment to run Kivy, but it’s recommended to separate Kivy from other already existing projects.
Before creating the virtual environment, we should make sure that the tools required for creating it are already installed and updated. The following command ensures that the virtualenv and setuptools tools are already existing and updated:
virtualenv is used to create isolated Python environments. setuptools is used for packaging Python projects.
After that, we’re ready to create the Kivy virtual environment. The following command creates an environment called KivyAndroid:
The — no-site-packages argument is used to isolate the environment from the main Python installation. This is to work freely on that project without affecting any other project.
After issuing that command, you should see a new folder in the current directory named according to the virtual environment name, as shown in the next figure.
The previous command will use the default Python interpreter within the environment. It may be Python 2, and we’re looking to work with Python 3. For this reason, we can explicitly specify which Python interpreter to use using the -p option as in the following command:
After creating the virtual environment, we can activate it to start installing Kivy. It can be activated based on the following command:
The dot (.) in the previous command is a built-in command that executes the content of the file passed as an argument. It’s a synonym for the command source. As a result, the previous command is identical to this command:
The command prompt should change after activating the virtual environment to be as follows:
Before installing Kivy, Cython must be installed in such an environment according to the following command:
Note that the version of Cython is dependent on the version of Kivy to be installed. In the current date, the latest Kivy version is 1.10.0 and it requires Cython 0.25.2 and this is why it is used in the above command. After that, we are ready for installing Kivy.
Kivy could be installed using pip according to the following command:
After that command, Kivy will be downloaded and installed automatically.
Importing Kivy
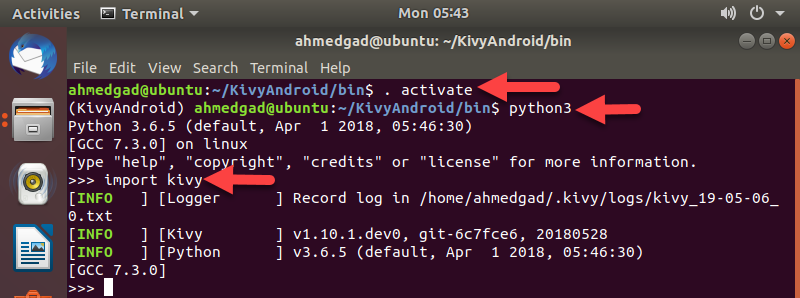
In order to make sure Kivy is installed successfully, we can run Python within the virtual environment and import Kivy and see whether it’s imported successfully or not. The commands are given in the next figure. After making sure Kivy is working, the next step is to start discussing the structure of the Kivy applications through a number of examples.
Creating a Basic Application
In order to create a Kivy application, a new Python class is created that extends the App class in the kivy.app module. The Kivy application is created by instantiating such a new class (child class). Remember that the Kivy application is not created by instantiating the App class but by instantiating a child class extending the App class. There’s a method called run() inside the App class.
The application runs by calling the run() method using an instance created from the child class. Between instantiating the class and running it, we have to specify the layout of the application user interface. The App class supports a method called build() that returns the layout widget containing all other widgets in the UI. This method can be overridden from the parent App class.
Let’s make things a bit more by discussing a basic Kivy application in the code below. At first, the required modules from Kivy are imported. kivy.app contains the App class. This class is used as the parent of our defined class FirstApp. The second statement imports kivy.uix.label, which has the label widget. This widget simply displays text on the UI.
Inside the build() method, the label widget is created using the kivy.uix.label.Label class. The class constructor accepts an argument named text, which is the text to be displayed on the UI. The returned label is saved as a property of the FirstApp object. Adding widgets as properties for the class object makes it easy to retrieve them later, compared to saving them in separate variables.
import kivy.app
import kivy.uix.label
import kivy.uix.boxlayout

class FirstApp(kivy.app.App):
    def build(self):
        self.label = kivy.uix.label.Label(text="Hello Kivy")
        self.layout = kivy.uix.boxlayout.BoxLayout()
        self.layout.add_widget(widget=self.label)
        return self.layout

firstApp = FirstApp()
firstApp.run()
Widgets in Kivy are grouped into a root widget. In the above code, the BoxLayout is used as the root widget that contains all other widgets. This is why the kivy.uix.boxlayout is imported.
Based on the constructor of the kivy.uix.label.BoxLayout class, the BoxLayout object is saved as a property of the FirstClass object. After creating both the label and the layout objects, the label is added to the layout using the add_widget() method. This method has an argument named widget that accepts the widget to be added to the layout. After adding the label into the root widget (layout), the layout is returned by the build() method.
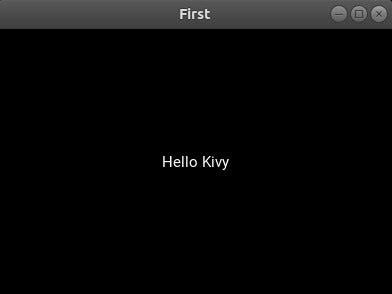
After creating the child class FirstApp and preparing its build() method, an instance from that class is created. The run() method is then called by that instance and the application window is displayed according to the next figure.
We can add more than one widget inside the BoxLayout. This layout widget arranges its child widgets either vertically or horizontally. Its constructor has an argument named orientation to define the arrangement. It has two values—horizontal and vertical. It defaults to horizontal.
If the orientation is set to vertical, then the widgets are stacked on top of each other, with the first widget added appearing at the bottom of the window and the last widget added appearing on the top. In this case, the window height is divided equally across all child widgets.
If the orientation is horizontal, then the widgets are added side-by-side, where the first widget added is the left-most widget on the screen and the last widget added is the right-most widget on the screen. In this case, the width of the window is divided equally across all child widgets.
The next code uses 5 button widgets with their text set to Button 1, Button 2, etc., up to Button 5. These widgets are added horizontally inside a BoxLayout widget. The result is given in the next figure:
import kivy.app
import kivy.uix.button
import kivy.uix.boxlayout

class FirstApp(kivy.app.App):
    def build(self):
        self.button1 = kivy.uix.button.Button(text="Button 1")
        self.button2 = kivy.uix.button.Button(text="Button 2")
        self.button3 = kivy.uix.button.Button(text="Button 3")
        self.button4 = kivy.uix.button.Button(text="Button 4")
        self.button5 = kivy.uix.button.Button(text="Button 5")
        self.layout = kivy.uix.boxlayout.BoxLayout(orientation="horizontal")
        self.layout.add_widget(widget=self.button1)
        self.layout.add_widget(widget=self.button2)
        self.layout.add_widget(widget=self.button3)
        self.layout.add_widget(widget=self.button4)
        self.layout.add_widget(widget=self.button5)
        return self.layout

firstApp = FirstApp(title="Horizontal BoxLayout Orientation.")
firstApp.run()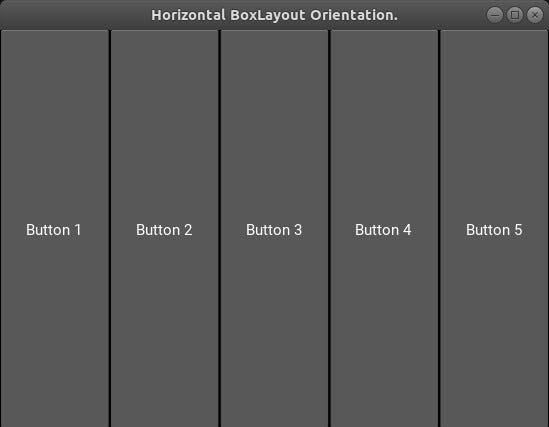
Let’s use a new widget called TextInput. This widget allows the user to enter input to the application. There will be two TextInput widgets where the user can enter two numbers. There will also be a Button widget that, when pressed, with fetch the two numbers and add them using NumPy. The code for such an application is given below.
Inside the build() method, the TextInput widgets are created as instances from the kivy.uix.textinput.TextInput class. Then a Label is created as an instance of the kivy.uix.label.Label class and finally a Button using the kivy.uix.button.Button class. In order to handle the button press event, the bind() method is used.
import kivy.app
import kivy.uix.button
import kivy.uix.label
import kivy.uix.textinput
import kivy.uix.boxlayout
import numpy

class TestApp(kivy.app.App):

    def add_nums(self, btn):
        num1 = numpy.asfarray(self.input1.text, float)
        num2 = numpy.asfarray(self.input2.text, float)
        result = num1 + num2
        self.lbl.text = str(result)

    def build(self):
        self.input1 = kivy.uix.textinput.TextInput(hint_text="Number 1")
        self.input2 = kivy.uix.textinput.TextInput(hint_text="Number 2")

        self.lbl = kivy.uix.label.Label(text="Result of Addition")

        btn = kivy.uix.button.Button(text="Add numbers using NumPy")
        btn.bind(on_press=self.add_nums)

        layout = kivy.uix.boxlayout.BoxLayout(orientation="vertical")

        layout.add_widget(self.input1)
        layout.add_widget(self.input2)

        layout.add_widget(self.lbl)
        layout.add_widget(btn)

        return layout

app = TestApp()
app.run()
The bind() method accepts an argument specifying the target event to be handled. This argument is assigned a function or a method to be called for handling such an event. For example, when a button is pressed, the on_press event is fired. As a result, the argument used with the bind() method will be named on_press.
Assume that we want to handle this event using a method called handle_press. In this case, the on_press argument of the bind() method will be assigned this method name. Note that the method handling an event accepts an argument representing that the widget actually fired the event. In this example, a method named add_nums is created which adds the two numbers entered in the two TextInput widgets. The bind()method has an argument named on_press which is assigned the callback method name which is add_numsin this example.
Inside the add_nums() method, the text inside the two TextInput widgets are returned using the text property into the num1 and num2 variables. Because the result returned by the text property is a string, we have to convert it into a number. NumPy is used for this purpose. The asfarray() function inside NumPy converts the data into a float. After having two NumPy arrays, they can be added simply using the + operator.
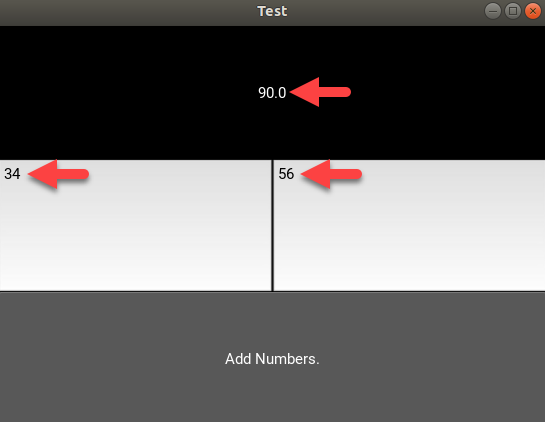
Adding two numbers will return a number. Thus the data type of the result variable is numeric. Because the text property only accepts strings, we have to convert the result variable into a string using the str() function in order to display its value on the Label. The next figure shows the application UI after adding two numbers and rendering the result on the Label widget.
With this discussion, we still haven’t covered many aspects of Kivy, but at least this foundation will help us build an application, even if it’s a simple one. After running the previous application and making sure it works well on the desktop, we’re ready to building our Android application.
Python for Android
At this point, we can go forward towards building an Android application using Kivy. Without any change in the code of the previous application, it will run on Android after packaging it, The simplified steps of converting the Kivy application into an Android application are illustrated in the next figure:

After completing the Kivy Python application, Buildozer prepares the required tools for creating the APK file. The most important tool is called python-4-android (P4A). Buildozer creates a file named buildozer.spec for each Kivy application before being converted into an Android application. This file holds details about the application that we’ll discuss later. Let’s start by installing Buildozer.
Installing Buildozer
Once installed, Buildozer automates the process of building Android applications. It prepares the environment for all requirements, including python-for-android, the Android SDK, and NDK. Before installing Buildozer, some dependencies are required. They can be downloaded and installed automatically using the following Ubuntu commands:
After installing these dependencies successfully, Buildozer can be installed according to this command:
If Buildozer is currently installed on your machine, the — upgrade option makes sure the latest version is installed. After installing Buildozer successfully, let’s prepare the buildozer.spec file in order to build the Android application.
Preparing buildozer.spec File
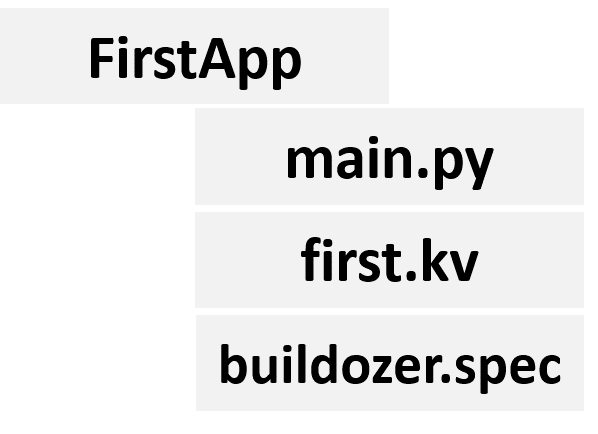
The project structure to be packaged into an Android application is given in the next figure. There is a folder named FirstApp that contains three files. The first file is named main.py, which is the Kivy application previously named FirstApp.py. The reason it’s renamed is that when building the Android application, there must be a file named main.py, which is the entrance of the application. This will not change anything in the application.
We should check whether the Kivy application runs successfully before proceeding to the next steps. Just activate the Kivy virtual environment on your machine and run the main.py Python file according to the figure below:

Up to this point, a Kivy desktop application is created successfully. We can now start preparing the missing file buildozer.spec and build an Android application.
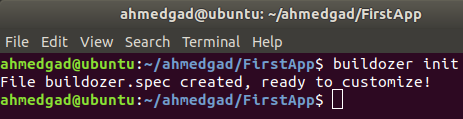
The buildozer.spec file can be simply generated automatically using Buildozer. After opening the Ubuntu terminal and navigating to the FirstApp directory in which the application Python and KV files exist, issue the following command:
After issuing this command, a confirmation message appears like in the figure below:
Some of the important fields of that file are listed in the code below. The following list describes some of these fields:
- title: represents the application title,
- source.dir: refers to the root directory of the application in which the main.py file exists. It is set usually as the current directory
- version: application version
- orientation: whether the application appears in full screen or not
- requirements: it is just set to the libraries needed to be packaged within the Android application. It is set just to Kivy in this example. If we use a library supported by P4A such as NumPy, then we need to list it in addition to Kivy in order to load it into the application.
- permissions: represents the requested permissions by the application. Note that the # character before a line indicates it is a comment.
- presplash.filenam: used to specify the image path that appears when loading the application before being started. The icon.filename property is assigned the file name of an image to be used as the application icon.
These fields are inside the [app] section of the specification file. You can also edit the specification file to change whatever fields you think need modification. The package.domain property is by default set to org.test, which is used just for testing, not production. If this value left as it is, it will prevent building the application for production.
After preparing the required files to build the Android application, the next step is to build it using Buildozer.
Building an Android Application using Buildozer
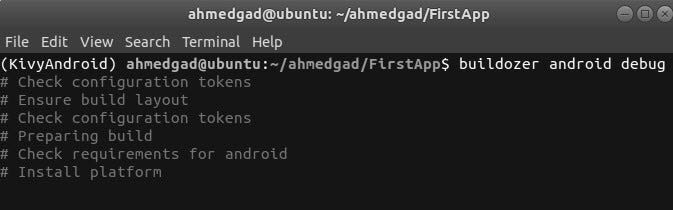
After preparing all project files, Buildozer uses them to produce the APK file. For development, we can produce a debug version of the application using the following command:
The next figure shows the response when the command is entered. When building the application for the first time, Buildozer has to download all of the required dependencies such as SDK, NDK, and P4A. Buildozer will download and install them automatically. Based on your Internet connection, the process might take a bit of time. Be patient.
Upon successful installation, there are two folders created. The first one is named .buildozer, which represents all files downloaded by Buildozer that are necessary for building the application.
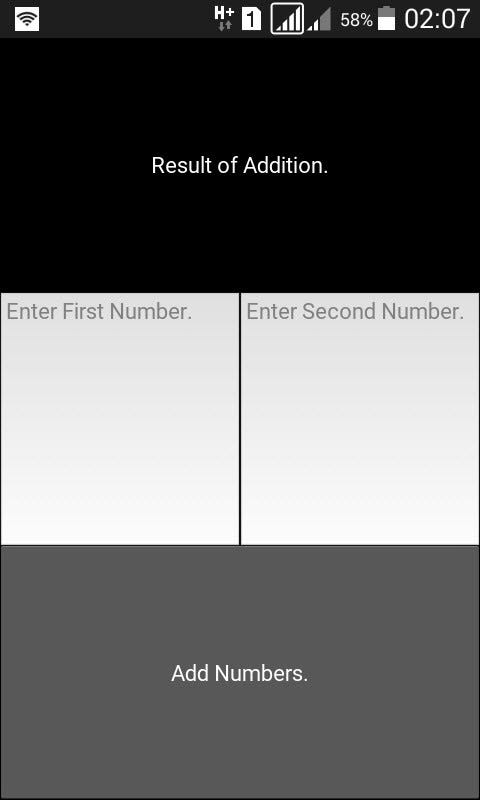
The second folder is named bin and it stores the APK files produced after building the application. We can transfer the APK file to an Android device to install and test it. The screen of the Android application is shown in the figure below. Once the application is running on the Android device, we can enter numbers and test it exactly the same as before.
If an Android device is connected and recognized by the machine, Buildozer can both produce the APK file and install it once produced on the machine, according to this command:
For Contacting the Author
- E-mail: [email protected]
- LinkedIn: https://linkedin.com/in/ahmedfgad/
- KDnuggets: https://kdnuggets.com/author/ahmed-gad
- TowardsDataScience: https://towardsdatascience.com/@ahmedfgad
- GitHub: https://github.com/ahmedfgad

Comments 0 Responses