
Creating accurate machine learning models capable of identifying multiple objects in a single image remains a core challenge in computer vision, but now with the advancement of deep learning and computer vision models for mobile, you can easily detect target objects from an image on Android.
In this article, we’ll do just that with the help of Firebase ML Kit’s Object Detection API.
What is Object Detection?
Object detection is a computer vision technique for identifying and locating instances of objects within images or videos. It provides much better understanding of an image as a whole when compared to visual recognition (i.e. image classification), which only identifies objects exist in an image, but doesn’t locate instance of them.
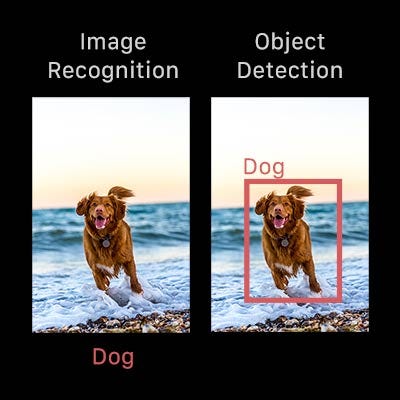
Object detection, essentially, is a process of finding instances of real-world objects such as faces, bicycles, and buildings in images or videos.
Possible Real World Use-Cases
With the right custom object detection model, you can detect recognize and locate pretty much anything, but here are a few possible examples of potential use cases:
- Person Detection: This is the task of identifying and locating all instances of individuals present in an image or video frame
- People Counting: You can also use object detection to counts the number of people—i.e. for detecting group measurements during events
- Vehicle Detection: We can detect, for instance, the license plate of a speeding car—we could then combine this with optical character recognition to automatically read the plates
What is ML Kit?
ML Kit is essentially a cross-platform mobile SDK (Android and iOS) developed by Google. It offers both on-device and cloud-based APIs.
The on-device APIs give you real-time and offline capabilities, but with limited accuracy compare to cloud-based API. The on-device API is also free of charge.
The object detection feature, unfortunately, is not available as cloud APIs . Here is the list of features available for both the cloud-based and on-Device APIs 👇
In this article, we’ll learn how to work with one of the provided models by the SDK: Object Detection for Android.
Create a Firebase Project and Add to Android
The first step we need to take is to create a Firebase project and add it to our Android app. At this point, I’ve already created a Firebase project, added it to a new project, and also included the Google Play Service JSON file. If you’re not familiar with this process, you can check out the official guide below.
What You’ll Build
In this article, we’re going to build an Android app in which we’re going to use the Firebase ML Kit Object Detection API to detect a target object in a given image
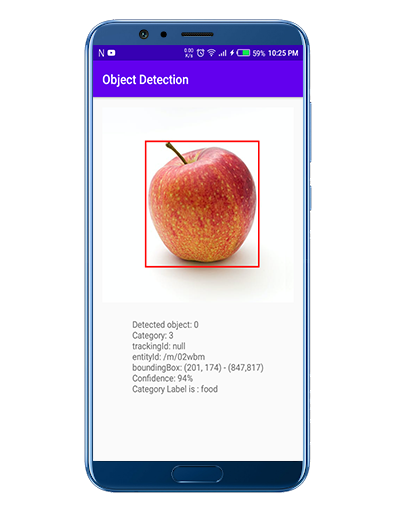
These are the prediction outputs involved in the object detection API (detected objects, confidence level, category label, and bounding box coordinates). By the end of this tutorial, you should see something similar to the below screenshot.
Let’s get Started
The Google Services plugin uses a Google Services JSON file to configure your application to use Firebase. And the ML Kit dependencies allow you to integrate the machine learning SDK into your app.
Step 1: Add Dependency
First things first, we need to add a firebase-ml-vision dependency and a firebase-ml-vision-object-detection-model dependency on our Android project in the build.gradle file. To use the object detection feature, these are the dependencies we need:
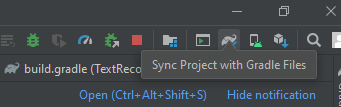
Sync the Project
After successfully adding the dependency, just sync the project, as shown in the screenshot below:
Step 2: Create an Image Object
The image in this application is coming from the assets folder, i.e drawable. You can also use a captured camera image as well, with MediaStore.ACTION_IMAGE_CAPTURE; after that, we need to put the bitmap image to FirebaseVisionImage.
Firebase ML Kit provides a simple API to create a FirebaseVisionImage from Bitmap—here’s the code snippet for that:
Step 3: Create Object Detector Instance
To actually detect objects, first we need to configure the FirebaseVisionObjectDetectorOptions, which we need to pass the builder pattern, given that ML Kit follows a builder design pattern. We have 3 options to configure.
- Image mode (The image will be a single image or stream image)
- Detection mode (The detection image will be of a single or multiple objects)
- Classification mode (It will return the classification category (i.e food, place, fashion food, etc): If we don’t turn on the classification mode, it will return the category FirebaseVisionObject.CATEGORY_UNKNOWN .
For simplicity, in this article, we’re detecting a single object. Let’s jump to the code to see how these above steps look in practice:
We’ve successfully created a detector instance with the above configurations—let’s now jump to the final step to process the image and detect the object.
Step 4: Send Image to Detector and Process the Image
In step 4, we need to pass an image to the detector via processImage() .
After that, we call processImage on the detector, which passes the FirebaseVisionImage as a parameter. We also use the onSuccessListener to determine when the object detection is complete. If successful, we can access the list of FirebaseVisionObjects.
We also add an OnFailureListener—if image processing fails, we’ll be able to show the user an error.
Now let’s jump into some code to see how these above steps look in practice:
After successful completion, the detector notifies you with:
- Total objects detected
- And each detected object is described with the following things.
- trackingId: an integer value can you use to track it cross frames (NOT used in this article
- boundingBox: The detected object’s bounding box. (i.e The outline of the detected object in a box using the bounding box values)
- classificationCategory (integer value representing “Fashion Goods”, “Food”, “Home Goods”, “Place”, “Plant”, “Unknown”)
- classificationConfidence (a float value between 0.0 to 1.0 with 1.0 which means 100% confidence)
- entityId: It’s a unique ID for the detected objects.
Here’s the function that sets all the above values:
Draw a Canvas On Detected Object:
To draw a canvas on the detected object, we need to first create a class with the list of <FirebaseVisionObject> as a constructor, and extend that class with the View.
In the onDraw method, we need to first create a Paint Object and then iterate the list of FirebaseVisionObject, In the iterate, we need to set the paint settings like color, stroke width, & style, and after that, we need to just pass the bounding box coordinates and the Paint object to the canvas.drawRect method.
Here’s the DrawBox.kt class, to see how these above steps look in practice:
Calling DrawBox Class To Draw Canvas:
After successfully created a DrawBox class, now it’s time to call that class to draw the canvas into our detected object.
In the onSuccessListener method first, we need to create an instance of our DrawBox class and then we need to call the draw method and pass the bitmap which we earlier created. After that, we just need to set the bitmap image to our detected image.
Now let’s jump into some code to see how these above steps look in practice:
Result
Let’s build and run the application to see our object detector in practice:
Wow! Look at that. We’ve successfully added an object detection feature to our Android application.
Tips to improve real-time performance
Before we conclude, I wanted to also address a few ways you might improve the performance of object detection.
- If you’re using the camera API, then make sure to capture the images in the format of ImageFormat.NV21.
- If you’re using the camera2 API, then make sure to capture the images in the format of ImageFormat.YUV_420_888.
- Keep in mind to capture the images at low resolution.
Conclusion
This article taught you how to detects the objects from an image using the Firebase ML Kit Object Detection API. To do this, we learned how to create a FirebaseVisionImage object and how to process the selected image.
We also created an application in which we get the image locally from the assets folder i.e (drawable folder) and pass that bitmap image to FirebaseVisionImage.fromBitmap(bitmap) . After detecting the object from the API, we then showed the list of FirebaseVisionObjects in the TextView.
I hope this article is helpful. If you think something is missing, have questions, or would like to offer any thoughts or suggestions, go ahead and leave a comment below. I’d appreciate the feedback.
I’ve written some other Android-related content, and if you liked what you read here, you’ll probably also enjoy these:
Sharing (knowledge) is caring 😊 Thanks for reading this article. Be sure to clap or recommend this article if you found it helpful. It means a lot to me.
If you need any help then Join me on Twitter, LinkedIn, GitHub, and Facebook.

Comments 0 Responses