
A Non-Developer Building Mobile ML?
I’m by no means a developer, engineer, or coder of any kind. Though I do read a lot of tutorials that include code implementations, and occasionally peruse repos to explore what folks are building, the most I’ve ever done is add some CSS style elements to a button within an HTML file.
So on the surface, the idea of me being able to build a cross-platform, mobile-ready machine learning model is kind of absurd.
However, this is what we’re aiming for with Fritz AI Studio, our new end-to-end development platform for mobile ML. We want to democratize access to mobile machine learning, with robust and comprehensive tools that allow those with limited experience and expertise (that’s me!) to build amazing on-device experiences.
We know we have plenty of work to do to make this a reality, but what better way to test our progress than by having someone like myself—who could tell you more about the intricacies of iambic pentameter (I’m a poet, by trade) than what makes an ML model work—give Fritz AI Studio a test drive from end-to-end.
That’s what I’ll be doing in this post—building, testing, and improving a mobile-ready model, with absolutely zero previous experience building ML models or mobile apps or anything in between.
Wish me luck!
About Fritz AI Studio
For a closer look at the core components of Fritz AI Studio, you can find more information and some short explainer videos here:
To offer a quick overview, here are the primary tools we’ve built to help power easier and more streamlined project development:
- Dataset Generator: Even I know access to high-quality data is essential for any ML project, whether for mobile or server-side use cases. And especially since I’m a novice with no previous experience, I don’t have troves of data or a working dataset. Our Dataset Generator helps bridge this gap, leveraging what’s known as synthetic data to programmatically generate 1000s of labeled images in a matter of minutes, from just a few manually-labeled input images (we call these Seed Images). I’ll be using the Generator to build an initial dataset for my demo.
- Model Training: Our take on no-code model training, optimized for cross-platform mobile deployment. Mobile-specific optimizations happen under the hood, with use case-specific model variants available. I definitely don’t understand how this works, but then again, the idea is that I shouldn’t have to! I’ll use this tool to both train an initial model and then retrain on some ground-truth data collected with our…
- Dataset Collection System: Personally, this is the part of Fritz AI Studio that’s most intriguing to me. Essentially, this tool helps us set up a data collection pipeline in which we can collect and adjust annotations on real-world model predictions. Using this pipeline, we can create additional datasets for model retraining, leveraging data that’s closer to what the model will see in the wild.
Using these core pieces, along with an already-setup demo iOS project (I’m not nearly equipped to create a mobile app from scratch), I’ll attempt to build a working proof-of-concept that serves as a starting point for a powerful on-device experience.
The Use Case: Cat Detection
Like many of us, our team has been working from home. I’m fortunate to have a furry companion during these times…

But now that I’m home pretty much all the time, Spek, this little monster seen above, wants constant attention. To get what she wants, she’s taken to hopping on counters, surfaces where I regularly eat, and, as you can see, the kitchen sink 🙄
Incredibly cute, but also incredibly distracting. I need to get things done, and Spek wants to do everything she can to make sure that doesn’t happen, including jumping on surfaces I’d rather her not.
This problem is the source material for my mobile ML use case. Essentially, I want to:
- Create an object detection model that detects when my cat (or, theoretically, any cat) is on a surface that I don’t want her on.
- Hook this model up to a camera-based mobile app—specifically, the model would need to detect if the cat is located within a segment of the camera’s view that I’ve demarcated as a no-go zone. The phone running the model would be set up in a stationary position, with a clear view of the area of the apartment I’d like to surveil (i.e. the kitchen)
- Trigger an alert when the model detects (in real-time and through a video stream) the cat’s presence in a no-go zone. This could be an alert sent to my primary phone, an auditory alert from the stationary device, etc.
A quick note on this plan. Though I won’t implement all of the above features (this would take some advanced app dev skills I don’t have), it’s important when developing an ML model for mobile to have at least a basic understanding of the overall UX you’re aiming to create.
Project Setup
Setting up a project with Fritz AI is really simple. Once you’ve signed up for a Fritz AI Studio plan, you’ll be able to create a new project or select one you’ve already created right from the dropdown menu on the webapp’s home page (red arrow).
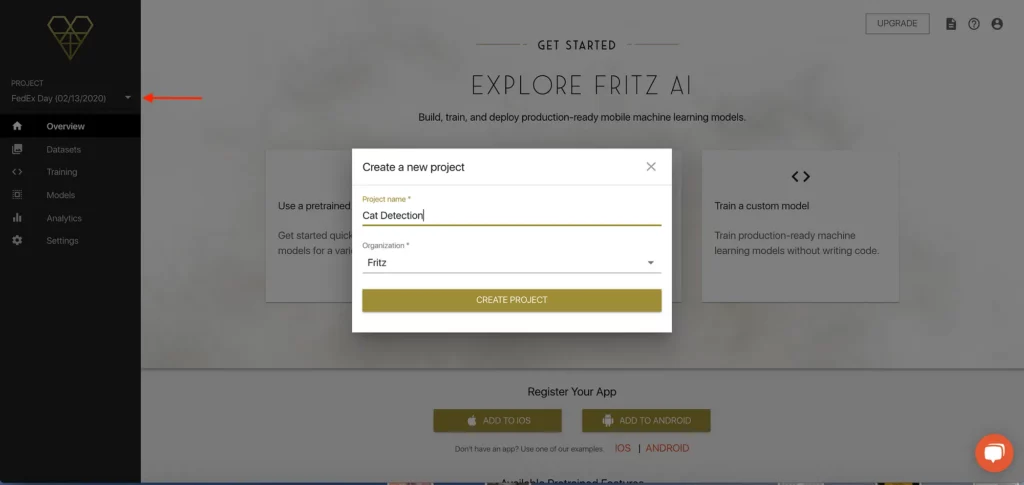
I’m going to be working within an already-created project, but you can see it’s really simple to start something new.
Since we don’t have any data, that’s where we need to start. You can’t see it because of the “Create a new project” prompt above, but behind that there’s a card that says “Collect and generate data”.
I’m actually a little nervous as I type this, but…let’s get started!
Collecting and Generating Data
By clicking the card mentioned above, we’re taken to the “Datasets” screen within the webapp. This is where we can view:
- Image Collections: Image Collections contain images and corresponding annotations (i.e. labels) that will eventually be used to train a model.
- Datasets: A dataset contains annotated images at a snapshot in time. Once created, datasets cannot change. They are used primarily for model training.

As expected, a brand new project has neither image collections nor datasets. The first step, then, is to add an Image Collection that we can feed into the Dataset Generator to create a dataset that we’ll be able to train.
Once we click the “ADD IMAGE COLLECTION” button on the righthand side, we’ll first have to configure it just a bit before we can start finding and adding images.
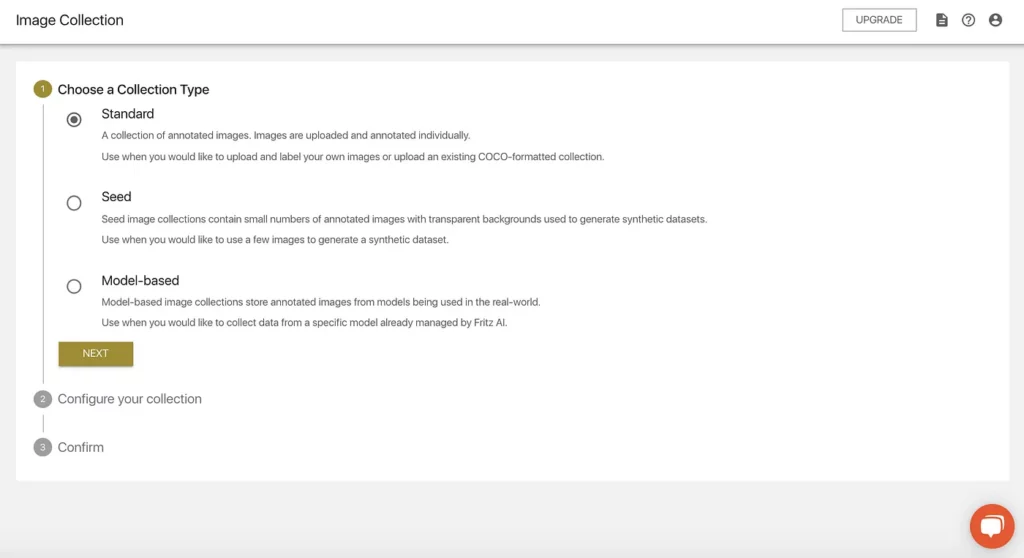
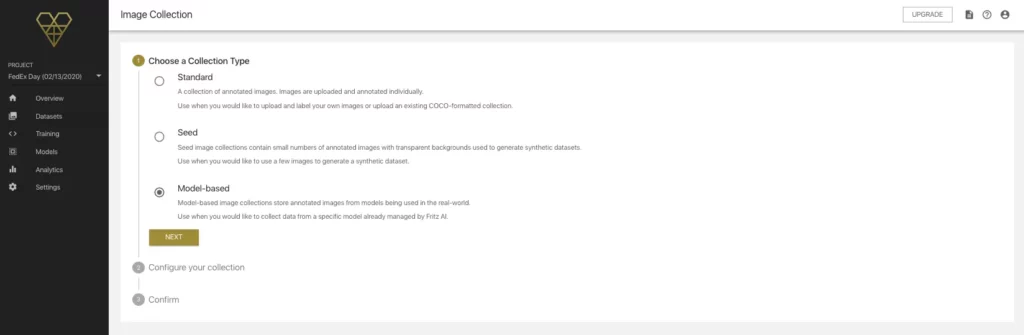
We have three choices here:
- We can upload and label our own training images. This means both individual images that we can upload and label within the webapp, or images that already have COCO-formatted annotations (Standard Image Collection).
- We can create a Seed Image Collection, which will be the “seeds” or source images for synthetic data generation.
- Or we can create a Model-Based Collection, which is essentially made up of labeled images captured from models being used in the wild. We don’t have a model to collect data with, so we’ll come back to this when we explore the Dataset Collection System.
Because we don’t have any of our own data, we’ll need to create a Seed Image Collection. Once we select and confirm that option, we’ll be able to add a name and a description:
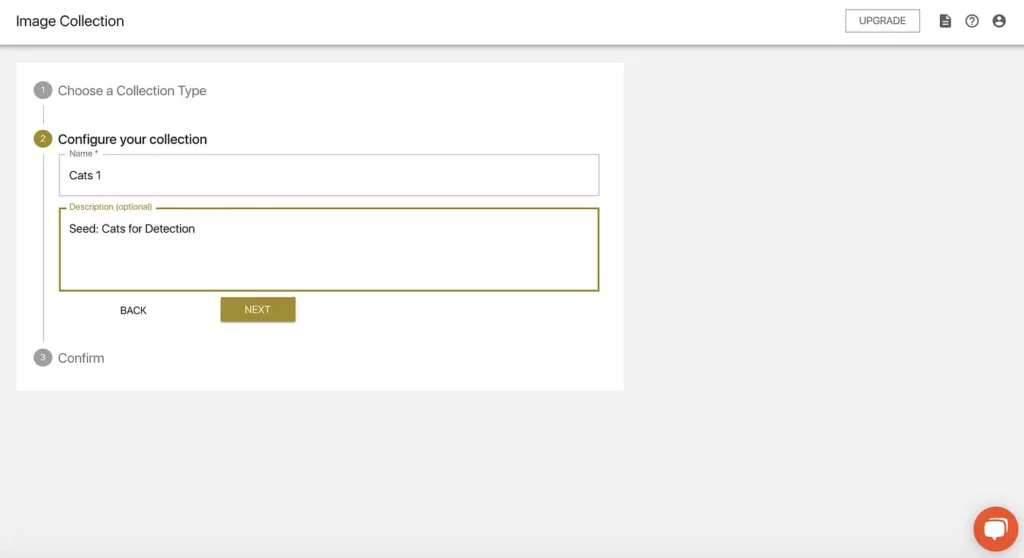
We’ll then be asked to confirm and save this input. Now we’ve created a Seed Image Collection…but what are these exactly, and how do they work?
More about Seed Image Collections
As aforementioned, Seed Images are basically the input to the Dataset Generator—they provide the Generator the target object(s) and the annotation configuration(s) needed to produce correctly-labeled images synthetically.
The Dataset Generator works by compositing a small set of these Seed Images onto a large, diverse set of backgrounds in different positions, orientations, and with other mobile-specific augmentations (blur, dropout, other noise, etc).
This allows us to generate much larger datasets that can be used for training machine learning models, without collecting and labeling thousands of images by hand.
To actually find and upload Seed Images of our target object (in our case, cats), we’ll need to:
- find about a dozen or so images of cats (I’m going to work under the assumption that more diversity within images is better than less)
- remove their backgrounds to isolate just the target object
- and convert those images to transparent .PNGs
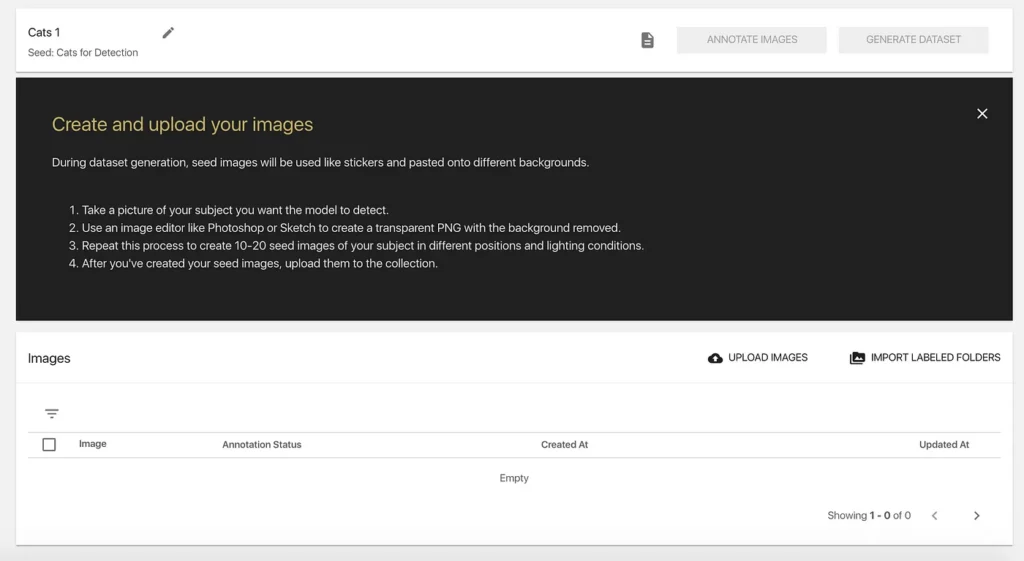
When we first enter our new collection, we’ll see a set of instructions for creating Seed Images. To source these images, we can take our own photos and/or find them online. Just ensure you’re using publicly-available or free-to-use images (Unsplash, Pixabay, and Pexels are good places to start).
For background removal, we can use tools like Photoshop, Sketch, or even Preview if you’re working on a Mac. One tool I particularly like is remove.bg, which is an auto-removal tool that should work well with common objects like cats. So I’ll use that here, but as long as you end up with transparent .PNGs with the background removed, you’ll be all set.
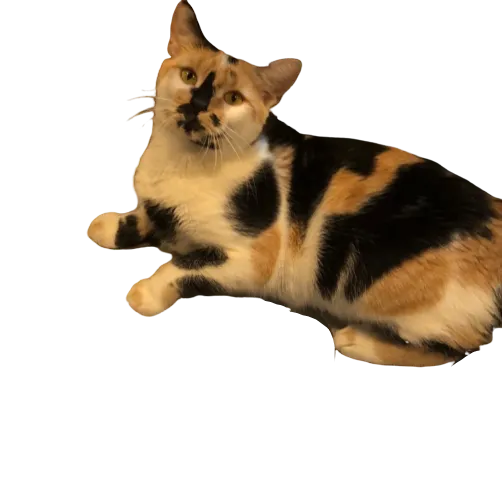
Using remove.bg with just a bit of manual fine-tuning, I took the original image of Spek I shared above and turned it into this:
I think I want the final model to generalize to other cats, not just mine, so for the other Seed Images, I’ll find some free-to-use images on the internet.
Annotating Seed Images
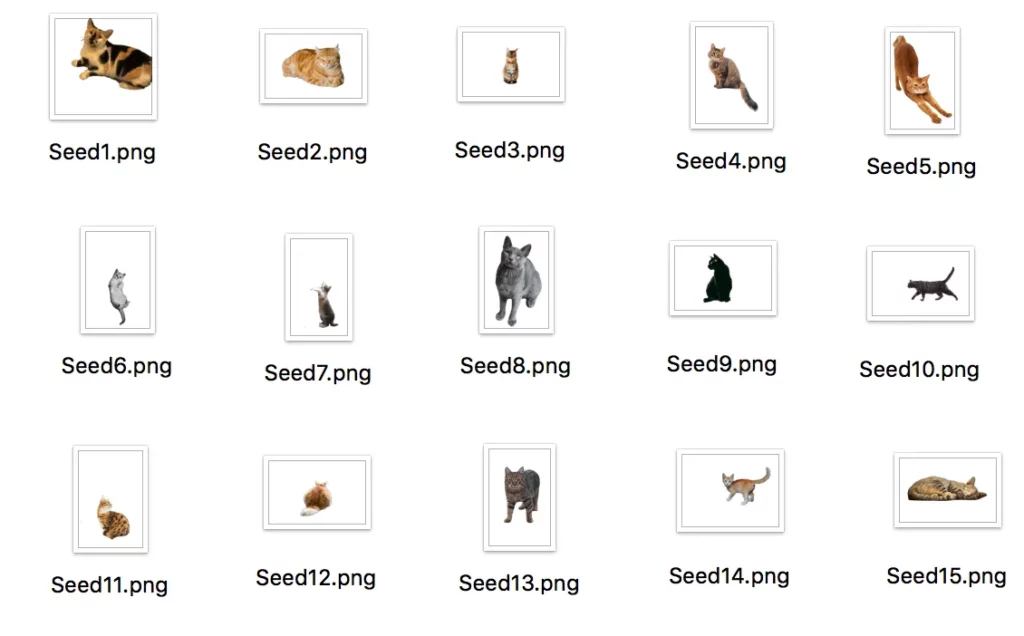
I ended up creating 15 Seed Images, attempting to find pics of cats that had a bit of diversity and included different body positions, breeds, colors, etc. Total time—from finding and downloading the raw files to using remove.bg and setting up a new folder of transparent .PNGs—was about 30 minutes, working at a somewhat leisurely pace.
This is a grid view of what I ended up with. You don’t have to rename the images, but the long file names were annoying to look at:
Using the “UPLOAD IMAGES” button, I was able to bulk upload these 15 images into our Seed Image Collection, which we can now see in a list, along with the dates/times the images were uploaded, their annotation status (currently “incomplete”), and when they were last updated:

Before we can actually generate our synthetic dataset, we need to manually set up an annotation configuration and hand-label these 15 images, so that the Generator knows what to do with them.
Annotation Workflow Overview
To start annotating our Seed Images, we can either click on one of the images in our list, or click the ANNOTATE IMAGES button at the top of the screen. When we do this, we’ll enter the annotation workflow, which looks like this:
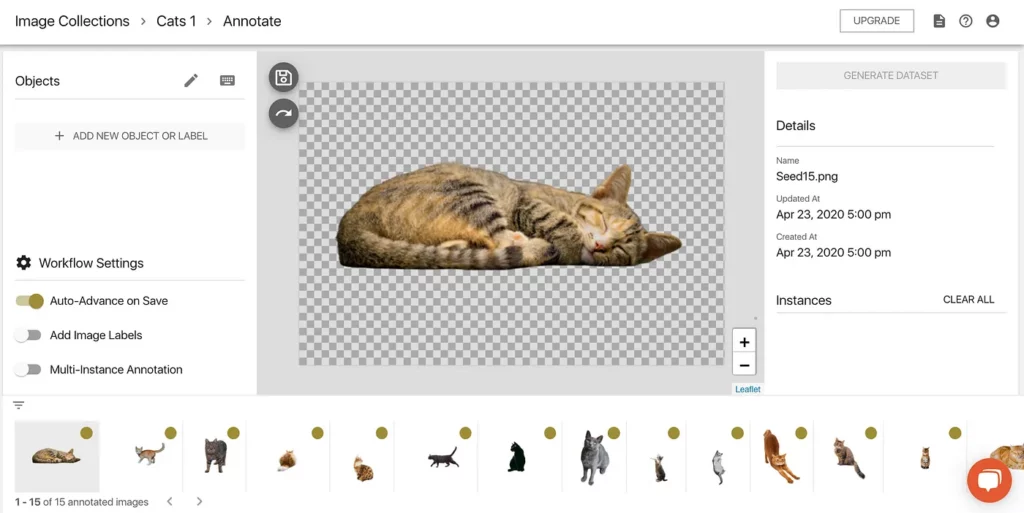
There’s quite a bit going on on this screen, so let’s pause and break it down:
- On the right, we see the image details, similar to what we saw in the list on the previous page.
- At the bottom, we have a carousel of our Seed Images. We can choose which one we want to label and see the annotation status of each (gold dot = Incomplete; green checkmark = Complete)
- In the middle, we have the Seed Image we’re currently annotating. Once we’ve made our annotation (we’ll do this shortly), we can save the annotation using the floppy disk icon, which by default will advance us to the next image in our lineup.
- On the left, we have our annotation configuration. This is currently empty, so we’ll need to define that configuration first before we can actually hand-label these images. Here, we can also find keyboard shortcuts for working through this flow—these are nested in the keyboard icon in the top left.
Setting Up Our Annotation Configuration
The first thing to keep in mind when setting up an annotation config for Seed Images is that each type of model (object detection, pose estimation, image labeling, etc) requires slightly different labels.
- Pose estimation models require an object name and a series of keypoints.
- Object detection models require bounding boxes and object name (i.e. cat).
- Image labeling models require object names/labels (no bounding box or keypoints needed).
Remember, our target object here is a Cat. This means we need to set up an object detection annotation configuration for an object labeled Cat.
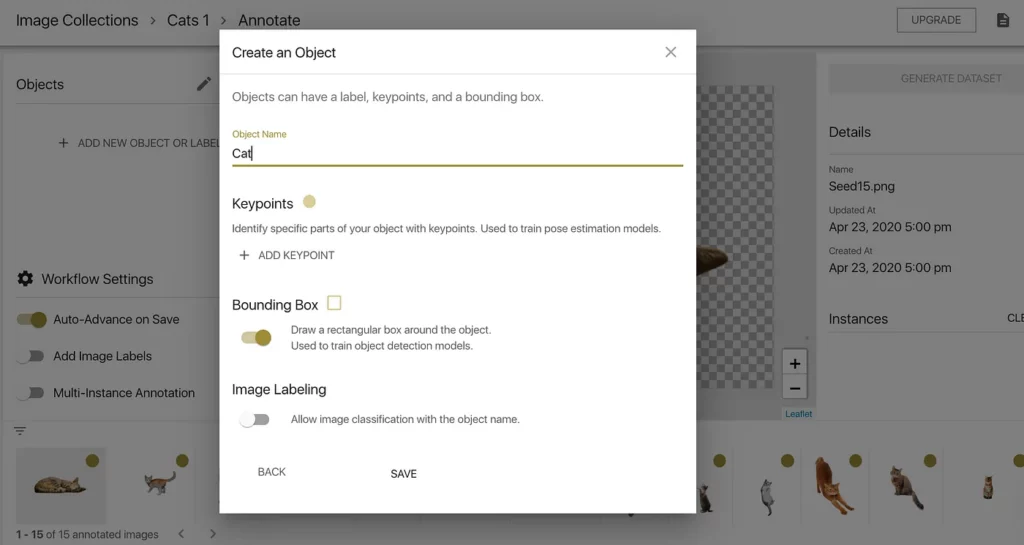
After clicking the + ADD NEW OBJECT OR LABEL field on the left side of the screen, we’re prompted to create an object. I’ve named the object Cat and enabled bounding boxes, while deselecting image labeling and not creating any keypoints. Once we confirm this is what we want, we can save this config and start manually labeling.
We’ll now see Cat as an object in the panel on the left. We can then click on that configured object, which will trigger the annotation flow:
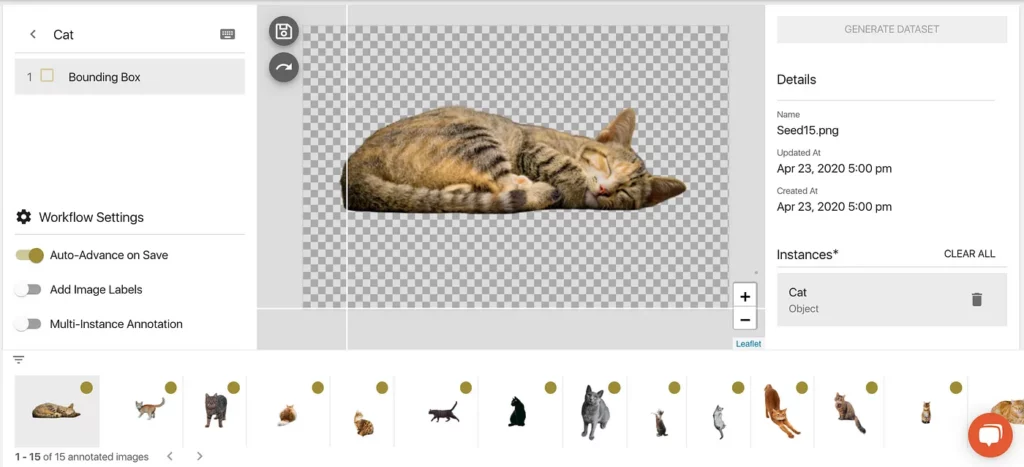
At last, we’re ready to draw bounding boxes on our Seed Images. If you look closely at the selected Seed Image above, you can see two white intersecting white lines. This is our drawing tool.
Our goal here is to draw our box so that it borders our Seed Image object as closely as possible. Here’s a look at how this is done:
For me, it took a couple tries to get the flow down—there are certainly ways we can and will improve this flow moving forward—but after a couple of annotations, I was confident. The last 12 images felt pretty natural to annotate. Overall, this took maybe 5 minutes.
At this point, we should see green check marks next to all of our images on the carousel at the bottom, indicating our annotations have been saved:

Once we confirm all of our images have saved annotations, it’s time for the first bit of magic…generating a labeled dataset that we can use to train a model!
Configuring a Dataset Generation Job
Believe it or not, all of the seed image work we just did is the most labor-intensive part of building an initial model with Fritz AI. This is because now we get to really let the Studio do some heavy lifting.
First, we need to take these labeled Seed Images and generate a dataset using them. Configuring a job is pretty easy. At the top right of the annotation workflow page (the one we were just on), click “GENERATE DATASET”, which sends us to the config setup:
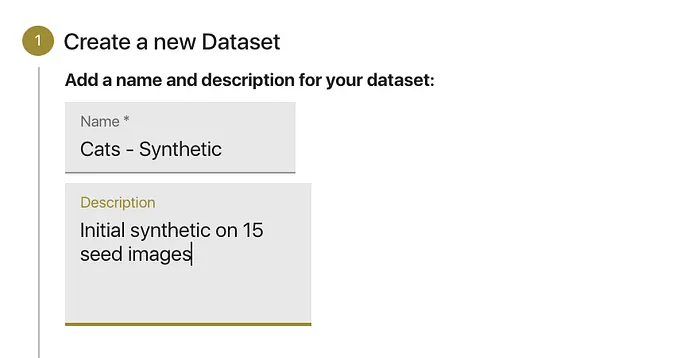
As I mentioned before, I’m working on a previously-created project, so there’s a bit of clutter. The two images above are what you’ll see on the dataset config screen:
- Add a name and description: Best practice here is to identify the kinds of images we’ll be generating (in this case synthetic). Other datasets could have other kinds of images, so for project management reasons, it’s better to be precise and descriptive.
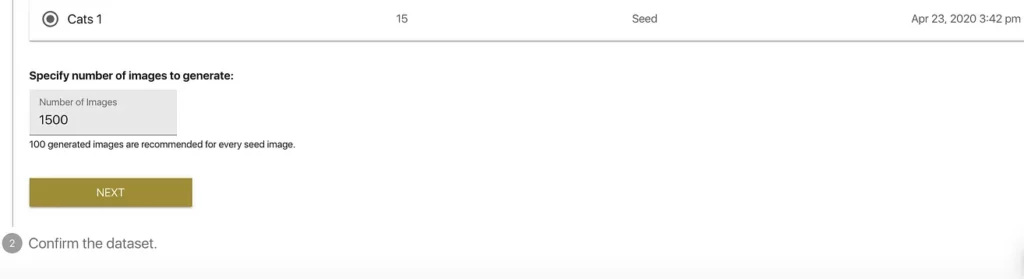
- Select a Seed Image Collection: Make sure you’ve selected the correct Image Collection with which to generate the dataset. If you have a bunch of Image Collections, just double check to make sure you’ve picked the right one.
- Specify number of image to generate: By default, for an initial dataset, we recommend generating 10x the number of Seed Images — this is pre-populated in the “Number of Images” field, but you’re free to experiment with this value (since I don’t really know what would work best, I’ll stick with this suggestion).
We click “Next” and are prompted to confirm our configuration and…GASP…generate our dataset:

We’ll see a job details page that looks like this:
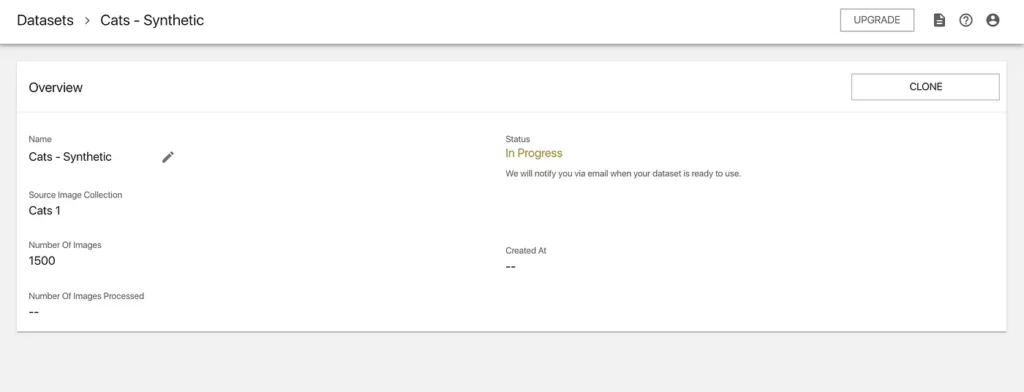
This job shouldn’t take too long (15–20 minutes, believe it or not), but we can always check on its status by clicking on the “Datasets” tab on the lefthand side of the webapp and clicking on the respective dataset list item. Additionally, we’ll receive an email when the dataset has been successfully generated.
Now, time for a quick break while our dataset is generated!
Reviewing Our Dataset
Wow, so not much of a break…I launched the job at 6:09 p.m., and it was completed at 6:12 p.m.
When we click into into the dataset to take a look, we see both the job details and a preview of dataset images:
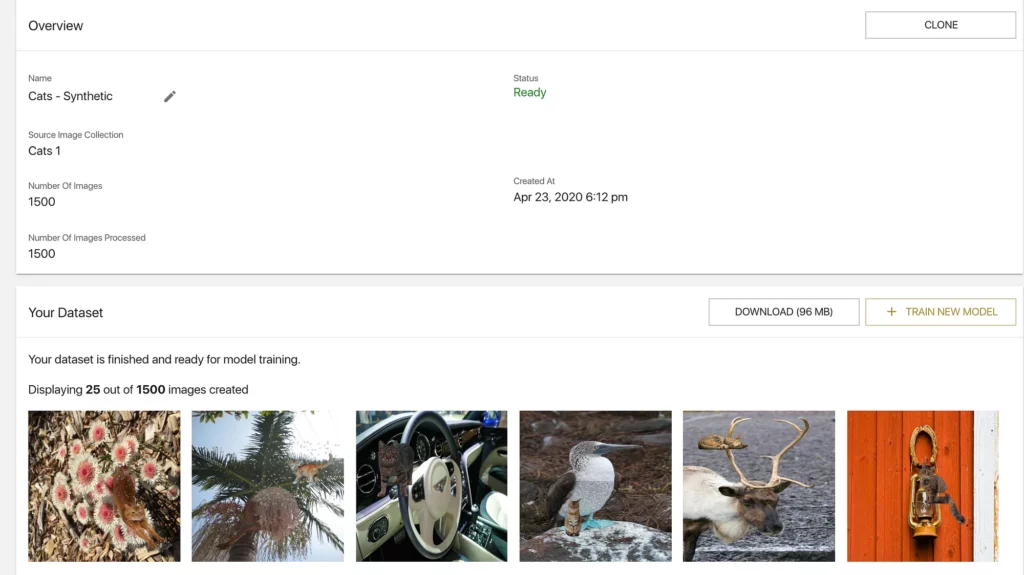
A couple of things of note here:
- We can use this dataset to train a new model, or we can download it if we need local access.
- Also wanted to draw your attention to the preview images. If you look closely you can see how the Seed Images are augmented and pasted onto these random backgrounds. I just think this is super cool.
Next up, we’ll use this dataset to train a cross-platform, mobile-ready model.
Model Training
When we click on “TRAIN A NEW MODEL” (see previous image), we’re taken to a training job configuration screen, where we’ll have to make a few choices in order to train the kind of model we think will best suit our needs.
I’ve explained this in more depth below, but here’s a quick look at the training configuration I set up for our model:
Let’s take a closer look at each of these pieces.
Name the job
Again, specificity is good for project management and for keeping track of experiments—you’ll almost certainly be creating more than one version of a model for production applications.
Choose a model type
At the time of building this demo, we have three options: Object Detection (which we’ll choose here), Pose Estimation, and Image Labeling. Double-check this! If you select the wrong model type, the model won’t work, as different tasks require different model architectures, annotation configs, and more.
Choose dataset(s) to train
We can actually train models on multiple datasets (we’ll discuss this in more detail later), and because this is our internal demo workflow, you can see there are many to choose from. But if this is your first project, you’ll only see the dataset(s) you’ve created.
Pick a model variant
This config option is where we need to think again about our use case. We have 3 model variants to choose from. Here’s a closer look at those options:
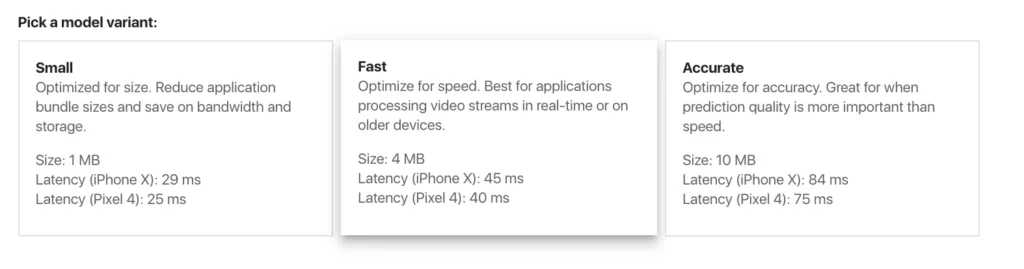
I’ll let these provided explanations stand for themselves. But if we again consider our use case, this will inform our selection.
We want our model to be able to identify and track a cat in a video feed, in real-time (or as close to it as possible), so we can trigger an alert immediately and remove the offending cat from the humans-only surface (i.e. counter, sink, table).
We can also afford predictions that aren’t perfect, but good enough to detect cats anywhere in our defined no-go zones. As such, a Fast model variant probably makes the most sense.
When selecting model variants, just remember that there are always tradeoffs when considering the size, speed, and accuracy of ML models, whether they’re being deployed to mobile or otherwise.
Set a Training Budget
Another configuration we need to pay special attention to is the training budget. By default, the budget is set to 5 hours—a budget recommended by folks much smarter than me. But we can also adjust this if we’d like to try training for longer or shorter periods of time.

You might have noticed there are also a couple optional configurations regarding model checkpoints. We won’t cover those in this tutorial, but they’re useful when experimenting with new model versions and retraining existing models.
Once we’ve checked and double-checked our configuration, we can kick off the training job! We’ll receive an email when our model is finished training, and then we’ll be able to drop it into a demo project to test it out on real-world data.
Now we can take a break. This will take a bit longer than the 3 minutes it took to generate our dataset.
Additional Note about Training: Cross-Platform Model Variants
In my mind, one of the coolest things about our Model Training tool is that models are automatically converted into Core ML, TensorFlow Lite, and Keras versions. This means that, out-of-the box, models are inherently cross-platform and ready to use on both iOS and Android.
Reviewing Our Trained Model
Success! I have to be honest, I breathed a big sigh of relief when I saw the email in my inbox letting me know that our model had trained successfully. I wasn’t going to believe it until I saw it. Here’s another look at the training job details page, upon completion:
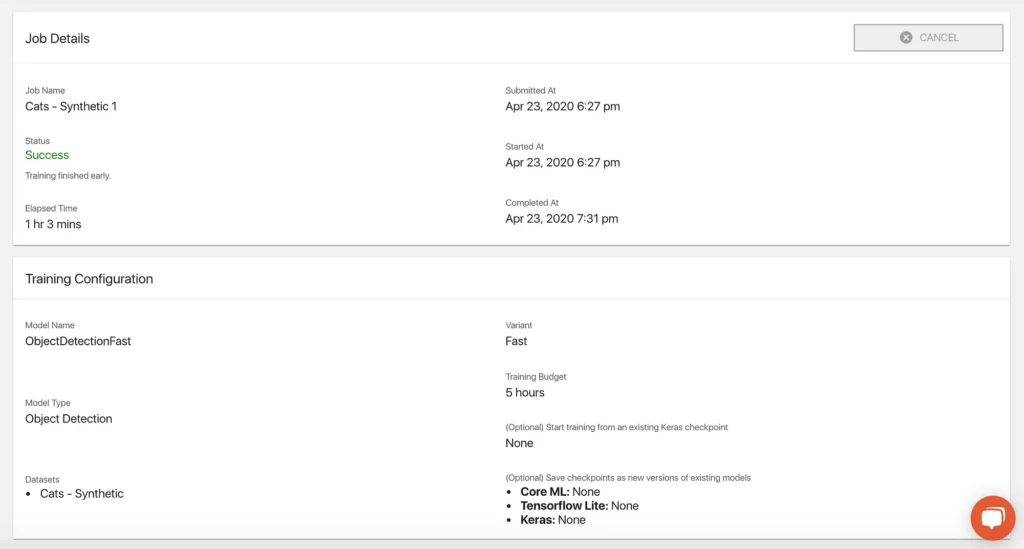
One thing I noticed, looking at this page, is that while I named the training job, I didn’t actually name the model itself, which was an option on the job configuration page. To change this, I selected the “Models” tab from the left-hand panel, selected each version of ObjectDetectionFast, and renamed them.
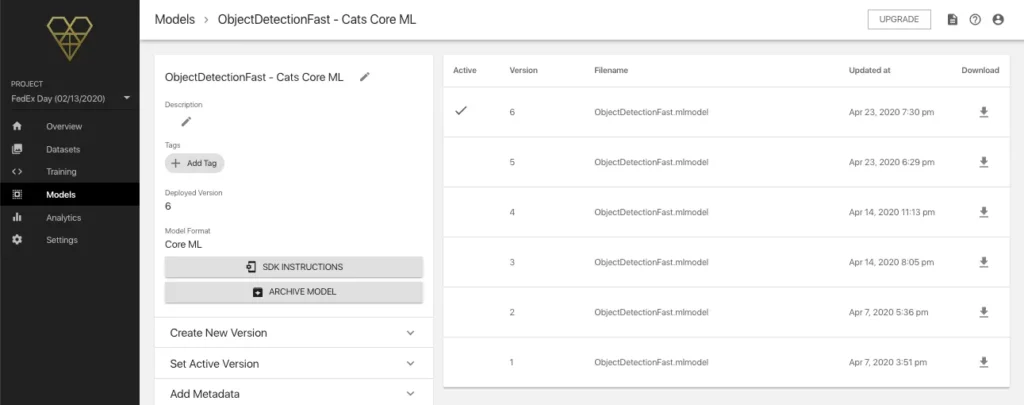
I probably went a little overboard with how I named each version, but below is a look at the model details page for the Core ML version.
Now it’s time for the step that I’m most nervous and excited about—adding the model to a demo project (I have an iPhone 8 so I’ll work on an iOS version in Xcode) and testing it out!
Creating a Demo Application in Xcode
Luckily, we don’t have to build this demo app from scratch. If you’re experimenting with models you’ve built with Fritz AI, we have an array of demo projects that’ll allow you to quickly drop in models you’ve trained to test them out.
If I were a non-technical project manager, this is probably the point where I’d hand off the project to my engineers and ask them to setup a demo app for us to test. But giving this a shot seems like fun…
Step 1?
I know we now need to do a couple things (at least), but I’m not quite sure what’s first:
- Create the demo project in Xcode
- Initialize the Fritz SDK (iOS) in said project
- Load the model correctly
- Build the demo project and test on my iPhone
My sense is that I need to figure out what to do with Xcode to set up the demo project. After doing a bit of searching like this:

and after a bit of clumsy digging, I realized our first step would be to install Cocoapods as a dependency manager, with this line of code in my terminal:
To clone the demo project from the fritz-examples repo, we also need to install Git Large File Storage — otherwise, some things won’t be cloned correctly:
cd <directory> pod install
Once I’d cloned the repo and pod installed it in my Xcode project, I followed the SDK initialization instructions provided on our docs and the model setup instructions on the model details page:
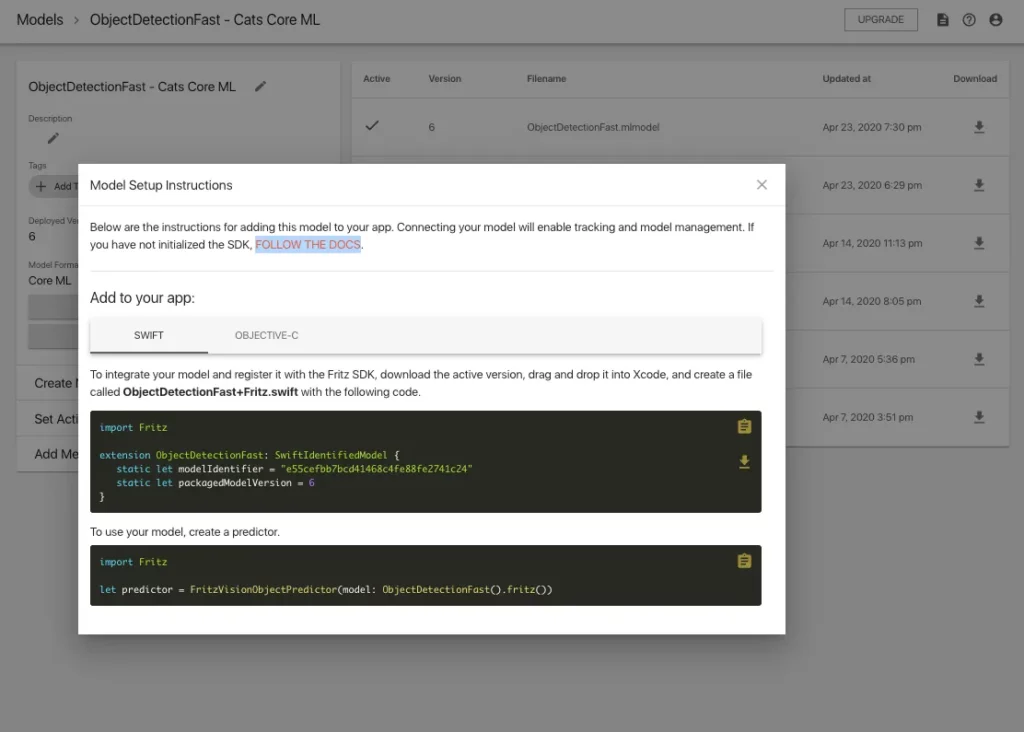
With a bit of guidance from a colleague who knew how to adjust the app’s bundle ID, allow permissions, and maneuver around Xcode, I was able to rebuild our object detection iOS demo with the first version of our cat detector.
Basically, I pasted those provided code snippets (see above) in the ViewController of the Fritz AI demo project, loaded the model, connected my device, and ran the code to build the application.
At this point, I was finally able to test. And great news! It makes predictions (I’m unreasonably proud as I type this):
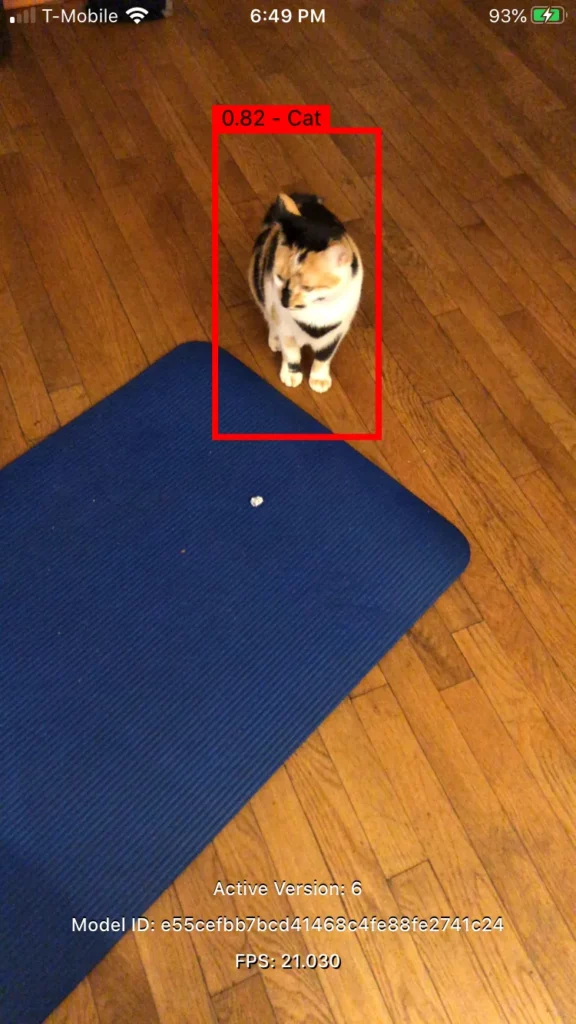
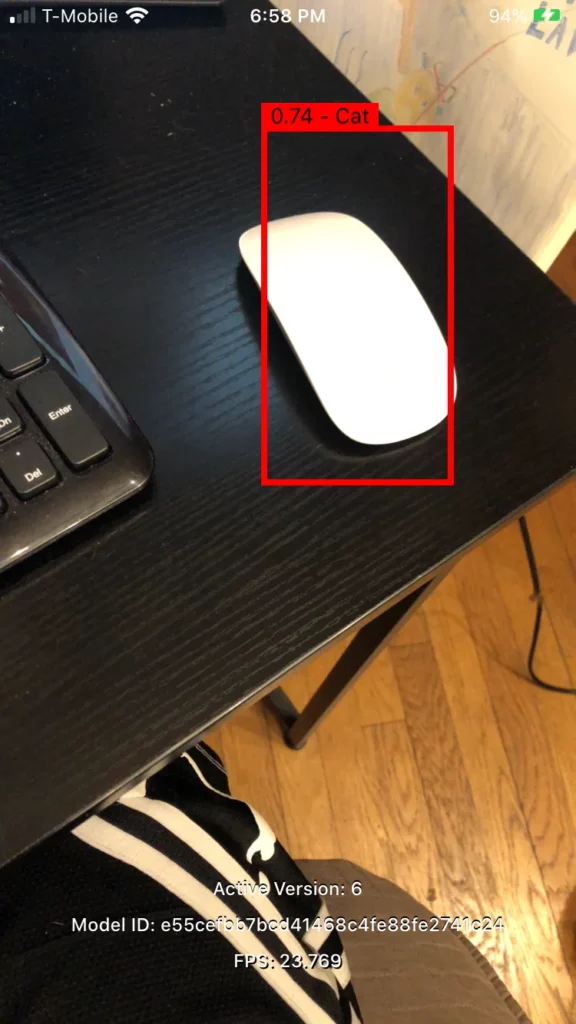
Unfortunately, as exemplified above, there are a lot of false positives in this first version of our model. This is particularly problematic for our use case, as we don’t ultimately want an unending series of alerts if our model is incorrectly predicting the presence of a cat on a given no-go zone.
Turns out, building ML models is a bit of a cat and mouse game…

I played with the confidence threshold (super easy to define in the demo app’s ViewController), increasing it to .7 (i.e. if the model’s predicted confidence score is above .7, the prediction is displayed; otherwise, it is not).
But even so, the model was predicting that pretty much anything and everything was a cat—though I found the confidence scores on images of Spek and other internet cats to be a bit higher than with the false positives. Here’s a closer look at V1:
Though of course I’m a bit sad the model didn’t work perfectly right away, that’s ok! This is just a first try, and luckily with Fritz AI, we have an easy way to collect new ground-truth data to help retrain and improve our models over time. That’s what we’ll set up next.
Collecting Ground-Truth Data with Fritz AI
The Fritz AI Dataset Collections system, simply put, allows you to record predictions a particular model is making (i.e. within images or video frames), upload those results into a new Image Collection within Fritz AI, and then adjust any incorrect annotations to build a new, ground-truth dataset.
If you’ll recall, earlier we briefly mentioned Model-Based Image Collections. That’s what we’ll be working with here.
Creating a Model-Based Image Collection
First, we need to create and configure this new Image Collection so that when we do record predictions, our app knows where to send them:
When we click “NEXT”, we’ll be prompted to enter a name and description for the collection just like before, but this time we’ll also be asked to associate it with a particular model from a dropdown menu.
I won’t show you a screenshot of that here since this project is filled with demos we’ve been working on, but I promise it’s really simple to set this up.
Adding a ‘record’ Function to Our App
We need to add something to our app that tells it to send “recorded” or captured prediction results to our newly-created Image Collection.
This step is laid out nicely in the documentation for the Dataset Collection System—just a single line of code in the ViewController:
visionModel.record(image, predicted: results, modified: nil)
Once we have this set up in the demo app, in addition to our new Image Collection, we can fire up the app on our test device, and the live camera feed will automatically transfer still frames and their accompanying predictions into this Image Collection.
You can collect a whole bunch of still frames quickly, so be aware that if you were to have the demo app and model running for a full minute, you might end up with 100s of real-world images in the new Collection to cull through.
It’s smart to try this once for a few seconds and then close the app to confirm the connection is working. If so, you’ll see a list of new ground-truth images with “INCOMPLETE” annotations.
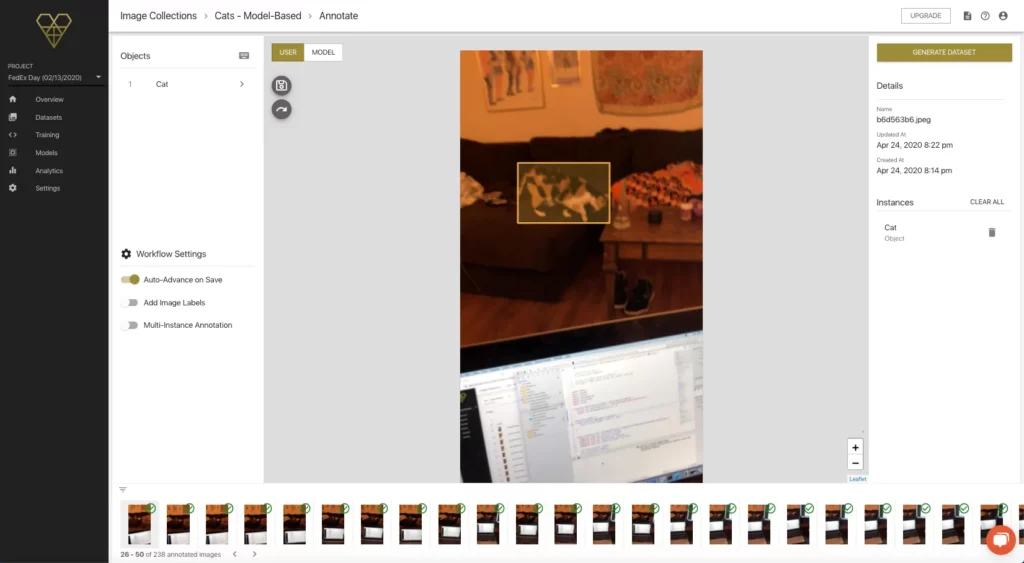
Adjusting Ground-Truth Annotations
From this new list, we can enter the same annotation flow as before, except this time we can both annotate the images by hand, and also view the model’s predictions.
Here’s a quick look:

As you can see in the example above, when we click through to see the model’s prediction, it actually didn’t make one. So here, we’ll click back to the USER tab and complete our bounding box annotation, exactly the same as we did when creating Seed Images.
There are a few things to keep in mind during this process, from what I can tell:
- Because we’re just trying to detect Spek, collecting ground-truth data that’s exclusively still images of her is ok. Generally speaking, we’d want to diversify our collection as much as possible, if we’re building a model we want to generalize. This is an adjustment to the original use case, which can and often does happen during project development.
- There are some still frames where the model has worked perfectly—in these cases, we can probably skip a manual annotation and leave those out of our new dataset.
- Given that we saw a lot of false positives when first testing the model, it might make sense to collect ground-truth data that represent those false positives, correcting them with either annotations of the target object or no annotation at all.
I’m sure there are other considerations here, but these are the ones that struck me while testing and considering the use case at hand.
Retraining and Testing Again
With this newly-annotated ground-truth data, we can train a new version of our model, load it into the demo project, and see if we notice any improvements.
We’ll work through the exact same training configuration flow—but first, we need to turn that Model-Based Image Collection into a new dataset:
Notice the GENERATE DATASET button in the top right corner. We click on that button, and we’re taken to a slightly different dataset configuration page—the only difference being, since we aren’t generating new images, the number of images is set at the number of ground-truth images we collected and annotated.
Once the new dataset has been created, we can circle back and train a new model with the same basic configuration, making sure to select both the synthetic and collected datasets (I’ll also remember to name the model this time).
This training job, using the original 1500 synthetic images and about 260 ground-truth images, took 1 hour and 8 minutes, as opposed to the 1 hour and 3 minutes for the initial model.
After downloading the model file and hopping back over to the demo app code, I was able (this time) to quickly copy the new model and the accompanying prediction function into Xcode, rebuild the project, and test on my device:
A couple of learnings here:
- The model is still predicting a lot of false positives, but the eye test suggest to me that this rate is lower — and it didn’t predict the mouse as a cat this time!
- Rookie mistake🤦♂️ I collected ground-truth images during the evening, and pretty much exclusively in my living room. Nothing outside, nothing in anything resembling daylight. So there’s a lack of diversity in the images I collected, which likely limits how much our model was able to improve.
Round 3
Frankly, the small taste of seeing something I built “working” on my phone left me hungry for more, and I realized I’d made some sloppy mistakes in my curation of data, which was probably a limiting factor. But this is ok! All part of the experimentation (and learning) process.
So I collected some more ground-truth data—this time a bit of it outside, in brighter conditions, and in different areas—and trained a third version of our model on the original synthetic dataset and both of our Model-Based Image Collections (~650 real-world images in total).
Discussion
Wooo! We did it! In about a day’s work total, we were able to:
- Generate a brand new, annotated dataset for our task at hand (cat detection) from 15 manually-labeled Seed Images.
- Train a first version of a cross-platform, mobile-ready model—without code.
- Easily set up a data collection pipeline in which we were able to manually adjust model predictions, using these ground-truth images to quickly retrain a new and improved version of the model.
We’d need to set up some reporting and analytics around model performance, but a cursory comparison of the three models shows that, with just a little bit of lifting, we’ve moved from a model predicting a ton of false positives to one that’s more effectively able to locate, track, and stick with the target object (our good friend Spek).
Fritz AI does include some analytics and reporting out-of-the-box, so we can look at how many predictions our model has made, on what devices, and at what speeds:
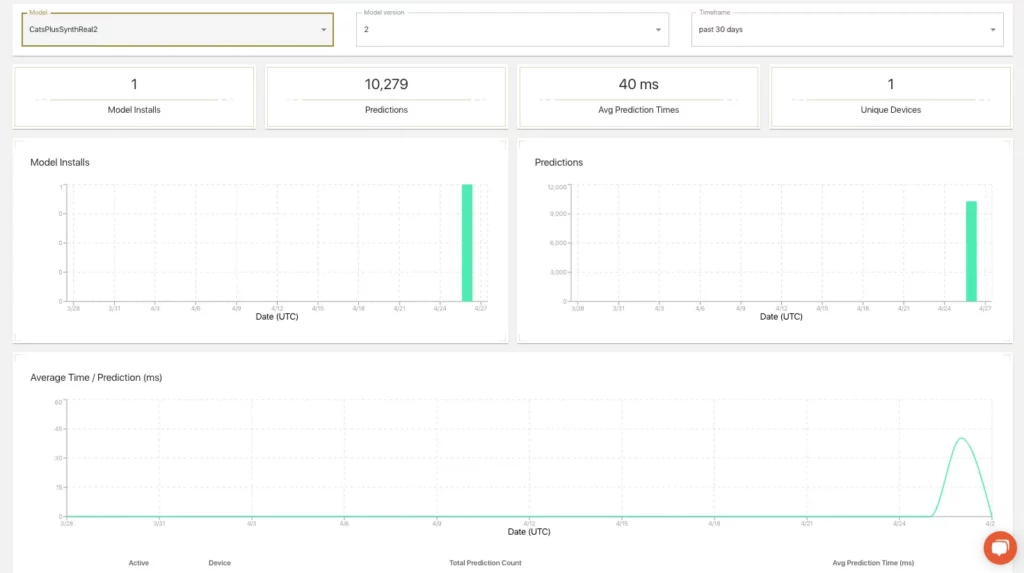
To make the comparison between models a bit more clear, here’s a side-by-side look at the results across the 3 versions:
What’s Next?
In this end-to-end tutorial, we saw that by combining the integrated, core components of Fritz AI Studio, we were able to move from an idea to a working prototype in a weekend.
We did this consuming only about 3.5 training compute hours over the course of the 3 model versions we created, and though there was some manual lifting when it came to collecting and adjusting the annotations on ground-truth samples, the early evidence suggest those efforts are paying off.
Moving forward, we’d want to continue working within our established data collection pipeline, gathering real-world samples that are more widely representative, diverse, and cover more environments and edge cases. This would allow us to continue to iterate on our model and improve it over time.
This last point is key: Effective mobile machine learning projects are never really finished. There’s always more data to collect, model versions to train, and other fine-tuning we can try to ensure our end users get the best experience possible.
And remember…I did all of this having never written code in my life, beyond the most basic HTML/CSS. This is what we envision for Fritz AI Studio—a platform that allows individuals and teams with or without stacked rosters of ML engineers to create incredible, intelligent applications that delight their users and forever change the landscape of mobile app development.
If you have a project idea, we’d love to hear about it. Learn more about the Studio here, and let us know how we can help turn your mobile ML dreams into reality.
Editor’s Note: Heartbeat is a contributor-driven online publication and community dedicated to exploring the emerging intersection of mobile app development and machine learning. We’re committed to supporting and inspiring developers and engineers from all walks of life.
Editorially independent, Heartbeat is sponsored and published by Fritz AI, the machine learning platform that helps developers teach devices to see, hear, sense, and think. We pay our contributors, and we don’t sell ads.
If you’d like to contribute, head on over to our call for contributors. You can also sign up to receive our weekly newsletters (Deep Learning Weekly and the Fritz AI Newsletter), join us on Slack, and follow Fritz AI on Twitter for all the latest in mobile machine learning.

Comments 0 Responses