
Introduction
Are you looking for fast deep learning modeling? If so, Keras is going to be your natural choice. But there are so many deep learning frameworks available today, and the list is growing very fast—why choose Keras?
Keras has the capability and resources to run on top of popular deep learning libraries like TensorFlow, Theano, or CNTK. It also offers a relatively simple API that manages to also offer a lot of flexibility. This makes Keras easy to learn and easy to use. Isn’t that enough reason to start using Keras?
To demonstrate this, let’s work through a quick implementation of linear regression using Keras and Python.
Linear regression is a foundational algorithm in machine learning, which is great for getting started, because it’s based on simple mathematics. It works on the equation of a straight line, which is mathematically denoted as y = mx + c, where m is slope of the line and c is the intercept. x is the independent variable and y is the dependent variable.
Get the data:
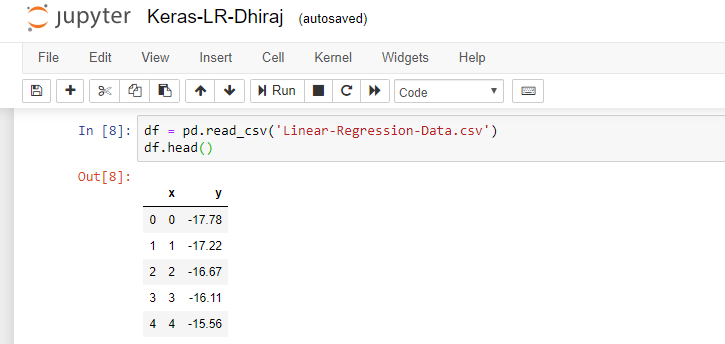
So let’s arrange our data first. For the purposes of this tutorial, we have a .csv file that has two variables (x and y), and we need to implement linear regression on this data. First, we load the data using Pandas in a data frame and check the head as shown below:
After that, we import the required libraries and create a sequential model using Keras. We need to implement NumPy, Pandas, Keras, keras.backend and TensorFlow. Note that we’re using TensorFlow as a Keras backend here.
We’re going to use the below high-level steps to work with Keras models:
- Define the model
- Compile the model
- Fit the model
- Predict using the model
- Verify the outcome
Keras is a high-level library that provides model-level components for building deep learning models. Keras is not designed to handle operations like tensor products, convolutions, etc. Hence, Keras depends on other specialized and optimized tensor manipulation libraries like TensorFlow, Theano or CNTK, which serve as the backend for a given Keras model.
Define the Model
Keras has a class called Sequential, which represents a linear grouping of layers. This class helps us create models layer-by-layer. Thus, using Sequential, we cannot create models that share layers. Also, Sequential does not support creating models that have multiple inputs or outputs. We can use the below import to get Sequential:
As seen below, we have created four dense layers. A dense layer is a layer in neural network that’s fully connected. In other words, all the neurons in one layer are connected to all other neurons in the next layer.
In the first layer, we need to provide the input shape, which is 1 in our case. The activation function we have chosen is ReLU, which stands for rectified linear unit.
ReLU is defined mathematically as F(x) = max(0,x). In other words, the output is x, if x is greater than 0, and the output is 0 if x is 0 or negative.
import numpy as np
import pandas as pd
import keras
import keras.backend as kb
import tensorflow as tf

model = keras.Sequential([
    keras.layers.Dense(32, activation=tf.nn.relu, input_shape=[1]),
    keras.layers.Dense(32, activation=tf.nn.relu),
    keras.layers.Dense(32, activation=tf.nn.relu),
    keras.layers.Dense(1)
  ])
After choosing our activation function, we still need to define the optimizer, compile the model, and fit the model. A machine learning algorithm should decide how to utilize the difference between the predicted value and actual value to adjust the weights so that the model converges. An optimizer is the algorithm which helps in deciding that action.
Compile the model
We’re using RMSprop as our optimizer here. RMSprop stands for Root Mean Square Propagation. It’s one of the most popular gradient descent optimization algorithms for deep learning networks. RMSprop is an optimizer that’s reliable and fast.
We’re compiling the mode using the model.compile function. The loss function used here is mean squared error. After the compilation of the model, we’ll use the fit method with 500 epochs.
I started with epochs value of 100 and then tested the model after training. The prediction was not that good. Then I modified the number of epochs to 200 and tested the model again. Accuracy had improved slightly, but figured I’d give it one more try. Finally, at 500 epochs I found acceptable prediction accuracy.
Fit the model:
optimizer = tf.keras.optimizers.RMSprop(0.0099)
model.compile(loss='mean_squared_error',optimizer=optimizer)
model.fit(x,y,epochs=500)
The fit method takes three parameters; namely, x, y, and number of epochs. During model training, if all the batches of data are seen by the model once, we say that one epoch has been completed. Below is the output snapshot for model training. As you can see, we’re running 500 epochs in this example. After every epoch, we print the loss value. You can clearly see how the loss changes after each epochs.
Predict using the model
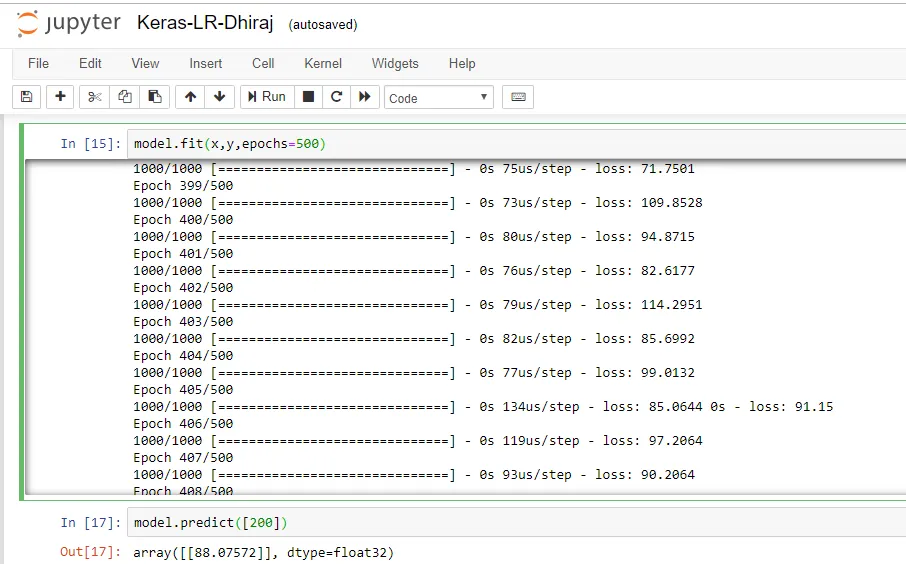
After training is completed, the next step is to predict the output using the trained model. We’re passing a random input of 200 and getting the predicted output as 88.07, as shown above.
Verify the outcome
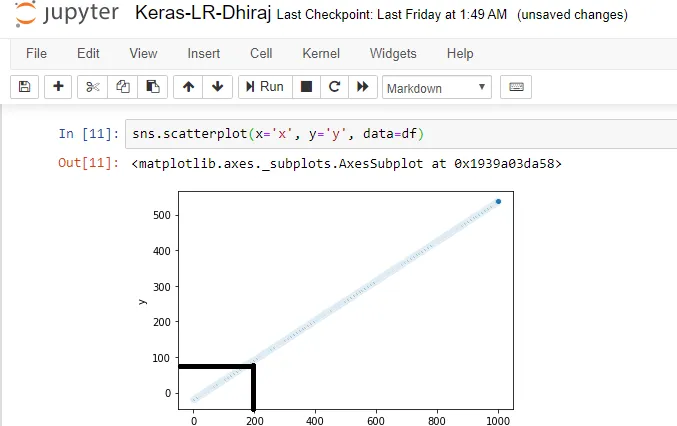
Let’s verify that our prediction is giving an accurate result. For this, we’ll plot the linear regression line for the data. In the graph below, for x = 200 we can easily see that the value of y should be around 90. And our prediction is y = 88. Hence, we can consider our prediction to be pretty highly accurate.
End Notes
We have come to the end of this post. In this article, we learned how to create a linear regression model using Keras’s Sequential class and predict the values using the trained model. We also verified the accuracy of our model. You can find the code and the data for this article here.
I hope you liked the concepts related to Keras and also understood the code used to train a Keras model. There are many possibilities with hyper-parameter tuning and training to improve your model. Feel free to modify and play with the code.
Happy Machine Learning! 🙂

Comments 0 Responses