
The introduction of iOS 13 brought a major upgrade to Apple’s augmented reality framework. ARKit 3 arrived with a lot of interesting new features — people occlusion, motion tracking, simultaneous front and back camera, and collaborative support. These enhancements to ARKit strongly indicate Apple’s ambition for pushing AR immersion even further.
Up until iOS 12, we had SceneKit, SpriteKit, and Metal as the primary rendering frameworks. Among these, SceneKit, the 3D graphics framework, had been the most logical choice for building ARKit apps.
While a lot of enhancements in the SceneKit framework were expected to be announced at WWDC 2019, Apple surprised us by introducing a completely new and independent 3D engine framework—RealityKit, which allows developers to create AR experiences and scenes more easily than ever. Additionally, it comes with a utility app, Reality Composer, which allows us to create our own 3D objects and customizations.
Our Goal
The purpose of this article is to get you started with RealityKit and set you up to start building awesome augmented reality-based applications. We’ll start off by setting up an Xcode Project for our AR-based iOS application, followed by a brief tour through the various key components of the RealityKit framework.
As we work through this tutorial, we’ll put the various pieces together to end up with a really cool AR application that lets users add 3D models and structures to the RealityKit’s virtual scene and interact with them by using gestures.
Additionally, we’ll set up a drawing canvas view for handling user input. In this case, the user input that will include digits inferred using the MNIST Core ML model, which will then be converted into 3D text that eventually gets placed in the virtual scene.
Besides RealityKit and ARKit, we’ll be using the following iOS frameworks in our application:
- PencilKit — This is a drawing framework introduced in iOS 13 that allows us to create custom, canvas-based applications. We’ll leverage this framework for handling the input.
- SwiftUI and Vision — SwiftUI is the popular new declarative UI framework, and Vision abstracts complex computer vision algorithms with an easy-to-use API.
Project Setup
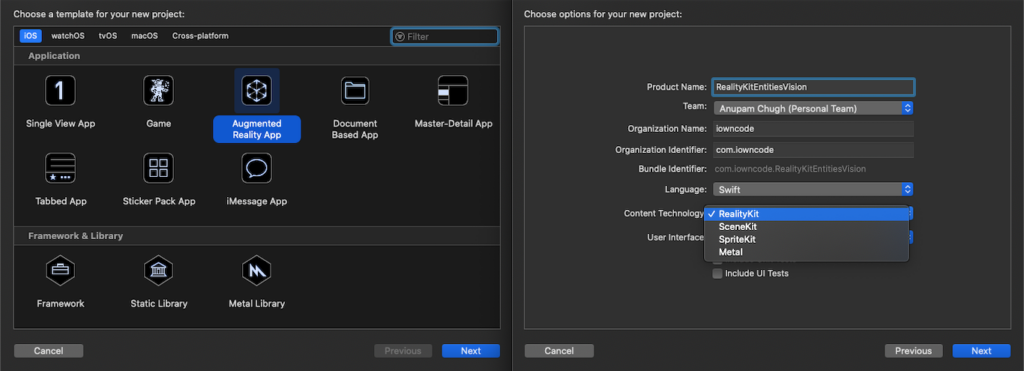
To start off, open Xcode 11 or above and create a new project. Go to the iOS tab and select the Augmented Reality App template. In the wizard, make sure to choose RealityKit as the technology and SwiftUI as the user interface, as shown below:
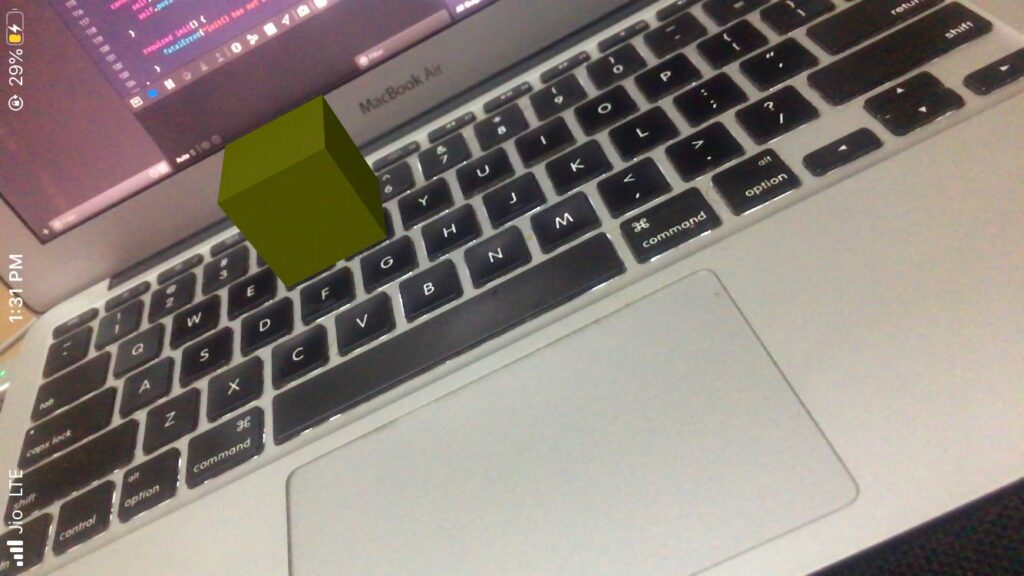
If you look at the left panel in Xcode you’ll see a file named Experience.rcproject. This is a Reality Composer file. By default, it comes with a single scene consisting of a steel box. You can create your own scenes with custom models, 3D assets, and effects.
The starter project that you’ve just created consists of an ARView, in which the box entity is loaded and added to the anchor of the ARView. Upon building the project, the following box will be displayed in the middle of your AR app’s screen:

The starter project is devoid of any gestures and interactions with the virtual scene. As we go along, instead of using the Reality Composer to construct scenes and structures, we’ll create our own 3D entities programmatically. But before we do that, let’s talk about the core components that build a RealityKit scene and address the fancy terms — scenes, entities, anchors, etc.
Anatomy of RealityKit
RealityKit’s ARView is the view responsible for handling the AR experience. From setting up the onboarding experience (more on this later) to configuring ARKit configurations, camera, and interactions, everything goes through the ARView.
Every ARView consists of a single scene—a read-only instance over which we add our AnchorEntities.
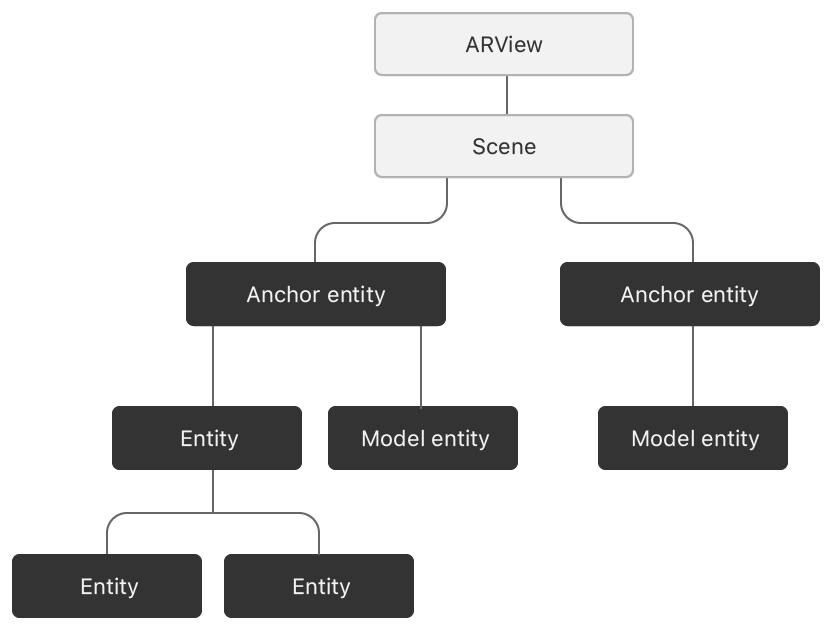
An Entity is the most important component of RealityKit. All objects in a RealityKit scene are entities. An AnchorEntity is the root of all entities. Similar to the ARAnchor of ARKit, it’s responsible for holding the entities and their children.
We can add Components to an entity to further customize it. A ModelComponent lets us define the geometry of the 3D object, and a CollisionComponent lets us handle collisions between objects.
RealityKit makes it really easy to generate simple 3D shapes, such as boxes, spheres, planes, and text.
The following code showcases how to create a ModelEntity that represents a cube:
The Material protocol is used to set the color and texture of the entity. Currently, the three built-in types of Material available with RealityKit are:
- SimpleMaterial — For setting the color and whether or not the entity is metallic.
- OcclusionMaterial — An invisible material that hides objects rendered behind it.
- UnlitMaterial — This kind of entity doesn’t react to lights in the AR scene.
An entity is added to the scene in the following way:
In order to add the entity to the virtual scene, we need to ensure that it conforms to the HasAnchoring protocol or is added as a child to an Anchor with this property, as we did above.
So the following won’t work, since the ModelEntity doesn’t conform to the HasAnchoring protocol:
Before we create our first custom entity and add it to the scene, let’s see what ARCoachingOverlay is and how to integrate it into our ARView.
Configuring ARCoachingOverlay
The ARCoachingOverlayView is used to provide visual instructions to the user in order to facilitate ARKit’s world tracking. For this, we need to add this view as a subview of the ARView and set up the goal property, which specifies the tracking requirements — horizontalPlane, verticalPlane, anyPlane, or tracking (tracks feature points). Once the goal is determined, the ARCoachingOverlayView is dismissed.
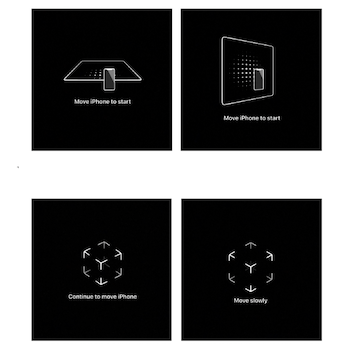
The delegate’s coachingOverlayViewDidDeactivate function gets triggered once the goal is met. The ARCoachingOverlay is automatic by default. This means if, during the scene, the feature points or the plane is lost, onboarding would start again. You can prevent this by setting it as a one-off operation and disable the automatic behavior by setting coachingOverlayView.activatesAutomatically = false.
Next, just execute the addCoaching function from above on the ARView instance as shown below:
Next up, we’ll create a custom entity and add it to the scene once the ARCoachingOverlayView is dismissed.
Creating a Custom Box Entity
We can create our own Entity subclasses of custom shape and sizes by conforming to the HasModel and HasAnchoring protocols. Additionally, the HasCollision protocol is used to enable interactions with the entity — ray casting (more on this later), gesture handling (scale, translate, rotate), etc.
The following code shows how to create a custom entity box structure:
There’s also a convenience initializer that allows us to specify the position of the entity in the scene with respect to the camera:
Now we’ve added an entity to our AR scene, but we can’t perform any interactions with it yet! To do that we’ll need to add gestures, which we’ll explore next.
Entity Gestures and Child Entities
RealityKit provides us with a bunch of built-in gesture interactions. Specifically, it allows scaling, rotating, and translating the entities in the AR Scene. To enable gestures on an entity, we need to ensure that it conforms to the HasCollision protocol (which we did in the previous section).
Also, we need to “install” the relevant gestures (scale, translate, rotate or all) on the entity in the following way:
The function generateCollisionShapes generates the shape of the Collision Component of the entity with the same dimensions as the entity’s Model Component. The collision component is responsible for interacting with the entity.
To install multiple gestures, we invoke the method with the list of gestures in an array, as shown below:
With this, our entity is ready to be interacted and played around with in the AR scene.
Adding an entity to another entity
We can also add child entities to the current entity and position them relative to it. Let’s extend our current case by adding a 3D text mesh on top of the box, as shown below:
The following is a glimpse of our RealityKit application with the text placed above the box:
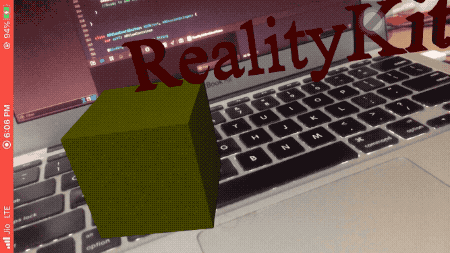
As a note, the world’s environment has an impact on the lighting of the entities. The same box that looks pale yellow in the above illustration would look brighter in different surroundings.
Now that we’ve added interactivity to the entities and created a 3D text mesh, let’s move on to the last segment of RealityKit — ray casting.
Ray Casting
Ray casting, much like hit testing, helps us find a 3D point in an AR scene from your screen point. It’s responsible for converting the 2D points on your touch screen to real 3D coordinates by using ray intersection to find the point on the real-world surface.
Though hitTest is available in RealityKit for compatibility reasons, ray casting is the preferred method, as it continuously refines the results of tracked surfaces in the scene.
We’ll extend the above application to allow touch gestures in the ARView in SwiftUI to be converted into the 3D points, where we’ll eventually position the entities.
Currently, the TapGesture method in SwiftUI doesn’t return the location of the view — where it’s pressed. So we’ll fall back onto the UIKit framework to help us find the 2D location of the tap gesture.
In the following code, we’ve set up our UITapGestureRecognizer in the ARView, as shown below:
extension ARView{

    func setupGestures() {
        let tap = UITapGestureRecognizer(target: self, action: #selector(self.handleTap(_:)))
        self.addGestureRecognizer(tap)
    }

    @objc func handleTap(_ sender: UITapGestureRecognizer? = nil) {

        guard let touchInView = sender?.location(in: self) else {
            return
        }

        rayCastingMethod(point: touchInView)

        //to find whether an entity exists at the point of contact
        let entities = self.entities(at: touchInView)
    }

    func rayCastingMethod(point: CGPoint) {


        guard let coordinator = self.session.delegate as? ARViewCoordinator else{ print("GOOD NIGHT"); return }

        guard let raycastQuery = self.makeRaycastQuery(from: point,
                                                       allowing: .existingPlaneInfinite,
                                                       alignment: .horizontal) else {

                                                        print("failed first")
                                                        return
        }

        guard let result = self.session.raycast(raycastQuery).first else {
            print("failed")
            return
        }

        let transformation = Transform(matrix: result.worldTransform)
        let box = CustomBox(color: .yellow)
        self.installGestures(.all, for: box)
        box.generateCollisionShapes(recursive: true)

        let mesh = MeshResource.generateText(
            "(coordinator.overlayText)",
            extrusionDepth: 0.1,
            font: .systemFont(ofSize: 2),
            containerFrame: .zero,
            alignment: .left,
            lineBreakMode: .byTruncatingTail)

        let material = SimpleMaterial(color: .red, isMetallic: false)
        let entity = ModelEntity(mesh: mesh, materials: [material])
        entity.scale = SIMD3<Float>(0.03, 0.03, 0.1)

        box.addChild(entity)
        box.transform = transformation

        entity.setPosition(SIMD3<Float>(0, 0.05, 0), relativeTo: box)

        let raycastAnchor = AnchorEntity(raycastResult: result)
        raycastAnchor.addChild(box)
        self.scene.addAnchor(raycastAnchor)
    }
}- Take note of the findEntities function — this helps us find nearby entities in 3D space based on the 2D screen point.
- The setupGestures method will be invoked on our ARView instance.
- The makeRaycastQuery creates an ARRaycastQuery, in which we’ve passed the point from the screen. Optionally, you can pass the center point of the screen if you intend to just add the entities to the center of the screen each time. Additionally, the plane type(exact or estimated) and orientation(you can set either among horizontal, vertical or any).
- The results returned from ray casting are used to create an AnchorEntity on which we’ve added our box entity with the text.
- overlayText is what we’ll receive from the user input as the label for the 3D text (more on this later).
Before we jump onto PencilKit for creating input digits, let’s modify the ARViewContainer that loads the ARView with the changes we’ve made so far.
Configuring ARView with SwiftUI Coordinator
In the following code, the Coordinator class is added to the ARViewContainer in order to allow data to flow from the PencilKitView to the ARView.
struct ARViewContainer: UIViewRepresentable {

    @Binding var overlayText: String

    func makeCoordinator() -> ARViewCoordinator{
        ARViewCoordinator(self, overlayText : $overlayText)
    }

    func makeUIView(context: Context) -> ARView {


        let arView = ARView(frame: .zero)
        arView.addCoaching()

        let config = ARWorldTrackingConfiguration()
        config.planeDetection = .horizontal
        arView.session.run(config, options: [])

        arView.setupGestures()
        arView.session.delegate = context.coordinator

        return arView
    }
    func updateUIView(_ uiView: ARView, context: Context) {
    }
}


class ARViewCoordinator: NSObject, ARSessionDelegate {
    var arVC: ARViewContainer

    @Binding var overlayText: String

    init(_ control: ARViewContainer, overlayText: Binding<String>) {
        self.arVC = control
        _overlayText = overlayText
    }

    func session(_ session: ARSession, didUpdate frame: ARFrame) {
    }
}
The overlayText is picked up by the ARView scene from the Coordinator class. Next up, PencilKit meets the Vision framework.
Handling Input with PencilKit
PencilKit is the new drawing framework introduced in iOS 13. In our app, we’ll let the user draw digits on the PencilKit’s canvas and classify those handwritten digits by feeding the Core ML MNIST model to the Vision framework.
The following code sets up the PencilKit view (PKCanvasView) in SwiftUI:
ContentView
Now it’s time to merge the ARView and PKCanvasView in our ContentView. By default, SwiftUI views occupy the maximum space available to them. Hence, both of these views would take up almost half of the screen.
The code for the ContentView.swift file is presented below:
struct ContentView : View {

    let pkCanvas = PKCanvasRepresentation()
    @State var digitPredicted = "NA"


    private let textRecognitionWorkQueue = DispatchQueue(label: "VisionRequest", qos: .userInitiated, attributes: [], autoreleaseFrequency: .workItem)

    var body: some View {
        VStack{
            ARViewContainer(overlayText: $digitPredicted).edgesIgnoringSafeArea(.all)
            pkCanvas

            HStack{

            Button(action: {
                let image = self.pkCanvas.canvasView.drawing.image(from: self.pkCanvas.canvasView.drawing.bounds, scale: 1.0)

                self.recognizeTextInImage(image)
                self.pkCanvas.canvasView.drawing = PKDrawing()

            }){
                Text("Extract Digit")
            }.buttonStyle(MyButtonStyle(color: .blue))

                Text(digitPredicted)

            }

        }
    }

    private func recognizeTextInImage(_ image: UIImage) {

        guard let cgImage = image.cgImage else { return }

        let model = try! VNCoreMLModel(for: MNISTClassifier().model)

        let request = VNCoreMLRequest(model: model)
        request.imageCropAndScaleOption = .scaleFit

        textRecognitionWorkQueue.async {
            let requestHandler = VNImageRequestHandler(cgImage: cgImage, options: [:])
            do {
                try requestHandler.perform([request])

                if let observations = request.results as? [VNClassificationObservation]{
                    self.digitPredicted = observations.first?.identifier ?? ""
                }

            } catch {
                print(error)
            }
        }
    }
}
The following code does the styling for the SwiftUI button:
Finally, our app is ready! An illustration of a working RealityKit + PencilKit iOS application is given below:
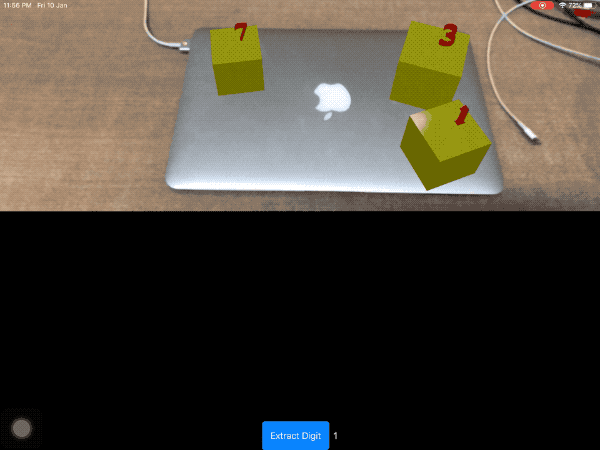
Once the digit is extracted from the PencilKit drawing, all we do is a ray cast from the point where the ARView is touched on the screen to create an entity on the plane. Currently, the entities do not support collision and can be dragged in and out of each other. We’ll be handling collisions and more interactions in the a subsequent tutorial, so stay tuned!
Conclusion
RealityKit is here to abstract a lot of boilerplate code to allow developers to focus on building more immersive AR experiences. It’s fully written in Swift and has come as a replacement for SceneKit.
Here, we too a good look at the RealityKit entities and components and saw how to set up a coaching overlay. Furthermore, we created our own custom entity and child entities. Subsequently, we dug into the 3D gestures currently supported with RealityKit and integrated them on the entities, and then explored ray casting. Finally, we integrated PencilKit for handling user inputs and used the Vision framework for predicting hand-drawn digits.
The full source code along with the MNIST Core ML model is available in this GitHub Repository.
Moving on from here, we’ll explore the other interesting functionalities available in RealityKit. Loading different kinds of objects, adding sounds, and the ability to perform and detect collisions will be up next.
That’s it for this one. Thanks for reading.

Comments 0 Responses