
Introduction:
Developing with the camera on Android can be difficult. When we need to develop a camera-based application, we need to do a lot of manual work, and we need to do handle a lot of complex things with the Camera API, like handling preview screens, image rotations, and much more
At Google IO 2019, Google added another powerful tool for camera development in Android called CameraX as part of Jetpack.
Features of CameraX:
- It’s backward compatible to Android 5.0 / Lollipop (API 21).
- Supports advanced features like Portrait, HDR, night mode, etc.
- CameraX doesn’t have specific call/stop methods in onResume() and onPause(), but it binds to the lifecycle of the View with the help of CameraX.bindToLifecycle()
OnResume and OnPause methods are part of the Android Activity lifecycle, normally used when we need to stop/resume any service. But cameraX binds with the lifecycle, and it will auto stop/resume the request when the user leaves the screen or returns to the screen.
What we’ll learn
To help us get started with Android CameraX, we’ll work through a simple implementation to get it set up in a project. Here’s what we’ll cover:
- How to add the CameraX dependencies.
- How to display the camera preview in an activity (Preview use case).
- How to take a photo and save it to storage (ImageCapture use case).
Step 1: Add the Gradle dependencies
First, let’s add the CameraX dependencies to our app’s Gradle file, inside the dependencies section, as shown below:
// Use the most recent version of CameraX, currently that is alpha04
def camerax_version = "1.0.0-alpha04"
implementation "androidx.camera:camera-core:${camerax_version}"
implementation "androidx.camera:camera-camera2:${camerax_version}"
Step 2: Create the viewfinder layout
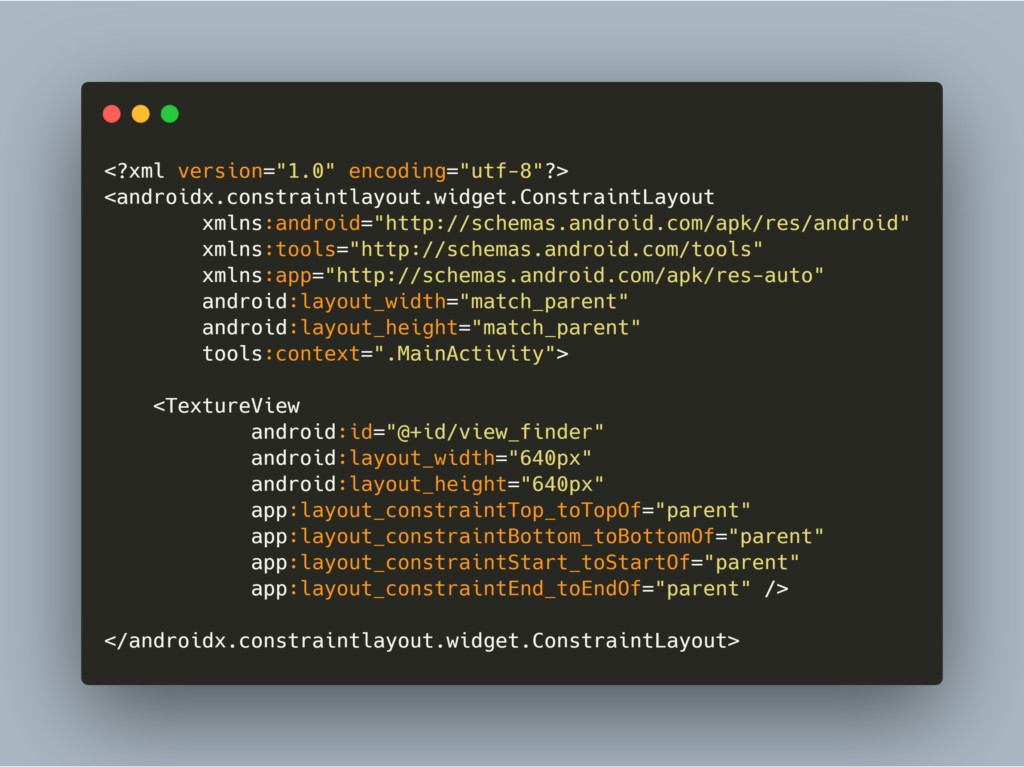
Now we need to create the viewfinder layout to display the image. We’ll be using a SurfaceTexture method to display the camera’s viewfinder, so just add the TextureView to your layout.
TextureView:
TextureView extends the class View in Android, which can be used to display a content stream.
Step 3: Request camera permissions
After adding the viewfinder, we now need to add camera permissions to the Manifest.xml file:
<uses-permission android:name=”android.permission.CAMERA” />
Step 4: Implement viewfinder
For camera applications, showing a viewfinder to the users is very important — otherwise, it’s very difficult for them to point the camera where they intend to. A viewfinder can be implemented by using the CameraX Preview class.
To use Preview, we first need to define a configuration for preview and then bind the preview instance/object with the CameraX lifecycle. We’ll be doing this within the startcamera() method:
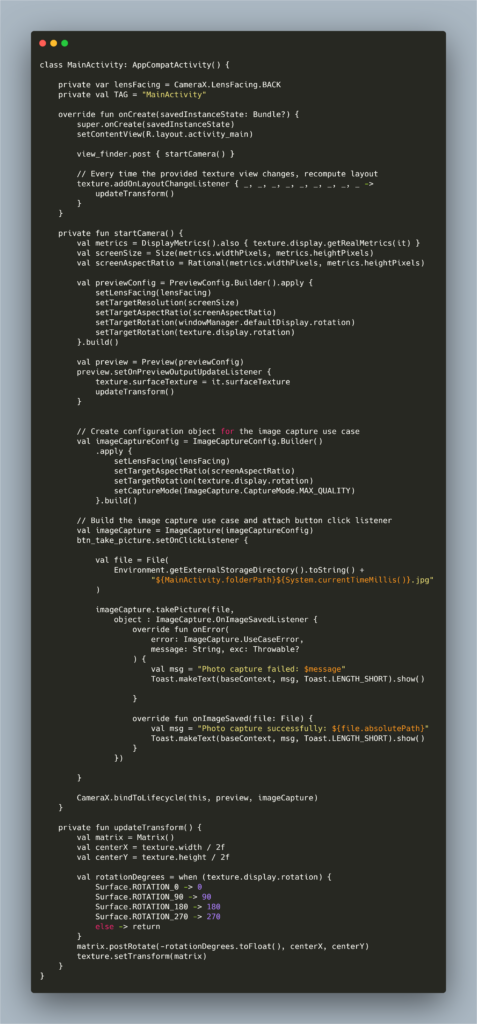
In the above code, view_finder is our TextureView to show the camera view.
And:
- CameraX.bindToLifecycle() binds to the lifecycle of the view.
- PreviewConfig.Builder() is the builder class for PreviewConfig (which helps to see the preview of an image) where you can set different types of configuration like lens facing side, target resolution, and Aspect ratio, with setLensFacing(value), where value = CameraX.LensFacing.BACK/FRONT.
- ImageCaptureConfiguration.Builder() is the configuration for an image when the image is captured.
- rotationDegrees corrects the output of the Preview, texture sets the transformation using texture.setTransform(matrix), and matrix rotates the preview based on rotationDegrees.
- When the button button_take_picture is clicked, we have to select an image and store it in device storage.
- In the Click listeners, we take images using the take picture method and implement two methods: onError() and onImageSaved().
The above guide covers some of the basics of CameraX to help you get started. But there’s a lot more you can do with CameraX. A couple of those capabilities include:
- Creating a video recorder using CameraX
- You can also use CameraX’s Image Analyzer to more efficiently complete advanced image processing techniques, such as computer vision and other machine learning-related tasks
Conclusion
This article introduced you to Android Jetpack’s CameraX, and led you through some of its basic features and functionality.
It’s now easier and more efficient to use the camera in Android development, reducing the amount of manual image processing and analysis that devs have to undertake. CameraX also makes it much easier to analyze images for advanced processing techniques, including computer vision and machine learning tasks.
If you want to read more about, check out the official developer documentation below:
I hope this article is helpful. If you think something is missing, have questions, or would like to give feedback, go ahead and leave a comment below. I’d appreciate the feedback.
I’ve written some other Android-related content, and if you liked what you read here, you’ll probably also enjoy this:
Sharing (knowledge) is caring 😊 Thanks for reading this article. Be sure to clap or recommend this article if you found it helpful. It means a lot to me.
If you need any help, join me on Twitter, LinkedIn, GitHub, and Subscribe to my Youtube Channel.

Comments 0 Responses