
Like many developers exploring the world of wearables, I’m an avid fan of apps that track your exercise. Companies like Strava & Runkeeper have paved the way for what we can do with motion and health data, creating new and unique experiences that attract millions of users. However, I was always frustrated that I could automatically track my runs, but I still had to enter each gym set by hand.
Can we record different exercises and classifying them? Could we see what we’ve done at the end of a plyometric workout? — how many pushups, how many jumping jacks, how many burpees? I found the answer in Core Motion, Apple’s library to glean data from the device’s accelerometer and gyroscope, and Core ML, their on-device machine learning kit.
Define a goal
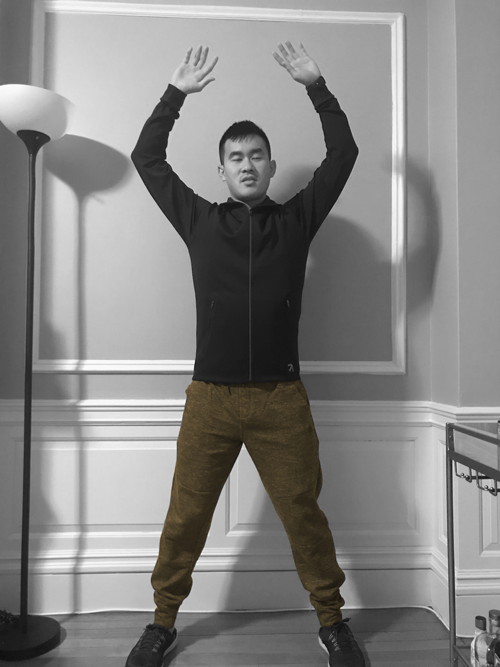
The ultimate goal is to build a machine learning model that can automatically categorize and log an exercise from the motion data we collect from the watch. I decided to choose a ubiquitous exercise used in almost all traditional workouts: jumping jacks. In this post, we’ll focus on data collection by understanding Core Motion and building a WatchKit app to record jumping jacks. Future posts will discuss more sophisticated models that can recognize multiple exercises.
Diving into Core Motion
To better understand the watch’s sensors (gyroscope, accelerometer, etc) and how it can help us track motion, let’s take a look at Apple’s Core Motion and what we can measure:
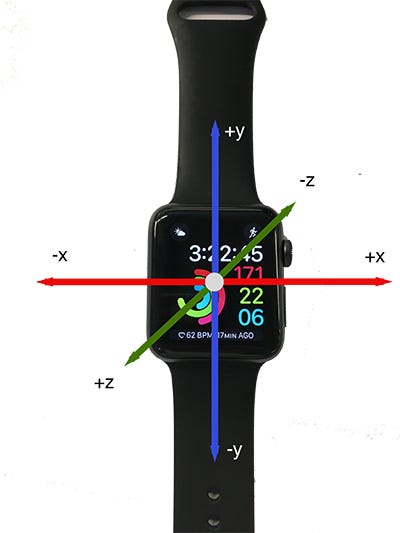
- User Acceleration — the acceleration that the user imposes on the device (x, y, z)
- Gravity — the acceleration undergone by gravity (x, y, z)
- Attitude — the orientation of the device (roll, pitch, yaw)
- RotationRate — the rate of rotation (x, y, z)
Since our original goal is to track a jumping jack, we can focus on the important metrics here — user acceleration and gravity (vectors in 3D space).
Breaking down a Jumping Jack
Let’s describe the motion of the watch and the different forces we enact on it throughout a standard jumping jack. (In the pictures below, the user acceleration vector is in red and gravity is in blue. To make it easier to visualize, we’ll neglect motion along the z-axis)
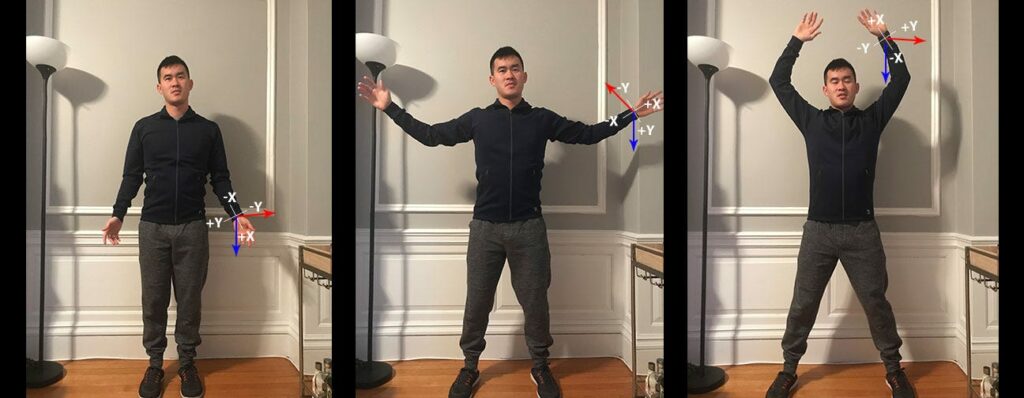
- Starting position — Arms by your side.
- On upswing — Arms halfway up
- Halfway through a jumping jack — Arms at the top
- On downswing — Arms halfway down
- Back to starting — Arms by your side
Notice the watch orientation. In the photos above, the watch is facing backwards towards the wall the whole time but depending on how you do a jumping jack, we may start this motion differently.
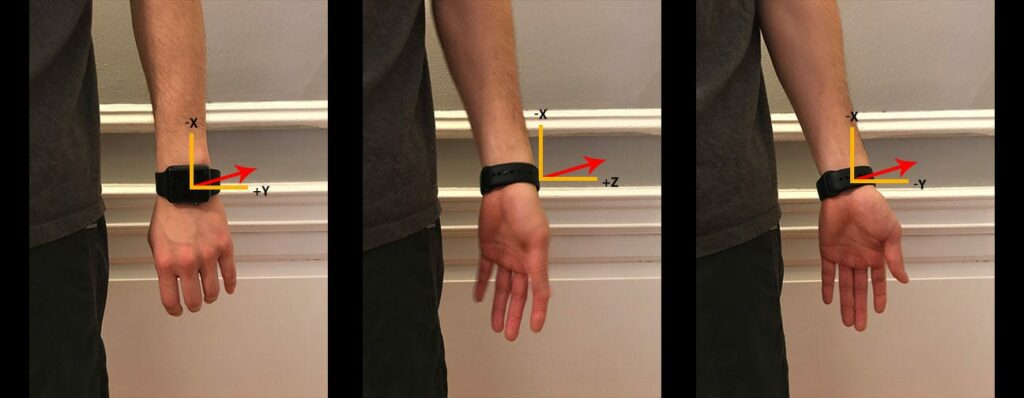
- Palms facing backwards
- Palms facing toward my body
- Palms facing forward.
Unless you’re extremely flexible, changes are that your palms won’t be facing away from your body (if you’ve put the watch on correctly). In all of these cases, gravity will be in the +x direction because the right side of the watch is facing downwards (picture a watch on your wrist). In all of these cases, the motion will be slightly different depending on how people are used to doing their jumping jacks. We’ll revisit this idea later.
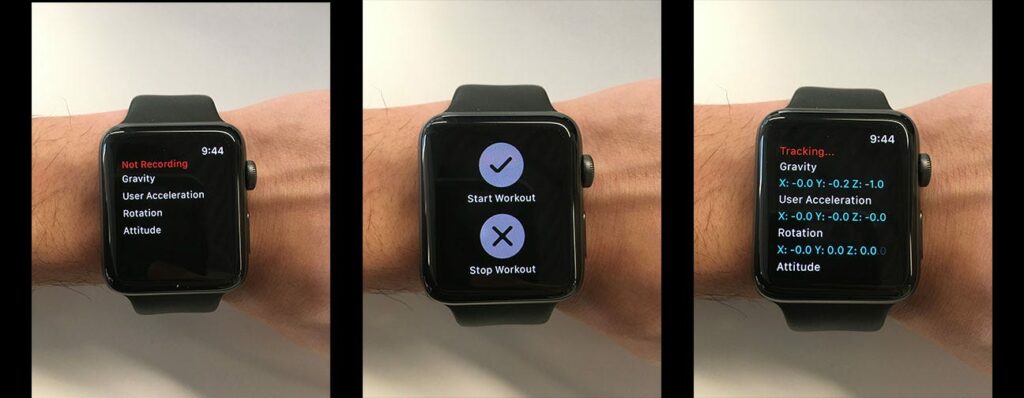
Recording Exercises with the Watch
After digging through Apple’s docs and googling around, I came across a sample app that Apple created which uses Core Motion to track forehand and backhand tennis swings.
https://developer.apple.com/library/content/samplecode/SwingWatch/Introduction/Intro.html.
We’ll use this project as a starting point, but before we start editing it, let’s first decide how we’re going to process the motion data from the watch. One way would be to send the data from the watch to the phone’s app, hit an API endpoint, and store it in a database for us to fetch. That seems like overkill.
Instead, we can log these data points and extract them later on. A nice bonus would be to show these measurements on the app for debugging purposes. In order to do this, let’s edit the InterfaceController and set up a couple of labels to display the device motion on the home screen. If you’re new to this, take a look at getting started with Swift.
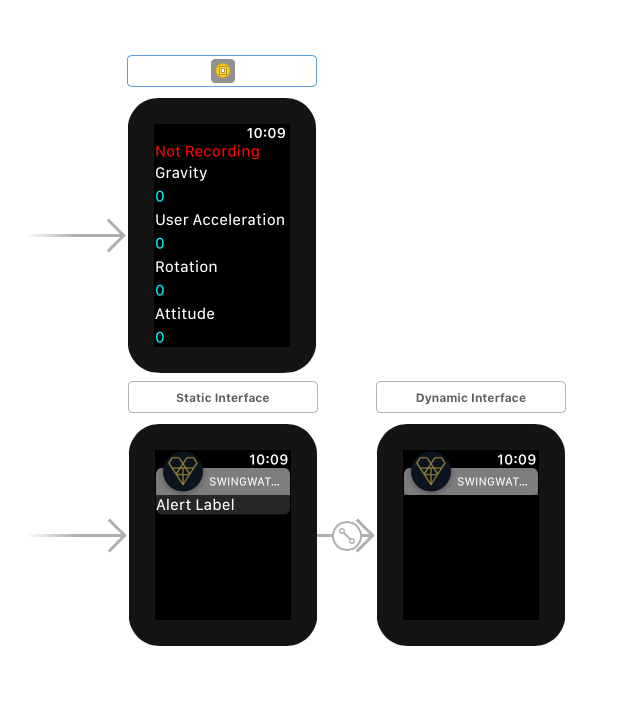
Next, let’s create a function to update the text.
Now that we have a way to display this data, we can figure out how to connect these UI components to the sensor updates. For that we’ll need to use Core Motion’s Manager. The update interval tells how often we should record a measurement.
Since we’re actually updating a UI element, 50hz (10 measurements / second) is good enough. If we need more granularity later on we can increase the frequency.
When we start recording, we’ll start reading the data from the sensors, log it, and dispatch it to update the UI.
Again we’ll extract the raw values out of the logs after we finish recording. Let’s walk through this (comments inline)
Finally updateMetricsDelegate just passes the strings to display on the labels we set up earlier.
Here’s the finished code on GitHub. When we run it, here’s the result:
Taking the SwingWatch sample as a starting point, we’ve created a simple, “hello world” program to play around with Core Motion. We devised a simple way to capture the device motion so that we can extract it later on for analysis.
We’ll take a deep dive into the motion data in a future post, but for now let’s take quick look and see if a pattern emerges. After putting on the watch doing 5 jumping jacks, I was able to capture this in the Xcode logs.
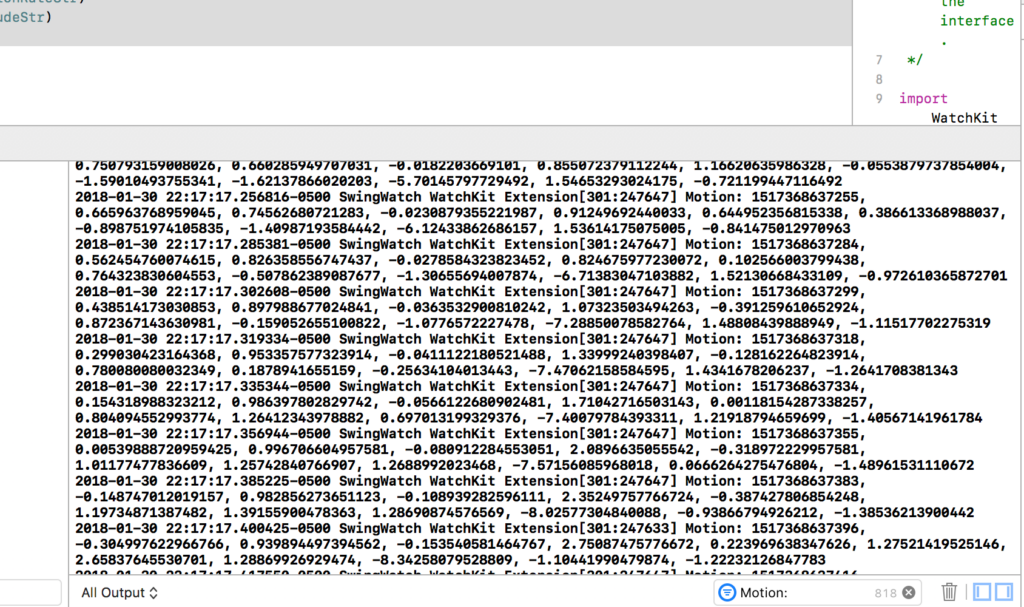
From the console, filter the lines by “Motion:” to get a good reading of all these values. Copy and paste the result into new file and save it as “raw_motion_output.log”.
Next, open up a terminal and run the following command. This splits out the csv formatted data that we logged from the unnecessary text that we don’t care about.
Now that we have this file, let’s take a quick look at the motion recorded over 6 seconds:
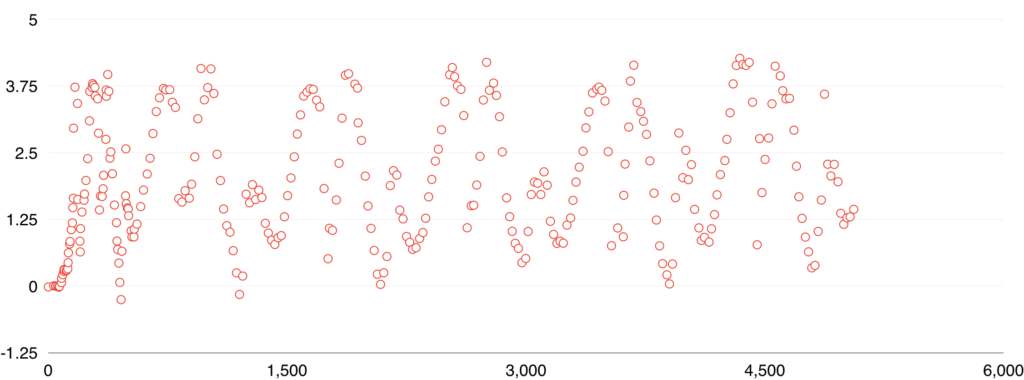
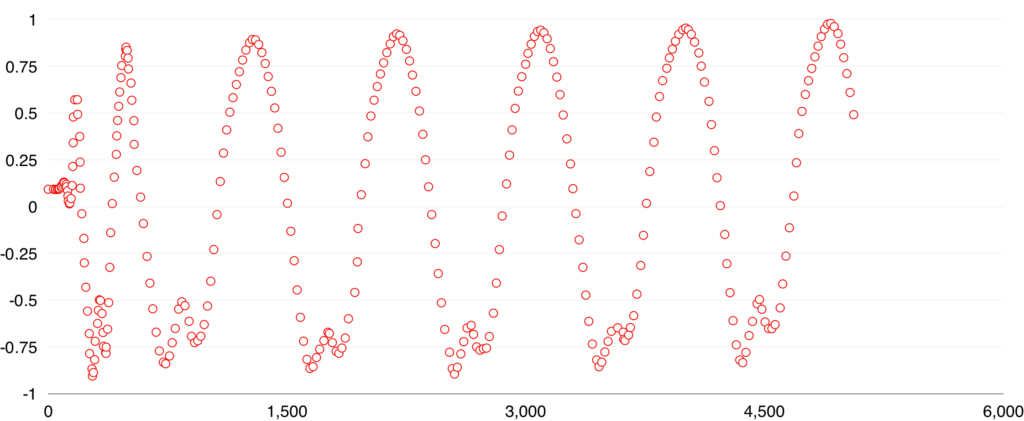
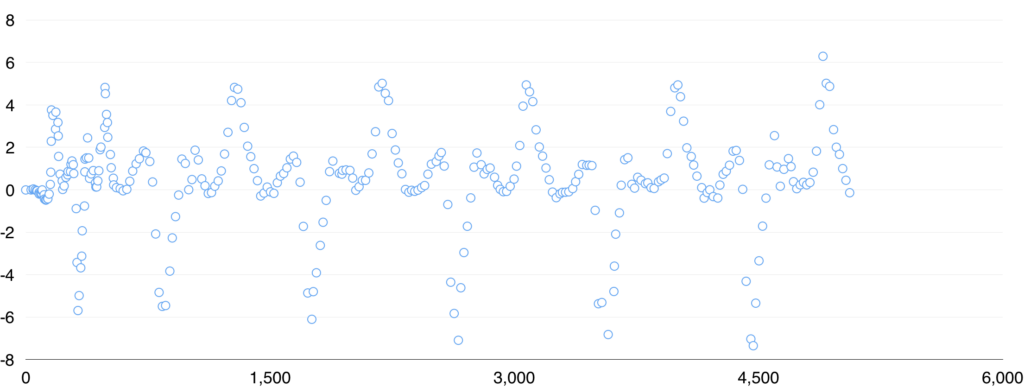
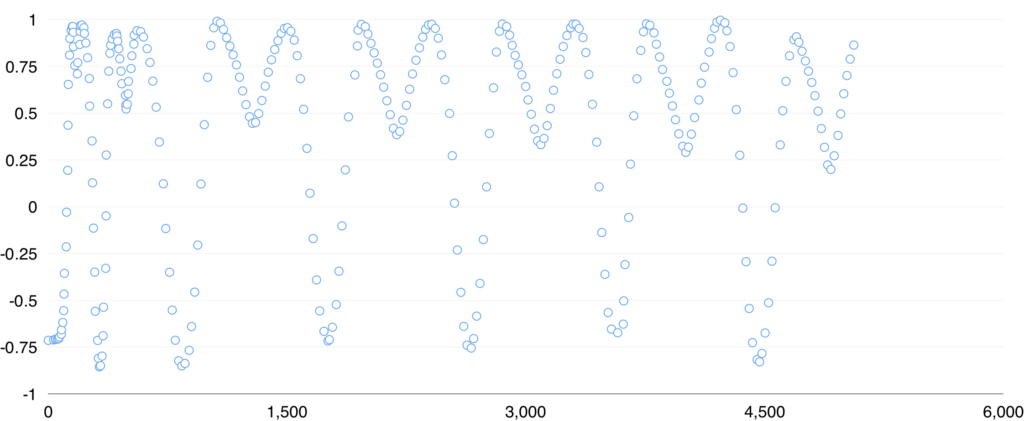
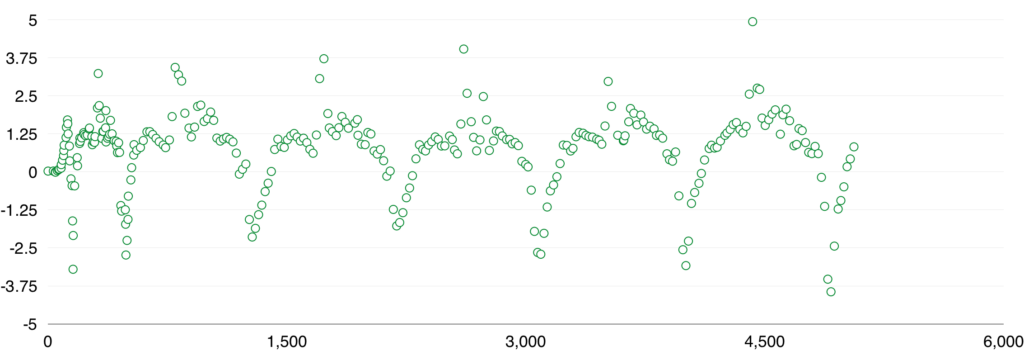
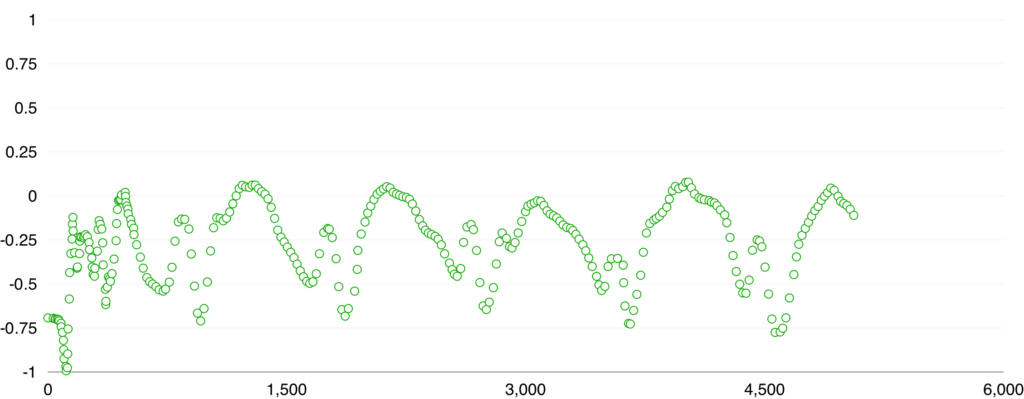
- x-axis is measured in milliseconds
- y-axis is measured in g’s (9.81m/s²)
From these charts, we can see a distinct pattern emerge for each jumping jack. Measuring gravity separately from user acceleration shows how the watch is positioned throughout the jumping jack. User acceleration describes the motion on the watch. Coupling them together, we have a general profile of what this particular exercise looks like from the Apple Watch.
Takeaways / Questions
- If you’re looking to trying out Core Motion, take a look at their SwingWatch sample app. Coming in without an iOS background, I was able to get it setup and running on my watch in under 30 minutes. It also helped to be able to trace through the code, get a sense of the syntax and patterns, and play around with the UI.
- Might seem trivial but as we move the watch around, it’s important to understand how the watch it’s oriented. To play around with this, run the app on your watch and tilt it in different directions. Gravity will always be pointed down so if you point the right side of the watch (as pictured above) towards the ground, you should see the x vector for gravity to read “1.0” (values are measured as multiples of g — the acceleration of gravity) and the y and z values to be 0.
- I’m right handed so I normally wear my watch on my left wrist. These recorded motions are done with the watch on the left side of my body. If we recorded jumping jacks when the watch is on my right wrist, then we’d have a different force vectors.
- We only took a small sample of jumping jacks but to train our model, we need more data. Our app is fairly straight-forward since it just writes to the log but the main drawback is that we have to connect this to Xcode. One way to improve on the existing app is to store each recording on the watch so we can extract this data later on, similar to how running apps like Strava store each run on the watch until the phone is within reach.
- We captured data from the watch’s gyroscope (device attitude & rotation rate) but are they important to model this particular exercise? This will be something we’ll need to keep in mind when we start training it.
Next Steps:
In this post, we focused on using Core Motion to collect sensor data from the Apple Watch — the first step towards building a machine learning model for edge devices.
Looking at the data we’ve captured, it’s clear that there are distinct patterns that describe motion of a jumping jack in 3D space. In the next post, we’ll use machine learning to classify exercises for us and explore the different tradeoffs we need to make so our model runs on mobile.

Comments 0 Responses