
After working on a couple of projects using handwritten text recognition, I’m in total awe of this technology: Send an image to a REST endpoint, wait for the machine learning magic to happen, and then receive a bunch of JSON data with your recognized text as the response /output—wow!
But I already “awed” a lot about this in a blog post a while back. For anyone who’s interested in it and doesn’t know how to get started — check this out:
Despite the powerful tech behind this process, there are a few issues you might run into. First, all the inference involved in text recognition works only online. So if you are using this feature with a bad network connection, you’ll experience at least long waiting times, and in an even worse case, timeouts on your requests.
Moreover, the possibility of having no network connection at all is also likely in certain scenarios. What do you do then? That’s where on-device machine learning comes in!

TL;DR
Before we start, a quick side note for readers who want to jump right in:
The whole project can be found on GitHub, including all the machine learning and model building materials. So if it’s more helpful for you to look at code instead of reading explanations, visit this repo, and see you soon 🙂
The Idea
To be able to offer offline handwritten text recognition, you might have already assumed that there needs to be a bunch of logic packed into your application. And this is exactly what this article is dealing with.
For two reasons, we’ll focus solely on handwritten number recognition:
- Because the current Computer Vision OCR API can’t recognize letters or words properly. For proper recognition, there must always be a context in place (like grammar, a certain format, etc. For more info, check out this tutorial that looks at Sentiment Analysis on iOS).
- To make things easier for this proof of concept, we need to keep things as small and easy as possible.
Great objective I would say, so let’s start!
Create and Train a Model
The data
Machine learning is, first and foremost, about data. If you have valid data that can be categorized nicely, you’re already on a winning path. If you don’t have valid data— you’re doomed. In this case, you have to take a couple of steps back and get a good data set to start with.
In our case, we have a nice set of handwritten numbers from the MNIST database, which contains an incredible 60,000 images of handwritten numbers with an original size of 20×20 pixels. So with this set, we’ll train our machine learning model.
The Model
Finding an appropriate model won’t be much of a problem. There are many different algorithms out there that can help us build a valid model out of our data.
For this tutorial, we’ll be using a support vector machine (SVM). Why this model? Because a colleague told me to. And because the example we’ll be using from the scikit-learn library suggested this model. When learning something so new and foreign, it’s often best to trust the consensus before venturing out on your own.
Before we get started, let’s pause for a moment to put things into the correct order. To do this, let’s visit the scikit-learn docs. This page offers a lot of Python-based examples on how to solve problems with machine learning. A great resource:
So I searched for handwritten digits and found an already finished Python script on how to use an SVM (remember, the Support Vector Machine) on the number problem. With a machine like this, or an algorithm like this, we can classify things.
In detail, the SVM is a binary classifier, which can detect if a certain thing is part of group A or is something else. It doesn’t just necessarily say “This is A and not B but maybe C”— it tells you “This is A – and not B, C and D”.
As we have a look at the sample Python code, and depending on how well-versed you are with it (I was not and am not— remember — noob!), the whole process might seem complicated. But it really isn’t! And don’t be afraid if you don’t understand every last detail of it.
Let’s just run it and see it the result fits our need. In case it doesn’t, we’ll come back and tweak our model. But first — let’s go down the easy and straight path to machine learning.
#!/usr/bin/env python
#print(__doc__)

# Author: Gael Varoquaux <gael dot varoquaux at normalesup dot org>
# License: BSD 3 clause

# Standard scientific Python imports
import matplotlib.pyplot as plt
import pickle

# Import datasets, classifiers and performance metrics
from sklearn import datasets, svm, metrics

# The digits dataset
digits = datasets.load_digits()

# To apply a classifier on this data, we need to flatten the image, to
# turn the data in a (samples, feature) matrix:
n_samples = len(digits.images)
data = digits.images.reshape((n_samples, -1))

# Create a classifier: a support vector classifier
classifier = svm.SVC(gamma=0.001)

# We learn the digits on the first half of the digits
classifier.fit(data[:n_samples // 2], digits.target[:n_samples // 2])

with open('mymodel.pkl', 'wb') as file:
    pickle.dump(classifier, file, protocol=pickle.HIGHEST_PROTOCOL)

# Now predict the value of the digit on the second half:
expected = digits.target[n_samples // 2:]
predicted = classifier.predict(data[n_samples // 2:])

print("Classification report for classifier %s:n%sn"
      % (classifier, metrics.classification_report(expected, predicted)))
print("Confusion matrix:n%s" % metrics.confusion_matrix(expected, predicted))
I want to point out a couple of things to help orient you to what’s happening in this script.
First, we load the data set from the MNIST set and save it onto the variable digits.
Here, we’re creating a SVC — a Support Vector Classifier — which under the hood uses a SVM for it’s work. It’s basically the skeleton of our model, which we will now train with the big set of digits.
We have to save—or better to say, dump—the model somehow, which we do with this piece of code. The format is called Pickle and it’s a binary representation of the model itself.
Done! We now have a Pickle-formatted model that should be able to detect handwritten numbers from images. A little step is missing, though.
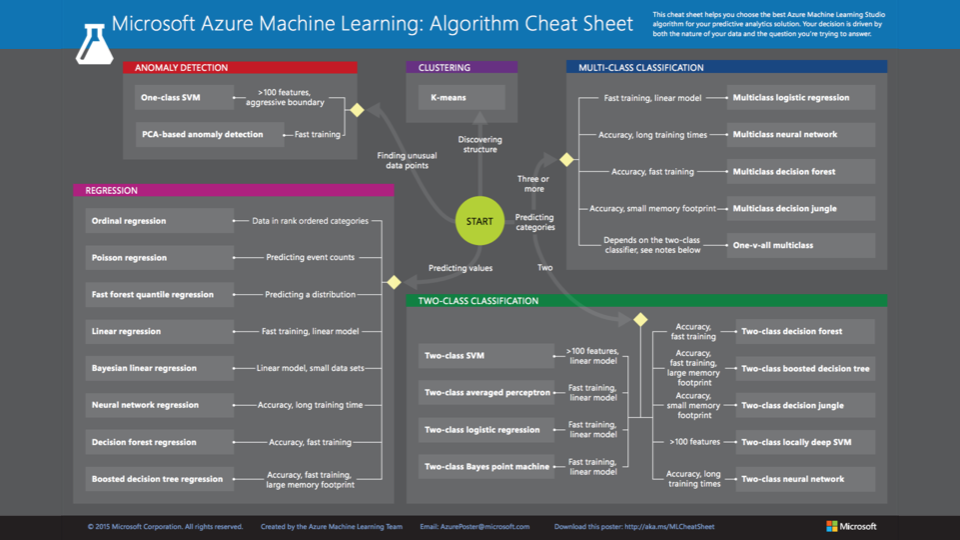
** If you’re not a data scientist and don’t know exactly what algorithm will fit best, have a look at this cheat sheet to get a started. The rest is then a bit of trial and error to experiment and see what fits best on your set of data.
Converting Our Model to Core ML
We now need to convert this model so we can use it in our iOS application. Why? Because Xcode only accepts Core ML models and not Pickle-formatted ones. But no worries, the conversion is quite easy! We again use Python for this task, and it’s done with these few lines of code.
from coremltools.converters import sklearn as sklearn_to_ml
from sklearn.externals import joblib

model = joblib.load('mymodel.pkl')

print('Converting model')
coreml_model = sklearn_to_ml.convert(model)

print('Saving CoreML model')
coreml_model.save('mycoremlmodel.mlmodel')
And there it is! We’re done with the machine learning part. Easy, right? All the noobs — including me — are cheering right now 🙂
Integrating the Core ML Model
The integration of our Core ML model into Xcode is actually quite easy. Just drag and drop it as a resource, don’t forget to copy it, and you’re good to go.
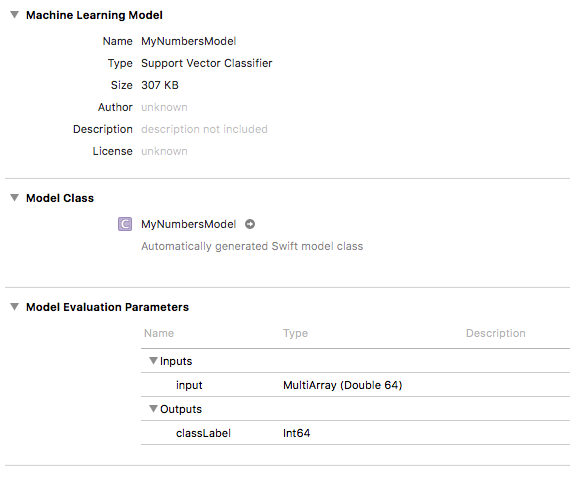
But now a bit of work lies between our model and the predictions we want to make with it. You might be wondering if I can simply cut images of my own handwriting and ask the model what’s on them. This might be true in many circumstances, but not with our model.
Our model doesn’t take pictures as an input—it only takes an 8×8 MultiArray of Doubles. It’s important to find out what these models accept as inputs and what they offer as outputs. We do this by selecting the model in Xcode and having a look at its properties.
What we have to do
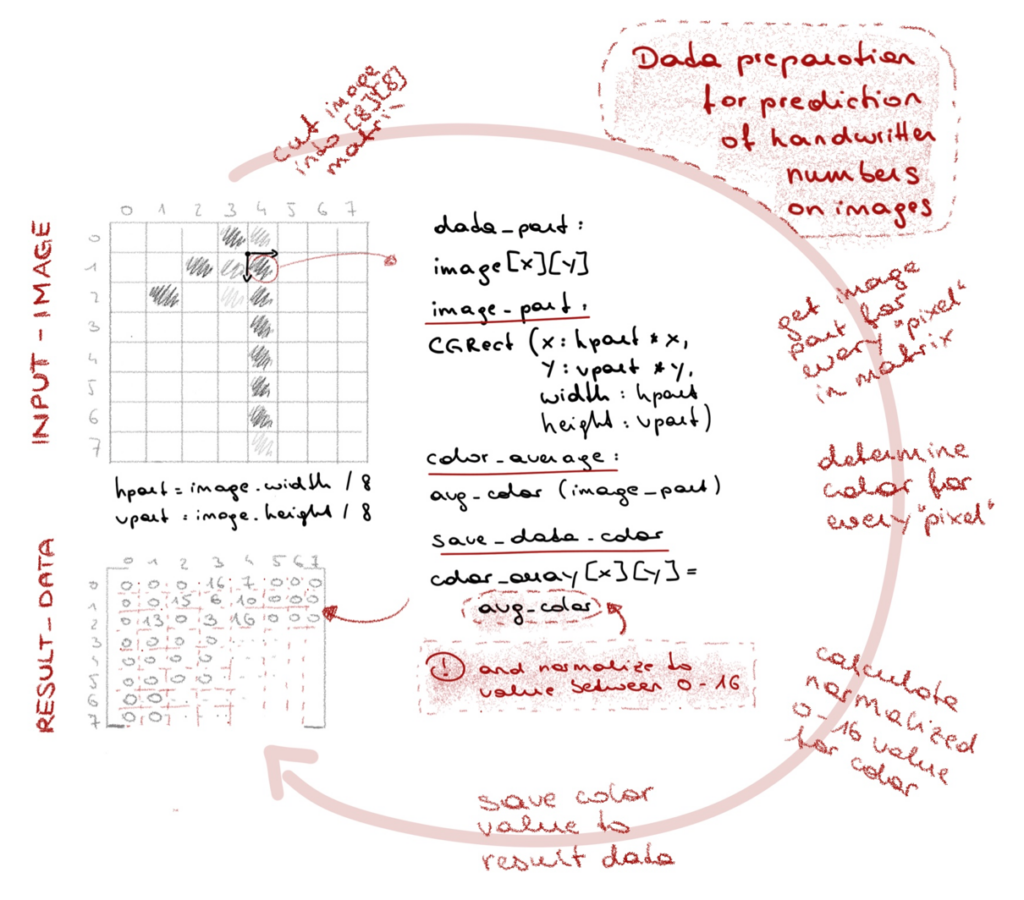
To convert our handwritten numbers to 8×8 MultiArrays, we need a bit of math, but not that much. Here’s what we essentially need to do:
- Get the handwritten number
- Save it on an UIImage
- Then cut the UIImage 8×8
- Look at every tiny piece
- Get its color info and the alpha for the tiny piece
- Multiply the resulting value by 16
- Save this value to the corresponding index in our MultiArray
- Give the MultiArray to the model for prediction
- And print out the result
The details
So let’s look at three little details that might be interesting.
First, the retrieval of the currently-written number. I’m checking each touch generated (see func drawStroke) while writing with the pencil and saving the lowest x/y coordinate (top left) as well as the highest x/y coordinates (lower right). Now we’ll have the rectangular area on the screen where the latest drawing took place.
As soon as the user stops drawing + a small timeout (see the trackTimer in func setup), a rectangle gets drawn around the latest drawing (see func drawDoodlingRect). The area inside the rectangle is now saved into a UIImage (see func fetchOCRText) and will serve as the raw data for our eventual model predictions.
func drawStroke(context: CGContext?, touch: UITouch) {
    let location = touch.location(in: self)
    if touch.type == .stylus {
        minX = min(minX, Int(location.x))
        minY = min(minY, Int(location.y))
        maxX = max(maxX, Int(location.x))
        maxY = max(maxY, Int(location.y))
        //....
    }
    //....
}

public func setup () {
    trackTimer = Timer.scheduledTimer(withTimeInterval: 0.5, repeats: true, block: {
        timer in
        //user pauses for more than a second when drawing
        //let's draw a border around it and save the area to an uiimage
        let now = Date().timeIntervalSince1970
        if Int(self.lastTouchTimestamp!) > 0 && now - self.lastTouchTimestamp! > 1 {
            self.drawDoodlingRect(context: self.context)
        }
    })
}

func drawDoodlingRect(context: CGContext?) {
    let inset = 5

    ocrImageRect = CGRect(x: minX - inset,
                          y: minY - inset,
                          width: (maxX-minX) + inset*2,
                          height: (maxY-minY) + 2*inset)

    context!.strokePath()

    //...

    fetchOCRText()
}

func fetchOCRText () {
    let ocrImage = image!.crop(rect: ocrImageRect!)

    switch recognizeMode {
        case .cognitiveServiceOCR:
            recognizeWithCognitiveServiceOCR(ocrImage)
        case .localMLModel:
            recognizeWithLocalModel(ocrImage)
            break
    }
}
Second, the translation of the image into an 8×8 MultiArray. The code consists exactly of the already listed steps above. All we do here is cut a piece out of our image (the number we’ve just written and cut out), have a look at it’s color, get the alpha, and save it with a little modification to the MultiArray. Doing this 8×8 (or, 64 times), we will have traced the whole image and can now ask the model for it’s prediction on it.
func generateMultiArrayFrom(image: UIImage) -> MLMultiArray? {
  guard let data = try? MLMultiArray(shape: [8,8], dataType: .double) else {
    return nil
  }

  let hTileWidth = image.size.width / 8
  let vTileWidth = image.size.height / 8

  var xPos : CGFloat = 0
  var yPos : CGFloat = 0

  for rowIndex in 0...7 {
    for colIndex in 0...7 {
      //cut the image part at the certain coordinates
      let imageRect = CGRect(x: xPos, y: yPos, width: hTileWidth, height: vTileWidth)
      let cutImage = image.crop(rect: imageRect)
      let avgColor = cutImage.areaAverage()
      var grayscale: CGFloat = 0
      var alpha: CGFloat = 0

      avgColor.getWhite(&grayscale, alpha: &alpha)
      xPos += hTileWidth

      let alphaAsNumber = NSNumber(integerLiteral: Int(alpha * 16.0))
      data[rowIndex*8 + colIndex] = alphaAsNumber
    }
    xPos = 0
    yPos += vTileWidth
  }
  return data
}
Third, the model prediction. It’s just one line of code. We ask the model for a prediction and get a number back. 8×8 MultiArray in, number out. And this number is, hopefully, exactly what we’ve written down 🙂
func recognizeWithLocalModel(_ image: UIImage) {
if let data = generateMultiArrayFrom(image: image) {
guard let modelOutput = try? singleNumberModel?.prediction(input: data) else {
return
}
if let result = modelOutput?.classLabel {
self.addLabelForOCR(text: "(result)")
} else {
print("no result available")
}
}
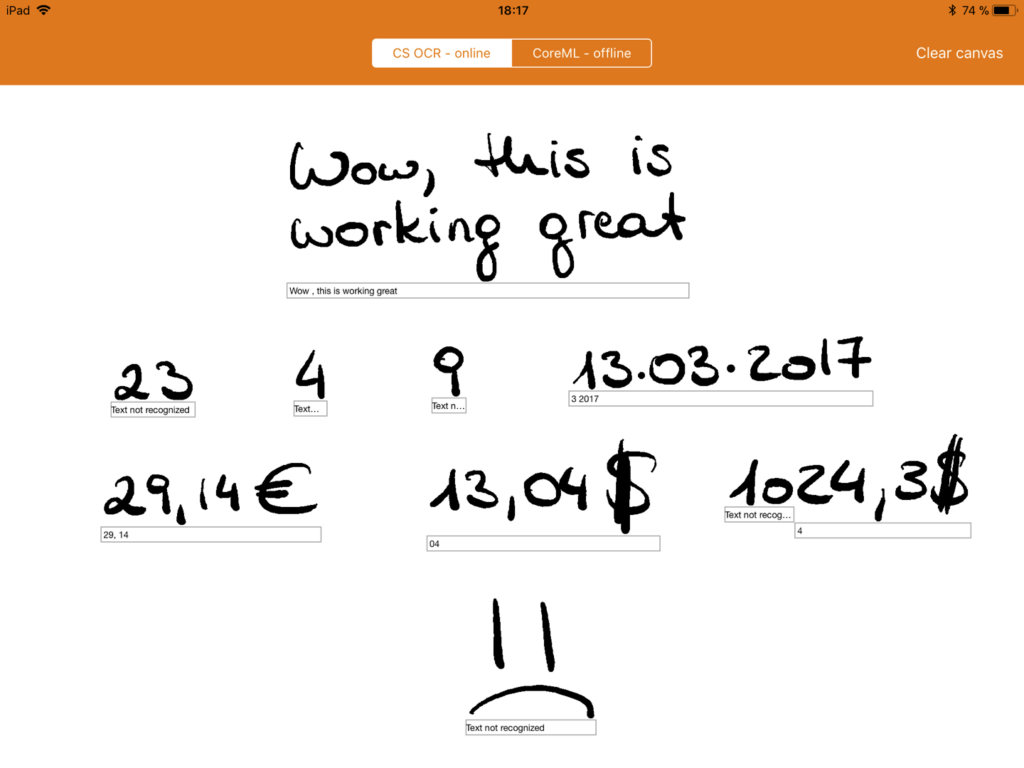
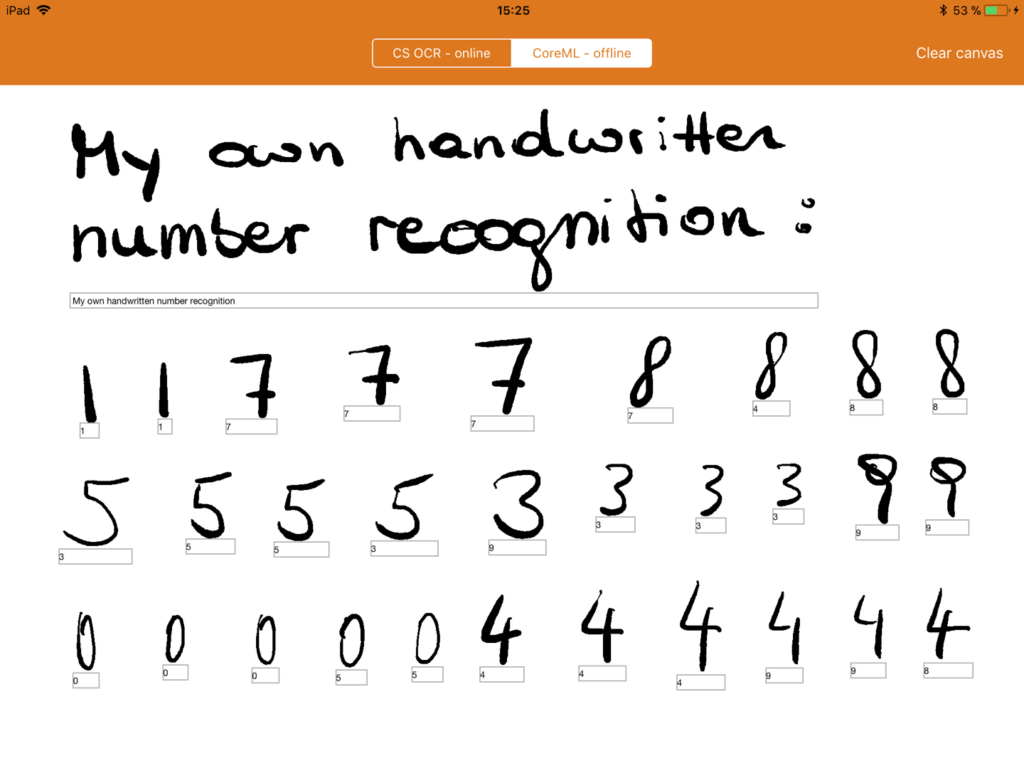
}Here’s a quick look at a bit of testing on our Scribble app—we get back our prediction from the model and print it right on the canvas underneath our written numbers.
IN THE END
… This is not the end!
Obviously. There are a couple of things we need to consider with the model.
First of all, the training images are all taken from U.S. people. You guys write numbers in many different ways than we Europeans do, but this already has a significant effect on the prediction quality of the model. So the model would need additional training with handwritten numbers from folks from other countries.
Another means of optimization would be to use another algorithm than the SVM. Maybe a neural network would fit better? This would be the next step in testing this first prototype.
And one last thing, which is a restriction from Core ML itself: You can’t give feedback to the model. It’s there. It’s trained. It’s read-only or better to say prediction-only. To improve the model in this scenario, we’d have to save the feedback somewhere, then do a new, separate training cycle, and then update the model in the app— a bit of a struggle.
Now it’s your turn! Play around, build something awesome. Dive into Python and don’t be afraid. It’s not that complicated to code your scripts with it. And getting into the ML stuff seems to be very hard on the surface. But as you’ve already seen in this tutorial, you don’t have to be a machine learning expert to work with these tools. Consider this your next challenge to master!

Take your time 🙂 And take this for a good start.
Happy coding!
PS: I’d love to hear how you’re doing with this or any other mobile ML projects 🙂
Discuss this post on Hacker News.

Comments 0 Responses