
For developers, the ability to run pre-trained models on mobile signifies an important shift towards edge computing. By being able to perform data processing straight from the user’s phone, private data remains in their hands, apps run more smoothly without having to wait for cellular networks, and your company’s cloud bill is significantly reduced.
Fast, responsive apps can now run complex machine learning models. This technological shift will usher in a new wave of app development by empowering product owners and engineers to think outside the box.
Following Apple’s announcement of Core ML, Google released the developer preview of TensorFlow Lite, the next evolution of TensorFlow Mobile. TensorFlow Lite promises better performance by being able to leverage hardware acceleration on devices that support it. It also has fewer dependencies, resulting in a smaller size than its predecessor.
While it’s still in the early stages, it’s clear that Google is doubling down on TensorFlow Lite as it continues to ramp up support and gradually shifts focus away from TensorFlow Mobile. With that in mind, let’s jump right in and do a technical walkthrough of TensorFlow Lite by working out a simple app.
In this article:
A First Look
The best place to start is obviously Google’s documentation for TensorFlow Lite, which is primarily in GitHub. They’ve also released a couple simple tutorials to help others get started.
- Android Demo: An Android app using a TensorFlow Lite version of mobile net.
- TensorFlow for Poets 2: TensorFlow Lite: Google’s tutorial that retrains a model to identify flowers.
These focus more on using pre-trained models or retraining existing ones. But what about custom models? What happens if I have a model structure I’ve trained, and I want to convert it to a .tflite file? (TensorFlow Lite’s file format for mobile) There’s some brief mention of what to do, but that led me on a wild goose chase and ultimately to a few dead ends.
After a day of soul searching, a handful of scripts, and several cups of coffee, I got it working — a simple, converted MNIST.tflite model. (I promise this won’t be another MNIST training tutorial since Google and plenty of other developers have already exhausted this topic).
In this post, we’ll look at some general tips and tricks along the way and go step-by-step in order to prepare a TensorFlow Lite model for mobile.
Starting with a simple model:
As a prerequisite, I wanted to choose a TensorFlow model that wasn’t pre-trained or converted into a .tflite file already, so naturally I landed on a simple neural network trained on MNIST data (currently there are 3 TensorFlow Lite models supported: MobileNet, Inception v3, and On Device Smart Reply).
Luckily, Google open sources plenty of research and available models in its model zoo, including a MNIST training script. We’ll be referencing that code in this section so take a quick look to familiarize yourself with it.
There are a couple of modifications we should make to this training script in order to make the mobile conversion easier later on.
1. The first question to ask is “What are the input and output layers?”
class Model(tf.keras.Model):
    ...
    def __call__(self, inputs, training):
        # Input layer
        y = tf.reshape(inputs, self._input_shape)
        y = self.conv1(y)
        y = self.max_pool2d(y)
        y = self.conv2(y)
        y = self.max_pool2d(y)
        y = tf.layers.flatten(y)
        y = self.fc1(y)
        y = self.dropout(y, training=training)
        # Returns a logit layer
        return self.fc2(y)
From this, we clearly see that the input layer is tf.reshape so let’s give it a name.
A good practice is to name your input and output layers. This will save you some time and energy later on so you won’t have to dig around in TensorBoard in order to fill out certain parameters for the conversion tools. (an added benefit is that if you share your model without the training script, developers can examine it and quickly identify the I/O of your graph).
2. For the output layer, my first guess was the logit layer, but that isn’t the one we want to capture for inference. Instead, we want the softmax layer for the output of our inference model. (see below on line 7)
def model_fn(features, labels, mode, params):
    ...
    logits = model(image, training=False)

    predictions = {
      'classes': tf.argmax(logits, axis=1),
      'probabilities': tf.nn.softmax(logits, name='softmax_tensor'),
    }
    if mode == tf.estimator.ModeKeys.PREDICT:
      return tf.estimator.EstimatorSpec(
          mode=tf.estimator.ModeKeys.PREDICT,
          predictions=predictions,
          export_outputs={
              'classify': tf.estimator.export.PredictOutput(predictions)
          })
To summarize, we looked at the training script and specifically named our input and output layers that we needed for model inference. It’s important to know the difference between training and inference layers. Since we’d like our prepared model to only be used for inference on mobile (predicting handwritten numbers in the case of MNIST data), we only need the layers necessary for that prediction.
Keep in mind that the MNIST script that we’re using does both (the training and inference). We’ll see the separation between both in TensorBoard a little later.
Here’s the completely edited mnist.py file for your reference.
- To train the model, run the following (from the model project root). This takes about 1–2 hours with my 2017 Macbook Pro.
These export directories save checkpoints and protobuf files that define the graph. Let’s dissect the different TensorFlow formats that are saved from the training script.
Converting between TensorFlow Formats:
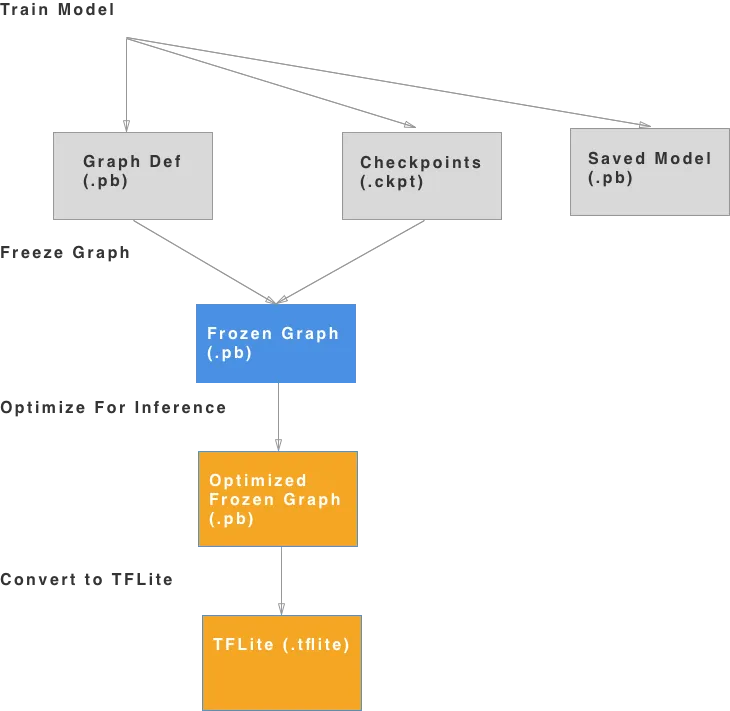
From GitHub documentation, there’s a clear explanation of GraphDef (.pb), FrozenGraphDef (.pb with frozen variables), SavedModel (.pb — common format used for inference server-side), and Checkpoint files (serialized variables during training). Here’s a chart I’ve created showing how to convert from one to another and a step by step explanation of what’s involved.
1. Training the Model
This generates 3 files that represent the structure of the network. The ones we care about are the GraphDef and checkpoint files. In the run command for the training script, the folder where these files are saved are under /tmp/mnist_saved_model. You should see something like this:
>> ls /tmp/mnist_graph_def_with_ckpts
checkpoint
model.ckpt-48000
model.ckpt-35626
model.ckpt-39410
model.ckpt-43218
model.ckpt-47043
model.ckpt-48000
graph.pbtxt
I highly recommend using TensorBoard in order to inspect the graph. Please see the appendix on how to import and use it.
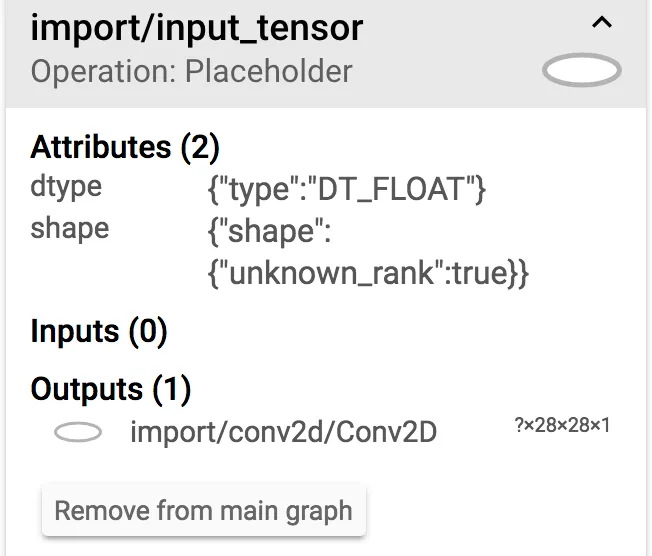
Investigating the .pbtxt graph, here’s what we see:
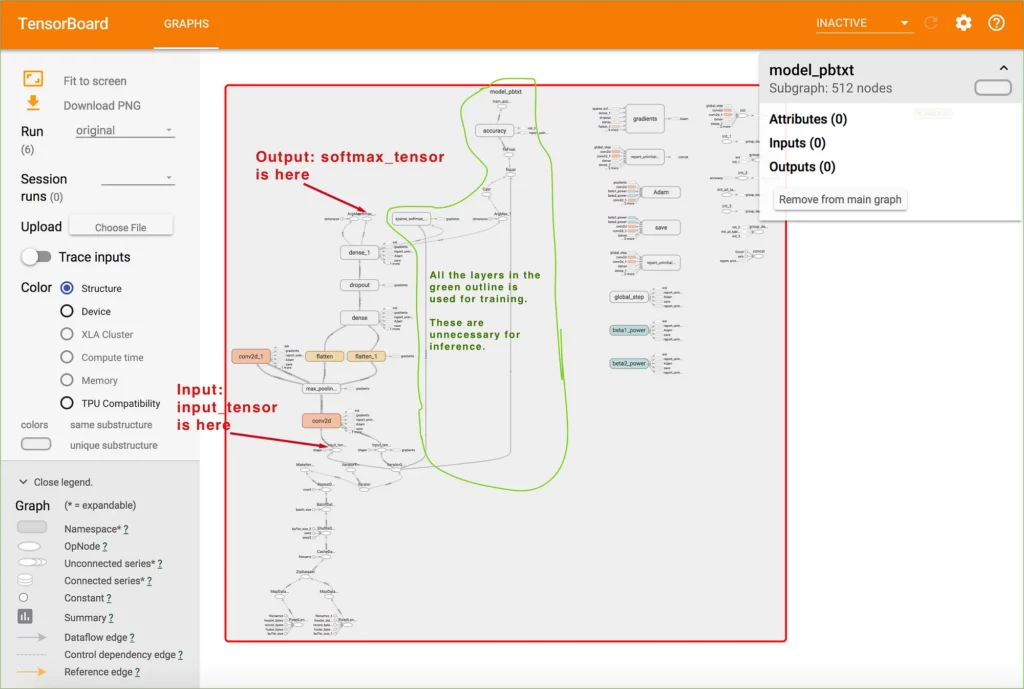
By using TensorBoard, we can see each of the layers generated in the training script. Since we named our input and output layers, we can identify them easily and then begin to understand which layers are necessary for inference and which ones we can get rid of. Everything in the green outline is used for adjusting weights during training. Similarly, everything before input_tensor is also unnecessary. We will need to trim this graph down before we can run it on mobile. Most training layers are also unsupported in TensorFlow Lite (see the appendix).
2. Freeze the Graph
This freezes the checkpoint variables with the GraphDef:
- If you pip installed TensorFlow, you should get the freeze_graph command. (install directions)
- Open up the checkpoint file and identify the latest one. In our case it was model.ckpt-48000
- Input binary option is false because we are passing in the .pbtxt file instead of a .pb (in that case it would be true).
- The hardest part is identifying the output_node_name, but because we gave it a name in the training script, this makes it a lot easier. If you don’t have the training script available for the model you’re creating, you’ll need to use TensorBoard and find the auto-generated name for it (I spent a lot of time trying to understand this so in short, having the training script handy is a huge bonus).
The result is a frozen graph under: /tmp/mnist_graph_def_with_ckpts/frozen_mnist.pb.
At this point, it’s a good idea to check the graph in TensorBoard again.
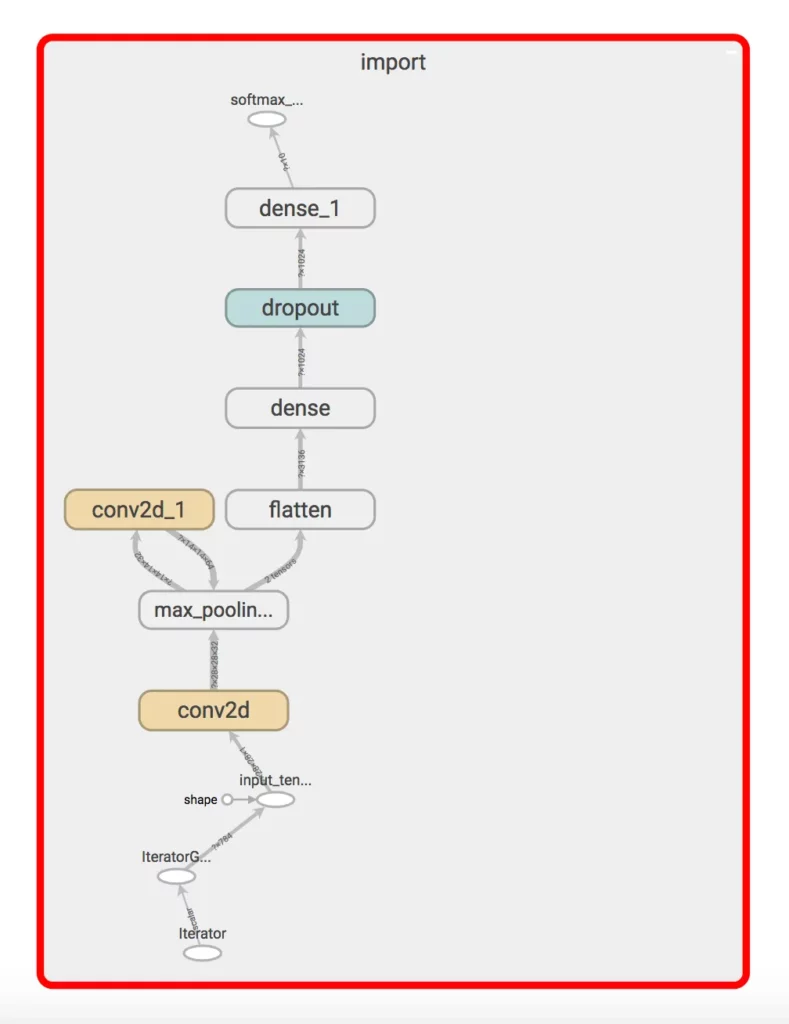
- Notice that freeze_graph actually removes most of the layers used in training; however, we still have a couple things left that aren’t compatible with TensorFlow Lite. Specifically, notice the dropout and iterator layers. These layers are used in training and will still need to be trimmed. For that we use the optimizer.
3. Optimizing the Frozen Graph
The optimize_for_inference tool (install directions) takes in the input and output names and does another pass to strip out unnecessary layers.
- We need to specify the input and output name (input_tensor & softmax_tensor). This task cuts out all the preprocessing in the graph.
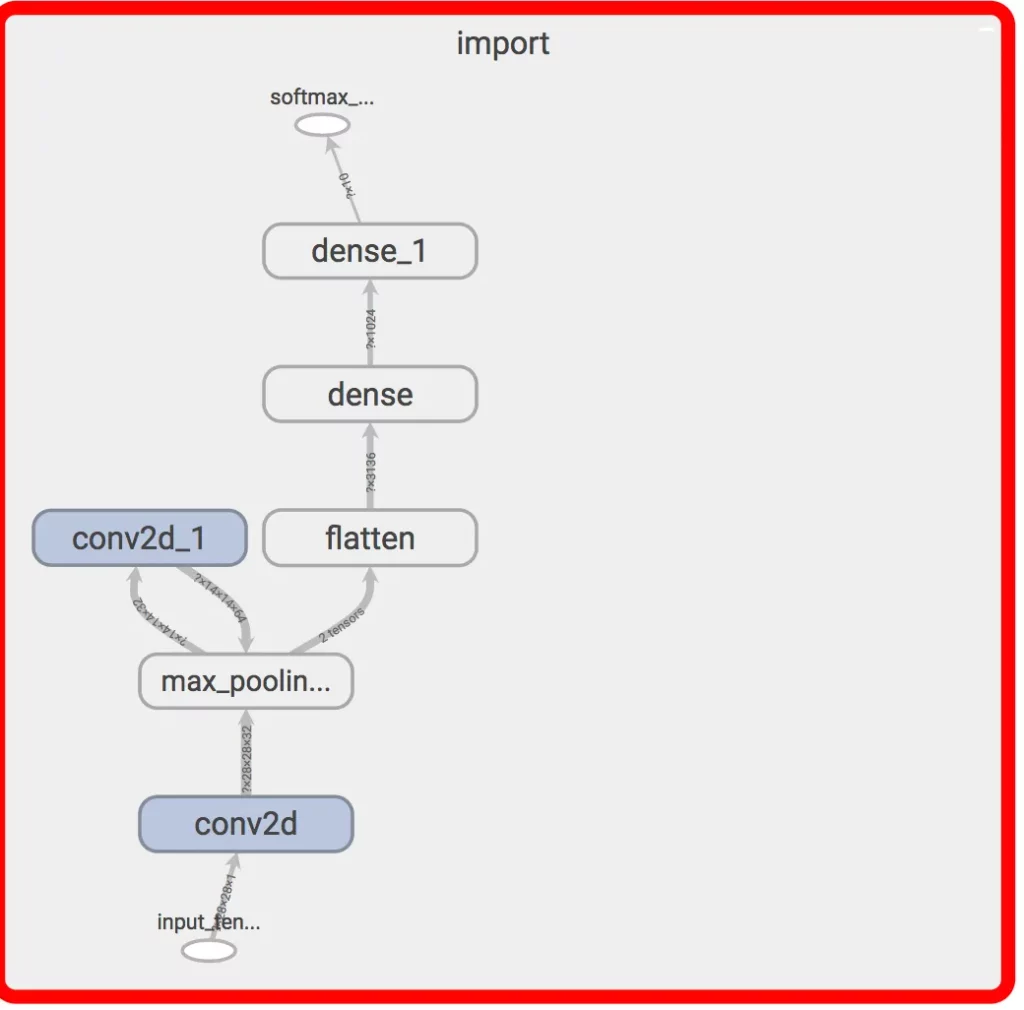
The result should be a graph ready to convert to TensorFlow Lite. If there are still unsupported layers, check out graph_transform tools. In this case, all of the ops are supported, so we don’t need to modify it further.
4. Converting to TensorFlow Lite
The last step is to run the TOCO tool, which stands for the TensorFlow Lite Optimizing Converter. The only part that might be confusing is the input shape. Using TensorBoard or the summarize_graph tool, you can get the shape.
And there you have it — a TensorFlow Lite file that you can add directly to your Android project. If you’ve done the previous steps and made sure that all of the operations are compatible with TensorFlow Lite, this part should be pretty straightforward. If you have any questions, feel free to leave a comment below.
Lessons Learned:
- TensorBoard is your friend. Use it to evaluate the graph after each step, identify unsupported layers, and figure out the input and output shapes. In more complex models, you’ll probably encounter ops that aren’t supported by TFLite yet so it’s good to know which ones they are and see if there’s anything you can do with the graph_transform tools.
- Name your inputs and outputs. Don’t let TensorFlow do it for you. We were able to breeze through filling out the different options in each of the conversion tools because of a small change we made in the training script. You can also find the generated name using TensorBoard, but naming the inputs and outputs makes it clear for others who might not have the original training script in hand.
- Understand what layers are used in training vs inference — We trained the MNIST model from one script so the resultant graph contained plenty of extra layers. Although tools like optimize_for_inference and freeze_graph stripped away any of the training nodes, I’ve also run across cases where they didn’t perform exactly as I expected (for example, one time I had to manually remove the dropout layer from the frozen graph by following this awesome blog post).
- TensorFlow formats — Understanding how each of the tools and actions produces a different file format. It would be great to automatically take a SavedGraph and convert it (cutting out a bunch of steps), but we’re not there yet.
- Converting server-side models for mobile framework compatibility is not easy — In the mobile machine learning lifecycle, plenty of engineers either get stuck or spend the majority of their time on converting their existing models for mobile. Having tools like TOCO and coremltools (for Core ML on iOS) are a great start, but more often than not, you’ll have to modify the underlying model architecture (and possibly retrain it) in order to get the converter to work.
- TensorFlow Lite is still in developer preview — It’s specifically mentioned in the docs, and even Google acknowledges that if you need production-level support, it’s best to stay with TFMobile for the time being as they build out more support for ops. As exciting as it is, there aren’t too many examples or documentation out there. If you’d like to get a head start, get used to diving into the actual TensorFlow repo. Code is always the best source of truth 🙂
Next Steps:
Starting with the training script, we were able to inspect and modify a TensorFlow graph in order to prepare it for mobile. By following these steps, we trimmed the unnecessary operations and were able to successfully convert a protobuf file (.pb) into TensorFlow Lite (.tflite).
In a following post, we’ll switch gears into mobile development and take a look at how to use our newly converted mnist.tflite file to detect handwritten numbers in an Android app.
EDIT: Part 2 of this post is now live— Building an app to detect handwritten digits.
Appendix
Using TensorBoard
- I created an edited version of import_pb_to_tensorboard.py in the TensorFlow repo to support importing graph defs (.pb), graph def text (.pbtxt), and saved models (.pb) file types. Will hopefully clean it up and submit a PR in the next few days.
- To setup TensorBoard, make sure to install it and follow these directions:
# From anywhere though I suggest you make it outside of the git repos
mkdir training_summaries

# Runs tensorboard in the background at http://localhost:6006
tensorboard --logdir training_summaries &

# Using my modified import_pb_to_tensorboard.py in the tensorflow repo (feel free to edit to your liking)
import_pb_to_tensorboard.py --model_dir /tmp/mnist_graph_def_with_ckpts/graph.pbtxt --log_dir training_summaries/mnist --graph_type=PbTxt
Supported TensorFlow Lite Operations
- Google is continuing to add support for more operations but here’s a list of the ones currently available.

Comments 0 Responses