
PyTorch-Python
Neural network implementation became a lot easier since the advent of transfer learning in accessible libraries. So much so that deep learning code that previously required hours to write can be written today in just 2 lines — No kidding !
Let me demonstrate what transfer learning is through the most basic example — our daily lives.
Remember when you last purchased a new phone — and didn’t even have to spend a day learning how it works ? As humans, we learn based on previous experiences. When we transitioned to our second smartphone, we already had mental and behavioral models to bring us up-to-date with the new device. This is what is known as transfer learning in the domains of data science and machine learning . So, what is this transfer learning we practice so much and know so little about?
So we now know that transfer learning means extending something that has been learned by a network to something that we want it to learn. In other words, we utilize the knowledge that a network has gained after hours and days of training and use that knowledge to our advantage. Sneaky, eh?
I will dedicate this article to one of the lesser known transfer learning libraries that I stumbled upon while trying to get through a segmentation problem. Let’s start with installing the library.
Installation
The installation is pretty simple and you can install using pip. For installation from the command line or terminal, type:
Simple as that!
To verify your installation, use IPython to import the library:
Now that we’re done with installing and setting up the library, let’s move on to a code example, where I’ll show you how you create a neural network in just 2 lines.
Build!
We’ll first try building the Unet architecture with the help of the segmentation library:
Yeah that’s it! Told you it would be 2 lines, didn’t I 😉
The segmentation models library imports the u-net architecture that’s been originally defined in its source code. An added benefit is that the library allows various types of customization in the encoder and the decoder architecture while initializing the model itself.
Depending on the task, we can even change the network architecture by choosing backbones with fewer or more parameters and using pre-trained weights to initialize. We can also change the number of output classes and have our own activation function at the very end, like the softmax function I’ve added here:
Features
The segmentation models library offers a total of 6 model architectures, as of now. The model architectures provided by it are those that are popular for binary and multi-class segmentation. It supports 46 different encoders (that go with those architectures), all of which come with pre-trained weights for faster and better convergence. The model architectures provided by the library as of now are —
- u-net
- Linknet
- FPN
- PSPNet
- PAN
- DeepLabV3
The GitHub page for this library features the details of these architectures with their corresponding research papers. Make sure to go through them if you stumble while using it!
Not satisfied with transfer learning yet? Let me show you some additional stuff you can do with these models in PyTorch.
Customization
PyTorch allows us to do much more than adding an activation layer or changing just an encoder. With PyTorch, we can basically unscrew a model architecture, redesign the components as we want to, and screw it back together. Let’s see how —
Adding a layer anywhere in the network
We’ll experiment with the u-net model with a ResNet18 encoder imported from the segmentation models library. We’ll start with printing the network architecture so that we have an idea of where things are. Since we’re focusing on adding a layer at the end, let’s see how the model ends:
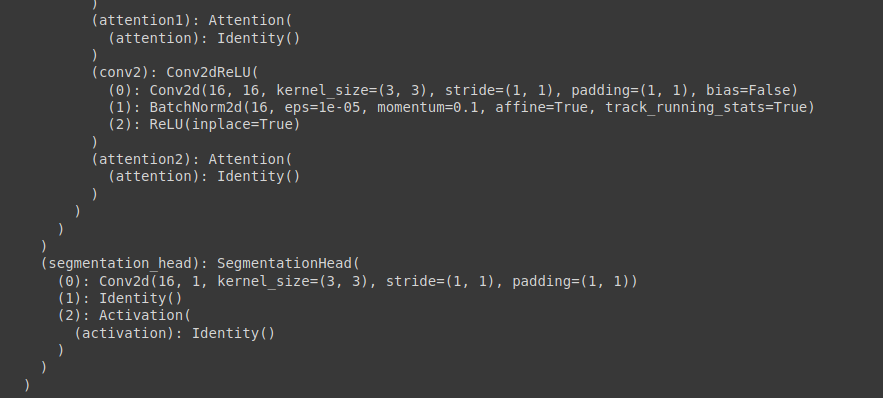
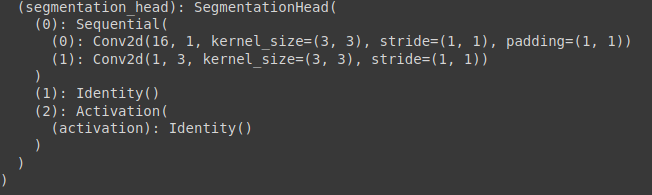
Now we can see that the convolutional layer marks the end of the model. The activation is set to None, as that is the default activation. For adding another layer at the end of the convolution, we first need to identify under what name we are adding a layer — segmentation_head in this case. After identification, we can add a layer at the end of the convolution like this:
Let’s see what we have here:
How cool is that? You can bring about many types of changes using this workaround. You can add dropout layers if your model doesn’t generalize well, or you can even add batch-normalization layers if your model is slow and unstable.
Freezing layers
Freezing layers is just a terminology for turning off some layers — ensuring that the gradient computation does not involve them. You may freeze some layers if you feel that the network is taking too much computation time. Freezing layers judiciously can heavily accelerate training!
Before we go into freezing layers, we must understand the concept of ‘children’ in PyTorch. The ‘children’ of a model are the list of the layers and combinations in the model. For example, the first children of our example model would be the ResNet encoder and the u-net decoder. To get an idea of the children of the model, you can run the following code:
Here, I’ll freeze the first 3 ‘children’ of the ResNet18 encoder as an example (I know, it sounds weird 😈):
So now we’ve seen various methods in which we can customize and use popular model architectures along with their weights, while skipping numerous lines of code along the way!
Discover further models in the Torchvision library maintained by PyTorch, and let me know if you stumble upon any problems — Happy to help 😄.
Check out my blog for faster updates and don’t forget to subscribe for quality content 😀
Hmrishav Bandyopadhyay is a 2nd year Undergraduate at the Electronics and Telecommunication department of Jadavpur University, India. His interests lie in Deep Learning, Computer Vision, and Image Processing. He can be reached at — [email protected] || https://hmrishavbandy.github.io

Comments 0 Responses