
In the previous article of this series on developing Flutter applications with TensorFlow Lite, we looked at how we can develop a Digit Recognizer using TensorFlow Lite.
In the second article of the series, we’ll keep working with TensorFlow Lite, this time focusing on implementing image classification to classify images between two classes. The application we are going to build will be able to classify whether an input image contains a horse or a human.
Table of contents:
Application and Use Cases
TensorFlow Lite gives us pre-trained and optimized models to identify hundreds of classes of objects, including people, activities, animals, plants, and places. Using Teachable Machine from Google, we can develop our own custom model using some of our own images. Teachable Machine 2.0 allows you to train machine learning models in the browser, without any ML code. You can train models on images, sounds, and poses, and then you can save the models you trained and use them on your own projects.
Required Packages
- TensorFlow Lite
- Image Picker
- Horse or Human Dataset
The set contains 500 rendered images of various species of horses, in various poses, and in various locations. It also contains 527 rendered images of humans in various poses and locations:
This dataset will be used to create the model using the Teachable Machine. First, download the dataset from the above link.
Training a model with Teachable Machine
Before we train our data using the Teachable Machine, we need to gather the required data for the machine to learn. The data collection process hinges on the problem you’re trying to solve. For image classification problems, after this data is collected, it needs to be arranged into relevant classes (i.e. labeled). This is where the Teachable Machine comes in.
After we’ve downloaded the required data through the Kaggle, we need to train a TensorFlow Lite model on it.
For this application, we need to divide our dataset into 2 classes. (Horses and Humans). The downloaded dataset from the Kaggle contains two different folders, depending on the class. We need to provide these images folders to the Teachable Machine and label them as follows:
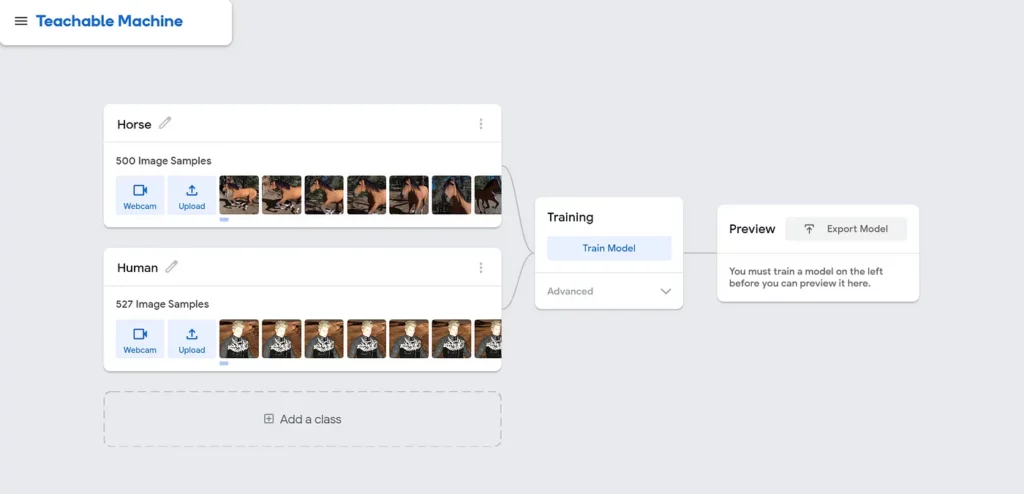
The second step is to train the model, which you can do by clicking the Train Model button. It will take a few minutes to train the model. You can try Advanced settings and give a custom number of epochs (basically, the time to train the model will depend on the number of epochs you define).
After the training is complete, you will be able to click the Export Model button.
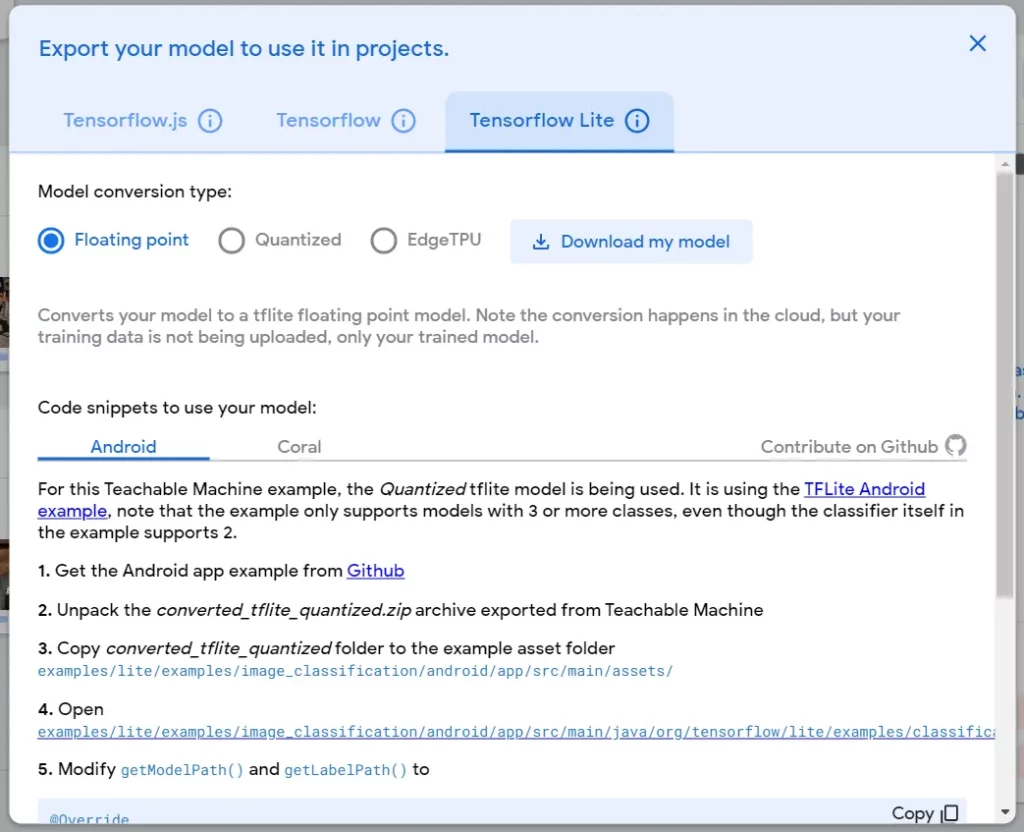
Download the model for TensorFlow Lite with the model conversion point Floating Point.
A quick look at all of your options here:
- Floating Point — Qualified for CPU and GPU (2x smaller, GPU acceleration)
- Quantized — Qualified for CPU (4x smaller, 2x-3x speedup)
- EdgeTPU — Qualified for EdgeTPU and Microcontrollers (4x smaller, 3x speedup)
Flutter Application
Now that we have the trained model, we can develop our Flutter application to classify an image as including either a horse or a human. Let’s get started.
First, create an assets folder inside the project folder and copy the downloaded model into that folder.
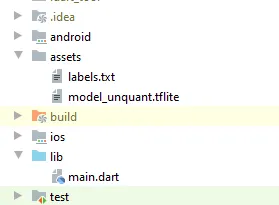
Since this is a beginner-level application, we can write the code inside the main.dart file without creating another page.
We’ll need to initiate three variables to carry out the application properly. To receive the output, we’ll need a List variable; to get the uploaded image we’ll need a File variable, and to manage errors we’ll need a Boolean variable:
Since the model will also be working offline (one of the benefits of on-device machine learning), we need to load the model when the app is launched:
Using the function above, we can load the model. To run this function when the application is getting started, we can call this function inside the initState() method:
With the above function, we can use the ImagePicker to pick an image from the gallery. We can then pass this image on to the classifyImage() function to run it through the classification model:
Now that we’ve identified the required functions, we can develop the UI so that our app can actually surface these results to the user:
Results
Now that we’ve implemented the Flutter application code, let’s look at the output of the application when it’s up and running:

Full code:
import 'dart:io';
import 'package:flutter/material.dart';
import 'package:image_picker/image_picker.dart';
import 'package:tflite/tflite.dart';

void main() => runApp(MaterialApp(
  home: MyApp(),
));

class MyApp extends StatefulWidget {
  @override
  _MyAppState createState() => _MyAppState();
}

class _MyAppState extends State<MyApp> {
  List _outputs;
  File _image;
  bool _loading = false;

  @override
  void initState() {
    super.initState();
    _loading = true;

    loadModel().then((value) {
      setState(() {
        _loading = false;
      });
    });
  }

  @override
  Widget build(BuildContext context) {
    return Scaffold(
      appBar: AppBar(
        backgroundColor: Colors.red,
        title: Text('Horse/Human Detector'),
      ),
      body: _loading
          ? Container(
        alignment: Alignment.center,
        child: CircularProgressIndicator(),
      )
          : Container(
        width: MediaQuery.of(context).size.width,
        child: Column(
          crossAxisAlignment: CrossAxisAlignment.center,
          mainAxisAlignment: MainAxisAlignment.center,
          children: [
            _image == null ? Container() : Image.file(_image),
            SizedBox(
              height: 20,
            ),
            _outputs != null
                ? Text(
              "${_outputs[0]["label"]}",
              style: TextStyle(
                color: Colors.black,
                fontSize: 20.0,
                background: Paint()..color = Colors.white,
              ),
            )
                : Container()
          ],
        ),
      ),
      floatingActionButton: FloatingActionButton(
        onPressed: pickImage,
        backgroundColor: Colors.red,
        child: Icon(Icons.image),
      ),
    );
  }

  pickImage() async {
    var image = await ImagePicker.pickImage(source: ImageSource.gallery);
    if (image == null) return null;
    setState(() {
      _loading = true;
      _image = image;
    });
    classifyImage(image);
  }

  classifyImage(File image) async {
    var output = await Tflite.runModelOnImage(
      path: image.path,
      numResults: 2,
      threshold: 0.5,
      imageMean: 127.5,
      imageStd: 127.5,
    );
    setState(() {
      _loading = false;
      _outputs = output;
    });
  }

  loadModel() async {
    await Tflite.loadModel(
      model: "assets/model_unquant.tflite",
      labels: "assets/labels.txt",
    );
  }

  @override
  void dispose() {
    Tflite.close();
    super.dispose();
  }
}
Source code:
Conclusion
Once you get the hang of it, you can see how easy is it to use TensorFlow Lite with Flutter to develop proof-of-concept machine learning-based mobile applications. Teachable Machine from Google Creative Labs helps us create custom models pretty easily and without much ML expertise. Moreover, you can visit Kaggle and download various datasets to develop different classification models.

Comments 0 Responses