
In a previous tutorial, I introduced the Kivy Python framework as a tool to run NumPy (Numerical Python) on Android. As a brief refresher, Kivy is a cross-platform framework for building natural user interfaces (NUIs). It’s very simple to learn and then use iteratively. The same code, unchanged, can run on Linux, Windows, Mac, iOS, and Android.
The previous tutorial started from preparing the development environment until building Android application that runs the NumPy library. The points covered in it are listed below:
- Kivy installation for Linux
- Installing Kivy in a Virtual Environment
- Importing Kivy
- Creating a Basic Application
- Python for Android
- Installing Buildozer
- Preparing buildozer.spec
- Building Android Application using Buildozer
This tutorial will expand on the previous tutorial, as we’ll build an image classifier using NumPy that runs on Android devices on top of Kivy. The machine learning model used will be an artificial neural network (ANN), built from scratch using NumPy and trained using a genetic algorithm (GA).
We’ll use the Fruits360 image dataset for training the ANN. After the ANN is trained successfully, we’ll create a Kivy desktop application that invokes it over new test images. After making sure the desktop application is working successfully, we’ll export the Kivy application into an Android app. Within it, we’ll be able to feed a test image into the pre-trained ANN for classification.
The organization of the tutorial is as follows:
- ANN Architecture.
- Creating the Widget Tree using the KV Language.
- Creating the Kivy Application.
- Using the Proper NumPy Version.
- Building the Android Application.
For More Information
This tutorial focuses on building an Android application that calls the pre-trained ANN for classifying images. The steps of preparing the dataset, building, training, and optimizing the ANN are not deeply discussed here. Just brief discussion about them will be given throughout this tutorial.
But don’t worry—it’s okay to follow up the ideas in this tutorial without knowing these details. If you want to read about them, then check out previous resources I’ve created that discuss all of these matters in detail:
- Implementation of the ANN from scratch using NumPy: “Artificial Neural Network Implementation using NumPy and Classification of the Fruits360 Image Dataset”. GitHub project here.
- Optimizing the ANN using GA: “Artificial Neural Networks Optimization using Genetic Algorithm with Python”. GitHub profile here.
- Feature reduction using Genetic Algorithm: “Feature Reduction using Genetic Algorithm with Python”. GitHub profile here.
It is optional to read the tutorials mentioned above and also optional to run their GitHub projects. What is very essential to do is to download the GitHub project associated with this tutorial available at my profile here:
This tutorial is going to focus on how this project works until building the APK file that runs on Android devices.
ANN Architecture
For understanding how this project works, it’s crucial to understand the architecture of the ANN we’re using, as shown in the next figure. As mentioned previously, the reduced feature vector length is 102. As a result, the number of neurons in the input layer will be 102.
The network has 2 hidden layers. The first layer has 150 hidden neurons. Because each neuron of the first hidden layer is connected to the all neurons in the input layer, there are a total of 102×150=15,300 parameters/weights. These weights are represented as a matrix of 102 rows and 150 columns. This is denoted in the figure below that shows the connection between the input layer and the first hidden layer.

The second layer has 60 neurons. Because each neuron in the second hidden layer is connected to all neurons of the first hidden layer, there will be a total of 150×60=9,000 parameters. It will be also represented as a matrix of 150 rows and 60 columns.
Because we’re using 4 classes of the Fruits360 dataset, the output layer of the ANN will have 4 neurons—1 for each class. Each neuron in the output layer is connected to all neurons in the second hidden layer, for a total of 60×4=240, which will be also represented as a matrix of 60 rows and 4 columns.
The next figure summarizes the process of predicting the class label for a given input. The input of a given layer is multiplied (matrix multiplication) by the weights matrix of the successive layer. The input row vector size is 1×10², and the weights matrix size is 102×150. And thus, the result of the matrix multiplication will be 1×150.
This result is then matrix multiplied by the weights matrix between the 2 hidden layers of size 150×60—the size of the result will be 1×60. The process repeats for the output layer until returning only 4 values, 1 value for each class. The input will be classified according to the class with the highest value.
The GitHub project that does these multiplications is found at this link:
This project just builds the forward pass of training the ANN. The weights are updated in the backward pass using GA. The updated weights are saved as a binary file in NumPy (.npy) format that we’ll load later when making predictions. Under the GitHub project of this tutorial, you can find a file named weights.npy. This is where the trained weights are saved.

Now that we’ve discussed the architecture of the ANN, our next step is to start building the Kivy project.
Creating the Widget Tree using the KV Language
In the previous tutorial about running NumPy in Android using Kivy, we added UI widgets within the Python file. This makes the Python file the place for both the logic and the UI widgets. If we want to change the UI, then we have to edit the Python file.
As there are many widgets within the Python file, the risk of error can be high while editing that file. Moreover, adding the widget tree within the Python file makes it difficult to deduce the parent-child relationship between the different widgets.
Kivy allows a better solution by separating the logic from the UI elements in a different file. We know that the logic is just Python code and will be added into a Python file (.py).
But what about the UI elements? They will be added into a new file with the extension .kv. The language used in this file is called the KV language. Thus, there will be a .py file for the application logic (such as handling events) and another .kv file for holding the UI of the application.
Building the widget tree using the KV language makes it structured and simple to recognize compared to building it within the Python code. KV also makes it easy to debug the UI because it’s clear what children belong to a given parent. The KV language styles the widgets similar to the Cascading Style Sheet (CSS) for styling the HTML elements.
The KV file consists of a set of rules similar to the CSS rule that defines the widgets. A rule consists of the widget class and a set of properties with their values. A colon is added after the widget class name to indicate the beginning of the widget content. The content under a given widget is indented to mimic what Python does for defining the content of blocks. There’s a colon between the property name and its value. For example, the following code creates a rule for building a Button widget.
The Button widget is written followed by a colon. Everything indented after the colon belongs to that widget. The number of indentation spaces is not fixed to just 4. It’s similar to Python, as we can use any number of spaces.
By the way, the color is defined using the RGBA color space, where A represents the alpha channel. Color values are between 0.0 and 1.0.
For the third property, the same process is repeated by writing its name, separated from its value using a colon. The color property defines the text color.
We can create a simple Kivy application that uses a KV file for building the UI. Assume we want to build a UI with the BoxLayout widget as the root with vertical orientation. That root widget has three children (Button, Label, and TextInput). Note that the KV language has only one root widget, which is defined by typing it without any indentation. The children of this root widget will be indented equally.
The KV language file is given below. The Button, Label, and TextInput widgets are indented by 4 spaces after the root widget. The root widget itself can have properties. The properties of each child widget are indented behind their widgets. It’s simple enough, but how do we use this KV file inside the Python code?
There are two ways for loading the KV file inside the Python code. The first way is to specify the path of the file inside the load_file() method of the kivy.lang.builder.Builder class. This method uses its filename argument to specify the path of the file. The file can be located anywhere and is not required to be in the same directory as the Python file. The next code snippet shows how to locate the KV file this way.
Previously, the return of the build() method is the root widget defined within the Python file. Now it returns the result of the load_file() method. The Python code is clearer after separating the logic inside the Python file from the presentation, which is now inside the KV file.
The code can be made clearer by using the second way of loading the KV file. This way depends on the name of the child class inheriting the App class. If this class is named FirstApp, then Kivy will look for a KV file named first.kv. That is, the App word is removed and the remaining text First is converted into lowercase. If there is a file named first.kv inside the same directory where the Python file exists, then this file will be loaded automatically.
When using this method, the Python code will look like the code snippet below. The code is now clearer than before and simpler to debug. The pass statement has been added inside the FirstApp class to avoid leaving it empty. Note that if Kivy cannot locate a file named according to first.kv, then the application will still run, but it will show a blank window.
We can separate the UI from the Python code and bind the event handler to the button inside the KV file. The KV file is given below. There are some points worth mentioning.
A widget can be given an ID inside the KV file using the id property. Its value doesn’t need to be enclosed between quotes. The ID can be used to retrieve properties of widgets inside both the KV file and the Python file. According to the code, IDs are given to the elements Label and the two TextInput widgets. The reason is that these are the widgets we’re looking to retrieve or change the properties of.
BoxLayout:
    orientation: "vertical"
    Label:
        text: "Result of Addition."
        id: label
    BoxLayout:
        orientation: "horizontal"
        TextInput:
            hint_text: "Enter First Number."
            id: textinput1
        TextInput:
            hint_text: "Enter Second Number."
            id: textinput2
    Button:
        text: "Add Numbers."
        on_press: app.add_nums(root)
The Button widget has the on_press property, which is used to bind the event handler to the on_press event. The event handler is the add_nums() method found inside the Python code given below. Thus we want to call a Python method from the KV file. How can we do that?
The KV language has 3 helpful keywords which are:
- app referring to the application instance,
- root referring to the root widget in the KV file,
- and self which refers to the current widget.
The suitable keyword to call a method from the Python code is the app keyword. Because it refers to the entire application, it will be able to refer to the methods inside the Python file. Thus we can use it to call the add_nums() method using app.add_nums().
import kivy.app

class FirstApp(kivy.app.App):

    def add_nums(self, root):
        num1 = float(self.root.ids["textinput1"].text)
        num2 = float(self.root.ids["textinput2"].text)
        result = num1 + num2
        self.root.ids["label"].text = str(result)

firstApp = FirstApp(title="Importing UI from KV File.")
firstApp.run()
Inside this method, we want to refer to the TextInput and Label widgets in order to fetch the numbers entered and print the result on the label. Because the self argument refers to what called it—the application instance—we can use it to refer to the root widget using self.root. This returns the root of the widgets, which can be used to access any of its child widgets based on their IDs.
All IDs inside the KV file are saved inside the ids dictionary. We can use this dictionary to retrieve whatever widget we want as long as it has an ID. After retrieving the widget itself, we can fetch its properties. This way, we can return the entered numbers within the TextInput widgets, convert their values from string to float, add them, and assign the text property of the Label widget the result after being converted into a string.
Creating the Kivy Application
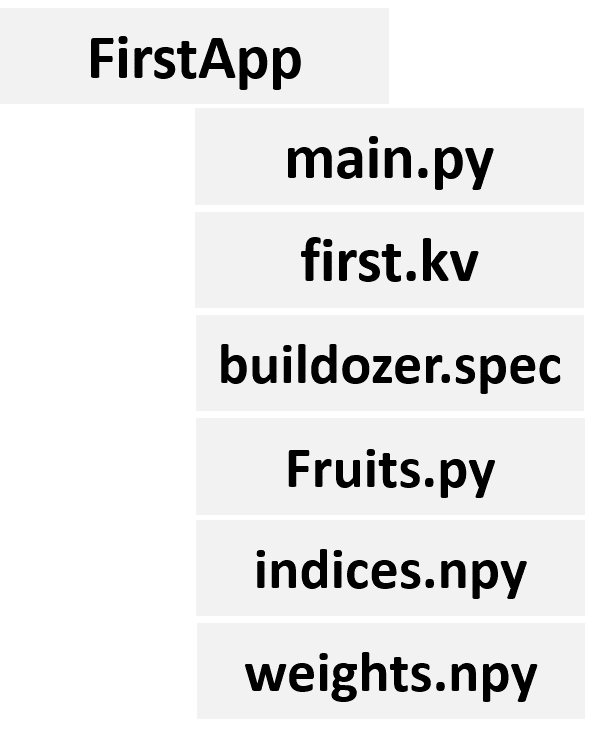
The structure of the application is illustrated in the next figure. There is a file named Fruits.py that contains the functions required for extracting features from the test image and predicting its label. The implementation of this file is given below.
The extract_features() function has an argument representing the image file path. It reads it using a library called Python Image Library (PIL). It’s a simple lightweight library for doing simple image processing operations. PIL is also used for converting the read image into HSV color space using the convert() method. This method accepts the HSV string specifying that the image is to be converted into HSV. After that, the extract_features() method extracts the features.
Remember that the extracted feature vector is reduced from length 360 to 102. The indices of the 102 elements are stored in a NumPy file named indices.npy. The indices are used after extracting the features in order to filter the feature elements. Finally, the feature vector is returned.
The predict_outputs() function is made to accept the weights .npy file path, then read it using NumPy, classify the image based on the ANN, and return the classification label.
import numpy
import PIL.Image

def sigmoid(inpt):
    return 1.0/(1.0+numpy.exp(-1*inpt))

def relu(inpt):
    result = inpt
    result[inpt<0] = 0
    return result

def predict_output(weights_mat_path, data_inputs, activation="relu"):
    weights_mat = numpy.load(weights_mat_path)
    r1 = data_inputs
    for curr_weights in weights_mat:
        r1 = numpy.matmul(a=r1, b=curr_weights)
        if activation == "relu":
            r1 = relu(r1)
        elif activation == "sigmoid":
            r1 = sigmoid(r1)
    r1 = r1[0, :]
    predicted_label = numpy.where(r1 == numpy.max(r1))[0][0]
    return predicted_label

def extract_features(img_path):
    im = PIL.Image.open(img_path).convert("HSV")
    fruit_data_hsv = numpy.asarray(im, dtype=numpy.uint8)

    indices = numpy.load(file="indices.npy")

    hist = numpy.histogram(a=fruit_data_hsv[:, :, 0], bins=360)
    im_features = hist[0][indices]
    img_features = numpy.zeros(shape=(1, im_features.size))
    img_features[0, :] = im_features[:im_features.size]
    return img_features
The KV file is named first.kv. The reason for using the name “first” is that the custom class created by extending the kivy.app.App class is named FirstApp. This KV file is responsible for building the UI of the application. The KV file is given below.
One thing worth mentioning is that the font size of both the Label and Button widgets is increased using the font_size property. Also, the classify_image() method is called in response to the Button widget on_press event.
BoxLayout:
    orientation: "vertical"
    Label:
        text: "Predicted Class Appears Here."
        font_size: 30
        id: label
    BoxLayout:
        orientation: "horizontal"
        Image:
            source: "apple.jpg"
            id: img
    Button:
        text: "Classify Image."
        font_size: 30
        on_press: app.classify_image()
The implementation of the classify_image() method is available inside the main.py file, which is listed below. This method loads the path of the image to be classified from the source property of the Image widget. This path is passed to the extract_features() function inside the Fruits module as an argument. The predict_output() function accepts both the extracted features, ANN weights, and the activation function. It returns the classification label after the matrix multiplication between the inputs of each layer and its weights. The label is then printed on the Label widget.
import kivy.app
import Fruits
class FirstApp(kivy.app.App):
def classify_image(self):
img_path = self.root.ids["img"].source
img_features = Fruits.extract_features(img_path)
predicted_class = Fruits.predict_output("weights.npy", img_features, activation="sigmoid")
self.root.ids["label"].text = "Predicted Class : " + predicted_class
firstApp = FirstApp(title="Fruits 360 Recognition.")
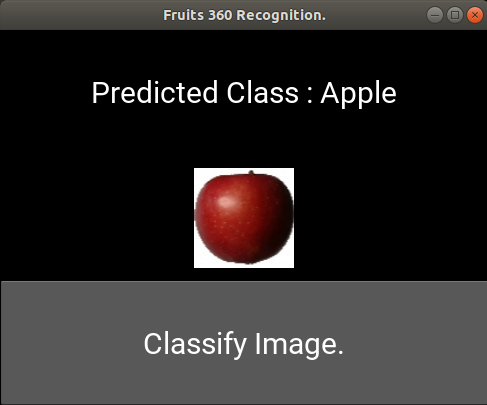
firstApp.run()Before building the APK file, we need to ensure that everything works as expected by running the Kivy application. After running the application and pressing the button, the image is classified and the result is shown in the next figure. After making sure the application is running successfully, we can start building the Android application.
Before building the application using Buildozer, the buildozer.spec file must be generated. You can use the buildozer.init command to create it automatically.
An important note: Inside the application, there are 2 .npy files representing the filtered elements’ indices and the weights. We need to include them in the APK file. How do we do that? Inside the buildozer.spec file, there’s a property named source.include_exts. It accepts the extensions of all files we need to include in the APK file, separated by commas. These files are located at the root of the application. For example, to add the files with extensions py, npy, kv, png, and jpg, the property will be as follows:
Using the Proper NumPy Version
Two critical steps for the successful execution of the application are:
- converting the RGB image into HSV using the PIL
- and matrix multiplication using matmul() function inside NumPy.
In completing these steps, it’s essential to use the versions of the libraries that offer these functionalities.
Regarding the conversion from RGB to HSV, make sure to use the new version of PIL, called Pillow. It’s an extension to PIL that can be imported and used with no discernible difference.
Regarding the matrix multiplication, it’s only supported in NumPy version 1.10.0 and higher. Make sure you’re not using a lower version. This leaves a question—How can we tell python-4-android (P4A) that we need to use a specific version of a library?
One way is to specify the required version inside the P4A recipe corresponding to NumPy. Such recipes are located in the P4A installation directory under Buildozer installation. For example, version 1.10.1 is used according to the next figure. Based on the specified version, the library will be downloaded from PyPI and installed automatically when building the application.

Building the Android Application
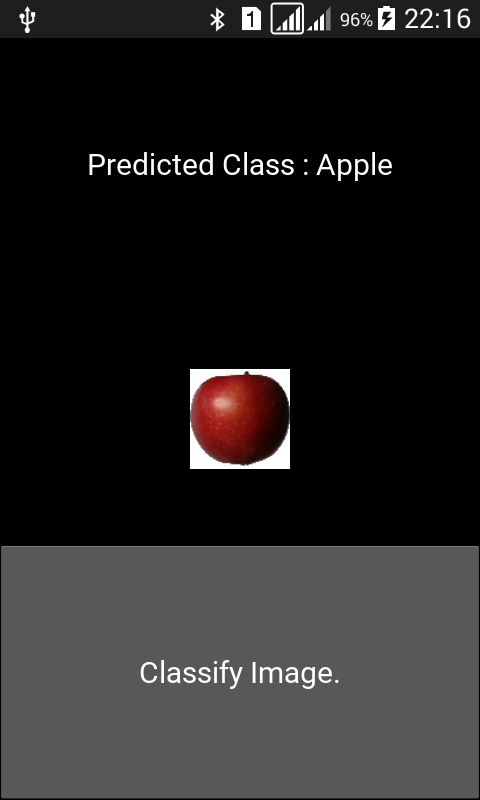
Now we’re ready to build our Android application. We can use the command below for building, installing, and running the application on an Android device connected to the development machine.
After the building finishessuccessfully, the Android application UI will be as shown in the figure below.
For Contacting the Author
- E-mail: [email protected]
- LinkedIn: https://linkedin.com/in/ahmedfgad/
- KDnuggets: https://kdnuggets.com/author/ahmed-gad
- TowardsDataScience: https://towardsdatascience.com/@ahmedfgad
- GitHub: https://github.com/ahmedfgad

Comments 0 Responses