
Images add another dimension to a mobile app. User-generated images amplify that.
If you’re building a React Native app, how do you give your users the ability to upload images? React Native has polyfills for many web APIs — to do image uploading we’ll be using the fetch API.
Setup
Before we can actually start uploading images, we’ll to create two projects:
- A React Native app
- A basic node server (so we have somewhere to upload the photo to)
React Native App
We‘ll be doing a few things here:
- Creating a directory for both of our apps to live in
- Creating a new React Native app
- Installing the react-native-image-picker library
- Linking the native dependencies of react-native-image-picker
In your terminal, run the following:
You then have to enable the necessary permissions in both the iOS and Android apps associated with your React Native app.
On iOS, this takes place in mobile/ios/mobile/Info.plist, and you’ll want to add:
<key>NSPhotoLibraryUsageDescription</key>
<string>For choosing a photo.</string>
<key>NSCameraUsageDescription</key>
<string>For taking a photo.</string>
<key>NSPhotoLibraryAddUsageDescription</key>
<string>For saving a photo.</string>
On Android, you’ll want to find the AndroidManifest.xml file a few directories down in mobile/android and add:
<uses-permission android:name="android.permission.CAMERA" />
<uses-permission android:name="android.permission.WRITE_EXTERNAL_STORAGE" />
You can then run react-native run-ios or react-native run-android, resulting in something similar to the following:

Node Server
In a new terminal window, run the following commands:
Then in index.js, put the following:
const Express = require('express')
const multer = require('multer')
const bodyParser = require('body-parser')

const app = Express()
app.use(bodyParser.json())

const Storage = multer.diskStorage({
  destination(req, file, callback) {
    callback(null, './images')
  },
  filename(req, file, callback) {
    callback(null, `${file.fieldname}_${Date.now()}_${file.originalname}`)
  },
})

const upload = multer({ storage: Storage })

app.get('/', (req, res) => {
  res.status(200).send('You can post to /api/upload.')
})

app.post('/api/upload', upload.array('photo', 3), (req, res) => {
  console.log('file', req.files)
  console.log('body', req.body)
  res.status(200).json({
    message: 'success!',
  })
})

app.listen(3000, () => {
  console.log('App running on http://localhost:3000')
})
Finally, you can run the app with node index.js.
Now we’re ready to start!
Choosing An Image
Before we can upload an image, we need to have an image to upload! That’s where react-native-image-picker comes in. It’ll allow us to select an image from our device.
You can update mobile/App.js with the following:
import React from 'react'
import { View, Text, Image, Button } from 'react-native'
import ImagePicker from 'react-native-image-picker'
export default class App extends React.Component {
state = {
photo: null,
}
handleChoosePhoto = () => {
const options = {
noData: true,
}
ImagePicker.launchImageLibrary(options, response => {
if (response.uri) {
this.setState({ photo: response })
}
})
}
render() {
const { photo } = this.state
return (
<View style={{ flex: 1, alignItems: 'center', justifyContent: 'center' }}>
{photo && (
<Image
source={{ uri: photo.uri }}
style={{ width: 300, height: 300 }}
/>
)}
<Button title="Choose Photo" onPress={this.handleChoosePhoto} />
</View>
)
}
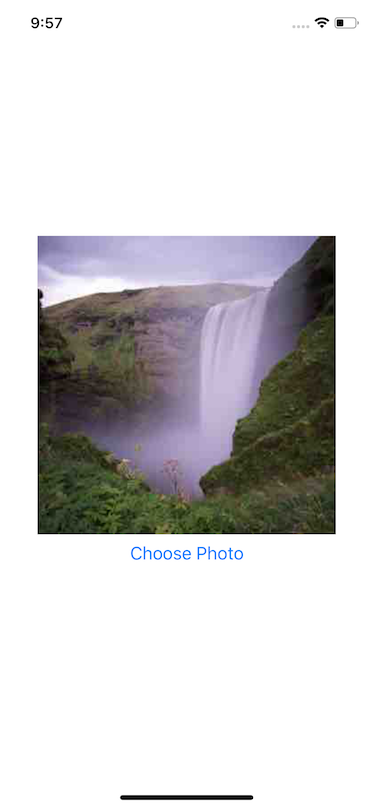
}This code allows the user to open the image gallery and select a photo. Once they select a photo it’ll be displayed in the app, like this:
Creating the Request Body
If you’ve used the fetch API before to create/update any data, you’ve likely done something like:
fetch('MY_API_URL', {
  method: 'POST',
  body: JSON.stringify({
    userId: '123'
  }),
})
To upload an image, we instead need to upload data in accordance with a multipart/form-data encoding type.
To do this, we can generate the body of our request using FormData.
When we set up our server, we told it the image would exist in the photo key, so we need to make sure that’s where we put all the required photo information. We’ll also allow you to pass any other associated information (like userId).
const createFormData = (photo, body) => {
  const data = new FormData();

  data.append("photo", {
    name: photo.fileName,
    type: photo.type,
    uri:
      Platform.OS === "android" ? photo.uri : photo.uri.replace("file://", "")
  });

  Object.keys(body).forEach(key => {
    data.append(key, body[key]);
  });

  return data;
};
First we initialize FormData, and we then append the photo key. The body of this message is the minimum required to get this working. We need to pass a file name, a file type, and then a uri. The uri is where the image is located on the device.
You’ll notice that we need to massage this uri a bit based on platform to make it work. Essentially, it just boils down to stripping file:// from the uri on iOS.
Finally, we loop over any additional data (that’s not the photo) that we want to pass on to the endpoint.
Uploading the Image
Finally, we can upload the photo.
We’ll create a new function on our component to upload the photo.
handleUploadPhoto = () => {
  fetch("http://localhost:3000/api/upload", {
    method: "POST",
    body: createFormData(this.state.photo, { userId: "123" })
  })
    .then(response => response.json())
    .then(response => {
      console.log("upload succes", response);
      alert("Upload success!");
      this.setState({ photo: null });
    })
    .catch(error => {
      console.log("upload error", error);
      alert("Upload failed!");
    });
};
Our endpoint is at api/upload and expects a POST request. We then pass the photo we saved to state previously to the createFormData function.
We can then tap into the promise chain that fetch provides us. First we convert the response to a json object and then alert the user the photo has been uploaded!
If the image fails to upload, we catch that error and alert the user the image failed to upload.
Before we can actually upload the photo, we need to give a user a button they can tap to start the process.
export default class App extends React.Component {
...
render() {
const { photo } = this.state
return (
<View style={{ flex: 1, alignItems: 'center', justifyContent: 'center' }}>
{photo && (
<React.Fragment>
<Image
source={{ uri: photo.uri }}
style={{ width: 300, height: 300 }}
/>
<Button title="Upload" onPress={this.handleUpload} />
</React.Fragment>
)}
<Button title="Choose Photo" onPress={this.handleChoosePhoto} />
</View>
)
}
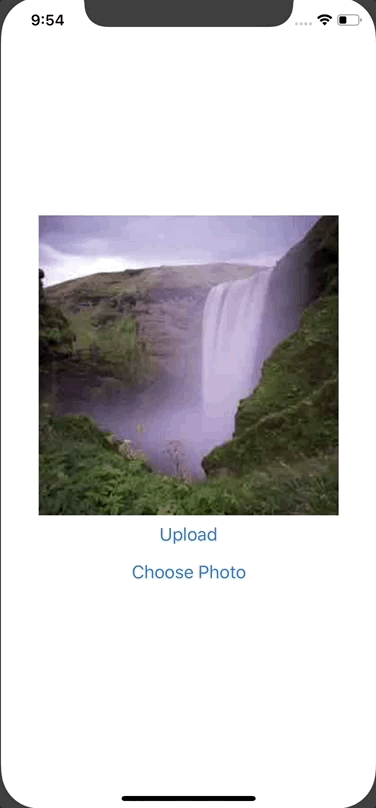
}Now, once you select a photo and press upload, you should see a new image appear on the server in server/images.

Comments 0 Responses