
Managing user authentication flows in your mobile apps is often a fundamental requirement to allow only authorized users to access data. The react-navigation library in its latest version (version 5) allows you to implement a custom authentication flow in React Native apps.
In this tutorial, we’ll discuss one of the strategies to implement an authentication flow using react-navigation library, and react-native-firebase.
As you follow along, you’ll set up and configure a Firebase project to implement anonymous sign-in functionality. Lastly, you’ll be able to take advantage of a number of specific features in the latest version of the react-native-firebase package.
Requirements
Ensure your dev environment includes the following required packages:
- Node.js above 10.x.x installed on your local machine
- JavaScript/ES6 basics
- watchman the file watcher installed
- react-native-cli installed through npm or accessed via npx
For a complete walkthrough on setting up a development environment for React Native, you can go through the official documentation here.
Also, do note that the following tutorial is going to use react-native version 0.61.5. Please make sure you’re using a version of React Native above 0.60.x.
Installing and configuring react-navigation
To start, create a new React Native project and install the necessary dependencies to set up and use the react-navigation library:
# create a new project
npx react-native init authFlow

cd authFlow

# install core navigation dependencies
yarn add @react-navigation/native @react-navigation/stack react-native-reanimated react-native-gesture-handler react-native-screens react-native-safe-area-context @react-native-community/masked-view
From React Native 0.60.x and higher, linking is automatic, so you don’t need to run react-native link.
To finalize the installation on iOS, you’ll have to install pods. (Note: Make sure you have CocoaPods installed.)
cd ios/ && pod install

# after pods are installed
cd ..
Similarly, on Android, open the file android/app/build.gradle and add the following two lines in dependencies section:
implementation 'androidx.appcompat:appcompat:1.1.0-rc01'
implementation 'androidx.swiperefreshlayout:swiperefreshlayout:1.1.0-alpha02'
Lastly, to save the app from crashing in a production environment, add the following line in index.js:
import 'react-native-gesture-handler'
import { AppRegistry } from 'react-native'
import App from './App'
import { name as appName } from './app.json'

AppRegistry.registerComponent(appName, () => App)
That’s all we need to do to configure the react-navigation library!
Create a new Firebase Project
To access the Firebase credentials for each mobile OS platform and configure them to use the Firebase SDK, create a new Firebase project from the Firebase console, or if you already have access to a project in your console, you can skip this step.
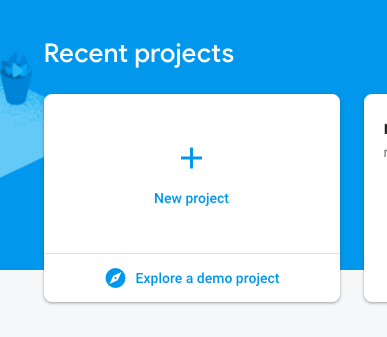
Create a new project as shown below:
Complete the details of your Firebase project:
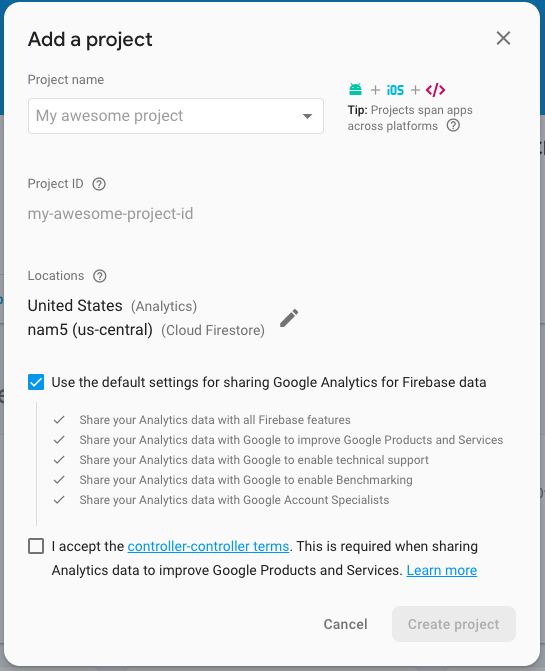
Click the button “Create project”, and you should be redirected to the dashboard screen. You should see your newly-created project in that dashboard.
Add Firebase SDK to React Native app
If you’ve used react-native-firebase version 5 or below, you probably noticed that it was a monorepo used to manage all Firebase dependencies from one module.
Version 6 of this library wants you to only install dependencies based on Firebase features that you want to use. For example, in the current app, to support the anonymous login feature, you’ll start by installing the auth and core app packages only.
Also, do note that the core module @react-native-firebase/app is always required.
Open a terminal window to install these dependencies:
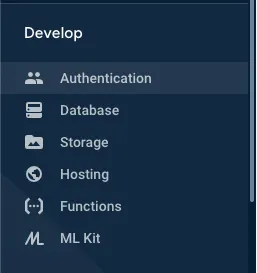
yarn add @react-native-firebase/app @react-native-firebase/authGo back to the Firebase console of the project and navigate to “Authentication” section from the side menu.
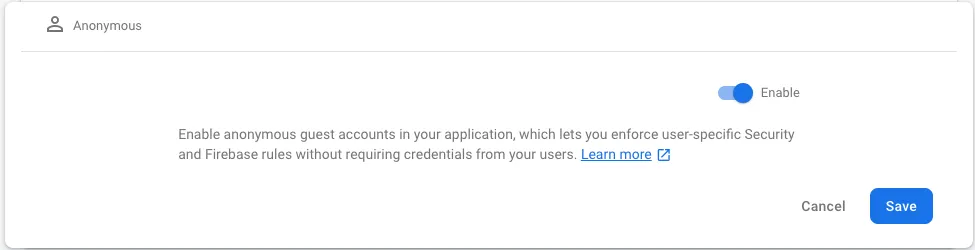
Go to the second tab (Sign-in method) and make sure to enable the Anonymous sign-in provider.

Add Firebase credentials to your iOS app
Firebase provides a file called GoogleService-Info.plist that contains all the API keys as well as other credentials needed for iOS devices to authenticate the correct Firebase project.
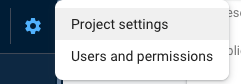
To get these credentials, go to back to the Firebase console, and from the dashboard screen of your Firebase project, open “Project settings” from the side menu.
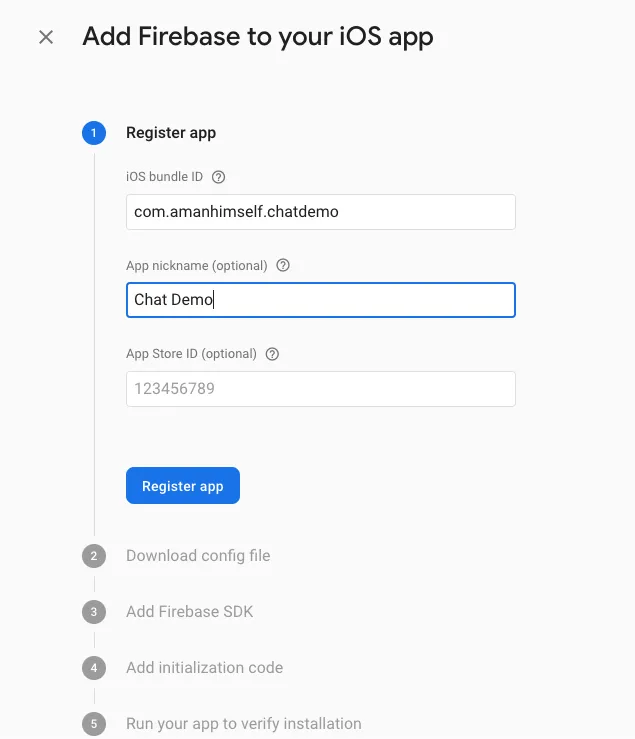
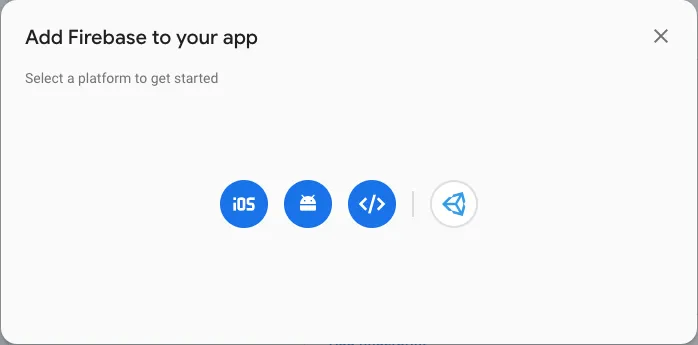
Go to the “Your apps” section and click on the icon iOS to select the platform.

Enter the application details and click on “Register app”.
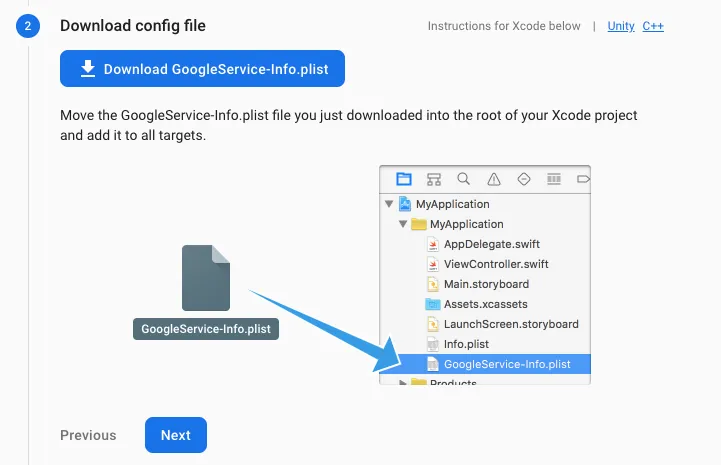
Then download the GoogleService-Info.plist file, as shown below:
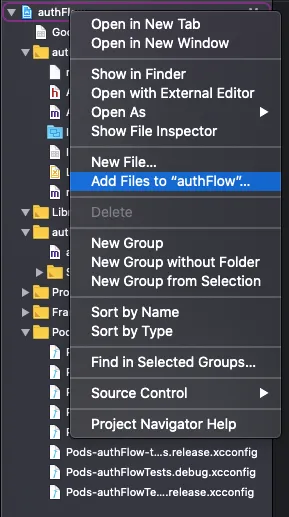
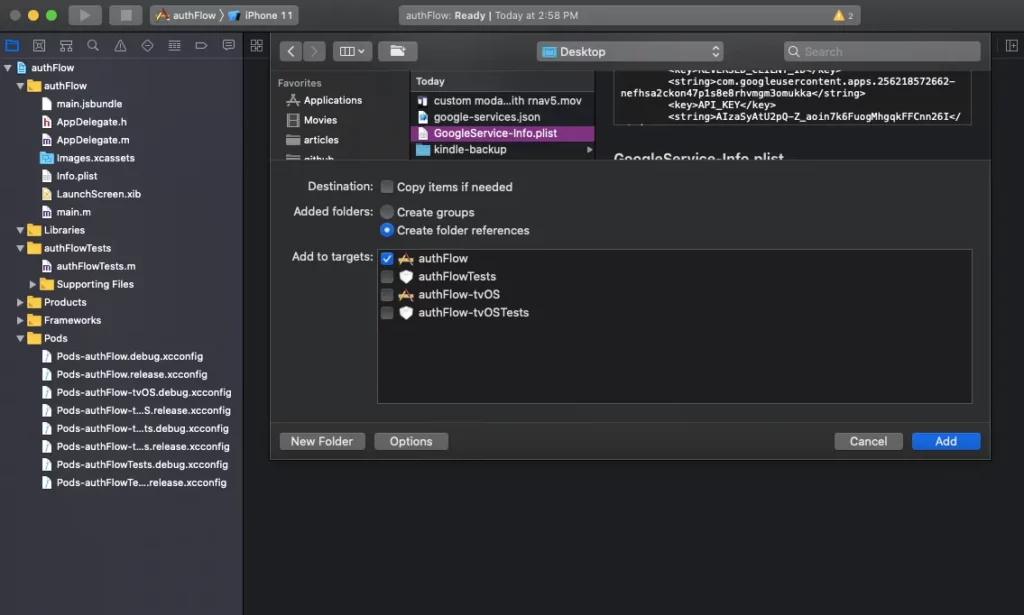
Open XCode, and then open the /ios/authFlow.xcodeproj file. Right-click on the project name and choose the Add Files option—then select the appropriate file to add to this project.
Next, open ios/authFlow/AppDelegate.m and add the following header:
#import <Firebase.h>Within the didFinishLaunchingWithOptions method, add the following configure method:
- (BOOL)application:(UIApplication *)application didFinishLaunchingWithOptions:(NSDictionary *)launchOptions {
    if ([FIRApp defaultApp] == nil) {
      [FIRApp configure];
    }
Lastly, go back to the terminal window to install pods:
cd ios/ && pod install

# after pods are installed
cd ..
Make sure you build the iOS app.
npx react-native run-iosAdd Firebase credentials to your Android app
For Android devices, Firebase provides a google-services.json file that contains all the API keys as well as other credentials needed for Android devices to authenticate the correct Firebase project.
Go to the “Your apps: section and click on the icon Android to select the platform.
Then download the google-services.json file, as shown below:
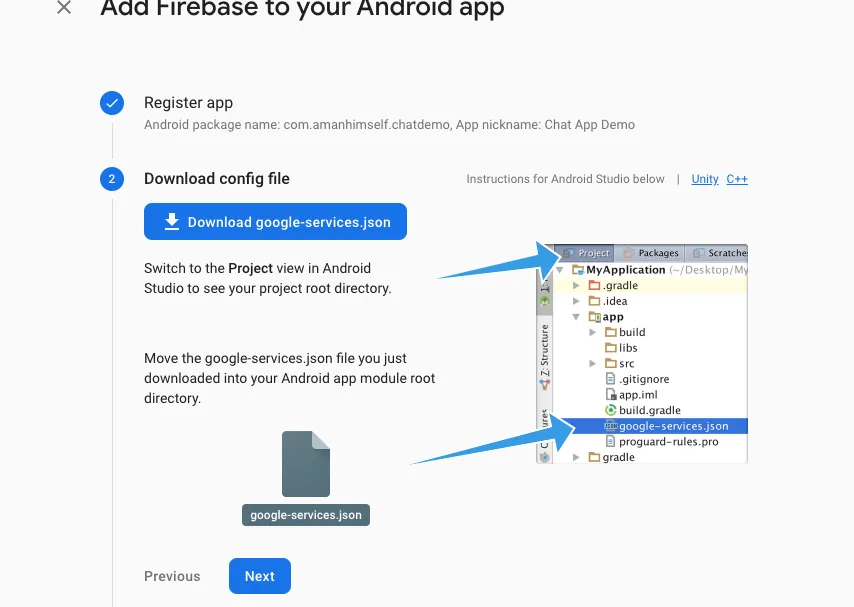
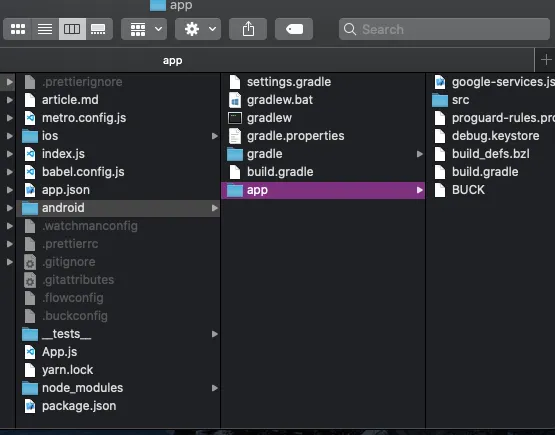
Now copy the downloaded JSON file into your React Native project at the following location: /android/app/google-services.json.
Then open your android/build.gradle file and add the following:
dependencies {
        // ...
        classpath 'com.google.gms:google-services:4.2.0'
    }
Next, open android/app/build.gradle file, and at the very bottom of this file, add the following:
apply plugin: 'com.google.gms.google-services'Make sure you build the Android app.
npx react-native run-androidSet up a Login Screen
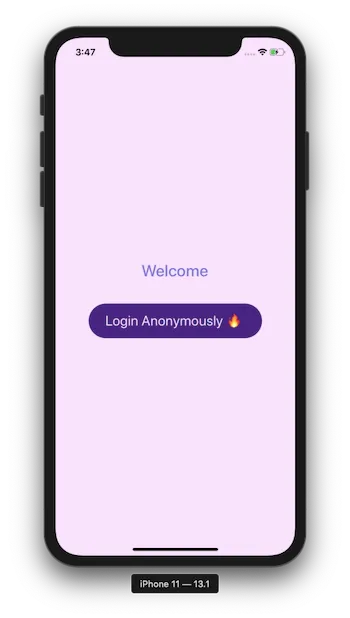
Create a new file called Login.js inside the directory src/screens/. This screen component is going to be responsible for displaying a login button and authenticating whether or not the user has signed out of the app.
Add the following code snippet to this file:
import React from 'react'
import { View, StyleSheet, Text, TouchableOpacity } from 'react-native'

export default function Login() {
  // TODO: add firebase login function later

  return (
    <View style={styles.container}>
      <Text style={styles.title}>Welcome</Text>
      <TouchableOpacity
        style={styles.button}
        onPress={() => alert('Anonymous login')}
      >
        <Text style={styles.buttonText}>Login Anonymously 🔥</Text>
      </TouchableOpacity>
    </View>
  )
}

const styles = StyleSheet.create({
  container: {
    flex: 1,
    justifyContent: 'center',
    alignItems: 'center',
    backgroundColor: '#ffe2ff'
  },
  title: {
    marginTop: 20,
    marginBottom: 30,
    fontSize: 28,
    fontWeight: '500',
    color: '#7f78d2'
  },
  button: {
    flexDirection: 'row',
    borderRadius: 30,
    marginTop: 10,
    marginBottom: 10,
    width: 300,
    height: 60,
    justifyContent: 'center',
    alignItems: 'center',
    backgroundColor: '#481380'
  },
  buttonText: {
    color: '#ffe2ff',
    fontSize: 24,
    marginRight: 5
  }
})
Add two stack navigators
Inside the directory src/navigation/, create two new files:
- SignInStack.js
- SignOutStack.js
Both of these files are more or less self-explanatory. Their functionality is to contain screens related to the authenticated state of the app. For example, the SignOutStack.js file is going to have a stack navigator, which itself has a screen file (such as Login.js) for when users are not authorized to enter the app.
For more details about what a stack navigator is and how to use it, check out a previous post of mine here:
Open the SignOutStack.js file and, using NavigatorContainer and an instance of createStackNavigator, implement the following code snippet:
import * as React from 'react'
import { NavigationContainer } from '@react-navigation/native'
import { createStackNavigator } from '@react-navigation/stack'
import Login from '../screens/Login'

const Stack = createStackNavigator()

export default function SignOutStack() {
  return (
    <NavigationContainer>
      <Stack.Navigator headerMode="none">
        <Stack.Screen name="Login" component={Login} />
      </Stack.Navigator>
    </NavigationContainer>
  )
}
This is how navigators are defined declaratively using version 5 of react-navigation. It follows a more component-based approach, similar to that of react-router in web development (if you’re familiar with it).
Add the following code snippet to the SignInStack.js file:
import * as React from 'react'
import { NavigationContainer } from '@react-navigation/native'
import { createStackNavigator } from '@react-navigation/stack'
import Home from '../screens/Home.js'

const Stack = createStackNavigator()

export default function SignInStack() {
  return (
    <NavigationContainer>
      <Stack.Navigator headerMode="none">
        <Stack.Screen name="Home" component={Home} />
      </Stack.Navigator>
    </NavigationContainer>
  )
}
If the user is authorized, they’ll be able to access the Home screen. Create another file in src/screens/ called Home.js and add the following code snippet:
import React from 'react'
import { View, StyleSheet, Text, TouchableOpacity } from 'react-native'

export default function Home() {
  // TODO: add firebase sign-out and user info function later

  return (
    <View style={styles.container}>
      <Text style={styles.title}>Welcome user!</Text>
      <TouchableOpacity style={styles.button} onPress={() => alert('Sign out')}>
        <Text style={styles.buttonText}>Sign out 🤷</Text>
      </TouchableOpacity>
    </View>
  )
}

const styles = StyleSheet.create({
  container: {
    flex: 1,
    justifyContent: 'center',
    alignItems: 'center',
    backgroundColor: '#ffe2ff'
  },
  title: {
    marginTop: 20,
    marginBottom: 30,
    fontSize: 28,
    fontWeight: '500',
    color: '#7f78d2'
  },
  button: {
    flexDirection: 'row',
    borderRadius: 30,
    marginTop: 10,
    marginBottom: 10,
    width: 160,
    height: 60,
    justifyContent: 'center',
    alignItems: 'center',
    backgroundColor: '#481380'
  },
  buttonText: {
    color: '#ffe2ff',
    fontSize: 24,
    marginRight: 5
  }
})
Set up an authentication flow
To complete the navigation structure in the current React Native app, let’s set up an authentication flow. Create a new file src/navigation/AuthNavigator.js and import the following, as well as both stack navigators created in the previous section:
import React, { useState, useEffect, createContext } from 'react'
import auth from '@react-native-firebase/auth'
import SignInStack from './SignInStack'
import SignOutStack from './SignOutStack'
Create an AuthContext that will expose user data to only those screens when the user successfully logs in; that is, the screens that are part of the SignInStack navigator.
export const AuthContext = createContext(null)Then, define the state variables initializing and user inside the functional component AuthNavigator. The initializing state variable is going to be true by default, and it keeps track of the changes in the authentication state. It will be false when the user’s authentication state changes. The change in the state is going to be handled by the helper method onAuthStateChanged.
It’s important to subscribe to the auth changes when this functional component is mounted. This is done by using the useEffect hook. When this component un-mounts, unsubscribe it.
Lastly, make sure to pass the value of the user data using the AuthContext.Provider. Here is the complete snippet:
export default function AuthNavigator() {
  const [initializing, setInitializing] = useState(true)
  const [user, setUser] = useState(null)

  // Handle user state changes
  function onAuthStateChanged(result) {
    setUser(result)
    if (initializing) setInitializing(false)
  }

  useEffect(() => {
    const authSubscriber = auth().onAuthStateChanged(onAuthStateChanged)

    // unsubscribe on unmount
    return authSubscriber
  }, [])

  if (initializing) {
    return null
  }

  return user ? (
    <AuthContext.Provider value={user}>
      <SignInStack />
    </AuthContext.Provider>
  ) : (
    <SignOutStack />
  )
}
Now, to make it work, open the App.js file and modify it as shown below:
import React from 'react'
import AuthNavigator from './src/navigation/AuthNavigator'

const App = () => {
  return <AuthNavigator />
}

export default App
You should get a similar output to what’s shown below:
Adding login functionality
Open the screens/Login.js file and start by importing the auth module.
// ... rest of the import statements
import auth from '@react-native-firebase/auth'
Inside the Login functional component, add a helper method signIn() that will be triggered when the user presses the sign-in button on this screen. This method is going to be an asynchronous function:
async function signIn() {
  try {
    await auth().signInAnonymously()
  } catch (e) {
    switch (e.code) {
      case 'auth/operation-not-allowed':
        console.log('Enable anonymous in your firebase console.')
        break
      default:
        console.error(e)
        break
    }
  }
}
Add this helper method as the value of the prop onPress for TouchableOpacity:
<TouchableOpacity style={styles.button} onPress={signIn}>
  {/* rest remains same */}
</TouchableOpacity>
Adding logout functionality
To add logout functionality, open the screens/Home.js file and import the Firebase auth module, as well as AuthContext from the navigator/AuthNavigator.js file. The AuthContext is going to help us verify that the user is being signed in. Also, import the useContext hook from React:
import React, { useContext } from 'react'
import { View, StyleSheet, Text, TouchableOpacity } from 'react-native'
import auth from '@react-native-firebase/auth'
import { AuthContext } from '../navigation/AuthNavigator'
Next, in the functional component Home using the hook, store the user object coming from Firebase. Also, define an asynchronous helper method logOut().
Make sure in the JSX returned in this component, the uid (or the unique user id) from Firebase is displayed; also, be sure to add the helper method that’s going to be the value of the prop onPress .
export default function Home() {
const user = useContext(AuthContext)
async function logOut() {
try {
await auth().signOut()
} catch (e) {
console.error(e)
}
}
return (
<View style={styles.container}>
<Text style={styles.title}>Welcome {user.uid}!</Text>
<TouchableOpacity style={styles.button} onPress={logOut}>
<Text style={styles.buttonText}>Sign out 🤷</Text>
</TouchableOpacity>
</View>
)
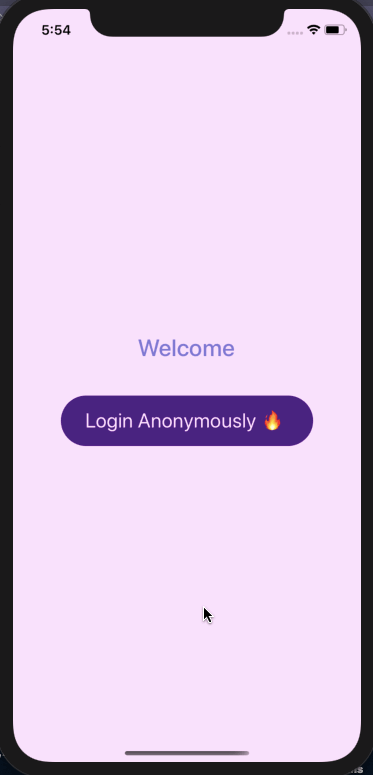
}Here’s the complete output of the app:
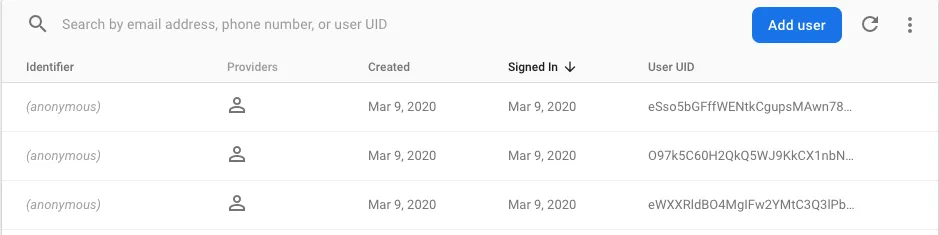
At this point, if you head back to the Firebase console, you can verify the same user id of the last logged in user.
Conclusion
Thanks for working all the way through this tutorial. I hope you had fun integrating the latest versions of the react-navigation and react-native-firebase libraries.
For more info on managing authentication flows, you can refer to the official documentation of react-navigation here.
💌 If you’d like to receive more React Native tutorials in your inbox, you can sign up for the newsletter here.

Comments 0 Responses