
Materials can seem intimidating to get the hang of — so many interconnected nodes, math operations, and procedural textures. I know it seemed like magic to me when I first started, but beneath this complexity are some very simple principles, and understanding these will enable you to create your own relatively complex materials in a short space of time.
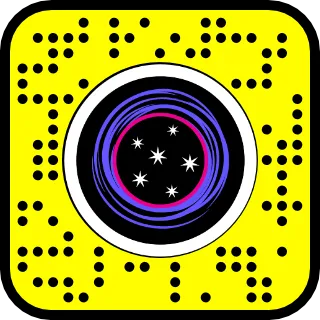
In this tutorial, we will make a “space wormhole” lens, which has both an animated wormhole material and a stars background material. Scan the Snapcode below to see it in action:
Pretty cool right? Let’s start making it!
First, open up Lens Studio and select the “window” template. There’s going to be a little bit of dry technical setup here, but it isn’t much, so just power though and think about the crazy wormhole we’re about to create! This comes with a demo portal to another dimension.
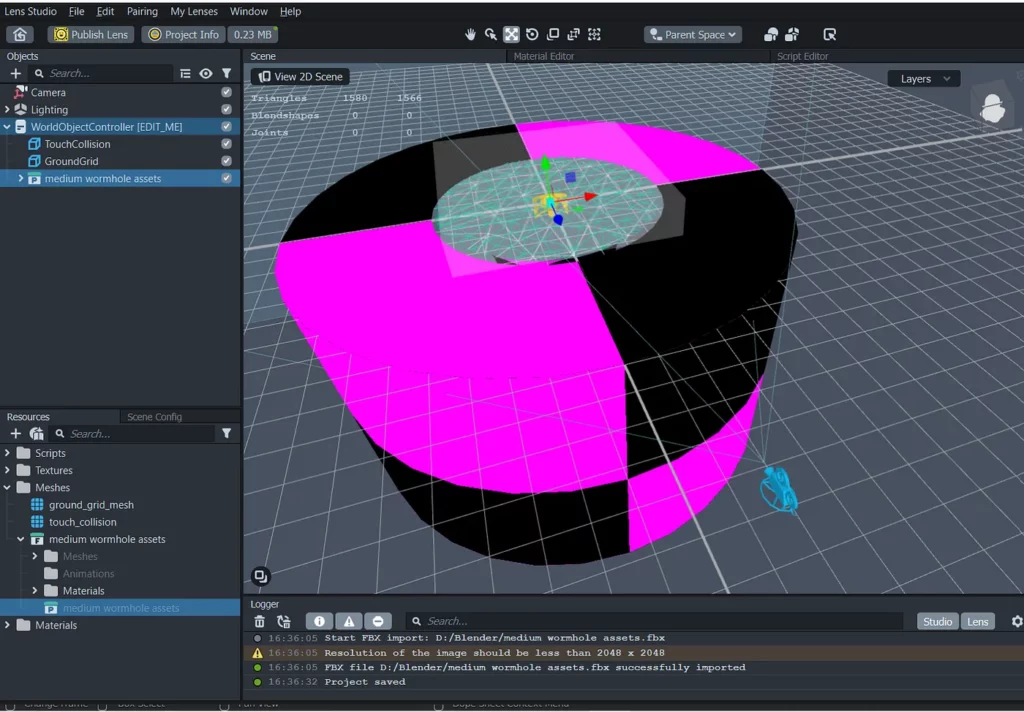
However, we’re going to be using our own meshes for this, so delete the “Hole” and “Hole occluder” assets (they both say “replace me,” so shouldn’t be hard to miss). Next, download and import the sample FBX files I made:
https://www.dropbox.com/sh/whx2pk83038gpmp/AADQYiXuH2RL3bQbTBIdVto8a?dl=0
Drag them under the “WorldObjectController” object. These assets include the wormhole mesh that our wormhole texture will go on, a dome mesh to hold the stars texture that we will create to give an illusion of outer space, and an occluder mesh that will hide the outside of the other meshes to create the illusion that there is a one-way portal in the floor. At this point, your project should look like this:
Wow, what a beautiful lens. It might look a bit better if it had some materials on it though, right? In the “materials” folder in the resources panel, add a new “Graph Empty” material, and name it “wormhole.” Go to the cylinder mesh in the wormhole object, and assign this material to it. You might not be able to see much here, in which case, check the “two sided” box in the material inspector. You should see that wormhole has now gone from being a weird purple and black color to being plain old white, the current color of our new material. Double click on the material, and you will see it open up in the material editor:
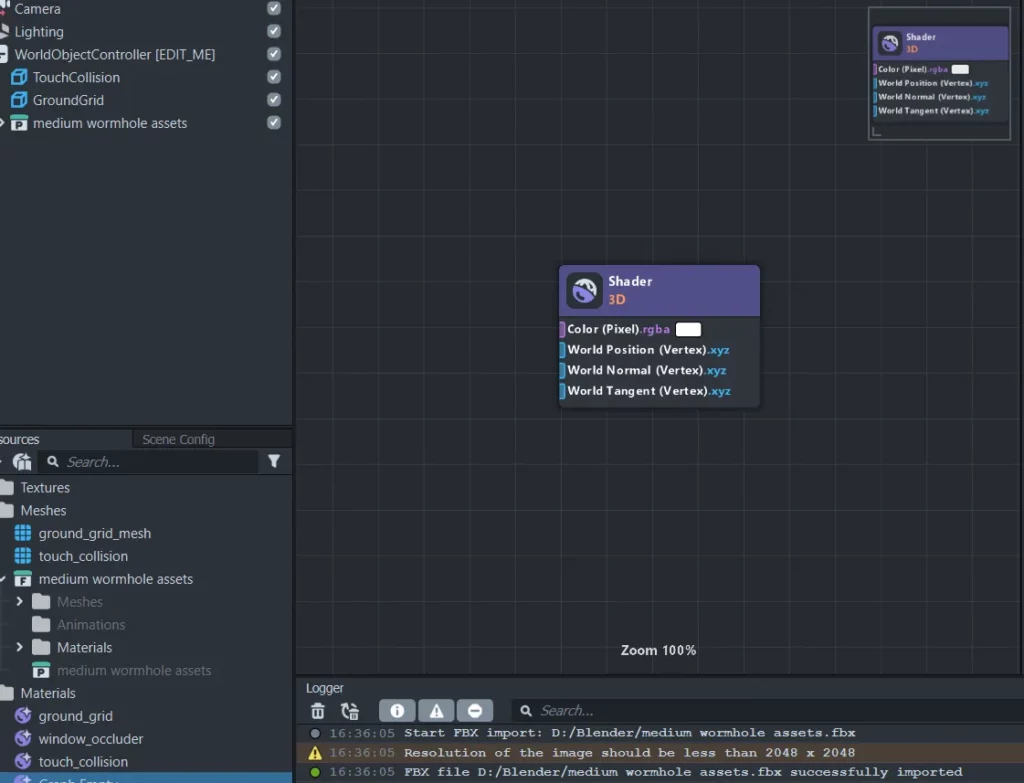
This is where the fun begins! At the moment, we have a single node, which is the output for the color data as well as the data that affects the vertices and faces in the mesh. We will only be concerned with making a flat texture here (although we will use multiple layers of texture to give it a 3D feel). This means everything we will be making will go into the color node.
When I’m creating a material, I like to visualize the final material that I want to make and work backwards. When I think of wormholes in space, science fiction shows taught me that they are glowing, spinning funnels of plasma. A simple Google search for wormholes will result in a host of images that confirm this. They tend to have a broken-up, cloudy texture and are normally some shade of blue combined with purple. They also don’t have hard edges, but softly fade into space. Side note: I’m sure real wormholes in space aren’t as cool-looking as this, in fact, they might not even exist at all. Anyway, that’s what’s so awesome about AR: we can make them real, and conjure them in our living rooms!
So far, we have the following checklist for our material. It should:
- Have a broken-up, cloudy/plasma-like texture
- Spin around
- Glow
- Have soft edges
Let’s start with the texture. Lens Studio comes with three types of texture node that we can plug into our materials to generate noise textures: voronoi, simplex, and random. We’ll be using simplex noise for this, as it has a cloudy look and is good at moving along a tangent.
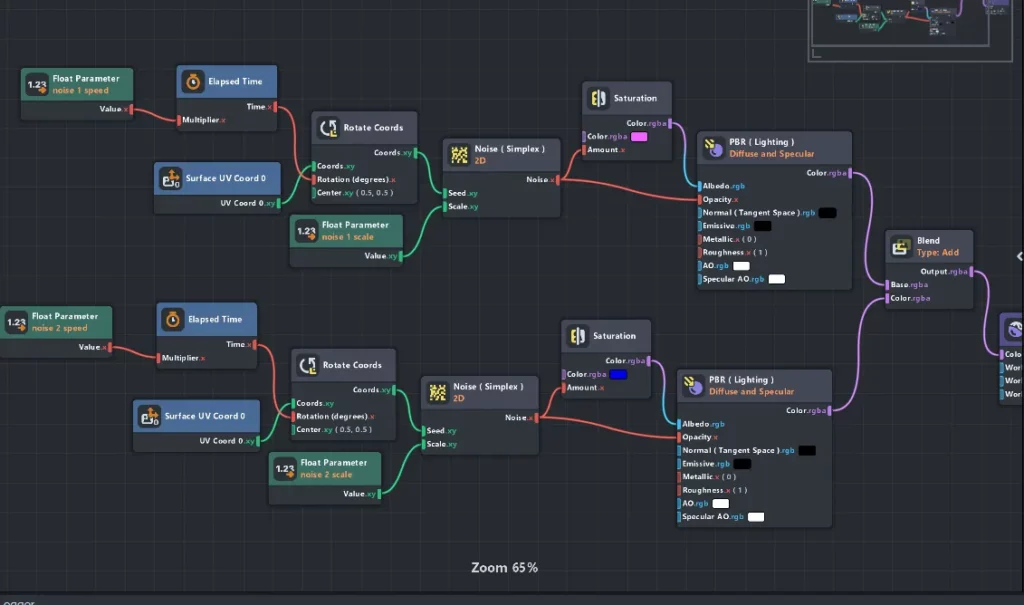
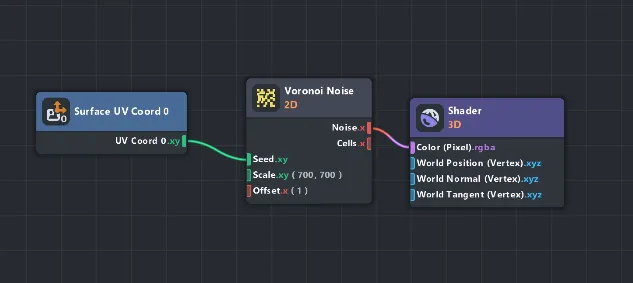
Press tab to add a new node, and search for simplex noise. Plug it into the color input of the 3D shader. You may notice it doesn’t look very noisy. That’s because we still need to tell it which coordinates it should use to generate the noise. Press tab again, and search for “surface UV coord 0” (you should only have to type part of it in before you see it). Plug it into the seed of the noise texture.
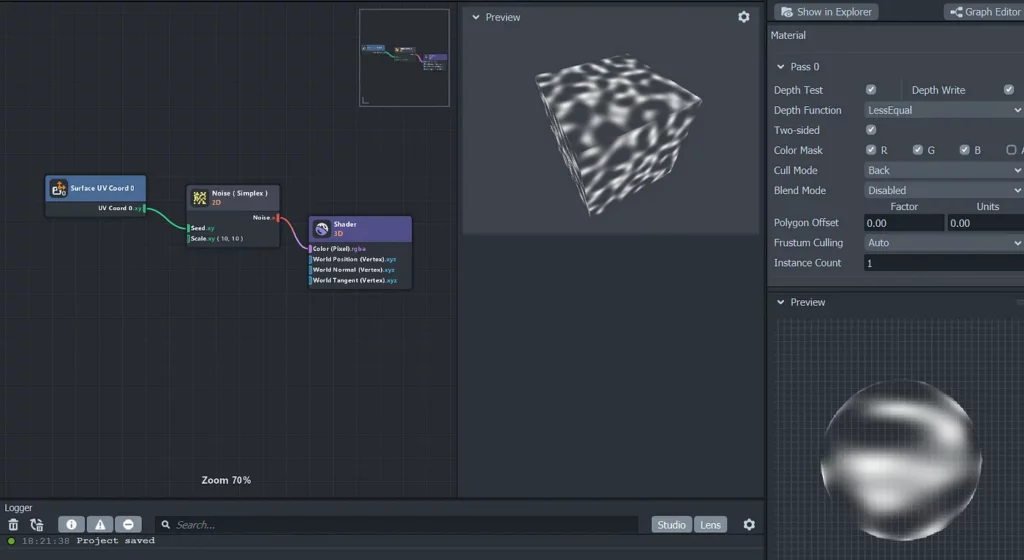
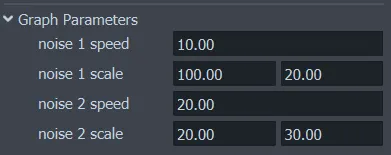
Boom, we have a texture displaying on the surface of the material! Try playing with the scale values in the settings for the noise node, and you’ll see the size of the noise change. We probably want to play around with this value a bit, so let’s make that easier to do. Create a “float parameter” node and plug this into the “scale” input for the noise texture. Change the channel to “xy” (as we have two scale values that we can change) and rename it to something like “noise 1 scale” (we’ll be creating another noise texture later).
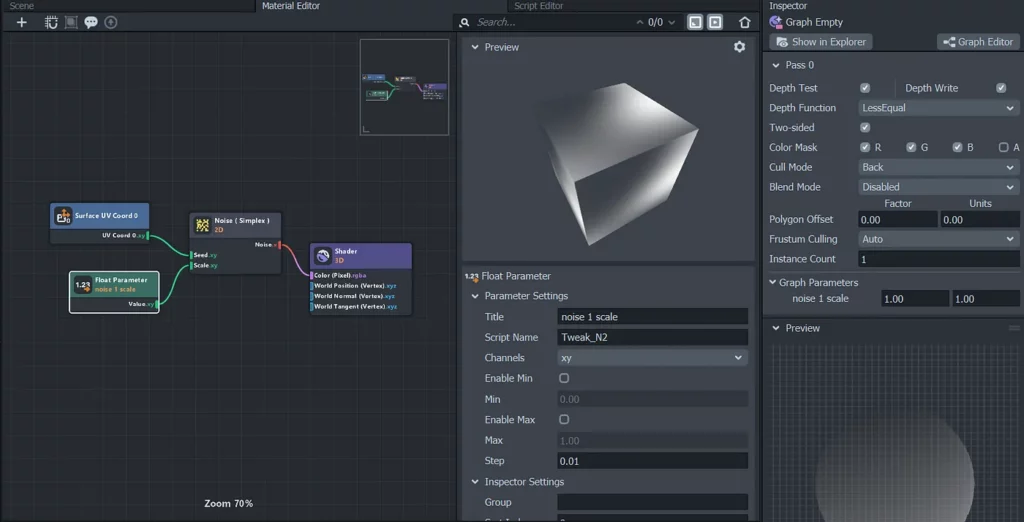
We can now change the size of the noise texture directly from the inspector! For now, let’s use an x value of 100 and a y value of 20.
What else should our wormhole do? It should rotate! This is actually super easy to do, as you just add a “rotate coords” node and shift-drag it between the surface UV coords and noise nodes (which will automatically attach it to both of them). Then add an “elapsed time” node and plug it into the “rotation” input. Add another float parameter too:
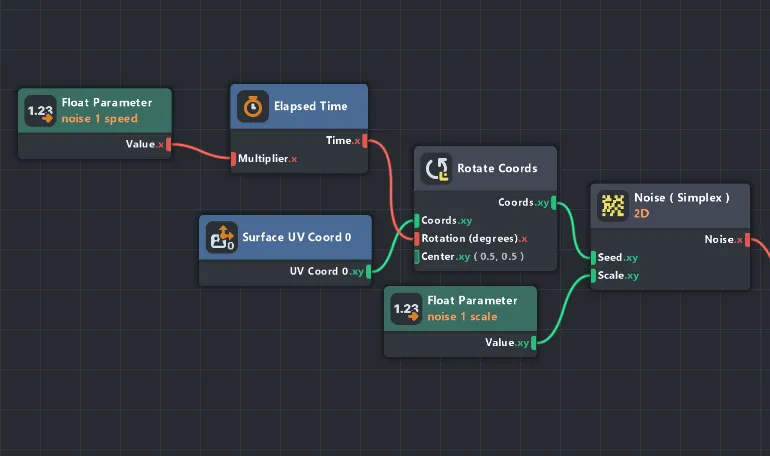
What this does is rotate the coordinates that the noise texture is generated at by the amount of time elapsed since the lens started (multiplied by the speed parameter). Now would also be a good time to point out that this material we have made will not work the same way on just any mesh; the settings in the rotate coords nodes would vary depending on the shape of the mesh (where the center is), and how it was UV unwrapped. You may notice a line down the middle of the wormhole where there is a discrepancy in the material. This is where the seam is that the mesh was unwrapped along.
To animate the texture, change the speed value in the inspector to 10. If you go to the lens preview now, you’ll see it spinning! See how much can be accomplished with just a few nodes?
Let’s change the color and opacity of this texture next. Add a saturation and PBR node as shown:
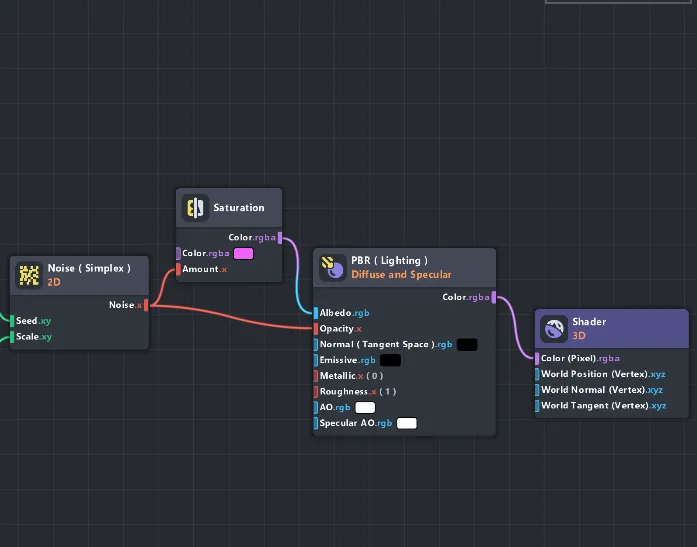
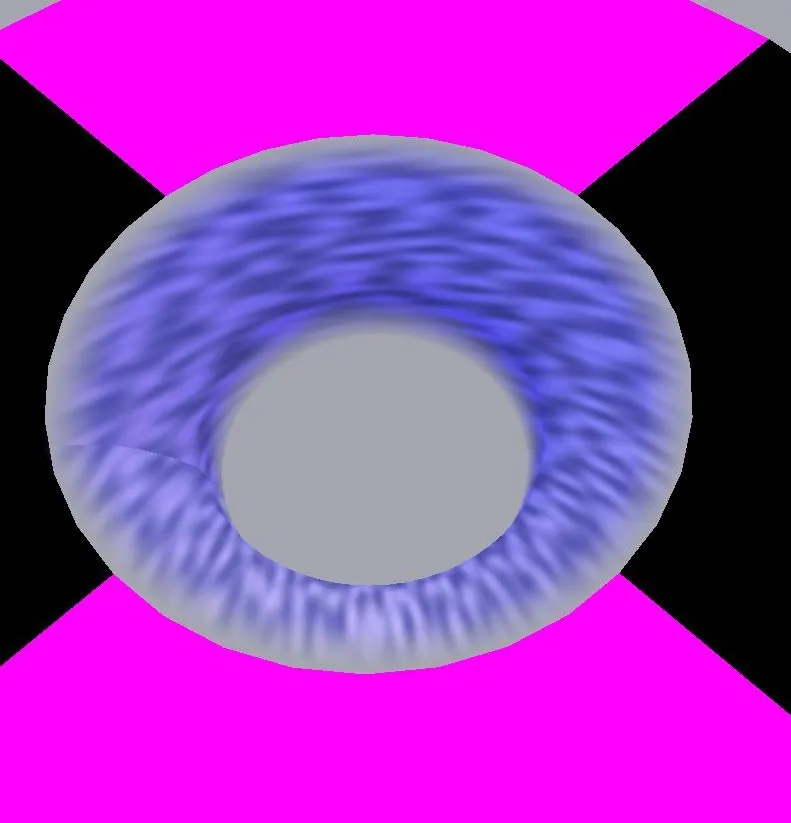
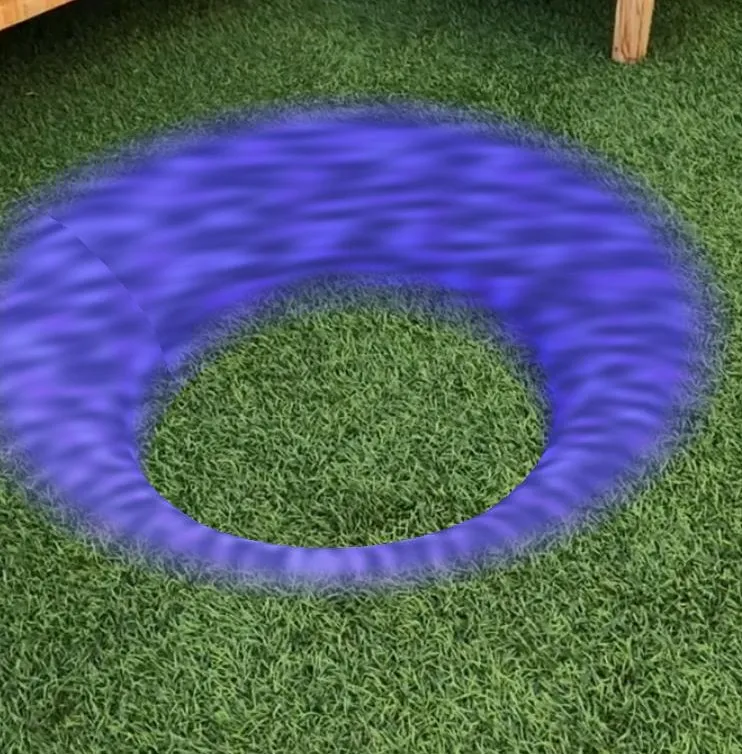
Now we’re getting some opacity going on! Change the roughness on the PBR node to 1 as the default is too shiny. To enable opacity for this material, we also need to change the blend mode to “normal” in the material inspector. The preview of the lens should now look like this, with a rotating purple texture:
Now that we know how to make a basic layer of texture, let’s duplicate it to create some depth. Click and drag to select everything except the shader output node, then ctrl-c ctrl-v (or cmd-c cmd-v on mac). Now that we’ve duplicated it, let’s change it up and blend it with the existing texture. By doing this, we can create layers moving at different speeds, which creates a sense of depth and realism to the material.
To blend the textures, add a blend node. There are heaps of different blend modes you can try, but I went with “add” on mine, but try whichever you like most. Once the new node group is connected, you can change the float input parameters. First, rename them so you know that they are part of the second input group. Then, change their values. I went with the ones below, which makes the second texture rotate faster but also makes the texture larger.
Also, change the color of the saturation node in the second node group, I chose a dark blue. Your node tree should now look like this:
We have two different colored textures, both rotating around the wormhole. We’re missing something though: the soft edges. In fact, we’re missing a background to this wormhole in general! Let’s fix that. Add two radial gradient nodes, and attach them to the opacity input of two new PBR nodes. Change the albedo of these PBR nodes to some kind of dark blue. Combine the output of these with a min node, and, finally, add another blend node with the blend mode set to overlay, and plug the output of the min node into the base input of it. Finally, plug the output of the blend node from our two noise textures into the color of this new blend node, so the setup looks like this:
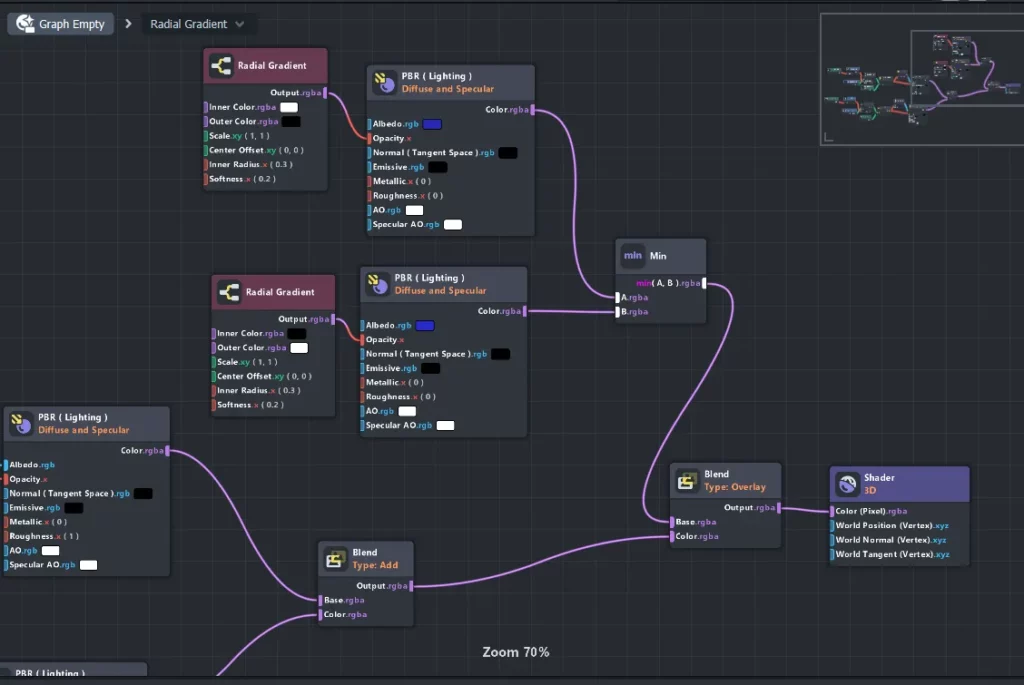
Don’t worry if this seems to break things, we’ll fix that in a bit. To back up a little: we created two blue PBR textures and used some radial gradients to control their opacities. Since the material editor doesn’t allow for multi-stop gradients, we have to use two gradients and combine them with a min node, which will render the lowest of the two opacities. We then overlay the noise textures on top of what we have created.
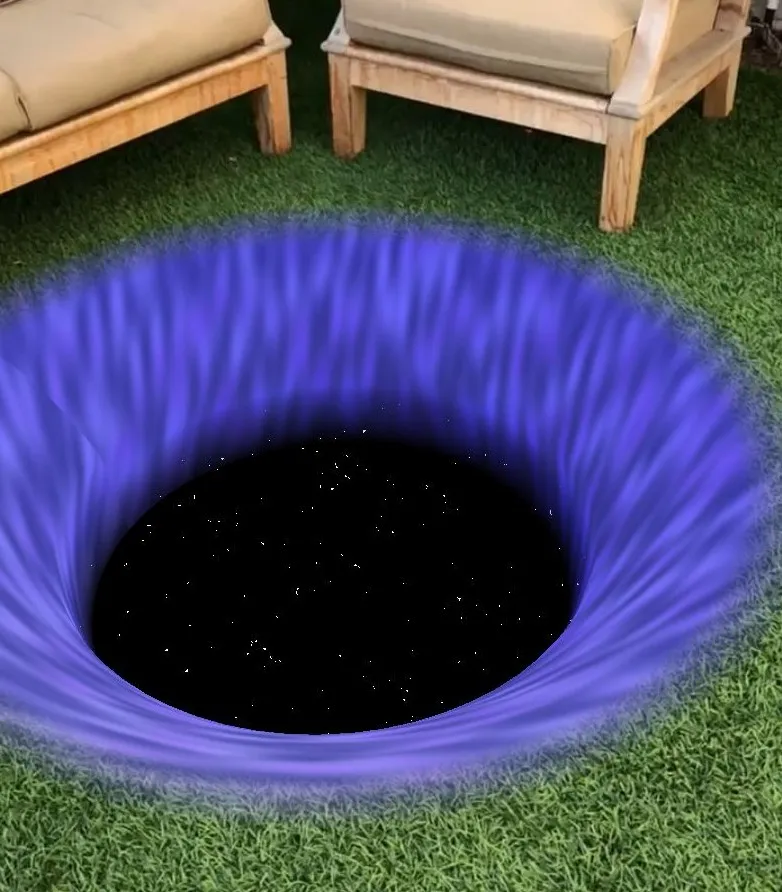
At the moment though, the values on the radial gradients are wrong, so most of the material is translucent. Set the inner radius on one of the gradients to 0.91 and the softness to 0.08 and set the inner radius on the other gradient to 0.55 and the softness to 0.11. Voila! we have a working wormhole! Except… it’s a bit dark. More like a black hole. Let’s add some lighting to it. Duplicate the directional right in the scene, rotate it so it’s facing upwards, and move down so it’s just below the wormhole. Wow, so much better!
So now we have our wormhole. Feel free to experiment with the color values and blend modes, and add some more layers of texture if you want. The sky (or rather, outer space) is the limit. Once you’re happy with it, it’s time to get rid of that annoying material-less occluder mesh around it. Fortunately this is as easy as selecting the occluder mesh itself, and assigning it the “window occluder” material that comes with this template. It looks even better now!
We have our magical floating portal and the only thing left is to put some magical outer space on the other side of it. This is where our “stars” dome mesh comes in.
Create a new empty graph material, and call it “stars.” Now we’re going to add a voronoi noise texture node, which is a noise texture that generates clusters of cells and is good for making lots of disconnected points, like stars. Plug the surface UV coords into the seed input, and attach it to the shader color input. Then set the scale to something big like 700 x 700.
Assign this material to the stars icosphere. You may need to make it two-sided in order to see it. It should look fuzzy, like TV static. Also, the stars icosphere is a little big.
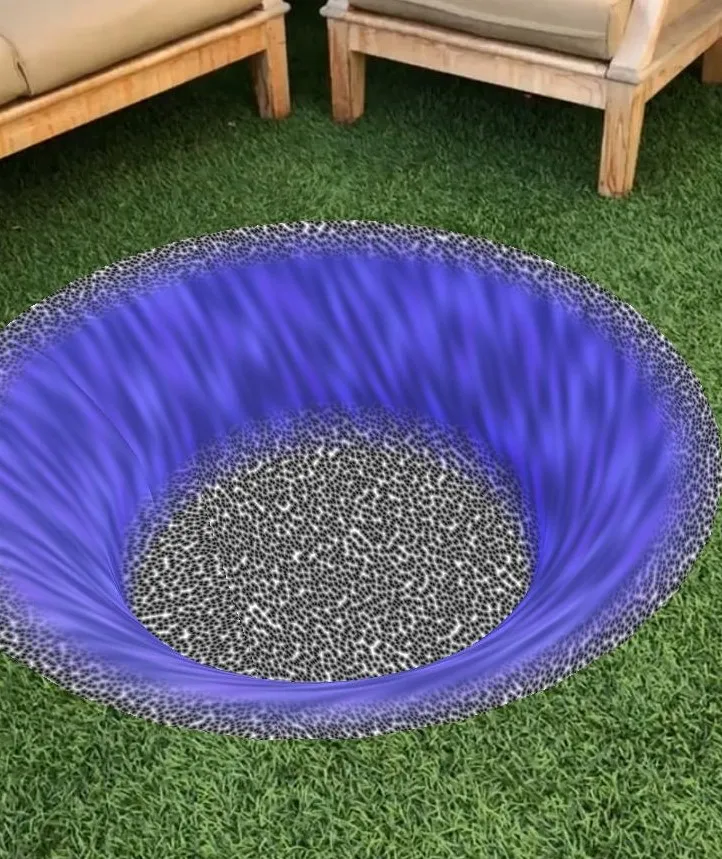
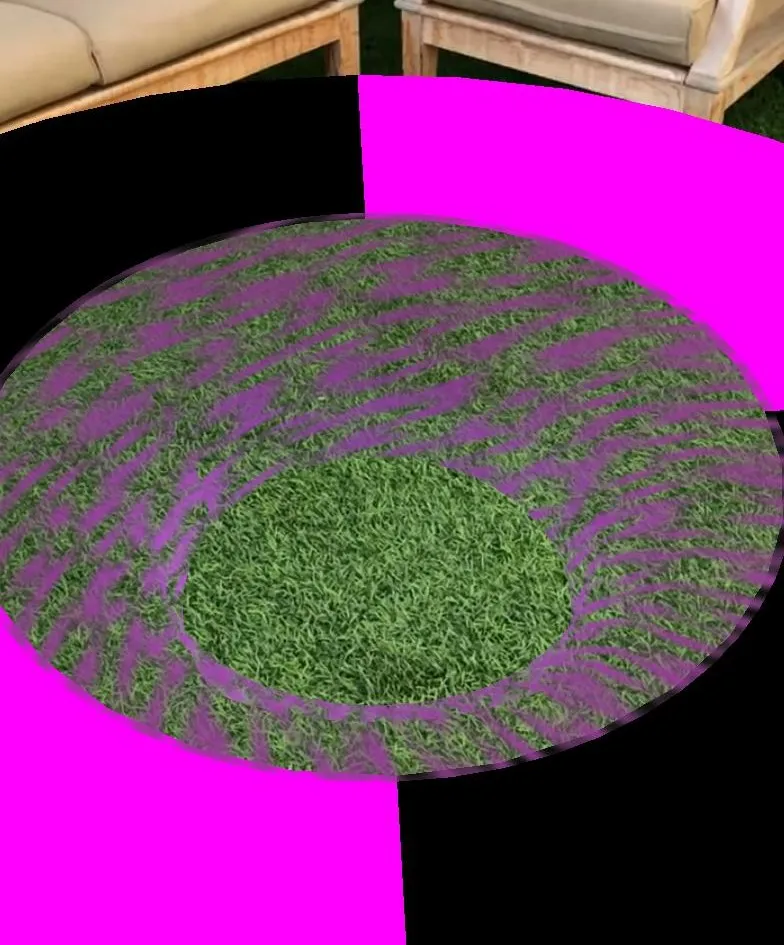
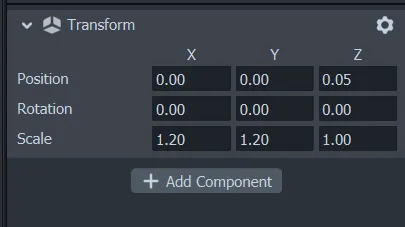
This is because of the opacity texture we added to the wormhole: it doesn’t cover the whole mesh, so part of it shows the stars mesh. This happens sometimes when working with 3D assets: changing things in the materials can affect the geometry. Let’s adjust the wormhole mesh in order to cover it properly: change the x and y values of the scale to 1.20 and the z value of the position to 0.05:
The wormhole should now cover the stars nicely. The stars texture still looks a bit weird though, maybe we should add some contrast. We just need to add a couple of nodes: first a blend node with the blend type set to negation. This will create a color output of white dots against a black background. Next, add a smoothstep node and change the ratio value to white.
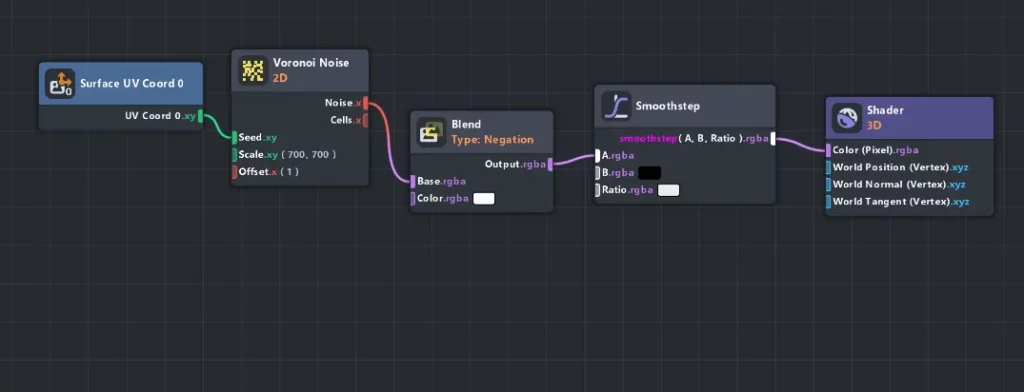
Wow, only five nodes! Let’s take a look at our lens preview and see what that generated:
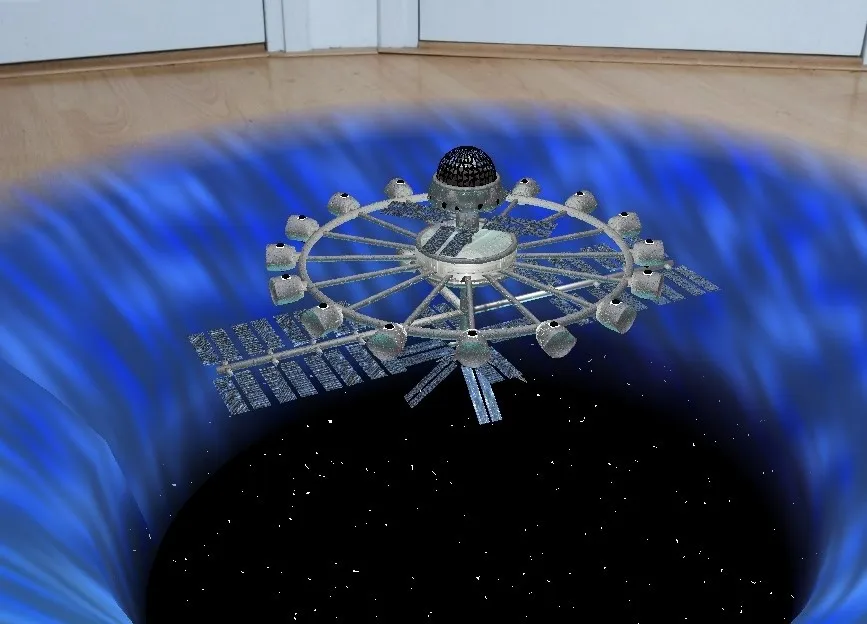
Yep, looks like outer space to me! So, there we have it, a spinning wormhole that leads to the vast infinity of space. Try playing around with the values to make different colored wormholes, maybe try adding some nebulae to the stars material. The possibilities are endless! Finally, look on sketchfab for a spaceship or planet you could add, or make your own. For my lens, I made the space station in Blender.
I hope you enjoyed reading this tutorial, hopefully it helps you if you are still getting used to the material editor. Happy creating!

Comments 0 Responses