
Machine learning is a buzzword nowadays. There are plenty of theories going around, but it’s hard to see real applications that can be built by an indie developer.
Developing an end-to-end machine learning system requires a wide range of expertise in areas like linear algebra, vector calculus, statistics, and optimization.
Therefore, from a developer’s perspective, there’s a high learning curve that stands in the way, but the latest tools take care of most of the work for developers, leaving them free to code.
In this tutorial, we’ll create an indie AI iOS app that employs image classification recognize banknotes and read their values aloud for people with visually impairments.
This post will guide you through four steps:
- Preparing a dataset to use in machine learning
- Data augmentation to diversify the dataset
- Transfer learning and fine-tuning to train the model faster
- Converting a Keras model to Core ML to use in an iOS app
First, let’s have a look at the tools and models we’ll be using.
Keras
As Mr. Le states “Keras is a wrapper over its backend libraries, which can be TensorFlow or Theano — meaning that if you’re using Keras with TensorFlow backend, you’re running TensorFlow code. Keras takes care of a lot of the nitty-gritty details for you, as it’s geared towards neural network technology consumers and is well suited for those practicing data science. It allows for easy and fast prototyping, supports multiple neural network architectures, and runs seamlessly on CPU/GPU.”
ResNet50
ResNet is an abbreviation for residual neural network. This network model is an improved version of the convolutional neural network (CNN). If you need to recap your knowledge about CNNs, take a look at this beginner’s guide.
ResNet solves the degradation problem of the CNN. This degradation problem is clearly stated in the original paper: “When deeper networks are able to start converging, a degradation problem has been exposed: with the network depth increasing, accuracy gets saturated (which might be unsurprising) and then degrades rapidly.”
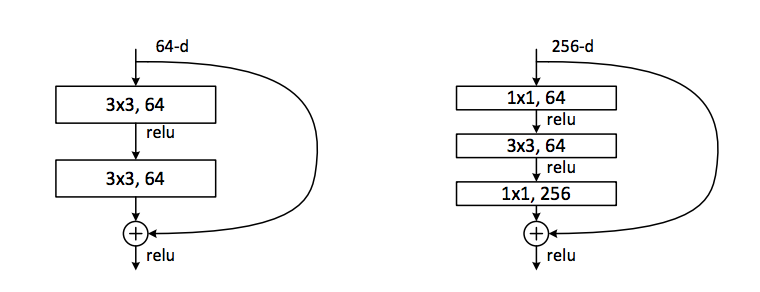
ResNet solves this problem by using shortcuts between layers. It’s a simple idea, but it really helps as the network gets deeper. It also uses a bottleneck design to shorten training time. ResNet50 is a 50-layered network trained on the ImageNet dataset. Instead of 2 layered (3×3) convolutions, it uses (1×1), (3×3), and (1×1) convolutions.
Dataset and Augmentation
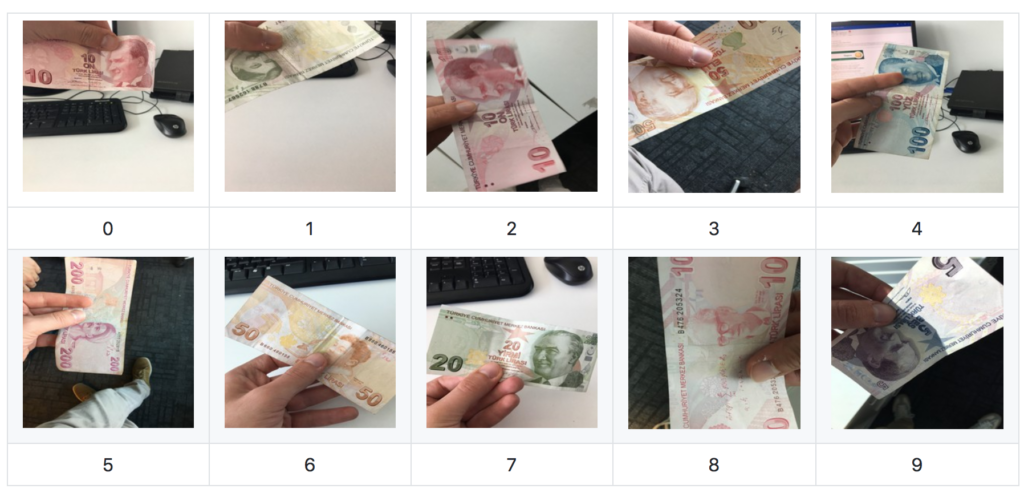
As I want to classify Turkish banknotes, I had to create my own image dataset under varied conditions (light, perspective, etc.). For this task, I accumulated 900 photos. This dataset is an amateur dataset and very biased, but it’s okay for the prototype. For production, large datasets with much more variance should be used. There are 6 denominations. 80% of the images are separated for training, with the remaining 20% used for the test dataset.
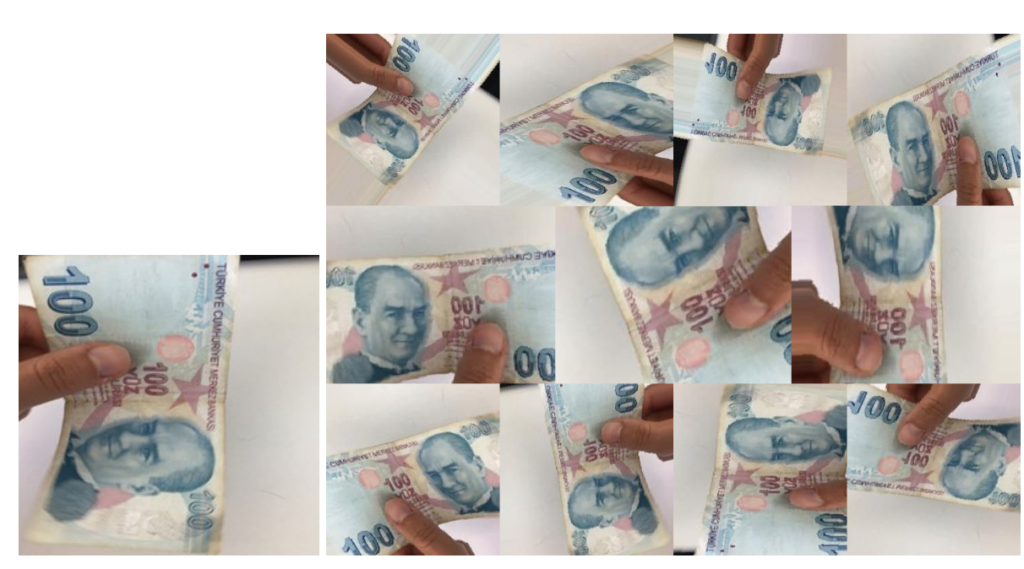
In order to increase variance, I used a technique called data augmentation. This allows us to rotate, zoom, and rotate images in order to increase the number and the variance of images. All the images are resized to 224×224 in order to fit ResNet50’s input size. You can see augmented image samples below. The one on the left is the original, and the collage on the right is augmented.
Transfer Learning
Transfer learning is a technique used to store knowledge learned while solving a specific problem and then apply it to a different but similar problem.
Although transfer learning is being used in machine learning, it originated in psychology. In this sense, transfer learning focused on understanding how humans transfers knowledge gained from a specific field into other related fields. It’s one of the main research areas of cognitive psychology.
In machine learning, we can use transfer learning to retrain a model that’s already been trained on a specific task, and then use it for a different task. This method is used to train models faster, because it requires less training time, as the model is built on top of the gained knowledge.
Generally, training a neural network from scratch requires a large dataset. Otherwise, it learns the training set very well. As such, the neural net over-performs on the training set and underperforms on the test set. This problem is called overfitting, and it leads to bad performance on images that the model hasn’t seen before.
It’s a signal that shows the model does not generalize the information very well. If the training set is small and the hardware and training time is limited, fine-tuning pre-trained models is a useful practice. This method is also called transfer learning. It allows knowledge transfer from pre-trained models. It’s faster to train because you don’t have to train all layers — training only the last layer is enough in most cases.
The ResNet50 model is trained on the ImageNet dataset. ImageNet contains more than 14 million images categorized into more than 20 thousand categories. This dataset contains images of animals, appliances, vegetables, etc. The ResNet50 model is trained to classify these images.
We’ll use this pre-trained model and retrain it for our dataset. In CNNs, the middle layers usually learn the higher-level features (edges, shape, etc.) and the final layers learn more specific features. Therefore, we’ll remove the final layer and add our classifier layer. We won’t train all layers, but only the final layer.
Fine-Tuning ResNet50
ResNet50 is trained to classify the ImageNet dataset. Therefore, it already knows how to classify a specific set of images. We’ll use it as a baseline to train our own classifier.
Google offers a free Tesla K80 GPU via Google Colab. I’ll be using this service to train the neural network faster. It also allows sharing and running iPython notebooks and reproducing the research.
Keras has a built-in function for ResNet50 pre-trained models. In the code below, I define the shape of my image as an input and then freeze the layers of the ResNet model. I’ll use the ResNet layers but won’t train them. I don’t include the top ResNet layer because I’ll add my customized classification layer there. So I add average-pooling and softmax layers to the ResNet model. As I only train my custom layer, this is much faster to train compared to training the all model layers.
def get_model():
input_tensor = Input(shape=(224, 224, 3)) # this assumes K.image_data_format() == 'channels_last'
# create the base pre-trained model
base_model = ResNet50(input_tensor=input_tensor,weights='imagenet',include_top=False)
for layer in base_model.layers:
layer.trainable=False
x = base_model.output
x = GlobalAveragePooling2D(data_format='channels_last')(x)
x = Dense(num_classes, activation='softmax')(x)
updatedModel = Model(base_model.input, x)
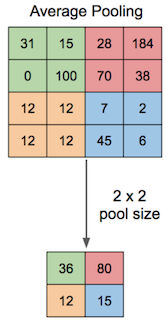
return updatedModelAverage pooling is a way to decrease matrix size. It does this by taking the average of the values in the pooling regions.
I will train the final layer that I added. As such, the model will train faster as compared to training it from scratch.
You can find the whole training code here on Colab.
I will compile the model using Adadelta optimizer.
def compile_model(compiledModel):

    compiledModel.compile(loss=keras.losses.categorical_crossentropy,
                  optimizer=Adadelta(),
                  metrics=['accuracy'])
In order to create augmented images (rotated, flipped, zoomed etc.) from the dataset, I use ImageDataGenerator.
def modelFitGenerator(fitModel):

    num_train_samples = sum([len(files) for r, d, files in os.walk(train_data_dir)])
    num_valid_samples = sum([len(files) for r, d, files in os.walk(validation_data_dir)])

    num_train_steps = math.floor(num_train_samples/batch_size)
    num_valid_steps = math.floor(num_valid_samples/batch_size)

    train_datagen = ImageDataGenerator(
      rotation_range=90,
      horizontal_flip=True,
      vertical_flip=True,
      zoom_range=0.4)

    test_datagen = ImageDataGenerator()

    train_generator = train_datagen.flow_from_directory(
      train_data_dir,
      target_size=image_size ,
      batch_size=batch_size,
      class_mode='categorical', shuffle=True
    )

    validation_generator = test_datagen.flow_from_directory(
      validation_data_dir,
      target_size=image_size ,
      batch_size=batch_size,
      class_mode='categorical', shuffle=True
    )

    print("start history model")
    history = fitModel.fit_generator(
      train_generator,
      steps_per_epoch=num_train_steps,
      epochs=nb_epoch,
      validation_data=validation_generator,
      validation_steps=num_valid_steps)
Converting our Model to Core ML Format
Coremltools is a python package for creating, examining, and testing models in the .mlmodel format. In the code below, I use this framework’s convert method to create a Core ML model from my Keras model.
def saveCoreMLModel(kerasModel):
coreml_model = coremltools.converters.keras.convert(kerasModel,
input_names=['input'],
output_names=['probs'],
image_input_names='input',
predicted_feature_name='predictedMoney',
class_labels = 'drive/Resnet/labels.txt')
coreml_model.save('resnet50custom.mlmodel')
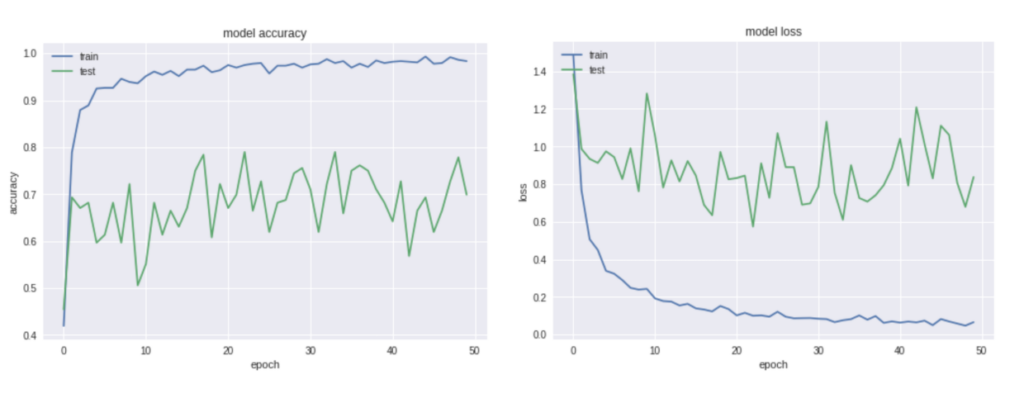
print('CoreML model saved')I train this model for 50 epochs with batch-size of 16. It reaches 0.98 accuracy on the training set and 0.77 on the test set. I can increase the accuracy by training more epochs, but I want to reduce the time it takes to build the prototype. The resulting accuracy isn’t perfect, but it’s high enough for the purposes of this tutorial.
Creating an iOS App
You can download my project sample from GitHub. Here, I dragged-and-dropped my Core ML model into the project’s models folder. In the viewDidLoad method, I set the model as my custom model:

You can examine your Core ML model simply by selecting it. As shown below, Xcode displays model size, input, and output types. Because the input type is a 224×224 sized image, we should feed the model this type of image.
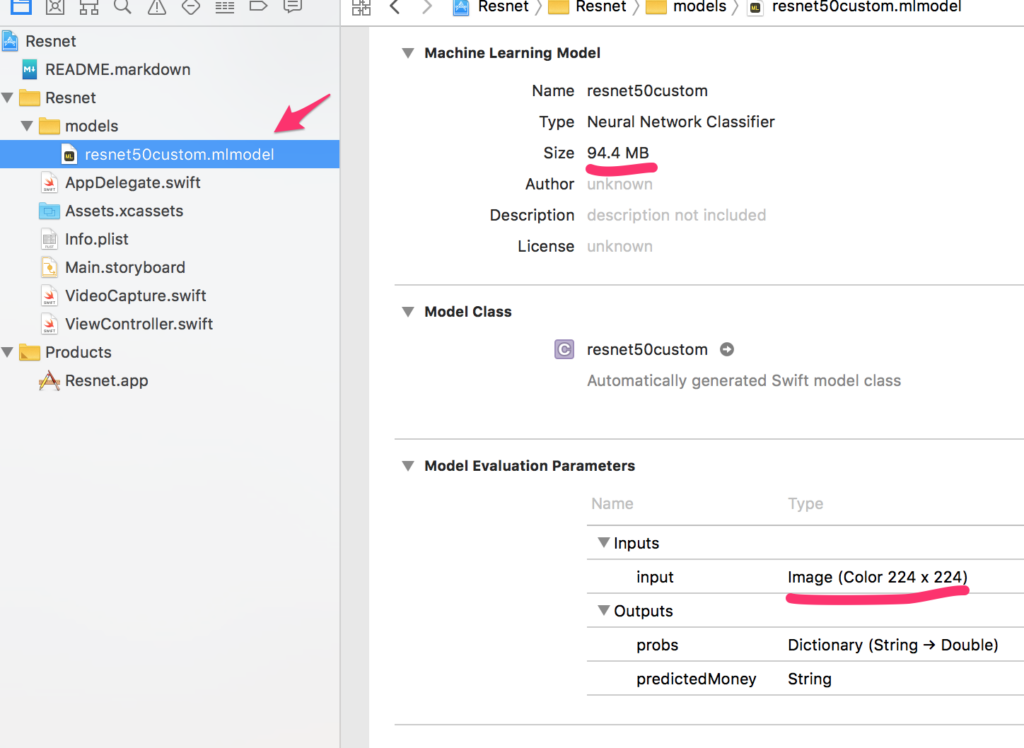
If the model size is too large for your app, you can use smaller models like MobileNet, or you can convert your model to a half-precision model. coremltools can convert a Core ML model’s floating point weights from full-precision to half-precision values (reducing the number of bits used in the representation from 32 down to 16).
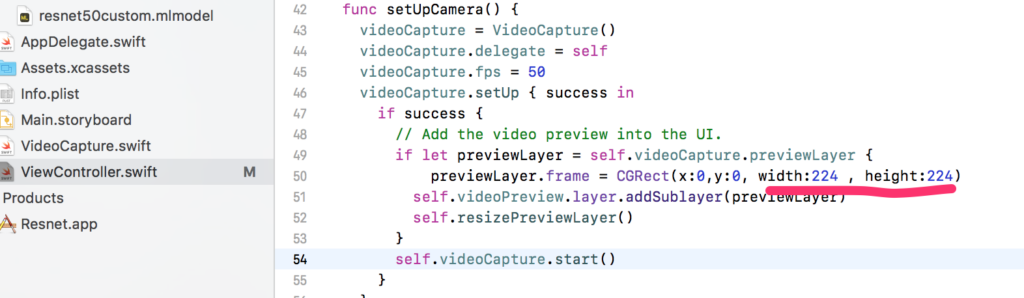
Before feeding the captured image to our ResNet model, we have to resize it to 224×224. Actually, the Vision framework can automatically resize your image due to your model input, so this resizing is not a mandatory step.
VNCoreMLModel is a container for a Core ML model used with Vision requests. We create a model container for our customized model. VNCoreMLRequest creates an image analysis request that uses a Core ML model to process images.
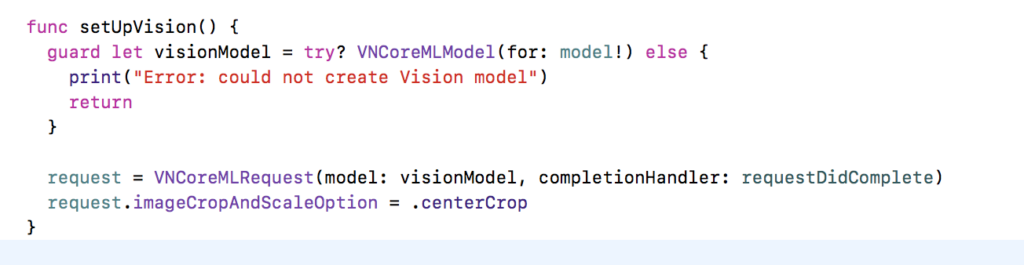
To process image analysis requests, VNImageRequestHandler is used. This handler takes captured image buffer as an input.

When this request is completed, it returns the prediction confidence for each class. These values represent the similarity between the captured image and the our ground truth banknote image classes. The returned observation list is sorted by confidence.
Finally, we’re ready to go. Just build the app and try it with your iOS device’s camera.
Thanks for reading! If you liked this story, you can follow me on Medium and Twitter. You can contact me via e-mail.
Discuss this post on Hacker News.

Comments 0 Responses