
Firebase is a Backend as a Service (BaaS) that provides a number of advantages React Native developers building mobile applications. As a React Native developer, if you use Firebase, you can start building an MVP (minimum viable product) to complete mobile applications, keeping your costs low and prototyping the application pretty quickly, without having to set up a complete backend solution.
Other than that, Firebase can help you manage mobile analytics, push notifications, and crash reporting. Additionally, it provides both email and social authentication out-of-the-box. Thus, in this tutorial, you’re going to start by examining how to integrate Firebase in a React Native application.
This application will be generated using expo-cli, but feel free to try and implement the same solutions provided in this tutorial in a react-native-cli project. Additionally, you’re going to implement email authentication in the app and store the authenticated user data in the cloud-based database known as Firestore.
Table of Contents
- Requirements
- Create a Firebase Project
- Generate an Expo App
- Integrate Firebase SDK
- Environment Variables
- Creating UI Screens
- Adding Navigation
- Login & Signup using Firebase
- Adding Redux
- Update Signup and Login Screens
- Creating a Firestore Database
- On Signup, save the user to Firestore
- On Login, fetch the user from Firestore
- Conclusion
Requirements
To follow this tutorial, please make sure you have the following installed on your local development environment and have access to the services mentioned below:
- Nodejs (>= 8.x.x) with npm/yarn installed
- expo-cli (>= 2.19.4), (previously known as create-react-native-app)
- watchman: The file change watcher for React Native projects
- Firebase account, free tier
Create a Firebase Project
To get started, you’re going to need a Firebase app. Once you’ve created a new account with Firebase and logged in, create a new project by clicking on the New Project button.

Next, add the details regarding this new Firebase project.
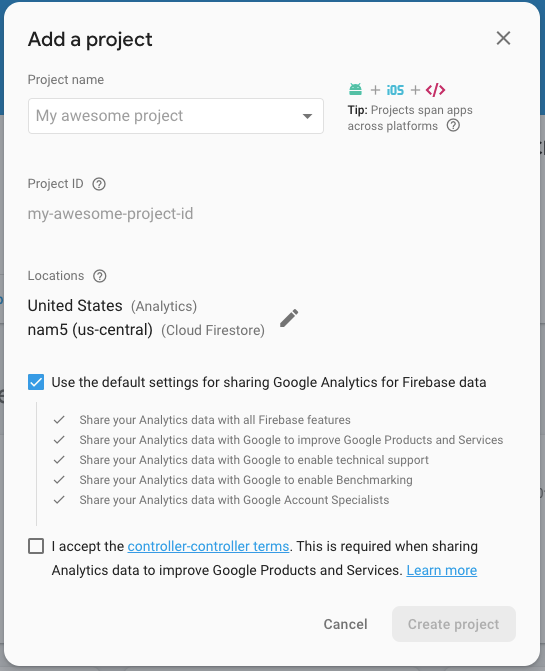
Click the button Create project and you’ll be redirected to the dashboard screen. On the left side menu, click the settings icon, and then go to Project Settings.
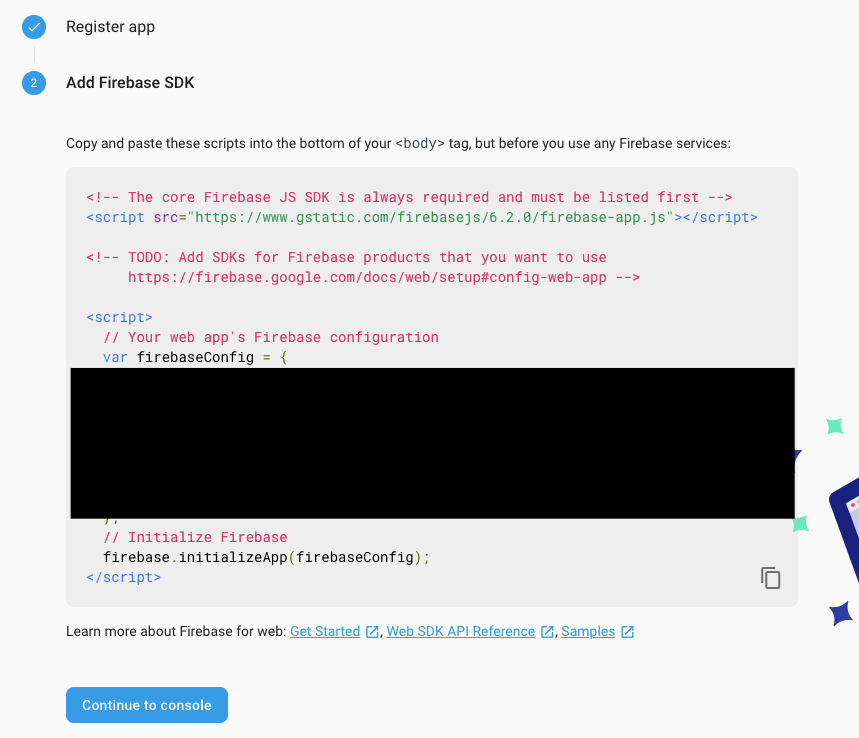
You need all the keys inside the firebaseConfig object as shown in the screen above to integrate Firebase with your React Native app. We’ll get into that later.
With Firebase setup done (for now), let’s generate the new React Native app with expo-cli. Run the following command from your terminal window:
expo-cli init rnfirebaseauth

# navigate inside the project folder
cd rnfirebaseauth
Generate an Expo App
When the project folder is generated, navigate inside the project using the second command, as shown in the above snippet. Expo CLI prompts you with three questions, which you can answer or choose as follows:
- For template, choose blank.
- Enter the name of the app RNFirebaseAuth or anything you’d like.
- Choose Y or yes to use yarn as the package manager.
When CLI does everything, you can execute the below command to run and see how the default Expo app looks.
expo startI’m going to use an iOS simulator, but you are free to use an Android emulator or Expo client on a real device.

Integrate Firebase SDK
To integrate the Firebase SDK, install the following dependency.
yarn add [email protected]Once installed, create a new directory called config at the root of the Expo project. This folder will mostly contain all the configuration your app needs to integrate Firebase. Inside this folder, create a new file called Firebase.js. Add the following snippet to this file.
import firebase from 'firebase'

const firebaseConfig = {
    apiKey: 'XXXX',
    authDomain: 'XXXX',
    databaseURL: 'XXXX',
    projectId: 'XXXX',
    storageBucket: '',
    messagingSenderId: 'XXXX',
    appId: 'XXXX'
}

// Initialize Firebase
const Firebase = firebase.initializeApp(firebaseConfig)

export default Firebase
All the X values defined above are the API keys you got from Firebase console in the first section of this tutorial. These X’s are all sensitive values, and I’d recommend not sharing them with anyone, especially if you’re thinking of committing this project on GitHub.
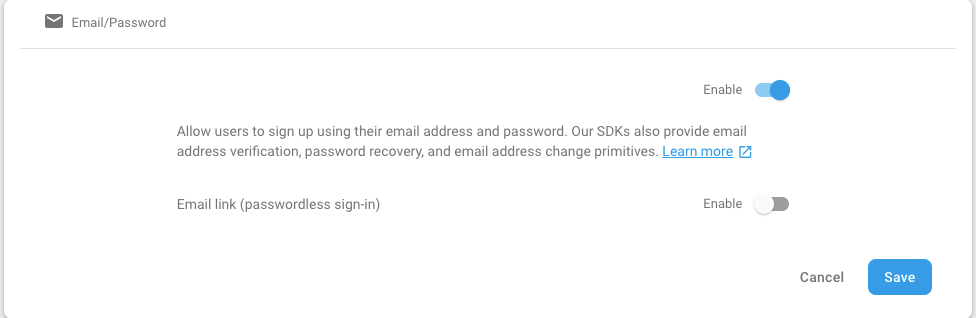
To enable the authentication strategy we’re going to use in this tutorial, from the sidebar menu, go to Authentication > Sign-in method tab and enable the Email/Password strategy as shown below.
Environment Variables
Create a file called .env at the root of the project like below and replace all the Xs with your Firebase config values.
API_KEY=xxxx
AUTH_DOMAIN=xxxx
DATABASE_URL=xxxx
PROJECT_ID=xxxx
MESSAGE_SENDER_ID=xxxx
APP_ID=xxxx
Next, install the following dependency that will help you manage your environment variables gracefully throughout this app.
yarn add react-native-dotenvThe module react-native-dotenv lets you import environment variables from the .env file. Now open the babel.config.js file and modify it like below.
module.exports = function(api) {
    api.cache(true)
    return {
        presets: ['babel-preset-expo', 'module:react-native-dotenv']
    }
}
In the above snippet, adding the second element to the presets array is essential. Now to use environment variables, open the config/Firebase.js file and modify it as shown in the below snippet. Notice how the variables are getting imported like a norm variable or a component in React Native.
import firebase from 'firebase'
import {
    API_KEY,
    AUTH_DOMAIN,
    DATABASE_URL,
    PROJECT_ID,
    MESSAGE_SENDER_ID,
    APP_ID
} from 'react-native-dotenv'

const firebaseConfig = {
    apiKey: API_KEY,
    authDomain: AUTH_DOMAIN,
    databaseURL: DATABASE_URL,
    projectId: PROJECT_ID,
    storageBucket: '',
    messagingSenderId: MESSAGE_SENDER_ID,
    appId: APP_ID
}

// Initialize Firebase
let Firebase = firebase.initializeApp(firebaseConfig)

export default Firebase
This concludes how you can store sensitive API keys in a React Native app.
Creating UI Screens
In this section, you’re going to create three screens inside a new directory screens. Start by adding some boilerplate code to them. Here are the following snippets for all the three screens. Create three files:
- Signup.js
- Login.js
- Profile.js
// screens/Signup.js
import React from 'react'
import { View, Text } from 'react-native'
class Signup extends React.Component {
render() {
return (
<View>
<Text>Signup Screen</Text>
</View>
)
}
}
export default Signup
// screens/Login.js
import React from 'react'
import { View, Text } from 'react-native'
class Login extends React.Component {
render() {
return (
<View>
<Text>Login Screen</Text>
</View>
)
}
}
export default Login
// screens/Profile.js
import React from 'react'
import { View, Text, StyleSheet } from 'react-native'
class Profile extends React.Component {
render() {
return (
<View style={styles.container}>
<Text>Profile Screen</Text>
</View>
)
}
}
const styles = StyleSheet.create({
container: {
flex: 1,
backgroundColor: '#fff',
alignItems: 'center',
justifyContent: 'center'
}
})
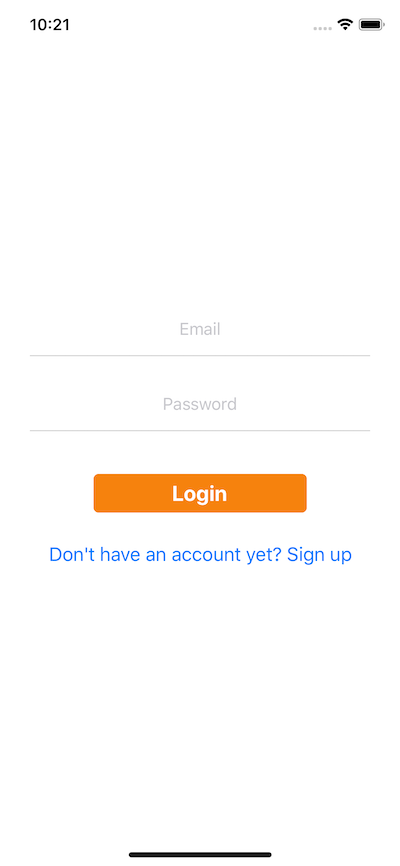
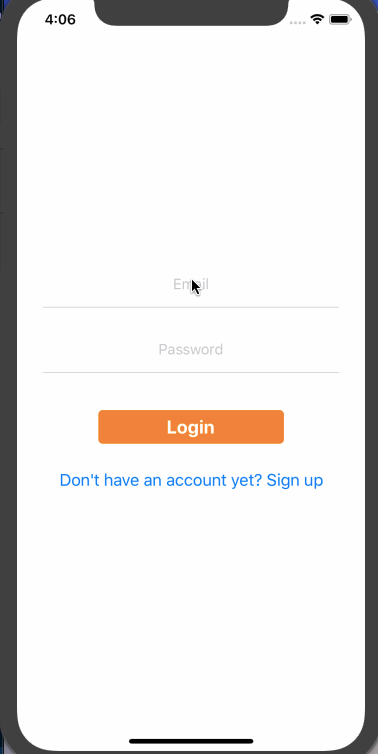
export default ProfileThe first screen you’re going to build is the login screen. The unauthorized user who’s going to use the application is going to see this screen first. To build the login screen, there are three requirements: two input text fields for the user to enter their email and password and a login button to submit these credentials.
Open Login.js file.
import React from 'react'
import { View, TextInput, StyleSheet, TouchableOpacity, Text, Button } from 'react-native'
class Login extends React.Component {
state = {
email: '',
password: ''
}
render() {
return (
<View style={styles.container}>
<TextInput
style={styles.inputBox}
value={this.state.email}
onChangeText={email => this.setState({ email })}
placeholder='Email'
autoCapitalize='none'
/>
<TextInput
style={styles.inputBox}
value={this.state.password}
onChangeText={password => this.setState({ password })}
placeholder='Password'
secureTextEntry={true}
/>
<TouchableOpacity style={styles.button}>
<Text style={styles.buttonText}>Login</Text>
</TouchableOpacity>
<Button title="Don't have an account yet? Sign up" />
</View>
)
}
}
const styles = StyleSheet.create({
container: {
flex: 1,
backgroundColor: '#fff',
alignItems: 'center',
justifyContent: 'center'
},
inputBox: {
width: '85%',
margin: 10,
padding: 15,
fontSize: 16,
borderColor: '#d3d3d3',
borderBottomWidth: 1,
textAlign: 'center'
},
button: {
marginTop: 30,
marginBottom: 20,
paddingVertical: 5,
alignItems: 'center',
backgroundColor: '#F6820D',
borderColor: '#F6820D',
borderWidth: 1,
borderRadius: 5,
width: 200
},
buttonText: {
fontSize: 20,
fontWeight: 'bold',
color: '#fff'
},
buttonSignup: {
fontSize: 12
}
})
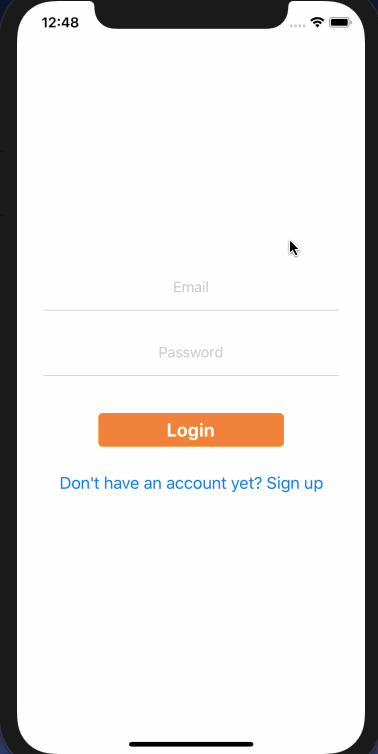
export default LoginTo see the screen in action, go to the App.js file and edit to only render the Login screen.
import React from 'react'
import Login from './screens/Login'

export default class App extends React.Component {
    render() {
        return <Login />
    }
}
Once done, run the app in your simulator or on a real device by executing the command expo start. You will get the following result.
Similarly, let’s edit the signup screen. Open the Signup.js file in your code editor.
import React from 'react'
import { View, TextInput, StyleSheet, TouchableOpacity, Text } from 'react-native'
class Signup extends React.Component {
state = {
name: '',
email: '',
password: ''
}
render() {
return (
<View style={styles.container}>
<TextInput
style={styles.inputBox}
value={this.state.name}
onChangeText={name => this.setState({ name })}
placeholder='Full Name'
/>
<TextInput
style={styles.inputBox}
value={this.state.email}
onChangeText={email => this.setState({ email })}
placeholder='Email'
autoCapitalize='none'
/>
<TextInput
style={styles.inputBox}
value={this.state.password}
onChangeText={password => this.setState({ password })}
placeholder='Password'
secureTextEntry={true}
/>
<TouchableOpacity style={styles.button}>
<Text style={styles.buttonText}>Signup</Text>
</TouchableOpacity>
</View>
)
}
}
const styles = StyleSheet.create({
container: {
flex: 1,
backgroundColor: '#fff',
alignItems: 'center',
justifyContent: 'center'
},
inputBox: {
width: '85%',
margin: 10,
padding: 15,
fontSize: 16,
borderColor: '#d3d3d3',
borderBottomWidth: 1,
textAlign: 'center'
},
button: {
marginTop: 30,
marginBottom: 20,
paddingVertical: 5,
alignItems: 'center',
backgroundColor: '#FFA611',
borderColor: '#FFA611',
borderWidth: 1,
borderRadius: 5,
width: 200
},
buttonText: {
fontSize: 20,
fontWeight: 'bold',
color: '#fff'
},
buttonSignup: {
fontSize: 12
}
})
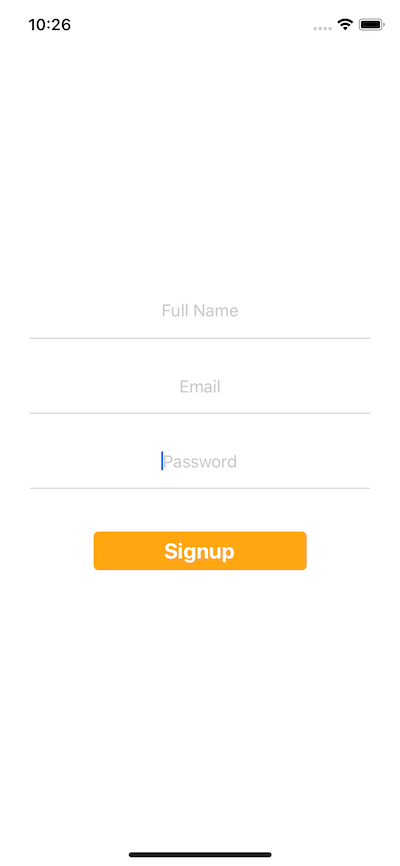
export default SignupNow, edit the App.js file to render the signup screen and see it in action.
import React from 'react'
import Signup from './screens/Signup'

export default class App extends React.Component {
    render() {
        return <Signup />
    }
}
You will get the following result.
We have completed our first two screens. Let’s now add navigation to our app to actually make use of both of these screens.
Adding Navigation
To navigate between different screens, install the following library to the Expo application.
yarn add react-navigationNow, create a new directory called navigation. This is where all the navigation strategies related to the current app will be stored. Inside this directory, create a new file called SwitchNavigator.js with the following code.
import React from 'react'
import { createSwitchNavigator, createAppContainer } from 'react-navigation'
import Login from '../screens/Login'
import Signup from '../screens/Signup'
import Profile from '../screens/Profile'

const SwitchNavigator = createSwitchNavigator(
    {
        Login: {
            screen: Login
        },
        Signup: {
            screen: Signup
        },
        Profile: {
            screen: Profile
        }
    },
    {
        initialRouteName: 'Login'
    }
)

export default createAppContainer(SwitchNavigator)
Adding authentication to an app certainly means there is some amount of data associated with the user that’s private content. SwitchNavigator from the react-navigation library is used for this purpose. It only shows one screen at a time. Right now, there is no mechanism to go back or switch between screens and reset the route altogether.
In the above snippet, import all three screens currently in the app directory. The auth flow we’re going to implement will look like this:
- User opens the app and is welcomed by the login screen; hence, the initialRouteName.
- If the user is not registered, we can use navigation.props to navigate to the signup screen.
- Once the user either logs in with the right credentials or signs up a new account, they will be directed towards the profile screen.
Login & Signup using Firebase
Since we’ve already enabled the email authentication strategy in the Firebase console, edit the Signup.js file first to register a new user. Add a new method called handleSignUp that will trigger only when the user presses the Signup button.
// ... other imports
import Firebase from '../config/Firebase'

class Signup extends React.Component {
    handleSignUp = () => {
        const { email, password } = this.state
        Firebase.auth()
            .createUserWithEmailAndPassword(email, password)
            .then(() => this.props.navigation.navigate('Profile'))
            .catch(error => console.log(error))
    }

    render() {
        return (
            // same as before
            <TouchableOpacity style={styles.button} onPress={this.handleSignUp}>
                <Text style={styles.buttonText}>Signup</Text>
            </TouchableOpacity>
        )
    }
}
To see this in action, add the onPress method on the Button component inside the Login.js file. Since login is the first screen, this is the way we’ll be directing our users to the signup screen.
<Button
title="Don't have an account yet? Sign up"
onPress={() => this.props.navigation.navigate('Signup')}
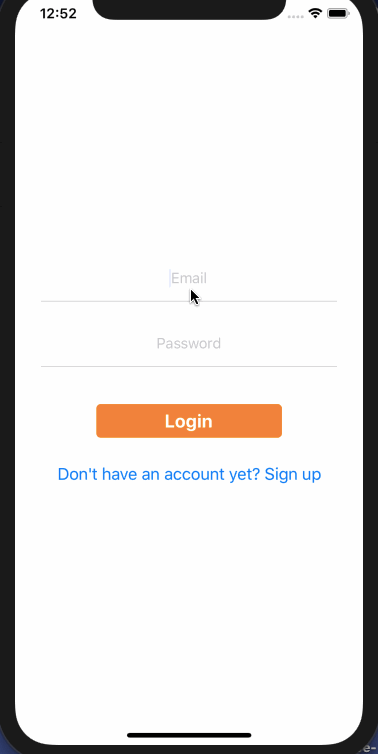
/>Now go to the simulator screen and try creating a new user from the Signup screen.
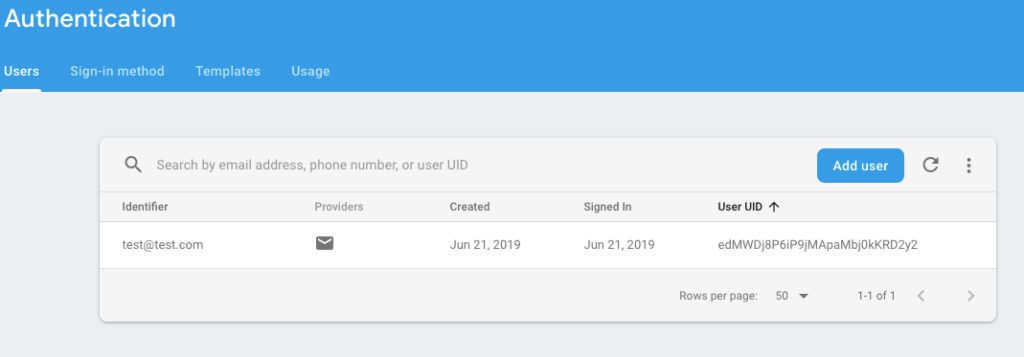
To verify that the user has been created, go to the Authentication > Users screen as shown below and find the user’s record.
To login the same user, first, modify the Login.js file and add a function to handle what to process when the user clicks the Login button.
// ... other imports
import Firebase from '../config/Firebase'

class Login extends React.Component {
    handleLogin = () => {
        const { email, password } = this.state

        Firebase.auth()
            .signInWithEmailAndPassword(email, password)
            .then(() => this.props.navigation.navigate('Profile'))
            .catch(error => console.log(error))
    }

    render() {
        return (
            // same as before
            <TouchableOpacity style={styles.button} onPress={this.handleLogin}>
                <Text style={styles.buttonText}>Login</Text>
            </TouchableOpacity>
        )
    }
}
Try logging in the app with the same credentials you used to signup a new user.
Our simple authentication flow with Firebase and React Native is now working.
Adding Redux
Redux is an essential part of the React Native ecosystem. If your world revolves around JavaScript, you’ve probably heard about Redux. Until you have a concrete solution, managing state across an entire application can be tricky. Though not the only solution, using Redux can be helpful in this effort.
To get started, run the following command to install Redux as a library.
yarn add redux react-redux redux-thunkApart from redux, the other two packages have important uses. react-redux lets your React Native components connect with the Redux store. redux-thunk is a middleware that enables you to make Redux actions return asynchronous operations. A thunk is a function that wraps an expression to delay its evaluation.
In Redux, the state of the whole application is represented by one JavaScript object. Think of this object as read-only, since we cannot make changes to this state (which is represented in the form of a tree) directly. We need actions to do so.
Actions are like events in Redux. They can be triggered in the form of mouse clicks, key presses, timers, or network requests. The nature of each event mentioned is mutable. An action is a JavaScript object. To define an action, there’s one requirement. Each action has its own type property. Every action needs a type property for describing how the state should change. Create a new file called actions/user.js and add the following types to it.
import Firebase from '../config/Firebase.js'

// define types

export const UPDATE_EMAIL = 'UPDATE_EMAIL'
export const UPDATE_PASSWORD = 'UPDATE_PASSWORD'
export const LOGIN = 'LOGIN'
export const SIGNUP = 'SIGNUP'
Make sure you don’t ignore the import statement. We will use it in a while to write business logic behind login and signup methods. Below these types, let’s define all the action creators we’re going to need later.
// actions

export const updateEmail = email => {
    return {
        type: UPDATE_EMAIL,
        payload: email
    }
}

export const updatePassword = password => {
    return {
        type: UPDATE_PASSWORD,
        payload: password
    }
}

export const login = () => {
    return async (dispatch, getState) => {
        try {
            const { email, password } = getState().user
            const response = await Firebase.auth().signInWithEmailAndPassword(email, password)
            dispatch({ type: LOGIN, payload: response.user })
        } catch (e) {
            console.log(e)
        }
    }
}

export const signup = () => {
    return async (dispatch, getState) => {
        try {
            const { email, password } = getState().user
            const response = await Firebase.auth().createUserWithEmailAndPassword(email, password)
            dispatch({ type: SIGNUP, payload: response.user })
        } catch (e) {
            console.log(e)
        }
    }
}
Inside the methods login and signup, we’re writing the same business logic to interact with the Firebase authentication service that we did previously in Login and Signup components separately. Also, we’re dispatching the user from each of these actions in order to trigger the changes in the app’s state. The only way to change the app’s state is through action. The getState method used in the above snippet allows accessing the current state of the application.
Next, define reducers to handle the state of the application. Create a new file inside reducers/index.js with the following code.
import { combineReducers } from 'redux'
import { LOGIN, SIGNUP, UPDATE_EMAIL, UPDATE_PASSWORD } from '../actions/user'

const user = (state = {}, action) => {
    switch (action.type) {
        case LOGIN:
            return action.payload
        case SIGNUP:
            return action.payload
        case UPDATE_EMAIL:
            return { ...state, email: action.payload }
        case UPDATE_PASSWORD:
            return { ...state, password: action.payload }
        default:
            return state
    }
}

const rootReducer = combineReducers({
    user
})

export default rootReducer
In Redux terminology, a reducer is a JavaScript function that takes two parameters. They are the current state of the application and an action. A reducer is a pure function that calculates the next state based on the initial or previous state. It always produces the same output if the state is unchanged. In the above snippet, the current state of this application is an empty object. It gets updated whenever the user provides an email and password.
Next, open App.js to create a redux store.
import React from 'react'
import { createStore, applyMiddleware } from 'redux'
import { Provider } from 'react-redux'
import thunkMiddleware from 'redux-thunk'

import SwitchNavigator from './navigation/SwitchNavigator'
import reducer from './reducers'

const middleware = applyMiddleware(thunkMiddleware)
const store = createStore(reducer, middleware)

export default class App extends React.Component {
    render() {
        return (
            <Provider store={store}>
                <SwitchNavigator />
            </Provider>
        )
    }
}
A store is an object that brings actions and reducers together. It provides and holds state at the application level instead of individual components. Redux is not an opinionated library in terms of which framework or library should use it or not. To bind a React Native application with Redux, you do it with react-redux module. This is done by using the high ordered component Provider. It basically passes the store down to the rest of the React Native application.
Update Signup and Login Screens
In this section, you’re going to edit both the Signup and Login components to use the Redux store. Open the Signup.js file and add three new import statements.
import { bindActionCreators } from 'redux'
import { connect } from 'react-redux'
import { updateEmail, updatePassword, signup } from '../actions/user'
The bindActionCreators maps actions to an object using the names of the action functions. These functions automatically dispatch the action to the store when the function is invoked. To change the data, we need to dispatch an action.
To enable this, we need two things: mapStateToProps and mapDispatchToProps, and we need to connect both of them with our component. This connection is done by using the connect() method from the react-redux package. We define these two functions and modify the export default statement after we define the styles in this component file.
const mapDispatchToProps = dispatch => {
    return bindActionCreators({ updateEmail, updatePassword, signup }, dispatch)
}

const mapStateToProps = state => {
    return {
        user: state.user
    }
}

export default connect(
    mapStateToProps,
    mapDispatchToProps
)(Signup)
The only thing left to make this component work is to edit the component logic. Here’s the complete source code for that.
class Signup extends React.Component {
    handleSignUp = () => {
        this.props.signup()
        this.props.navigation.navigate('Profile')
    }

    render() {
        return (
            <View style={styles.container}>
                <TextInput
                    style={styles.inputBox}
                    value={this.props.user.email}
                    onChangeText={email => this.props.updateEmail(email)}
                    placeholder='Email'
                    autoCapitalize='none'
                />
                <TextInput
                    style={styles.inputBox}
                    value={this.props.user.password}
                    onChangeText={password => this.props.updatePassword(password)}
                    placeholder='Password'
                    secureTextEntry={true}
                />
                <TouchableOpacity style={styles.button} onPress={this.handleSignUp}>
                    <Text style={styles.buttonText}>Signup</Text>
                </TouchableOpacity>
            </View>
        )
    }
}
We’re using props coming from the Redux store via mapStateToProps. On signup, using navigation props from react-navigation, the user is redirected to the profile screen.
Except for minor changes in function names, the Login.js component looks very similar and follows the same pattern to connect the Redux store and use actions to make changes to the application’s state. Open the component file and modify as shown below.
import React from 'react'
import { View, TextInput, StyleSheet, TouchableOpacity, Text, Button } from 'react-native'
import { bindActionCreators } from 'redux'
import { connect } from 'react-redux'
import { updateEmail, updatePassword, login } from '../actions/user'

class Login extends React.Component {
    handleLogin = () => {
        this.props.login()
        this.props.navigation.navigate('Profile')
    }

    render() {
        return (
            <View style={styles.container}>
                <TextInput
                    style={styles.inputBox}
                    value={this.props.user.email}
                    onChangeText={email => this.props.updateEmail(email)}
                    placeholder='Email'
                    autoCapitalize='none'
                />
                <TextInput
                    style={styles.inputBox}
                    value={this.props.user.password}
                    onChangeText={password => this.props.updatePassword(password)}
                    placeholder='Password'
                    secureTextEntry={true}
                />
                <TouchableOpacity style={styles.button} onPress={this.handleLogin}>
                    <Text style={styles.buttonText}>Login</Text>
                </TouchableOpacity>
                <Button
                    title="Don't have an account yet? Sign up"
                    onPress={() => this.props.navigation.navigate('Signup')}
                />
            </View>
        )
    }
}

const styles = StyleSheet.create({
    container: {
        flex: 1,
        backgroundColor: '#fff',
        alignItems: 'center',
        justifyContent: 'center'
    },
    inputBox: {
        width: '85%',
        margin: 10,
        padding: 15,
        fontSize: 16,
        borderColor: '#d3d3d3',
        borderBottomWidth: 1,
        textAlign: 'center'
    },
    button: {
        marginTop: 30,
        marginBottom: 20,
        paddingVertical: 5,
        alignItems: 'center',
        backgroundColor: '#F6820D',
        borderColor: '#F6820D',
        borderWidth: 1,
        borderRadius: 5,
        width: 200
    },
    buttonText: {
        fontSize: 20,
        fontWeight: 'bold',
        color: '#fff'
    },
    buttonSignup: {
        fontSize: 12
    }
})

const mapDispatchToProps = dispatch => {
    return bindActionCreators({ updateEmail, updatePassword, login }, dispatch)
}

const mapStateToProps = state => {
    return {
        user: state.user
    }
}

export default connect(
    mapStateToProps,
    mapDispatchToProps
)(Login)
If you try to run the application, register a new user with a different email, and you’ll find there’s no change in the working of the application.
Creating a Firestore Database
There are two types of cloud-based database services provided by Firebase. One is called Cloud Firestore, and the other one is known as Realtime Database. Realtime Database stores data as one large JSON tree. Complex and scalable data is hard to organize in it.
Cloud Firestore follows proper NoSQL terminology when it comes to storing data. It stores data in documents, and each document can have sub-collections—thus, making it suitable for scalable and complex data scenarios.

Go back to the Firebase console and in the Database section, choose the Cloud Firestore and click on the button Create database.

Then, choose the option Start in test mode and click the button Next as shown below.
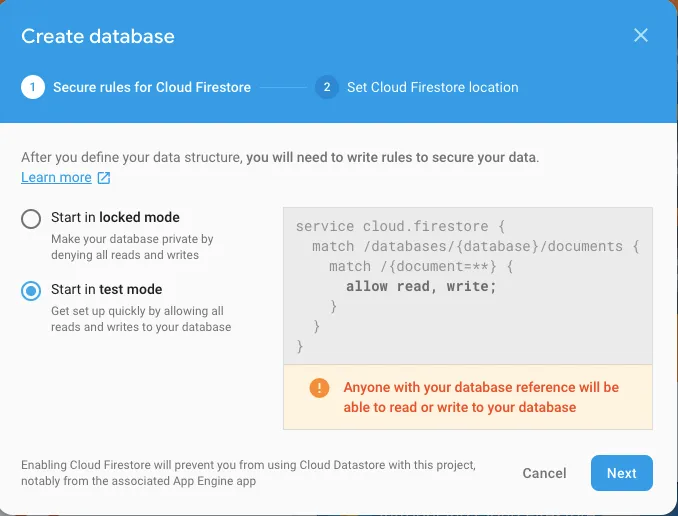
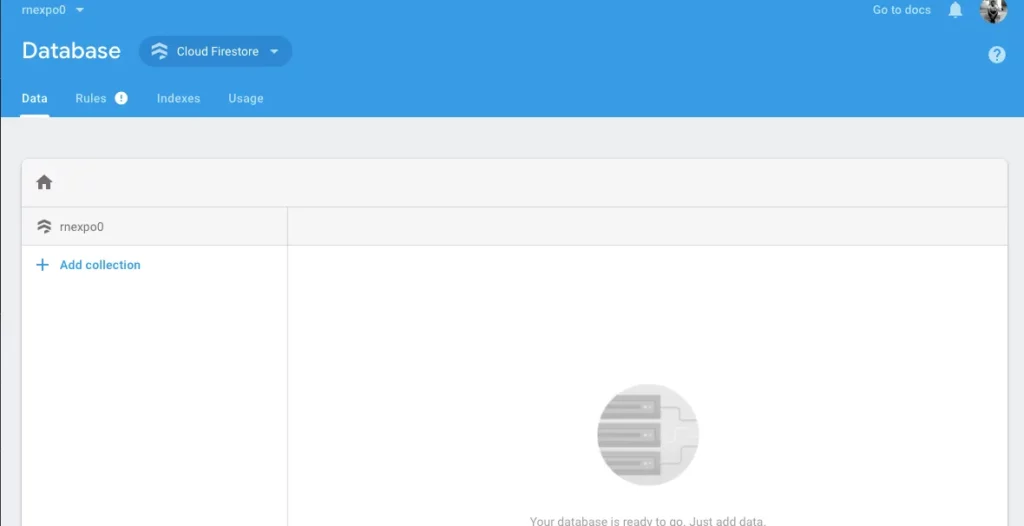
Next, it will ask you to choose the location for the database. The default is fine here—click the button Done. After a few moments, the cloud-based Firestore database is ready to use. It’s empty right now and does not contain any collections or documents.
We’ve already integrated the Firebase SDK in the React Native application. Let’s export an instance of the Firestore database in order to perform CRUD operations. Open the file config/Firebase.js and add the following lines:
// ... after other imports
import 'firebase/firestore'

// ... before export default statemen
export const db = firebase.firestore()

// avoid deprecated warnings
db.settings({
    timestampsInSnapshots: true
})
Setting up the Firestore database is now done. From the next section onwards, we’re going to use the cloud-based database to store users’ credentials and their IDs.
On Signup, save the user to Firestore
In this section, we’re going to hook the Firestore reference in the Redux action creators that let us create a new user. Open the file actions/user.js and modify the following import line to add the reference to the Firestore database.
import Firebase, { db } from '../config/Firebase.js'Next, modify the signup function as below.
export const signup = () => {
    return async (dispatch, getState) => {
        try {
            const { email, password } = getState().user
            const response = await Firebase.auth().createUserWithEmailAndPassword(email, password)
            if (response.user.uid) {
                const user = {
                    uid: response.user.uid,
                    email: email
                }

                db.collection('users')
                    .doc(response.user.uid)
                    .set(user)

                dispatch({ type: SIGNUP, payload: user })
            }
        } catch (e) {
            alert(e)
        }
    }
}
In the above snippet, using the createUserWithEmailAndPassword method, we create a new user and saving its credentials. Then, fetching the user id from the response on creating the new user, we use the Firestore reference db to create a collection called users (if first time and the collection with that name does not exist) and store the user object inside it. This user object contains the user id or uid from the authentication response and the email of the user.
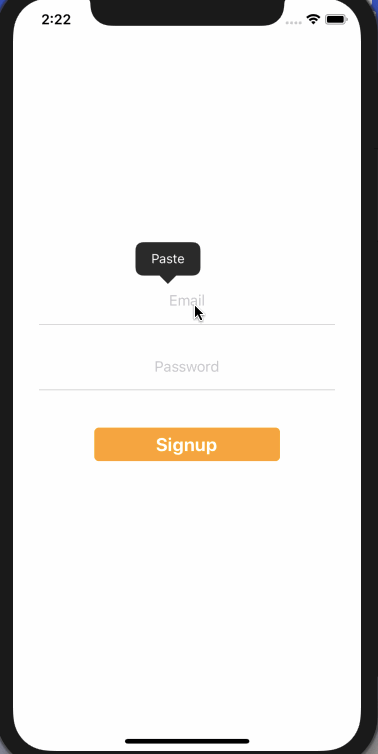
Take a look at the demo of registering a new user.
If you go back to the Firebase console, you’ll notice that a new collection with name users has one document with the same email id we registered with.
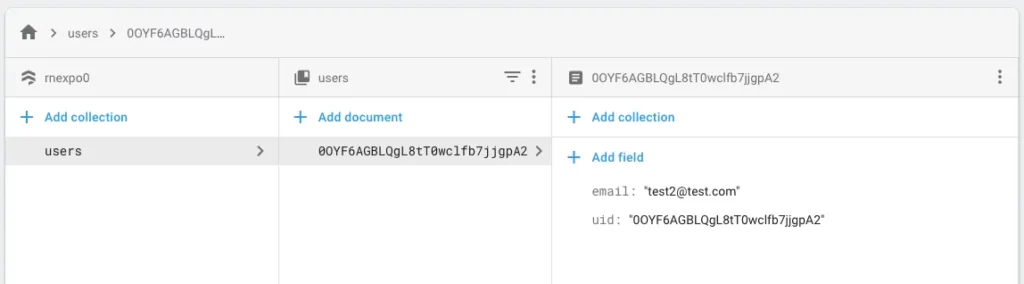
It also has another field called uid that shares the value with the uid store in the Authentication section. You can verify that by going to that section and matching both the email and uid as shown below.

On Login, fetch the user from Firestore
In this section, let’s modify the login action creator to fetch the user id from the Firestore database and then authenticate the user on that uid. Open the actions/user.js file and add the following snippet of code.
export const login = () => {
    return async (dispatch, getState) => {
        try {
            const { email, password } = getState().user
            const response = await Firebase.auth().signInWithEmailAndPassword(email, password)

            dispatch(getUser(response.user.uid))
        } catch (e) {
            alert(e)
        }
    }
}

export const getUser = uid => {
    return async (dispatch, getState) => {
        try {
            const user = await db
                .collection('users')
                .doc(uid)
                .get()

            dispatch({ type: LOGIN, payload: user.data() })
        } catch (e) {
            alert(e)
        }
    }
}
After the app user submits their credentials, the login method checks to see whether the credentials provided are valid in the Authentication or not. If they are, it dispatches the getUser method to fetch the user object from the collection.
In this method, we’re getting the user based on their uid and using get() method. Lastly, the dispatch function dispatches the user data in the payload. The alert() method in the catch statements is suitable to catch any errors occurring at the time of login.
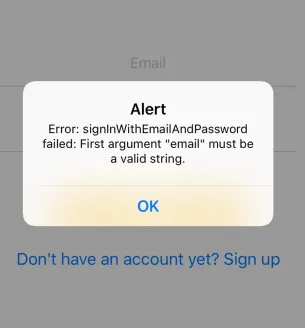
If the user provides the wrong credentials, or if they try to login with empty fields, this will catch and state the error as shown below.
Open the Login.js file to import these two actions. In a lifecycle method, you’re also going to check to see whether the user is already logged in or not using the Firebase.auth().onAuthStateChanged() method.
// ... other imports

import { updateEmail, updatePassword, login, getUser } from '../actions/user'
import Firebase from '../config/Firebase'

class Login extends React.Component {
    // add this lifecycle method
    componentDidMount = () => {
        Firebase.auth().onAuthStateChanged(user => {
            if (user) {
                this.props.getUser(user.uid)
                if (this.props.user != null) {
                    this.props.navigation.navigate('Profile')
                }
            }
        })
    }

    render() {
        return (
            // rest is same

            <TouchableOpacity style={styles.button} onPress={() => this.props.login()}>
                <Text style={styles.buttonText}>Login</Text>
            </TouchableOpacity>

            // rest is same
        )
    }
}

// don't forget to bind getUser

const mapDispatchToProps = dispatch => {
    return bindActionCreators({ updateEmail, updatePassword, login, getUser }, dispatch)
}
Now go to the Profile.js file and edit it as shown below.
import React from 'react'
import { View, Text, StyleSheet, Button } from 'react-native'
import { connect } from 'react-redux'
import Firebase from '../config/Firebase'

class Profile extends React.Component {
    handleSignout = () => {
        Firebase.auth().signOut()
        this.props.navigation.navigate('Login')
    }

    render() {
        return (
            <View style={styles.container}>
                <Text>Profile Screen</Text>
                <Text>{this.props.user.email}</Text>
                <Button title='Logout' onPress={this.handleSignout} />
            </View>
        )
    }
}

// styles are as before

const mapStateToProps = state => {
    return {
        user: state.user
    }
}

export default connect(mapStateToProps)(Profile)
In the above component, we’re fetching the user state to display the correct email ID of the user logged in. Next, there’s also a sign-out button that redirects back to the login screen once the user has signed out.
Here’s the complete demo of this section.
Conclusion
You have now successfully integrated and stored user data in the Firebase Firestore database. I hope you gained some much-needed information and guidance on integrating Redux in a React Native application as well.
If you need to take a look at the code for this tutorial, you can refer to this GitHub repo.
If you enjoyed reading this tutorial, please leave a 👏. You can always connect with me on amanhimself.dev.

Comments 0 Responses