
In this article, we’re going to build a simple sentiment analysis platform using Flask, a lightweight web application framework. Our platform will be able to classify a movie review as either positive or negative. We’ll use the IMDB dataset to build a simple sentiment analysis model, save it, and host it on Heroku. We’ll use Gunicorn to serve our model.
We assume that the user has prior experience with the following:
- Scikit Learn
- HTML, CSS, and Bootstrap.
- Pip & virtualenv
You can preview what we’ll be working on here. Our focus will be on building a simple model and moving it to production. We won’t be focusing on parameter tuning and feature engineering, so we won’t have the best model accuracy, but feel free to do so outside of this guide.
In the first section of this article, we’ll work on our simple sentiment analysis model, and in the second section we’ll work with Flask to move the model to production.
Section 1: Building the classifier
Loading in the reviews
Let’s edit the IMDB dataset and add a Review column for identifying the reviews and a status column to signify if the review was positive or negative. We kick it off by importing pandas for data manipulation and numpy for scientific computation. We then use the pandas read_csv utility to load in our text dataset.
Our dataset is tab separated; therefore, we use the delimiter as t to denote a tab separated dataset. If you load your dataset at this point you’ll get some errors at a later point due to the quotation marks found in the reviews. In order to avoid these errors we add quoting = 3 parameter which tells pandas to ignore the quotation marks.
import numpy as np
import pandas as pd
df = pd.read_csv('imdb_labelled.txt', delimiter = 't', engine='python', quoting = 3)
Cleaning the dataset
In order to be able to work with these reviews we need to do a few things, such as removing punctuation marks and stop words. Stop words are common words in English that don’t tell us anything about the polarity of a review. Such words include the, that, and a
Another thing we need to do is reduce the words to their root form. For example, if we have the words “loved” and “loving” we can use the root form of that word, “love”. This will help us reduce the number of words used for our model.
We’ll then convert all the words to lowercase. We shall use the re python utility to remove punctuation marks. We use the NLTK utility to remove stop words and the WordNetLemmatizer utility from NLTK to reduce the words to their dictionary root form.
import re
import nltk
nltk.download('stopwords')
nltk.download('wordnet')
from nltk.corpus import stopwords
from nltk.stem import WordNetLemmatizer
Stemmers vs. Lemmatizers
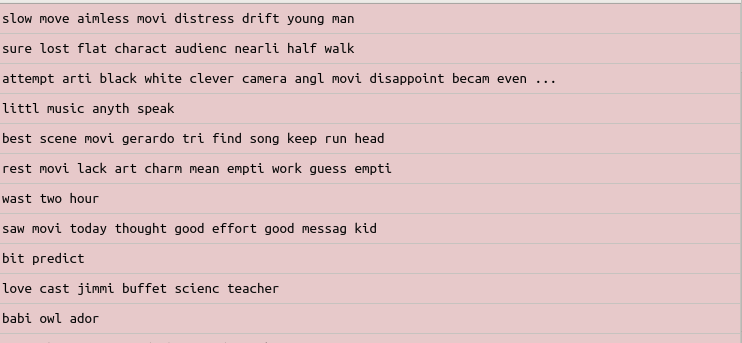
Stemmers use an algorithmic approach of removing prefixes and suffixes, and the result may not be an actual dictionary word. Using the PorterStemmer we obtain the corpus below. As you can see, some of the words are not actual dictionary words. For example, in this case we can see that the word movie was converted to movi.
Lemmitimizers always transform the words to actual dictionary words. Using WordNetLemmatizer, we obtain actual dictionary words. Lemmitimizers are generally slower than stemmers. Lemmatization is concerned with the context of the word in the sentence, while stemming is not.

The next step is to create an empty corpus in which we append all the words in the reviews. A corpus is simply a collection of words.
In the next stage, we create a for-loop that goes through all the reviews and does the following:
- Removes punctuation marks. We do this by specifying letters we don’t want to remove (i.e letters from a-z. We specify this using a caret [^]).
- After removing punctuation marks, we prevent two words from merging together by specifying space as the second parameter. This will ensure that the removed character is replaced with a space.
- Convert the words to lowercase.
- Split the words into a list of words.
- Convert the words to their root form by Lemmatization.
- Remove common words in English using stop words. We convert the stop words into a set to make the algorithm go through them faster. This is especially useful when dealing with massive data sets.
- Join the words back using a space.
- Append the words to our empty corpus list.
for i in range(0, 1000):
  review = re.sub('[^a-zA-Z]', ' ', df['Review'][i])
  review = review.lower()
  review = review.split()
  lemmatizer = WordNetLemmatizer()
  review = [lemmatizer.lemmatize(word) for word in review if not word in set(stopwords.words('english'))]
  review = ' '.join(review)
  corpus.append(review)
Creating a bag of words model
To create a bag-of-words model, we take all the words in our corpus and create a column with each word. The rows represent the reviews. If a certain word exists in the review, it’s represented by a 1, and if the word doesn’t exist in the review, its represented by a 0. Each word in the column represents a single feature.
In the end, we obtain a sparse matrix. A sparse matrix is a matrix with many zeros. There are two ways to reduce sparsity. One way is to reduce the number of features on our dataset by specifying the maximum number of features using the max_features parameter. The other way is to do dimensionality reduction using tools such as Principal Component Analysis.
The Python tool that we use for tokenization is CountVectorizer, which is imported from the sklearn.feature_extraction.text. One of the features of CountVectorizer ismax_features, which represents the maximum number of words we’d like to have in our bag of words model. In this case we use 2000 features, but you can experiment with this parameter.
After creating an instance of CountVectorizer, we use the fit_transform method, which will create this bag of words model for us. We then use the toarray() utility to convert the bag of words model to numpy arrays that can be fed to our machine learning model later. We then create a y dataset, which represents our labels for the dataset. Once fitted, CountVectorizer has built a dictionary of feature indices. The index value of a word in the vocabulary is linked to its frequency in the whole training corpus.
from sklearn.feature_extraction.text import CountVectorizer
cv = CountVectorizer(max_features = 2000)
X = cv.fit_transform(corpus).toarray()
y = dataset.iloc[:, 1].values
Occurrences to frequencies
Occurrence count has an issue in that longer documents will have a higher average count for a particular word than shorter documents. To avoid these discrepancies, we divide the number of occurrences of each word in a document by the total number of words as a way of normalization. These new features are called tf, short for Term Frequencies.
Very common words usually tend to have a higher tf. However, some of these words might not be so important in determining whether a review is positive or negative. The way we deal with this issue is by downscaling the weights for common words that are less informative than words that occur less in the corpus.
This downscaling is called tf–idf for “Term Frequency times Inverse Document Frequency”.
Consider a document containing 200 words, wherein the word love appears 5 times. The tf for love is then (5 / 200) = 0.025. Assuming we had one million documents and the word love occurs in one thousand of these, the inverse document frequency (i.e., idf) is calculated as log(1000000 / 1000) = 3. The tf-idf weight is the product of these quantities: 0.025 * 3 = 0.075.
We compute tf and tf-idf below. We use the TfidfTransformer utility from Scikit Learn. After instantiating the class, we call the fit_transform method, which first fits our dataset to our estimator and then transforms it to a tf-idf representation.
from sklearn.feature_extraction.text import TfidfTransformer
tf_transformer = TfidfTransformer()
X = tf_transformer.fit_transform(X).toarray()
Fortunately the good people at Scikit Learn have provided a function equivalent to fitting CountVectorizer followed by TfidfTransformer. That function is called TfidfVectorizer.
from sklearn.feature_extraction.text import TfidfVectorizer
tfidfVectorizer = TfidfVectorizer(max_features =2000)
X = tfidfVectorizer.fit_transform(corpus).toarray()
Next, we split our dataset into a training set and a test set using the train_test_split utility. We use 20% of the dataset for testing and 80% of the dataset for training.
from sklearn.model_selection import train_test_split
X_train, X_test , y_train, y_test = train_test_split(X, y , test_size = 0.20)
Fitting a Classifier
Our dataset is now ready, and we can fit it to our favorite classifiers. A common classifier used in sentiment analysis is the Naive Bayes Classifier. We use the Gaussian Naives Bayes classifier, which uses a normal distribution.
from sklearn.naive_bayes import GaussianNB
classifier = GaussianNB()
classifier.fit(X_train, y_train)
Making predictions and printing a confusion matrix
Let’s now use the predict method to make predictions using the test set. We then go ahead to print a confusion matrix to see how many reviews were predicted correctly.
predictions = classifier.predict(X_test)
from sklearn.metrics import confusion_matrix
cm = confusion_matrix(y_test, predictions)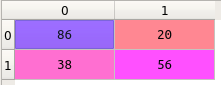
This means that the model predicted 86 negative reviews as negative and 56 positive reviews as positive. 38 reviews that were negative were classified as positive and 20 positive reviews were classified as negative. We can calculate the accuracy as (86+56) /200 = 0.71. The model accuracy can improved by applying K fold cross validation or parameter tuning.
Section 2: Using Flask to host the model
Saving the classifier and vectorizer
In order to bring our model to production, we need to save our classifier and our TfidfVectorizer for use in production. Python allows us to do this using the pickle Python module. The pickle module implements binary protocols for serializing and deserializing a Python object. Pickling is the process where a Python object is converted into a byte stream.
Unpickling is the process by which the binary file is converted into an object hierarchy. The pickle module is not secure against malicious data. You should therefore never unpickle binary files from untrusted or unauthenticated sources. The Python utility used for pickling and unpickling is known as joblib. The dump function from joblib saves the classifier and the vectorizer to our current working directory.
from sklearn.externals import joblib
joblib.dump(tfidfVectorizer, 'tfidfVectorizer.pkl')
joblib.dump(classifier, 'classifier.pkl')
Setting up the development environment
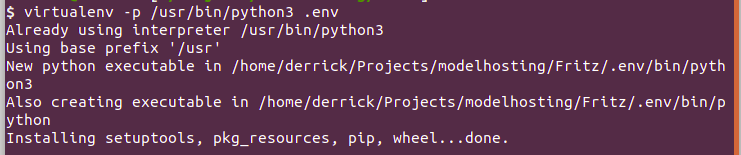
Let’s start by creating a virtual environment that will have all our Python packages. We use virtualenv and specify the version of Python we’d like to use for our project. In the event that you use the Anaconda Python distribution, you might experience some challenges when uploading your project to Heroku because Heroku uses the normal version of Python. We create a virtual environment known as .env.
Let’s activate our virtual environment and install the packages we’ll need for this project:

We then initialize git as our version control in our project folder:

We include a .gitignore file in our project folder that will contain a list of directories and documents we’d like to be ignored when pushing our code. For example, you wouldn’t want files containing passwords to be pushed. A good gitignore file is available at GitHub.
Installing the necessary packages
We need Flask as our web framework and Gunicorn as our web server. Flask comes with its own server, but you should never use it in production. The rest are the normal machine learning packages that we need for our model.
Set up your project folder as below. The templates folder will contain the index.html file that will display on the website. app.py is the file where all our Flask logic will go. Do not name any of your files as flask.py, as this will conflict with Flask itself. We’ll use the Procfile later to configure the Gunicorn server.
Go ahead and copy the classifier and vectorizer pickles in the same folder. Once you have installed all the packages, write them to a requirements.txt file using this command:
Heroku will use this requirements file to install these packages in order to run the application:

Implementing our model in Flask
The first step in creating a Flask application is to import the Flask class. The Flask object implements a WSGI application. Once it’s created, it will act as a central registry for the view functions, the URL rules, and template configuration. The first argument is the name of the application’s module or package. Since we are using a single module we use __name__.
This is needed so that Flask knows where to look for templates and static files. We also import request to be able to process form data and render_template to render html files.
At the top of that file, we also import other utilities we need in our application, such as joblib, to load the classifier and vectorizer pickles. The remaining packages are the same ones we used to clean our dataset. This is because we also need to clean the review the user is going to type in the form.
from flask import Flask, render_template, request
from sklearn.externals import joblib
import numpy as np
import re
import nltk
from sklearn.naive_bayes import GaussianNB
from nltk.corpus import stopwords
from sklearn.feature_extraction.text import TfidfVectorizer
nltk.download('stopwords')
nltk.download('wordnet')
from nltk.corpus import stopwords
from nltk.stem import WordNetLemmatizer
app = Flask(__name__)
We then use the route() decorator to tell Flask which URL should trigger our function. We allow two methods. The get method will display the review form while the post method will post the review to our model, which will classify it as either positive or negative.
We declare a main function that will get the review from the form, clean the data, and then classify it as either positive or negative. The process of cleaning the review is similar to the cleaning we did above during classification.
We use the joblib.load() utility to load the saved classifier and vectorizer. After loading the vectorizer, we transform the review into a tf-idf representation. We then use the pickled classifier to make the prediction. We can access the review using request.form[‘review’] and passing the name of the text area field in the html as a list.
def main():
	classifier = joblib.load('classifier.pkl')
	tfidfVectorizer = joblib.load('tfidfVectorizer.pkl')
	if request.method == 'GET':
		return render_template('index.html')

	if request.method == 'POST':
		review = request.form['review']
		corpus = []
		review = re.sub('[^a-zA-Z]', ' ', review)
		review = review.lower()
		review = review.split()
		lemmatizer = WordNetLemmatizer()
		review = [lemmatizer.lemmatize(word) for word in review if not word in set(stopwords.words('english'))]
		review = ' '.join(review)
		corpus.append(review)
		x_tfid = tfidfVectorizer.transform(corpus).toarray()
		answer = classifier.predict(x_tfid)
		answer = str(answer[0])
		if answer == '1':
			return "That looks like a positive review"
		else:
			return "You dont seem to have liked that movie."


if __name__ == "__main__":
    app.run()
However, before we can see our model in action we need to build the html form.
Create an index.html file in the templates folder of your directory. In the form action we use Flask’s url_for utility and pass the method that is to process the form, in this case main.
<!DOCTYPE html>
<html>
<head>
<!-- Latest compiled and minified CSS -->
<link rel="stylesheet" href="https://maxcdn.bootstrapcdn.com/bootstrap/3.3.7/css/bootstrap.min.css" integrity="sha384-BVYiiSIFeK1dGmJRAkycuHAHRg32OmUcww7on3RYdg4Va+PmSTsz/K68vbdEjh4u" crossorigin="anonymous">
<!-- Optional theme -->
<link rel="stylesheet" href="https://maxcdn.bootstrapcdn.com/bootstrap/3.3.7/css/bootstrap-theme.min.css" integrity="sha384-rHyoN1iRsVXV4nD0JutlnGaslCJuC7uwjduW9SVrLvRYooPp2bWYgmgJQIXwl/Sp" crossorigin="anonymous">
<!-- Latest compiled and minified JavaScript -->
<script src="https://maxcdn.bootstrapcdn.com/bootstrap/3.3.7/js/bootstrap.min.js" integrity="sha384-Tc5IQib027qvyjSMfHjOMaLkfuWVxZxUPnCJA7l2mCWNIpG9mGCD8wGNIcPD7Txa" crossorigin="anonymous"></script>
<title>Sentiment Analysis App</title>
</head>
<body>
<div class="container">
<div class="jumbotron">
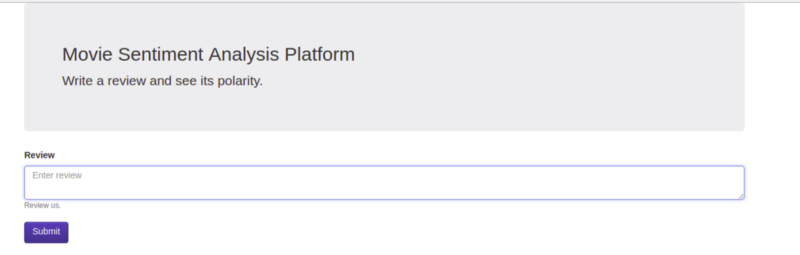
<h2>Movie Sentiment Analysis Platform</h2>
<p>Write a review and see its polarity.</p>
</div>
<form method="post" action="{{ url_for('main') }}">
<div class="form-group">
<label for="Review">Review</label>
<textarea name="review" class="form-control" placeholder="Enter review"></textarea>
<small class="form-text text-muted">Review us.</small>
</div>
<button type="submit" class="btn btn-primary">Submit</button>
</form>
</body>
</div>
</html>For references purposes the full code for this project is available on GitHub.
Before we can see the application in the browser, we need to export the FLASK_APP environment variable. We can also turn the debug mode on so that we don’t have to restart our server every time we make change our files.
We can do this in our terminal using:
An easy hack to make sure we don’t always export these environment variables manually every time is to declare them in the .env/bin/activate file. This way, every time you activate the virtual environment the variables will also be exported. Once this is done use flask run on your terminal. Head over to http://127.0.0.1:5000 to see your application.
Gunicorn server for hosting Python projects to production
Since we’ve already installed Gunicorn web server, all we need to do right now is edit the Profile to specify the configurations. A Profile is a mechanism for declaring what commands are run by your application’s dynos on the Heroku platform. At this point, if you haven’t created the requirements file, you can do so by typing pip freeze > requirements.txt in the terminal while your virtual environment is active.
Add the following line in the Profile:
We use Heroku to start a web server for the application. The app:app specifies the module and application name. Our module is app and our application name is app.
Setting up Heroku and pushing to production
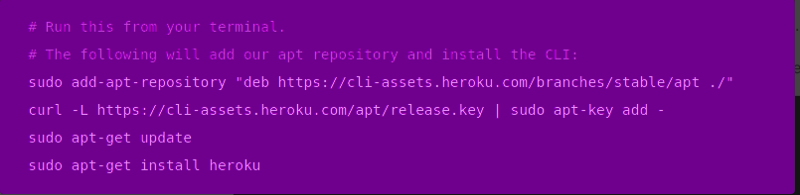
If you don’t have an account at Heroku you can create one here. Install the Heroku CLI, which enables us to deploy our application.
Once installed, type heroku login on your terminal to log into your account. You’ll be prompted to enter your email address and password.
Now let’s create an app on Heroku. This is where we’ll push our code. On your terminal use heroku create to start a new Heroku application.

You’ll notice that a link to your Heroku application and a link for pushing your project to Heroku. The link to your Heroku application is random, but you can change it on your Dashboard under settings. Next we need to set our git repository link to the one provided by Heroku. We do this using git remote add origin and specifying the link provided after running the Heroku Create command.

You can check if the remote origin has been added using git remote -v

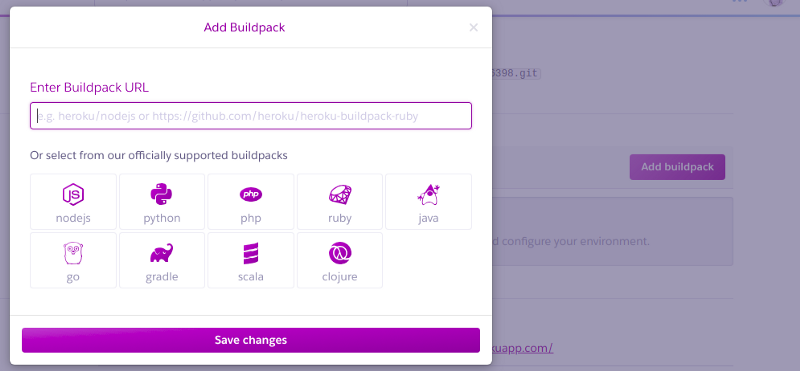
We need to inform Heroku which language our application is in by adding a buildpack under the settings panel of our dashboard. Click on Add buildpack and specify Python.
To deploy your project, push the project files to heroku master
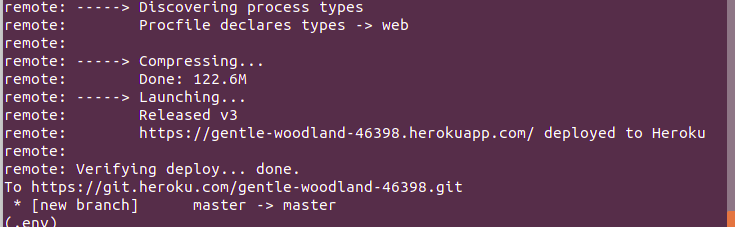
That’s it! You can now head over to the Heroku link to check out your application.
Conclusion
You can continue working on this application to improve its accuracy by training it on more data or experimenting with different algorithms. You can also work on making the application more visually appealing and user friendly. The next steps would be to learn more about Natural Language Processing and Flask.
Reference
Discuss this post on Hacker News.
Editor’s Note: Heartbeat is a contributor-driven online publication and community dedicated to providing premier educational resources for data science, machine learning, and deep learning practitioners. We’re committed to supporting and inspiring developers and engineers from all walks of life.
Editorially independent, Heartbeat is sponsored and published by Comet, an MLOps platform that enables data scientists & ML teams to track, compare, explain, & optimize their experiments. We pay our contributors, and we don’t sell ads.
If you’d like to contribute, head on over to our call for contributors. You can also sign up to receive our weekly newsletters (Deep Learning Weekly and the Comet Newsletter), join us on Slack, and follow Comet on Twitter and LinkedIn for resources, events, and much more that will help you build better ML models, faster.

Comments 0 Responses