
Machine learning and AI are taking mobile application development to a new level. Apps that utilizing machine learning can recognize speech, images, and gestures.
This gives us new and compelling ways to engage and interact with people in the world around us. But how do we integrate machine learning into our mobile apps?
Developing mobile applications that incorporate machine learning has long been a difficult task. But with the help of platforms and dev tools such as Fritz AI, Firebase’s ML, and TensorFlow Lite, it’s getting easier to do so.
These tools provide us with pre-trained machine learning models as well as tools to train and import our own custom models. But how do we actually develop a compelling experience on top of those machine learning models? That’s where Flutter comes in.
The Flutter SDK is a portable UI toolkit built by Google and its open-source community to develop applications for Android, IOS, Web, and Desktop. At its core, Flutter combines a high-performance graphic engine with the Dart programming language.
Dart provides both robust type safety and stateful hot reload, which helps developers build reliable apps quickly. Using Flutter, we can build mobile apps with machine learning capabilities like image classification and object detection, for both Android and iOS platforms.
In this article, we’ll combine the power of Flutter and on-device ML to develop a Flutter application that can recognize handwritten digits, using TensorFlow Lite and the famous MNIST dataset.
Required Packages
- TensorFlow Lite
In the android/app/build.gradle file, add the following setting in the android block and change the miniSdkVersion to 19. The installation walkthrough is given in the above Flutter package.
- MNIST (Modified National Institute of Standards and Technology database) dataset: One of the largest databases of handwritten digits, commonly used to train image processing systems.
Download the mnist.tflite file from the above link, and put it inside the assets folder of the Flutter project.
Create a mnist.txt file inside the assets folder and add the appropriate Model labels. (0 to 9 numbers)
Now that we’ve taken a quick look at how to set up your Flutter app to run TensorFlow Lite, let’s look at how to get it up and running.
Setting Up
Before we get started, we need to create 4 packages, models, screens, services, and utils.
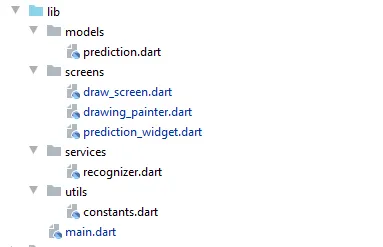
I’ll show the required code snippets for the above files.
class DrawScreen extends StatefulWidget {
  @override
  _DrawScreenState createState() => _DrawScreenState();
}

class _DrawScreenState extends State<DrawScreen> {
  final _points = List<Offset>();
  final _recognizer = Recognizer();
  List<Prediction> _prediction;
  bool initialize = false;

  @override
  void initState() {
    super.initState();
    _initModel();
  }

  @override
  Widget build(BuildContext context) {
    return Scaffold(
      appBar: AppBar(
        centerTitle: true,
        title: Text('Digit Recognizer'),
      ),
      body: Column(
        children: <Widget>[
          SizedBox(
            height: 10,
          ),
          _drawCanvasWidget(),
          SizedBox(
            height: 10,
          ),
          PredictionWidget(
            predictions: _prediction,
          ),
        ],
      ),
      floatingActionButton: FloatingActionButton(
        child: Text("Clear"),
        onPressed: () {
          setState(() {
            _points.clear();
            _prediction.clear();
          });
        },
      ),
    );
  }

  Widget _drawCanvasWidget() {
    return Container(
      width: Constants.canvasSize + Constants.borderSize * 2,
      height: Constants.canvasSize + Constants.borderSize * 2,
      decoration: BoxDecoration(
        border: Border.all(
          color: Colors.black,
          width: Constants.borderSize,
        ),
      ),
      child: GestureDetector(
        onPanUpdate: (DragUpdateDetails details) {
          Offset _localPosition = details.localPosition;
          if (_localPosition.dx >= 0 &&
              _localPosition.dx <= Constants.canvasSize &&
              _localPosition.dy >= 0 &&
              _localPosition.dy <= Constants.canvasSize) {
            setState(() {
              _points.add(_localPosition);
            });
          }
        },
        onPanEnd: (DragEndDetails details) {
          _points.add(null);
          _recognize();
        },
        child: CustomPaint(
          painter: DrawingPainter(_points),
        ),
      ),
    );
  }

  void _initModel() async {
    var res = await _recognizer.loadModel();
  }

  void _recognize() async {
    List<dynamic> pred = await _recognizer.recognize(_points);
    setState(() {
      _prediction = pred.map((json) => Prediction.fromJson(json)).toList();
    });
  }
}
In the above code snippet, We use the MNIST dataset of handwritten digits and create an application with a canvas where the user draws the digits.Widget_drawCanvasWidget() is used to determine the size of the drawing canvas. After defining the size of the draft we need to pass the data to using theCustomPaint(painter: DrawingPainter). Through drawing_painter.dart we can get the canvas details which contains properties for the canvas (brush size, color, background-color, etc.).
class DrawingPainter extends CustomPainter {
  final List<Offset> points;

  DrawingPainter(this.points);

  final Paint _paint = Paint()
    ..strokeCap = StrokeCap.round
    ..color = Colors.blue
    ..strokeWidth = Constants.strokeWidth;

  @override
  void paint(Canvas canvas, Size size) {
    for (int i = 0; i < points.length - 1; i++) {
      if (points[i] != null && points[i + 1] != null) {
        canvas.drawLine(points[i], points[i + 1], _paint);
      }
    }
  }

  @override
  bool shouldRepaint(CustomPainter oldDelegate) {
    return true;
  }

}
After the drawing (i.e. after stopping the drawing) the onPanEnd attribute calls the recognize() class and passes the image data. This will be used inside the service -> recognizer.dart.
final _canvasCullRect = Rect.fromPoints(
  Offset(0, 0),
  Offset(Constants.imageSize, Constants.imageSize),
);

final _whitePaint = Paint()
  ..strokeCap = StrokeCap.round
  ..color = Colors.white
  ..strokeWidth = Constants.strokeWidth;

final _bgPaint = Paint()
  ..color = Colors.black;

class Recognizer {
  Future loadModel() {
    Tflite.close();

    return Tflite.loadModel(
      model: "assets/mnist.tflite",
      labels: "assets/mnist.txt",
    );
  }

  dispose() {
    Tflite.close();
  }

  Future<Uint8List> previewImage(List<Offset> points) async {
    final picture = _pointsToPicture(points);
    final image = await picture.toImage(Constants.mnistImageSize, Constants.mnistImageSize);
    var pngBytes = await image.toByteData(format: ImageByteFormat.png);

    return pngBytes.buffer.asUint8List();
  }

  Future recognize(List<Offset> points) async {
    final picture = _pointsToPicture(points);
    Uint8List bytes = await _imageToByteListUint8(
        picture, Constants.mnistImageSize);
    return _predict(bytes);
  }

  Future _predict(Uint8List bytes) {
    return Tflite.runModelOnBinary(binary: bytes);
  }

  Future<Uint8List> _imageToByteListUint8(Picture pic, int size) async {
    final img = await pic.toImage(size, size);
    final imgBytes = await img.toByteData();
    final resultBytes = Float32List(size * size);
    final buffer = Float32List.view(resultBytes.buffer);

    int index = 0;

    for (int i = 0; i < imgBytes.lengthInBytes; i += 4) {
      final r = imgBytes.getUint8(i);
      final g = imgBytes.getUint8(i + 1);
      final b = imgBytes.getUint8(i + 2);
      buffer[index++] = (r + g + b) / 3.0 / 255.0;
    }

    return resultBytes.buffer.asUint8List();
  }

  Picture _pointsToPicture(List<Offset> points) {
    final recorder = PictureRecorder();
    final canvas = Canvas(recorder, _canvasCullRect)
      ..scale(Constants.mnistImageSize / Constants.canvasSize);

    canvas.drawRect(
        Rect.fromLTWH(0, 0, Constants.imageSize, Constants.imageSize),
        _bgPaint);

    for (int i = 0; i < points.length - 1; i++) {
      if (points[i] != null && points[i + 1] != null) {
        canvas.drawLine(points[i], points[i + 1], _whitePaint);
      }
    }

    return recorder.endRecording();
  }
}
The Recognizer class will load the mnist.tflite model and the mnist.txt label file. This will then be run through the image data we pass when we draw on the canvas. It’ll check for the similarity of the digit the dataset contains and pass the input through the prediction.dart class to convert the index, confidence, and label to JSON format. Then, we pass this to the prediction_widget.dart to display the most accurate digit.
class Prediction {
  final double confidence;
  final int index;
  final String label;

  Prediction({this.confidence, this.index, this.label});

  factory Prediction.fromJson(Map<dynamic, dynamic> json) {
    return Prediction(
      confidence: json['confidence'],
      index: json['index'],
      label: json['label'],
    );
  }
}
prediction_widget.dart contains the styles and numbers required to show the predicted digit for the one we drafted as input.
class PredictionWidget extends StatelessWidget {
  final List<Prediction> predictions;

  const PredictionWidget({Key key, this.predictions}) : super(key: key);

  Widget _numberWidget(int num, Prediction prediction) {
    return Column(
      children: <Widget>[
        Text(
          '$num',
          style: TextStyle(
            fontSize: 60,
            fontWeight: FontWeight.bold,
            color: prediction == null
                ? Colors.black
                : Colors.blue.withOpacity(
                    (prediction.confidence * 2).clamp(0, 1).toDouble(),
                  ),
          ),
        ),
        Text(
          '${prediction == null ? '' : prediction.confidence.toStringAsFixed(3)}',
          style: TextStyle(
            fontSize: 12,
          ),
        )
      ],
    );
  }

  List<dynamic> getPredictionStyles(List<Prediction> predictions) {
    List<dynamic> data = [
      null,
      null,
      null,
      null,
      null,
      null,
      null,
      null,
      null,
      null
    ];
    predictions?.forEach((prediction) {
      data[prediction.index] = prediction;
    });

    return data;
  }

  @override
  Widget build(BuildContext context) {
    var styles = getPredictionStyles(this.predictions);

    return Column(
      children: <Widget>[
        Row(
          mainAxisAlignment: MainAxisAlignment.spaceEvenly,
          children: <Widget>[
            for (var i = 0; i < 5; i++) _numberWidget(i, styles[i])
          ],
        ),
        Row(
          mainAxisAlignment: MainAxisAlignment.spaceEvenly,
          children: <Widget>[
            for (var i = 5; i < 10; i++) _numberWidget(i, styles[i])
          ],
        )
      ],
    );
  }
}
Now that we’ve taken a look inside the Flutter application code, let’s look at the output of the application when it’s up and running.
Conclusion
Once you get the hang of it, you can see how easy is it to use TensorFlow Lite with Flutter to develop proof-of-concept machine learning mobile applications. To improve your knowledge, you can visit the Kaggle site and download various datasets to develop different classification models.

Comments 0 Responses