
Object detection is a branch of computer vision, in which visually observable objects that are in images of videos can be detected, localized, and recognized by computers.
An image is a single frame that captures a single-static instance of a naturally occurring event . On the other hand, a video contains many instances of static images displayed in one second, inducing the effect of viewing a naturally occurring event.
Technically, a single static image in a video is called a video frame. In most videos, the number of frames in one second of the video ranges between 20 to 32, and this value is called the frames-per-second (fps).
Detecting Objects Using Keras, OpenCV, and ImageAI – An Introduction
Detecting objects in images and videos accurately has been highly successful in the second decade of the 21st century due to the rise of machine learning and deep learning algorithms. Specialized algorithms have been developed that can detect, locate, and recognize objects in images and videos, some of which include RCNNs, SSD, RetinaNet, YOLO, and others.
Using these algorithms to detect and recognize objects in videos requires an understanding of applied mathematics and solid technical knowledge of the algorithms as well as thousands of lines of code. This is a highly technical and time-consuming process, and for those who desire to implement object detection can find the process very inconvenient.
In this article, we we’ll be using a Python library called ImageAI that has made it possible for anyone with basic knowledge of Python to build applications and systems that can detect objects in videos using only a few lines of programming code. ImageAI supports YOLOv3, which is the object detection algorithm we’ll use in this article.
To get started, you will install a number of Python libraries and ImageAI. If you have any of the dependencies mentioned below already installed on your computer, you can jump straight to the installation of ImageAI. Also ensure the Python version you have installed on your computer is Python 3.7.6.
pip install the following dependencies:
i. TensorFlow
ii. Other Dependencies
iii. ImageAI
pip install imageai –upgrade
Now that we’ve installed the tools you need, we’ll be using a trained YOLOv3 computer vision model to perform the detection and recognition tasks. We can download the model file via this link. This model is trained to detect and recognize 80 different objects, named below:
For the purpose of this article, we’ve provided a sample video that you can download and use to write code to detect and recognize objects in the video. Download the video via this link.
Next, we create a Python file and give it a name, e.g FirstVideoDetection.py. Then we copy both the downloaded video and YOLOv3 model file into the folder where our FirstVideoDetection.py file is. Once you have done that, we write the exact code below into our FirstVideoDetection.py file.
from imageai.Detection import VideoObjectDetection
import os

execution_path = os.getcwd()

detector = VideoObjectDetection()
detector.setModelTypeAsYOLOv3()
detector.setModelPath( os.path.join(execution_path , "yolo.h5"))
detector.loadModel()

video_path = detector.detectObjectsFromVideo(input_file_path=os.path.join( execution_path, "traffic-mini.mp4"),
                                output_file_path=os.path.join(execution_path, "traffic_mini_detected_1")
                                , frames_per_second=29, log_progress=True)
print(video_path)
Before we run our Python code, here’s an in-depth explanation of the preceding code:
1) In the fourth line, we created an instance of the VideoObjectDetection class.
2) In the fifth line, we set the model type to YOLOv3, which corresponds to the YOLO model we downloaded and copied to the folder.
3) In the sixth line, we set the model path to the file path of the model file we copied into the folder.
4) In the seventh line, we loaded the model into the instance of the VideoObjectDetection class that we created.
5) In the eight line, we called the detectObjectsFromVideo function and parsed the following values into it:
i. input_file_path: This refers to the file path of the video we copied into the folder.
ii. output_file_path: This refers to the file path to which the detected video will be saved.
iii. frames_per_second: This refers to the number of image frames that we want the detected video to have within a second.
iv. log_progress: This is used to state that the detection instance should report the progress of the detection in the command line interface.
6) The detectObjectsFromVideo function will return the file path of the detected video. This file path will be printed in the ninth line of code once the detection task is done.
Now that we understand the content of our code, we can now run it and watch the progress in the command line interface until it’s done.
Note: If you have a computer system with an NVIDIA GPU and you installed the GPU version of TensorFlow, this detection process should be done in less than a minute. Otherwise, it may take a few minutes.
The detection will progress for each frame of the video detected, and the detected video that’s saved will be automatically updated for each frame detected.
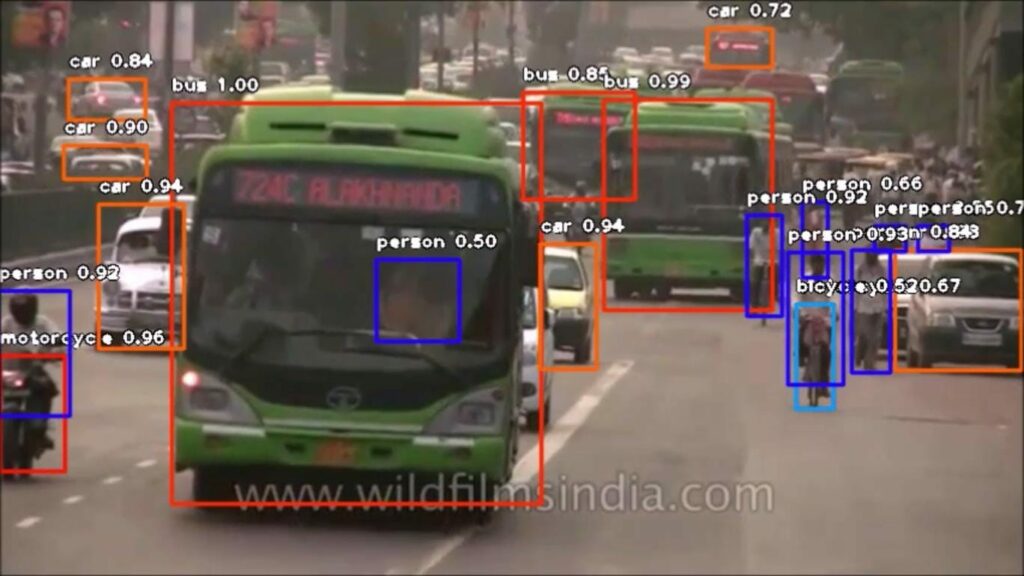
Once the detection is done, we’ll find the detected video in the folder that contains our Python file. When we open and play the video, it will contain the original video, but in this case, with boxes that locate various objects, the names of those objects, and the probability of the recognition as a percentage. See the results of this example in the YouTube video below:
As of now, we’ve applied the trained YOLOv3 model to detect objects in a video file. We can use this code to detect and recognize objects in any other video file, apart from the one provided in this article.
Next, we’ll look at how to detect and recognize objects in camera feeds. The camera can be the default one pre-installed on our computer system, a camera connected by cable, or an IP Camera. To do this, we create another Python file in the folder where the YOLOv3 model is and give it a name, e.g FirstCameraDetection.py.
Once we’ve created the Python file, we copy the code below and write it into our new Python file.
from imageai.Detection import VideoObjectDetection
import os
import cv2

execution_path = os.getcwd()

camera = cv2.VideoCapture(0)

detector = VideoObjectDetection()
detector.setModelTypeAsYOLOv3()
detector.setModelPath(os.path.join(execution_path , "yolo.h5"))
detector.loadModel()

video_path = detector.detectObjectsFromVideo(camera_input=camera,
                                output_file_path=os.path.join(execution_path, "camera_detected_1")
                                , frames_per_second=29, log_progress=True)
print(video_path)
The code above is very similar to our previous code. The differences are as stated below:
1) We created an instance of OpenCV’s VideoCapture class and loaded the computer’s camera into it.
3) Then in the detectObjectsFromVideo function, we stated the camera_input instead and parsed the name of the camera instance we created, unlike the input_file_path we used in the previous detection code.
These are the differences in detecting and recognizing objects in video files versus from camera feeds. Now, we can run the code and watch the progress in the command line interface.
Please note that, in this case, to stop the detection progress we’d have to do it manually, by halting the running of the Python code, because our system camera will keep recording videos as long as the code is running.
Once the progress in the command line interface reaches 150 frames, I suggest that we halt the Python code. Once we do this, we go to the folder of our Python file and find the detected video feed from our system’s camera.
If we’re planning to detect and recognize objects from the feeds of an IP Camera, all we need is to obtain the address of the IP Camera and load it with OpenCV, as seen in the example below:
camera = cv2.VideoCapture("http://192.168.43.1:8080/video")Conclusion
In this post, we’ve learned how to detect objects in video files and camera feeds with few lines of code using ImageAI. Beyond image recognition and object detection in images and videos, ImageAI supports advanced video analysis with interval callbacks and functions to train image recognition models on custom datasets. Learn more by visiting the link to the ImageAI repository below.
If you enjoyed and gained from reading this article, give it a clap. Also feel free to share it to friends and colleagues. You can reach to me if you have any questions or suggestions via my contacts below.
Twitter : https://twitter.com/OlafenwaMoses
Facebook: https://www.facebook.com/moses.olafenwa
Email: [email protected]
Website: https://moses.aicommons.science
Discuss this post on Hacker News and Reddit.

Comments 0 Responses