
Core ML is Apple’s framework for machine learning. With Core ML, everyone can use machine learning in their apps—as long as that app runs on an Apple platform, and Apple platforms only. Core ML cannot be used with Android, Windows, or on websites. This is very unfortunate because Core ML is such a great piece of technology.
It would be great if we could use Core ML with Python, for example. And as a programmer, you should know that if you want something bad enough, you can make it happen. And that’s what I’m going to show you in this post.
We’ll be building a REST API wrapper around a Core ML model using a new framework called Vapor. This API will be running on a remote server, accepting requests from every platform. This particular API will classify images, but any Core ML model should do.
Building an API around your Core ML model is not only beneficial when you want your model to work cross platform—even if your app only supports Apple devices, you might still want to consider using this approach over sending a copy of your Core ML model to each individual device.
First, your app size will decrease dramatically — Core ML models can be quite big. Second, you don’t need to update your app every time you improve your model — deploying new models can be done without Apple’s intervention.
I’ll start by introducing some web programming terminology you’ll need to know before writing a web app. Then we’ll write our own web app that uses Core ML in Vapor, because interfacing with Core ML is easiest with Swift, and because Swift is such a nice language to code with. Finally, we’ll also look at how to consume the API in Python.
The final project can be viewed on my GitHub. Don’t forget to leave a ⭐️ 😉
A quick introduction to web programming
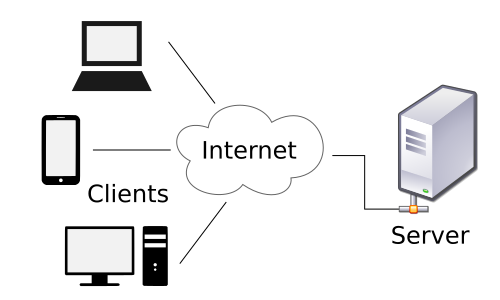
In the world of web programming, there are clients and servers. Each application can have multiple clients, but there is only one server. Servers provide some kind of API and clients “consume” it over HTTP(S), the molecules of the internet.
REST is an architecture where clients ask the server for information, and the server returns that information, or in some cases an error. REST “requires” your API to be stateless — it should return the exact same answer when you ask it the exact same thing. Sounds like something we’d like a machine learning model to do.
Uploading data to a server is done using HTTP POST requests. A POST request can carry data in its body (yes, it’s called body). The server reads from the body and performs some type of action, like classifying an image.
Web applications consist of so-called routes. These make up the endpoints (URLs) of the API. In Vapor, each route has its own function, where you can write code to implement a feature the route represents.
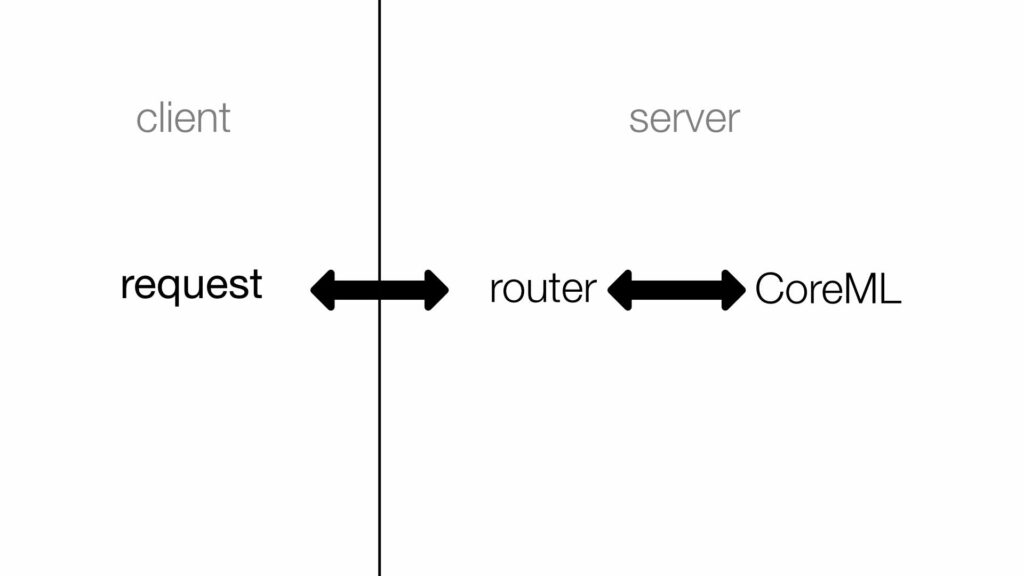
A schematic of the internal server architecture we’re going to build is shown below. The the server will have a router that’s always listening for incoming requests. Once it accepts a request, it will look for an image in the request’s body. It will then forward that image to Core ML and wait for a result. Finally, it will send the result back to the client.
In our case, the Vapor web application is the server. It will listen for clients, accept their requests, and return a result, encoded in JSON format. The client can be whatever device you want, as long as it has an internet connection.
Setting up a Vapor web application
Vapor is a new web framework written entirely in Swift. This is beneficial not only to iOS developers, but really to every developer. Swift is an easy-to-use, high-performance (and very popular!) programming language. You’ll notice huge performance increases if you’re used to something like Flask or Django.
Installing Vapor
Installing Vapor is easy using homebrew:
That’s it!
Validate the installation with vapor –help.
Creating a new project
Creating a new Vapor project is a breeze using its awesome command line utility. Use vapor new <name> to create a new project. Assuming you want to use Xcode to develop this app, you can use vapor xcode afterwards to have Vapor create an Xcode project for you. This might take a little while. Press y when it asks you if you want to open the project.
A “clean” Vapor project still comes with some code we don’t need. Let’s clean that up:
- Open the project and navigate to Sources/App and delete everything inside the models and controllers folders.
- In Sources/App/routes.swift, delete everything inside routes(_ router: Router) (keep the function itself).
- In Sources/App/configure.swift, delete lines 19–31. We don’t need a database in this project.
Press ⌘B to validate that your project still builds correctly.
Developing the API
Your first route
Creating a route is simple. Open Sources/App/routes.swift and add the following code to create a simple GET route on /, the root endpoint of the API.
router.get("/") { _ in
    return "Classifier!"
}
Press ⌘B to build the project. Then select the “Run” scheme in the top left corner and press ⌘R to build and run. If everything is OK, you should be able to visit http://localhost:8080 in Safari and see “Classifier!”
Congrats! You’ve now built your own web application.
The classification route
Now that we have a basic server set up, we can start working on the actual app. The main endpoint of this API will be /classify which is POST only.
The easiest way to fetch the data from the HTTP body in Vapor is through directly decoding the whole request to a custom model. So let’s create a model. Select File>New>File, name it ClassificationRequest.swift, and place it in App/Sources/Models/.
This model will decode a single entity from the HTTP POST body, the image of type File.
import Vapor

struct ClassificationRequest: Content {
    let image: File
}
Before we can actually implement the route and decode the image, we need to add CoreImage.framework to our project. Open the .xcodeproj file in the file browser inside Xcode. In the target list, make sure App is selected. Select General from the menu and scroll down to the bottom of “Frameworks and Libraries”. Press + and select CoreImage.framwork. Finally, click “Add”. Hit build to recompile the project.
Now we’re all set to start implementing the actual request. First, add import CoreImage to the top of the routes.swift file. This route will be wrapped inside a #available statement because we’ll be working with some APIs later on that require a particular version of macOS. If this app is running on an unsupported firmware, this route simply won’t be available. So make sure to update to the latest version of macOS!
if #available(OSX 10.13, *) {
    router.post(ClassificationRequest.self, at: "/classify") { (request, classificationRequest) -> String in
        let image = classificationRequest.image
        let ciImage = CIImage(data: image.data)
        // TODO: Classify contents of the image.
        return "success"
    }
}
Vapor automatically decodes the contents of the request and throws an error if it fails. Handy!
We can test out the endpoint using a little program named curl. If you’ve never worked with curl before, I highly recommend you learn more about it here. Your future self will thank you.
Here is an image you can use for testing:

If your browser does not automatically download the image, press ⌘S to save it. I named my image train.jpg. You should save this image in the directory you’re using curl in.
You can use the following curl command to test the API. Make sure to first stop and rerun the project in Xcode (select “Run” again).
If everything went OK, you should see “success” in your terminal, which means Vapor decoded our image!
The first part of the web app is done—we can now receive images. Next, we’ll classify them using machine learning, and after that we’ll go back to the web app to learn how to send results back.
Classifying in Core ML: Building the Controller
Before we can move on and code the classifier, we need to add one more framework to the project: Vision.framework.
Now that we have all the dependencies set up, we can start working on the controller. In the schematic above, this controller is indicated with “CoreML.” Create a new file in Sources/App/Controllers and name it Classifier.swift.
The classification model I used is Resnet50.mlmodel, which you can find here. But really, you can use any model you like — including the ones you’ve trained yourself. That’s the power Core ML gives you. Drag the model inside the project. Make sure “Copy items if needed” is checked.
At the top of the Classifier.swift, import CoreImage and Vision:
We don’t actually need to import Core ML here, as we’ll use the Vision abstraction layer ,which is even easier to use than Core ML itself. If you’re using another Core ML model, though, this is the place to interface with it.
Next, create a struct Classifier, the main controller of the web app. Because this struct will use new Vision APIs later on, make sure to limit its availability to macOS 10.13 or newer.
@available(OSX 10.13, *)
struct Classifier {

}
Vision expects us to input images as CoreGraphics images. Converting between CoreImage images and CoreGraphics images is not as trivial as converting most other types in Swift. Let’s create a custom method:
func convertCIImageToCGImage(image: CIImage) -> CGImage {
    let context = CIContext(options: nil)
    return context.createCGImage(image, from: image.extent)!
}
Now we’re ready to implement the public API of this class, which consists of only one method: classify(image:)->[VNClassificationObservation].
A quick note about asynchronous programming
VNCoreMLRequests are asynchronous, meaning they can return results on a background thread later on — the main execution won’t wait for it to be finished classifying.
In an iOS app, one would display some kind of loading indicator and update the view when Core ML is finished. However, since we’re working with a web API here, we want to return results immediately. We don’t want to tell the client: “I’m still busy, please check back later.” That’s not RESTful.
This is an obvious problem we need to solve. To do so, we use something called a semaphore. Semaphores are “signs” that will wait forever, until they’re called.
Implementing `classify`
Before making the request, we set up a semaphore, telling Swift to please wait until we tell it to continue. Inside the completion handler, when we get back the results from Core ML, we send the signal to continue execution — with results.
public static func classify(image: CIImage) -> [VNClassificationObservation] {
    var results = [VNClassificationObservation]()

    // Load the model.
    let model = try! VNCoreMLModel(for: Resnet50().model)

    // Prepare a ml request and wait for results before continuing.
    let semaphore = DispatchSemaphore(value: 1)
    semaphore.wait()
    let request = VNCoreMLRequest(model: model, completionHandler: { request, error in
        results = request.results as! [VNClassificationObservation]
        semaphore.signal()
    })

    // Make the request.
    let handler = VNImageRequestHandler(cgImage: convertCIImageToCGImage(image: image), options: [:])
    try? handler.perform([request])

    return results
}
Since we aren’t actually storing any data on the Classifier itself, it’s most efficient to make classify a static method, hence not wasting any memory.
Sending back results
Back in routes.swift, we can now complete the // TODO: Classify contents of the image. Using the Classifier API, we can classify images using only one line of code (and get back results immediately):
let results = Classifier.classify(image: ciImage)Encoding VNClassificationObservation
We can’t send back this array of VNClassificationObservations, because Vapor doesn’t know how to encode that to an HTTP response. Instead, we need to encode it, to JSON because it’s so easy to decode JSON in every language.
VNClassificationObservation does not conform to encodable so let’s implement a custom encoder for this class. Create a new file VNClassificationObservation+Encodable.swift and store it in Sources/App. Delete import Foundation and import Vision instead.
If you’ve never built a custom encoder before, don’t worry. There are two things you need:
- CodingKeys: the keys for the JSON dictionary. Here you specify the names for the things you want to encode.
- An encode(to encoder:) function. This function does the actual encoding using a container.
For more information on encoding (and decoding), check out this excellent talk by @k__mahar.
This encoder just encodes the label and score for each class — it’s everything we need.
@available(OSX 10.13, *)
extension VNClassificationObservation: Encodable {
    enum CodingKeys: String, CodingKey {
        case label
        case score
    }

    public func encode(to encoder: Encoder) throws {
        var container = encoder.container(keyedBy: CodingKeys.self)
        try container.encode(confidence as Float, forKey: .score)
        try container.encode(identifier, forKey: .label)
    }
}
Sending back the results
Now we can turn VNClassificationObservation into Data objects. Unfortunately, Vapor doesn’t allow us to send back Data. Luckily, we can work around that by turning the data into a String, which we can send back.
Here’s how you do that:
if let encodedResults = try? JSONEncoder().encode(results),
    let response = String(data: encodedResults, encoding: .utf8) {
    return response
} else { abort() }
If the encoding fails, we throw an error to let the client we’re having problems.
Annddd…That’s it! We’re done with the web app. Let’s move on and see how to consume the API.
Consuming the API with curl
Here’s the curl request again. Once you rerun your project, you’ll see a long list of labels with corresponding confidences.
You can convert that command to many other languages using this awesome website.
Consuming the API with Python
To consume JSON APIs in Python, you need two libraries: requests and json. You may need to install them.
In IDLE, IPython, or any other Python environment, import the libraries.
Then load the image from disk, just like we did in curl. Then make the request.
files = { 'image': ('train.jpg', open('train.jpg', 'rb')) }
response = requests.post('http://localhost:8080/classify', files=files)
Next, decode the JSON data into a Python dictionary:
results = json.loads(response.text)Let’s inspect some results:
It’s working!
Privacy Considerations
Apple’s main motivation to develop Core ML has been its ability to operate on a mobile device without the need to communicate with a remote server. This lines up with Apple’s strong focus on privacy.
Moving your model to the server exposes a lot of potentially sensitive user data. Remember: with great power comes great responsibility. Treat your users’ data carefully.
You can find the full source code on my GitHub. Let me know about projects you build on Twitter! I’m @rickwierenga.

Comments 0 Responses