
In a previous tutorial, I walked through how to train a style transfer model with Fritz AI and implement it inside Lens Studio to create a custom artistic Snapchat Lens:
While this was a really cool first step, it left me itching to push things just a bit further. Specifically, I wondered what it would take to manipulate where in the camera scene the style transfer model is actually applied. For instance, could I apply the artistic style only to the background and not the human subject, creating a semi-virtual background?

Well…despite my very limited experience with Lens Studio, ML Components, and digital design principles more broadly, I figured out how to get a working first version of this experience working. I’ll show you how I did it in this tutorial.
Just a note—because the previous tutorial (linked above) covers the end-to-end (and very simple) process of training a style transfer model with Fritz AI, I’ll focus here on the Lens Studio implementation of the same model I used in part 1 in a Lens I’l call a Style Transfer Background Replacer, which ended up looking like this:
The Problem
The problem I’ll work to solve in this tutorial is essentially the following:
- How can I create a Snapchat Lens that applies a custom style transfer effect to only the background of a given image or video stream?
This means that I need to work with two different ML tasks simultaneously: style transfer and people segmentation. Additionally, I need to wire those two ML tasks together correctly to achieve the desired effect.
The Solution
Luckily, Lens Studio already has an excellent Segmentation template you can get started really quickly with.
And for the style transfer side of things, in part one of this series, I was able to train a model ready-to-use in Lens Studio in a couple of hours, without any ML code of Python Notebooks or any other ML overhead. So I also have that ready to go.
Considering these two pieces that I have in place, the solution requires the following:
- Using the Lens Studio Segmentation template, add an additional ML Component that will contain the style transfer model trained with Fritz AI.
- Configure this additional ML Component so that it runs only on the background part of a given scene (i.e. not on a human subject).
While there might be other ways to achieve this solution—and of course incalculable tweaks, adjustments, and additional effects could be added—the following is my implementation inside Lens Studio.
The Implementation
Style transfer model download
In the previous tutorial, once our model had finished training in Fritz AI, I decided to proceed by downloading the Lens Studio project template file. This allowed me to prototype quickly, as the template structure made hooking up the ML Component to the Lens really simple.
In this case, however, I want to start working with a different template—the primary Segmentation template provided by Snapchat. This means using the project template provided by Fritz AI won’t work. Instead, I’ll need to download just the model file and manually configure it inside the Segmentation template.
While I’ll still have to configure this model file manually in Lens Studio, Fritz AI does all the heavy ML lifting for you—the model is in the correct format, with an optimized model architecture, and has inputs and outputs formatted
Working with the Lens Studio Segmentation template
Now that I have my ML model file downloaded (.onnx format), I can start putting the pieces together inside Lens Studio.
Upon opening the Segmentation template in Lens Studio, I see the following:
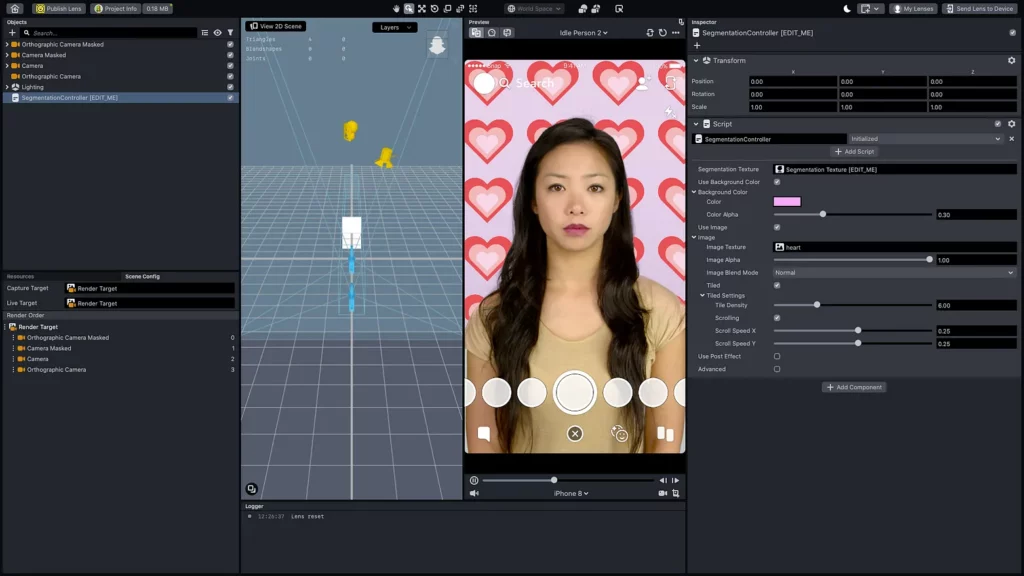
As we can clearly see here, this template already has the human subject separated (or segmented) from the background of the scene. And with that separation, we have a very simple heart AR effect currently occupying the background.
Note that, by default, the template opens with the Segmentation Controller (a script, essentially) opened in the Inspector on the right hand side.
So what I need to do here, ins essence, is replace the heart AR effect with the output of my style transfer model. The first step here is to add a new ML Component Object that will contain this model.
Adding an ML Component Object
To add an ML Component, I simply click the ‘+’ icon in the Objects panel (top left) and either scroll down to or search for ML Component.
Upon selection, a Finder window pops up (I’m using a MacBook)—this is where I’ll select the .onnx file I downloaded in the previous step. Upon selecting this model, a Model Import dialogue box will open that allows you to modify model inputs and outputs.
Fritz AI models have these inputs and outputs generically configured to be compatible with Lens Studio, but there are some use cases where experimentation might make sense (a bit more on that later)—so for simplicity’s sake, I’ll leave everything as is and click “Import”.
Parts of the above gif are difficult to make out, and I want to point you to a couple of different things here, as I prepare to try to hook up the two ML tasks.
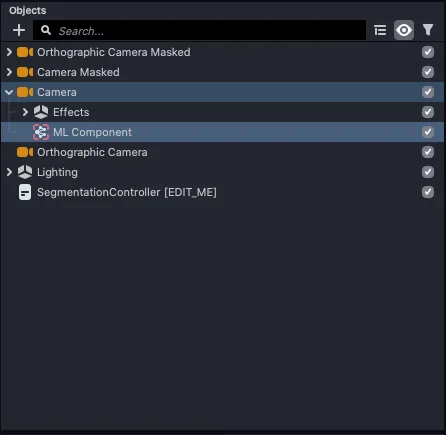
First, note that the ML Component is automatically nested under the Camera Object in the top left panel. This seems to allow the Component to communicate with this primary camera:
Second, the ML Component configuration. Note that, upon adding the style transfer model to the ML Component, I don’t have anything set in terms of the input and output Textures.
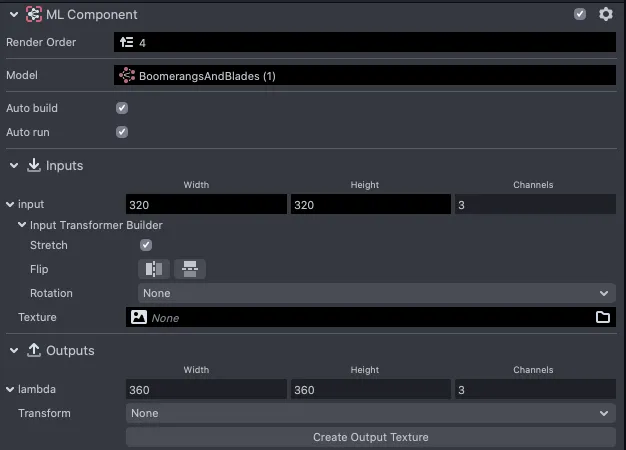
This means I’ll have to adjust these textures in order to allow the camera to provide the model input (i.e. the scene), and the component to provide the Lens the output (the altered style). To do this, I’ll follow the same steps as in the previous tutorial:
- In the Inspector, under the model’s Inputs, change the value of Texture from None to Default Textures →Device Camera Texture. This will feed the camera input to your model.
- Create an output texture for your model by clicking the Create Output Texture Button under the Outputs menu. Lens Studio will automatically create this.
Here’s how this looks in practice:
Previously, this was all I needed to do to get the ML Component working to apply the model’s artistic style to the camera scene. However, as you’ll notice here, nothing changes when I configure the ML Component.
This is because the Segmentation Controller (the script I referred to earlier) is the primary Object that’s communicating with the camera/scene. To change that, I’ll need to change the Segmentation Controller so that instead of applying these hearts to the background, it’s instead applying the ML Component’s style transfer output (i.e. the artistic style itself).
Configuring the Segmentation Controller
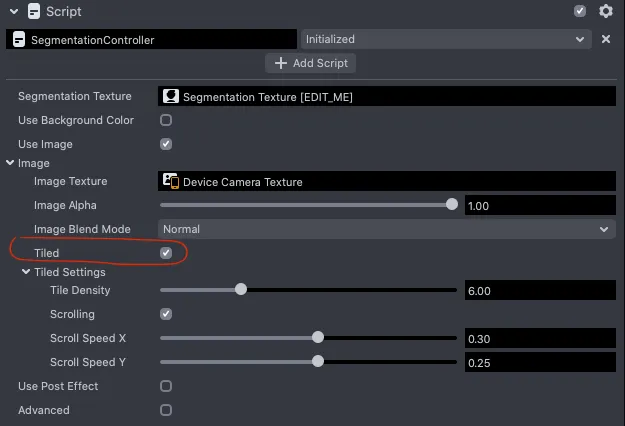
To configure the Segmentation Controller, I’ll complete a somewhat similar process as I did with the ML Component—namely, I’ll configure both an input (i.e. an Image) and an output (in this case, a Post Effect).
Because I ultimately want the segmented background to display the real life scene with the artistic style overlaid on top of it, I want the Segmentation Controller to use the device camera as its input source. So to do this, I’ll change the Image to Device Camera Texture, much like I did in the last step.
Note that I’ve also unchecked “Use Background Color”, which eliminates the pale pink that was serving as the background color palette. I’m not sure if this really does anything for this use case, but there seemed to be no reason to keep this background color.
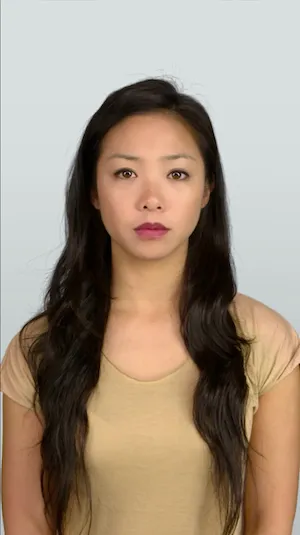
I was kind of startled the first time I saw the tiled panel of the human subject floating in the background. But upon closer inspection, this makes sense—with the hearts and the background color stripped away, the device camera is simply capturing this person against a neutral background, and the script is configured to include this floating tile effect:
Upon unchecking this option, the preview panel shows what looks like the most basic starter test image:
But not to worry! This next step is where all the pieces come together.
Adding the ML Component Output as a Post Effect
This final step took me quite a while to figure out and didn’t seem quite as intuitive as the others. And while there might be other ways to apply the style transfer effect to the isolated background that I’m unaware of, I got it working by adding a Post Effect that leverages the ML Component.
I’ll also edit this in the Segmentation Controller Object:
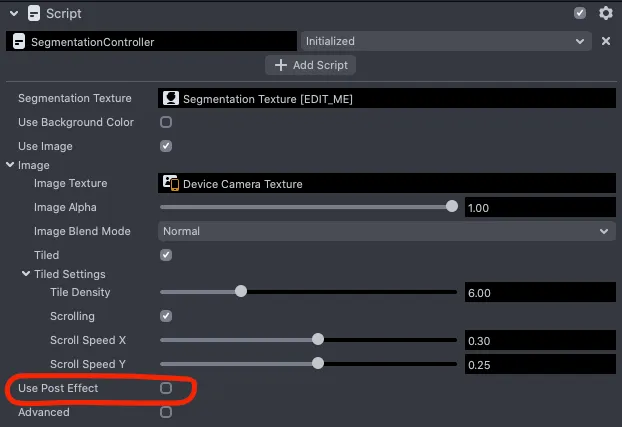
Once I enabled a Post Effect I was able to configure its Texture and Alpha value (intensity of the effect).
The final step here is to add the Output Texture of the ML Component (the auto-generated Iambda Proxy Texture) as the Post Effect Texture.

As you can see in the gif above, doing this adds the style transfer output to the segmented background.
At first, I wasn’t entirely sure if this was actually going to work the way I wanted to. The color palette seemed to be there, but how would it translate to a scene with objects and furniture and whatever else?
There are a couple ways to test this. My go-to is to just send the Lens to my device to test it out or use my webcam.
Alternatively, you can change the Segmentation Controller Image Texture to a photograph that will serve as the background in the preview panel. To show this process, I’ll use the following free-to-download-and-use image from Unsplash

To do this, I’ll simply add this .jpg to my project Resources (bottom left panel), and then I’ll be able to select it as an Image Texture.
Here’s a look at that process:
As you can see, the background is now a style-altered version of the photo above.
If I change that Image Texture back to Device Camera Texture and push to my device to test (iPhone SE), I end up with the results I showed at the outset. Here’s one more look at that, to compare:
Full Video
One last thing before we wrap up…I realize that the gifs included here are a bit difficult to make out at times. Apologies there—an unfortunate limitation of both Medium and screen recordings. In light of this, I’ve also uploaded the full process covered in this tutorial to YouTube (no sound on the video).
What’s Next?
For me—given my very limited experience/knowledge with ML, Lens Studio, and basic technical problems—this is a huge win.
But for Lens Creators who regularly work with 3D graphics and other immersive AR effects, this segmentation + style transfer Lens could serve as a starting point for some really unique and creative experiences.
If you’d like to give this a shot with your own style transfer model, you can get started really quickly with a Fritz AI account—our support for SnapML/Lens Studio is in beta and free to use at the time of writing. Your account will give you access to our model building Studio, as well as a growing collection range of ready-to-use ML-powered project templates.
I’d love to see what you come up with—and maybe even feature your work on Heartbeat—so feel free to reach out with your creations.

Comments 0 Responses