
The Open Neural Network Exchange (ONNX) is an open standard for representing machine learning models. With ONNX, AI developers can more easily move models between state-of-the-art tools and choose combinations that are best for them. ONNX is developed and supported by a community of partners including AWS, Facebook OpenSource, Microsoft, AMD, IBM, Intel AI, etc.
ONNX.js
On November 29th, 2018 Microsoft entered the arena of AI on browsers with the announcement for ONNX.js, their open-source library to run ONNX models on browsers. This is yet another option for web developers for running ML models on browsers and build amazing user experiences on the web.
Why ONNX.js? — Lightning Performance! ⚡️
With the development of Keras.js & TensorFlow.js, Microsoft had to come up with a solution that can deliver better results along with a good developer experience. IMHO, Microsoft succeeded in the performance arena to a large extent. Here are a few things that make it stand out.
- ONNX.js can run on both CPU and GPU.
- For running on CPU, WebAssembly is adapted to execute models at near-native speed. Furthermore, ONNX.js utilizes Web Workers to provide a “multi-threaded” environment to parallelize data processing. This is a really a great feature, as Keras.js and TensorFlow.js don’t support WebAssembly usage on any browser.
- For running on GPUs, a popular standard for accessing GPU capabilities — WebGL is adopted.
Here are the results of benchmarking done by Microsoft. Read more about it here.

Despite having such outstanding performance attributes, ONNX.js lacks some basic utility functions, such as converting an image to a tensor, which is available in TensorFlow.js. Being an open source library, we can expect the community will add such utilities soon for developers.
Get our hands Dirty, Code!
We tried developing a simple react app that labels an image using a SqueezNet model.
Let’s build a React App with TypeScript.
Add Libraries
We’ll use blueimp-load-image for drawing images and ndarray & ndarray-ops for processing images later in this tutorial.
Preparing the ONNX.js Environment
Import Tensor and InferenceSession from ONNX.js:
In order to execute any model, we have to create an InferenceSession in ONNX.js. It encapsulates the environment that ONNX.js operations need in order to execute. It loads and runs ONNX models with the desired configurations.
As seen above, the InferenceSession constructor takes an object with backend hint and profiler.
backendHint: Specify a preferred backend to for model execution. Currently, available backend hints are:
- cpu: CPU backend
- wasm: WebAssembly backend
- webgl : WebGL backend
If not set, the backend will be determined by the platform and environment.
profiler: Config.Profiler An object specifying profiler configurations used in an InferenceSession. If not set, the profiler will run in the default configuration.
Now our session is ready to load our model. This operation may take a little longer depending upon your Internet connectivity and the size of your model. SqueezNet model[1.1] used in our demo application is 5.9MB.
Preparing Images for detection

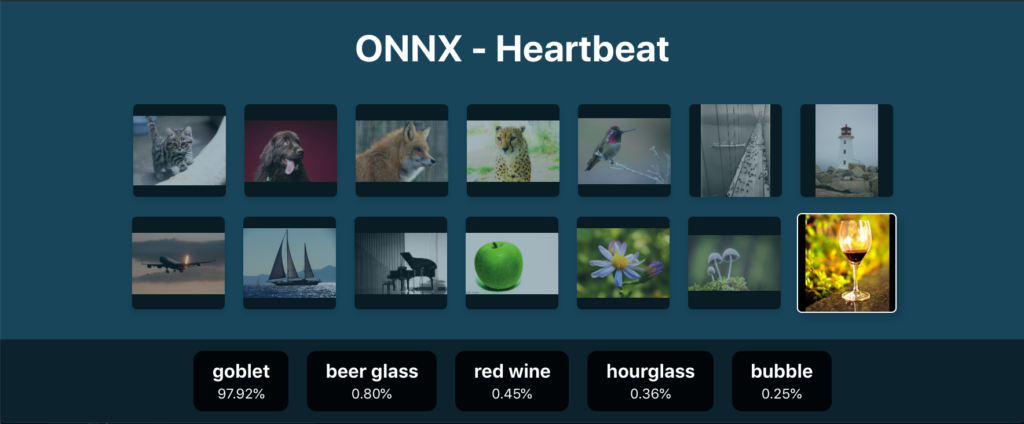
Let us pick up a goblet of wine’s image and prepare it for our SqueezetNet model.
In order to label an image, we have to convert our image into tensors that will work as an input for our ONNX model. In order to process an image, we have to load an image on our DOM inside acanvas. As discussed above, we’ll use theblueimp-load-image package for loading images from URLs on canvas.
import loadImage from 'blueimp-load-image';

const imageLoaderConfigs = {
  maxWidth: 224,
  maxHeight: 224,
  cover: true,
  crop: true,
  canvas: true,
  crossOrigin: 'Anonymous',
}

function renderImage(img: Event | HTMLImageElement) {
  if ((img as Event).type === 'error') {
    return
  }
  try {
    const element = document.getElementById('input-canvas') as HTMLCanvasElement;
    const ctx = element.getContext('2d');
    ctx.drawImage(img as HTMLImageElement, 0, 0);
  } catch (e) {
    console.error(e)
  }
}

export default function loadImageToCanvas(url: string) {
  if (!url) {
    return;
  }
  loadImage(url, renderImage, imageLoaderConfigs);
}
The 2D context of this canvas element can now be used to convert the images into tensors. Here is our utility method for converting images into tensors:
import ndarray from 'ndarray';
import ops from 'ndarray-ops';
import { Tensor } from 'onnxjs';

export function preProcess(ctx: CanvasRenderingContext2D): Tensor {
  const imageData = ctx.getImageData(0, 0, ctx.canvas.width, ctx.canvas.height);
  const { data, width, height } = imageData;
  const dataTensor = ndarray(new Float32Array(data), [width, height, 4]);
  const dataProcessedTensor = ndarray(new Float32Array(width * height * 3), [1, 3, width, height]);
  ops.assign(dataProcessedTensor.pick(0, 0, null, null), dataTensor.pick(null, null, 2));
  ops.assign(dataProcessedTensor.pick(0, 1, null, null), dataTensor.pick(null, null, 1));
  ops.assign(dataProcessedTensor.pick(0, 2, null, null), dataTensor.pick(null, null, 0));
  ops.divseq(dataProcessedTensor, 255);
  ops.subseq(dataProcessedTensor.pick(0, 0, null, null), 0.485);
  ops.subseq(dataProcessedTensor.pick(0, 1, null, null), 0.456);
  ops.subseq(dataProcessedTensor.pick(0, 2, null, null), 0.406);
  ops.divseq(dataProcessedTensor.pick(0, 0, null, null), 0.229);
  ops.divseq(dataProcessedTensor.pick(0, 1, null, null), 0.224);
  ops.divseq(dataProcessedTensor.pick(0, 2, null, null), 0.225);
  const tensor = new Tensor(new Float32Array(3 * width * height), 'float32', [1, 3, width, height]);
  (tensor.data as Float32Array).set(dataProcessedTensor.data);
  return tensor;
}
Let’s Execute It
Since we’ve now have loaded our model into inference sessions and converted our image into a tensor, we’re all set to utilize the power of ONNX.js. Here’s our function that will return the model output and time consumed during inference:
export async function runModel(model: InferenceSession, preProcessedData: Tensor): Promise<[Tensor, number]> {
    const start = new Date();
    try {
        const outputData = await model.run([preProcessedData]);
        const end = new Date();
        const inferenceTime = (end.getTime() - start.getTime());
        const output = outputData.values().next().value;
        return [output, inferenceTime];
    } catch (e) {
        console.error(e);
        throw new Error();
    }
}
Now we can map the model’s output on imagenet classes using this function:
import _ from 'lodash';
import { imagenetClasses } from '../data/imagenet';

/**
 * Find top k imagenet classes
 */
export function imagenetClassesTopK(classProbabilities: any, k = 5) {
  const probs = _.isTypedArray(classProbabilities) ?
      Array.prototype.slice.call(classProbabilities) : classProbabilities;

  const sorted = _.reverse(_.sortBy(probs.map((prob: any, index: number) => [prob, index]), probIndex => probIndex[0]));
  const topK = _.take(sorted, k).map(probIndex => {
    const iClass = imagenetClasses[probIndex[1]];
    return {
      id: iClass[0],
      index: parseInt(probIndex[1], 10),
      name: iClass[1].replace(/_/g, ' '),
      probability: probIndex[0]
    };
  });
  return topK;
}
Bingo! Here are the results💥
You can check out demos & the source code here:
You can also experiment with a number of pre-trained ONNX models from the ONNX Model Zoo. Also, you can convert models from mainstream frameworks, e.g. PyTorch, TensorFlow, & Keras, by following ONNX tutorials.

Comments 0 Responses