
Introduction
Hello everyone! My name is Yuma Soerianto. Today, I’ll show you how to make a simple Augmented Reality game using Apple’s ARKit framework and Xcode.
What we’re going to build
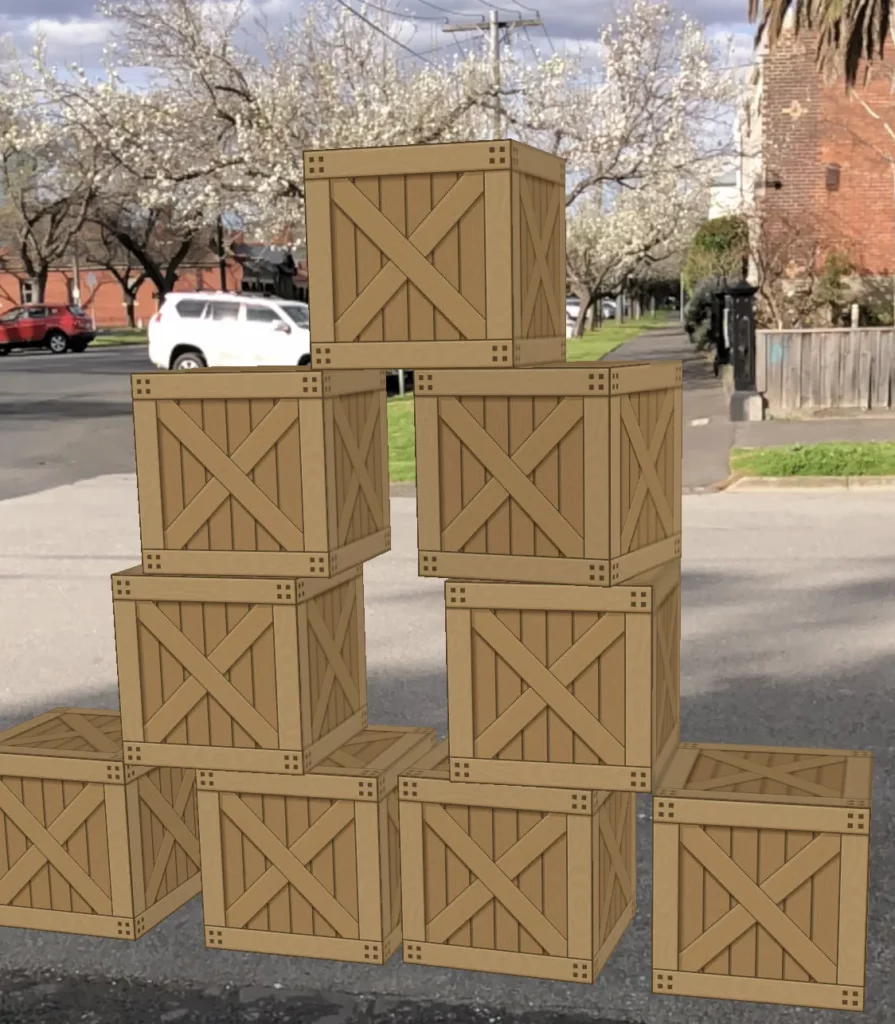
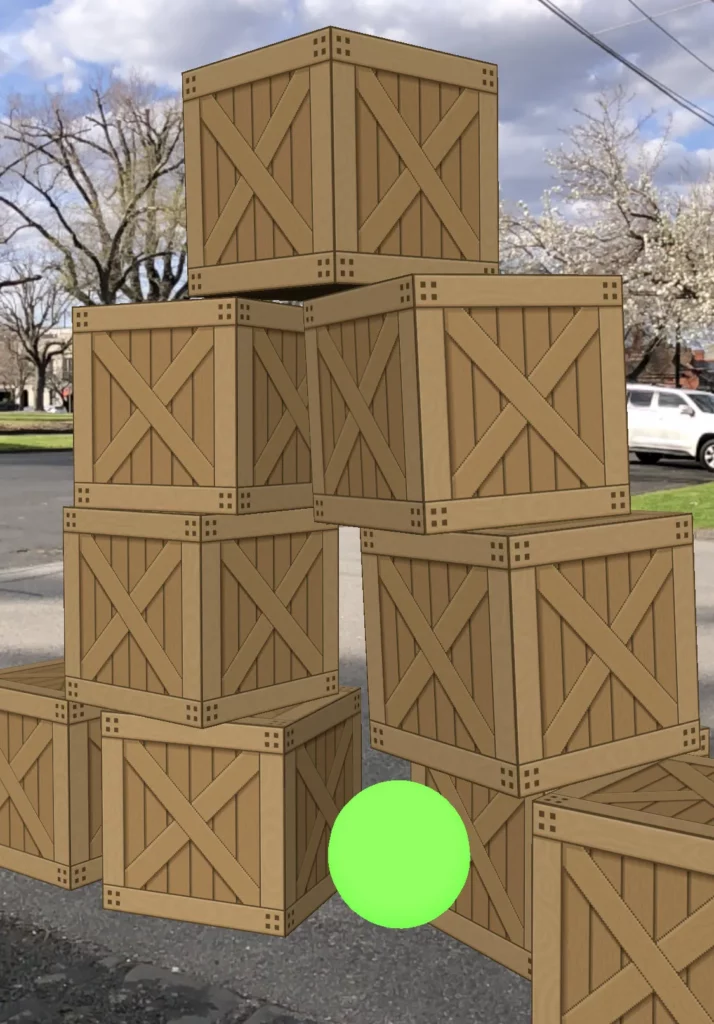
This is a finished product of what we’re going to build. It’s a simple game where you shoot and knock down crates.
We will cover:
- ARKit
- SceneKit and the SceneKit editor
- SceneKit’s Physics System
- Xcode
- Swift
- Particle effects
- Collision detection
So, what is ARKit?
Augmented reality is a technology that allows people to interact with digital objects in the real world. It does this by overlaying the virtual content on the camera! Apple introduced ARKit at WWDC (World Wide Developer Conference) last year. It’s a framework that makes creating augmented reality easier on the iOS platform.
Prerequisites
To follow along, you need to have a Mac and Xcode 9, as well as an iPhone 6S (or newer) or an iPad Pro (or newer) with iOS 10+. Although this is a beginner tutorial, I assume that you’ve worked with Swift and Xcode before, or have had some experience with them. Also, to be able to test the app on a physical device, you’ll need to have an Apple developer account. If you don’t already have one, you can sign up for a free account here.
So without further ado, let’s get started!
Project Setup
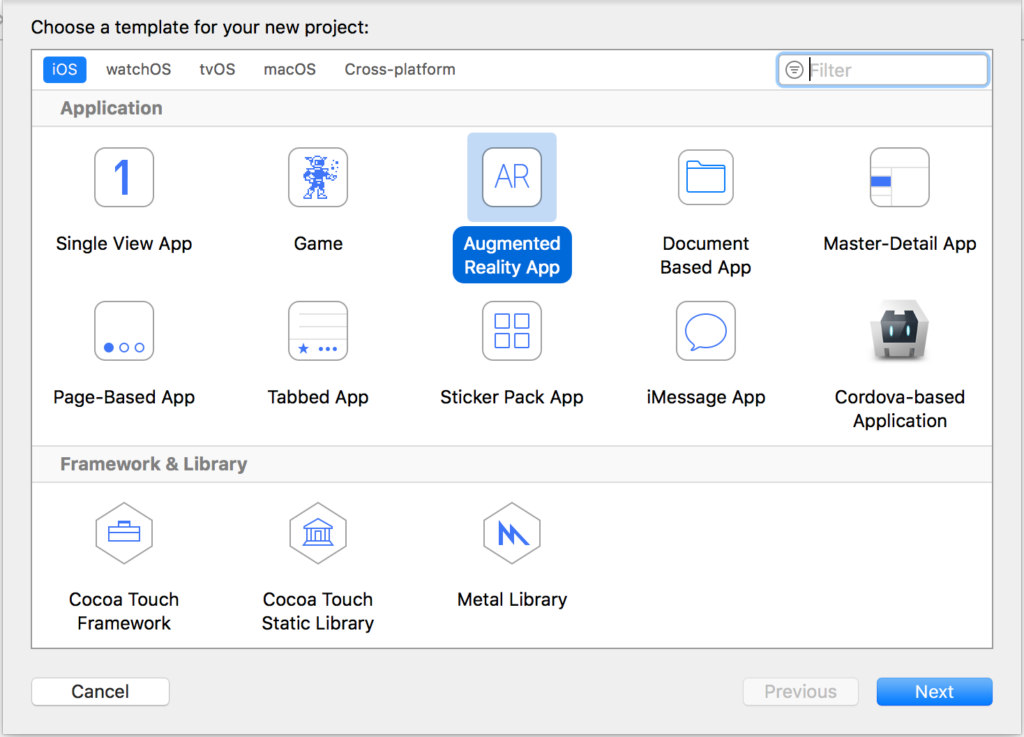
First, let’s open Xcode and create a new Xcode project. Go to the iOS tab and select Augmented Reality App. Hit Next, name your app, and leave the rest as default. Click finish.
Now we can import some assets needed for the app. I got the texture from opengameart.org. I have uploaded all of the assets along with the project file here.
Building the Blocks
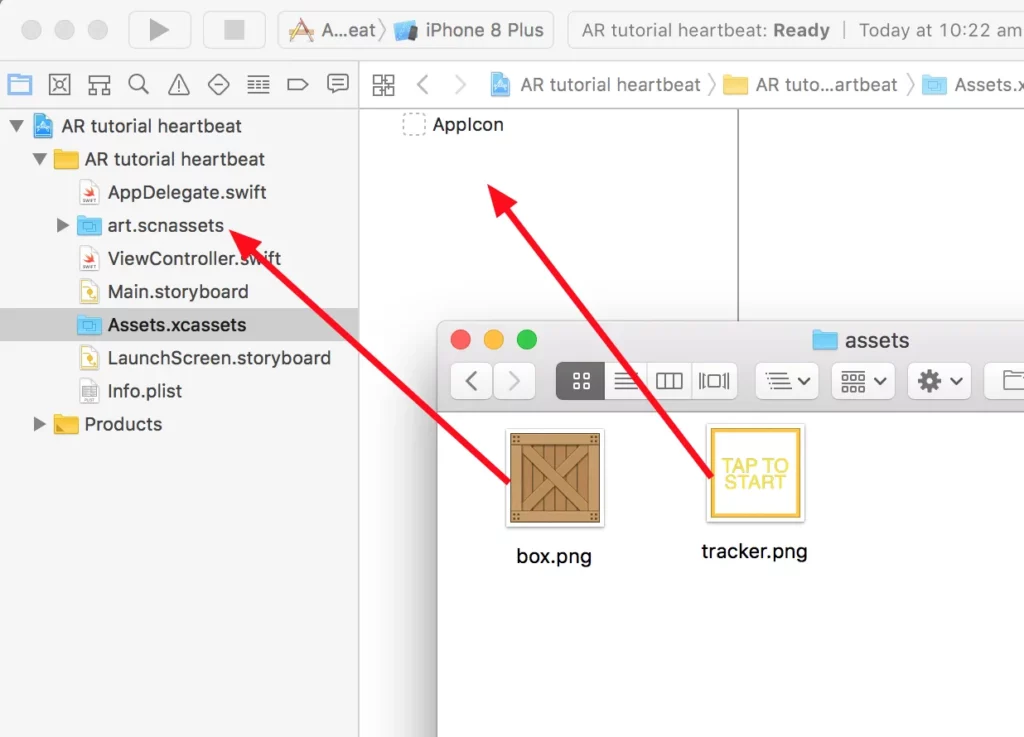
From the Finder, drag box.png into theart.scnassets folder. Open Assets.xcassets and drag tracker.png to the assets panel that opened.
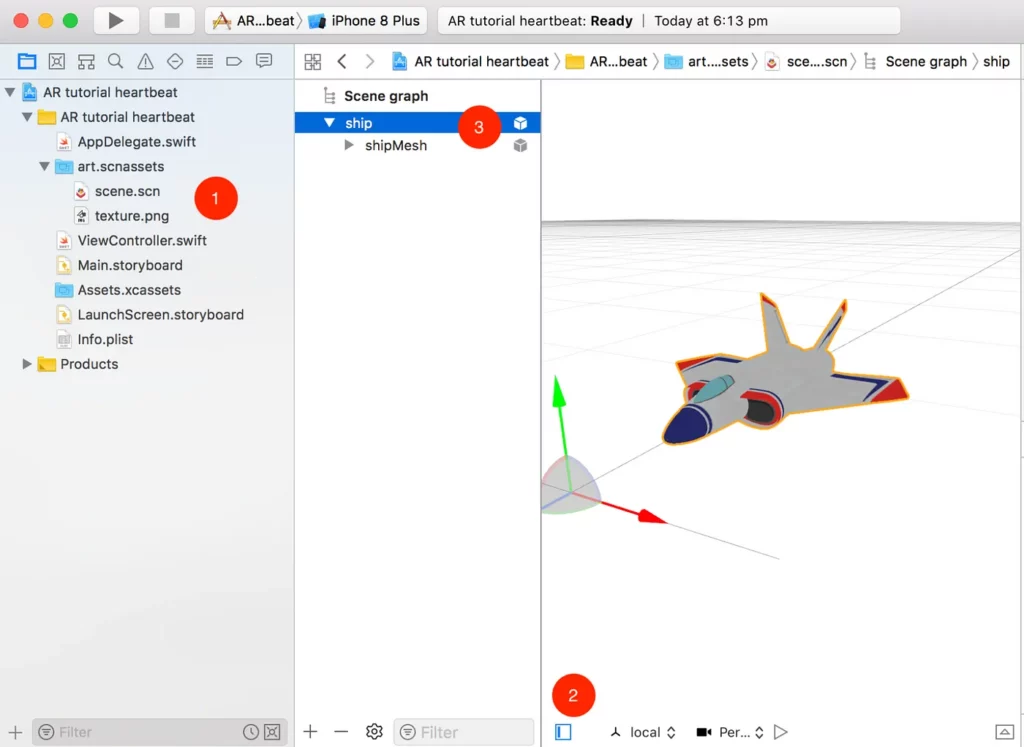
Find the art.scnassets folder on the left navigator panel and click on ship.scn and rename it scene.scn [Figure A-1]. Open it, and you’ll see a spaceship. Delete the spaceship by going to the scene hierarchy tab on the left [Figure A-2] and selecting and deleting it [Figure A-3]. We’re deleting this because it’s just a sample from Apple, and it isn’t needed.
Go to the tab on the bottom right (called Object Library) and drag a box into the scene. Click on the top right icon [Figure B-1] if you can’t see the panel. These are the blocks we’ll use for the crates. You can change the rotation and position by simply dragging the red, green, and blue arrows, but you can do it with more precision with the inspector on the right [Figure B-2].
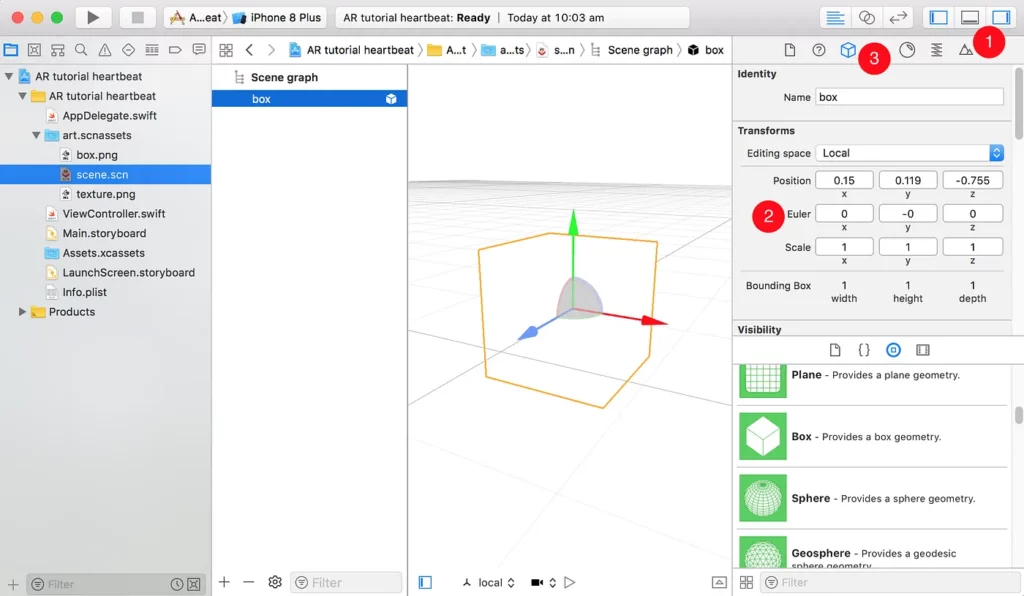
First of all, let’s name it block. Make it smaller by setting the scale to (0.5, 0.5, 0.5) on the inspector panel. Drag the box.png from art.scnassets and drop it on the block. This will set the texture of the crates.
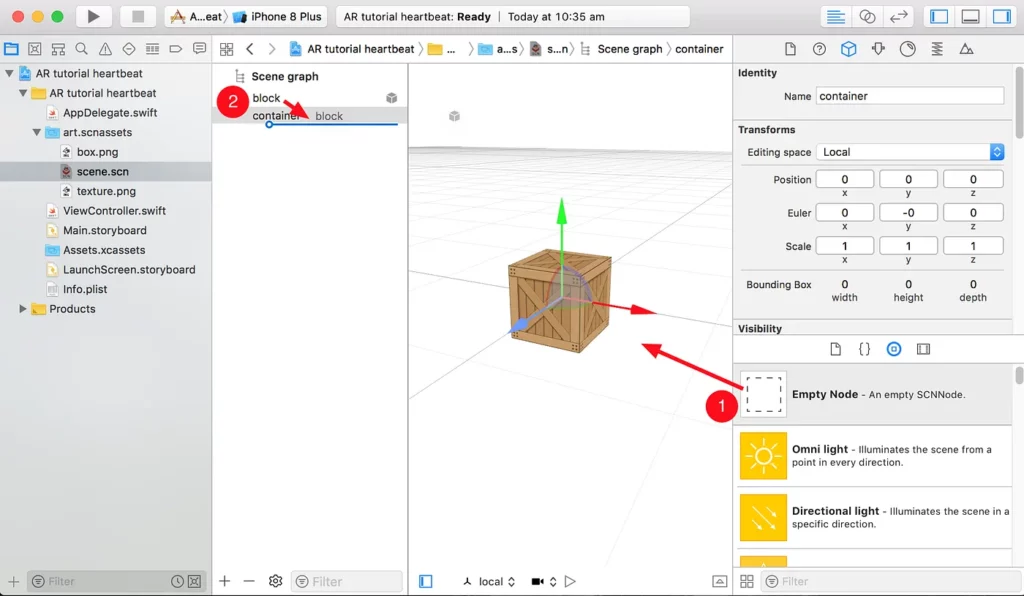
From the Object Library, drag in an empty node [Figure C-1], and set its position to (0, 0, 0). Name it container: this will be used to contain all our blocks, and will make it easier to move them around when we place the game in the real world.
Drag the block in the scene hierarchy into the container [Figure C-2]. This sets the container as a parent of the block. Move the container around, and you can see that the block is moving with it!
Adding Physics
Select the block again, and in the inspector tab, go to the section with the spring icon.
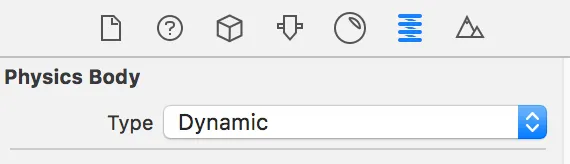
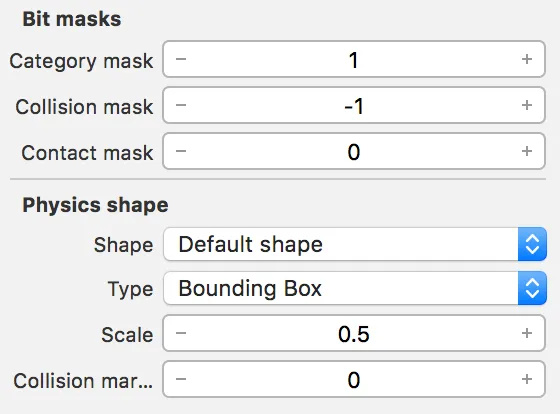
This is where we’ll add some physics! Set the physics body type to dynamic. This will make it so it can fall, be hit, and hit other things. Scroll down to the bit masks, change the category mask to 1, and make sure its contact mask is 0.
The masks are used to detect if the ball has collided with the block. In Physics shape, set the shape to Default shape, the type to Bounding Box, and the scale to 0.5. This is the approximation of our block shape, if you’re wondering. We’ve now completed our block!
Making the level
This is the fun part: Now we can actually make our level! Duplicate the blocks with cmd + C and cmd + V, and then you can move them around and make some sort of tower.
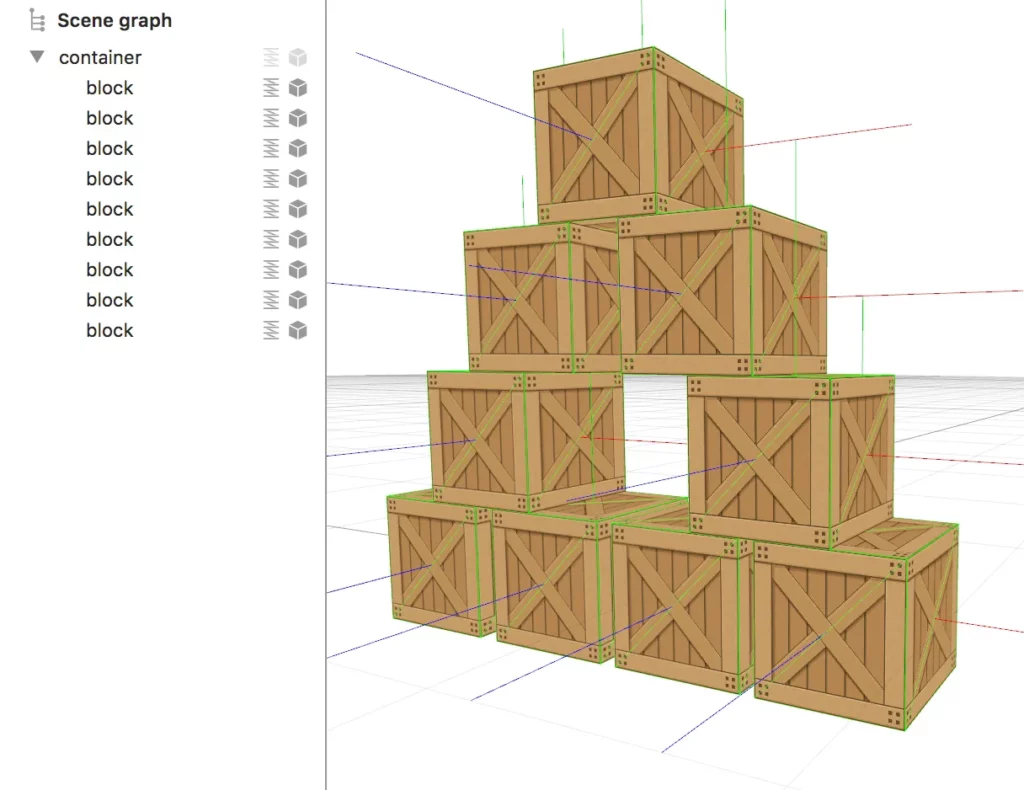
Once that’s done, you can go to the Play button at the bottom [Figure D-1] and click it to see the scene in action.

So let’s look at — Oh. They all fell, you say? All the blocks? Go ahead and click the button (now a Stop icon) to stop it. So what’s happened here? You know when I said the blocks were able to fall? Well, they fell! However, there was no floor to stop them. The easy solution is to just add a big floor.
Making the floor
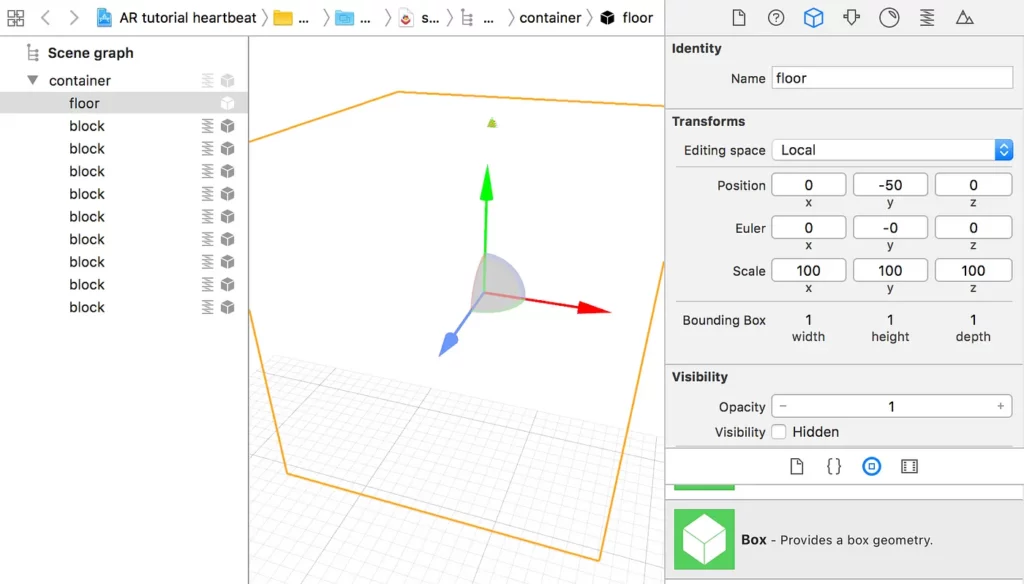
Go back to the Object Library, add a Box, name it floor, and set its scale to (100, 100, 100 — it has to be big). The reason why I chose a box and not a plane (you might have seen it in the Object Library), is that sometimes the balls glitch through the plane, since the floor is flat. Anyways, put it in the container, and set the position to (0, -50, 0).
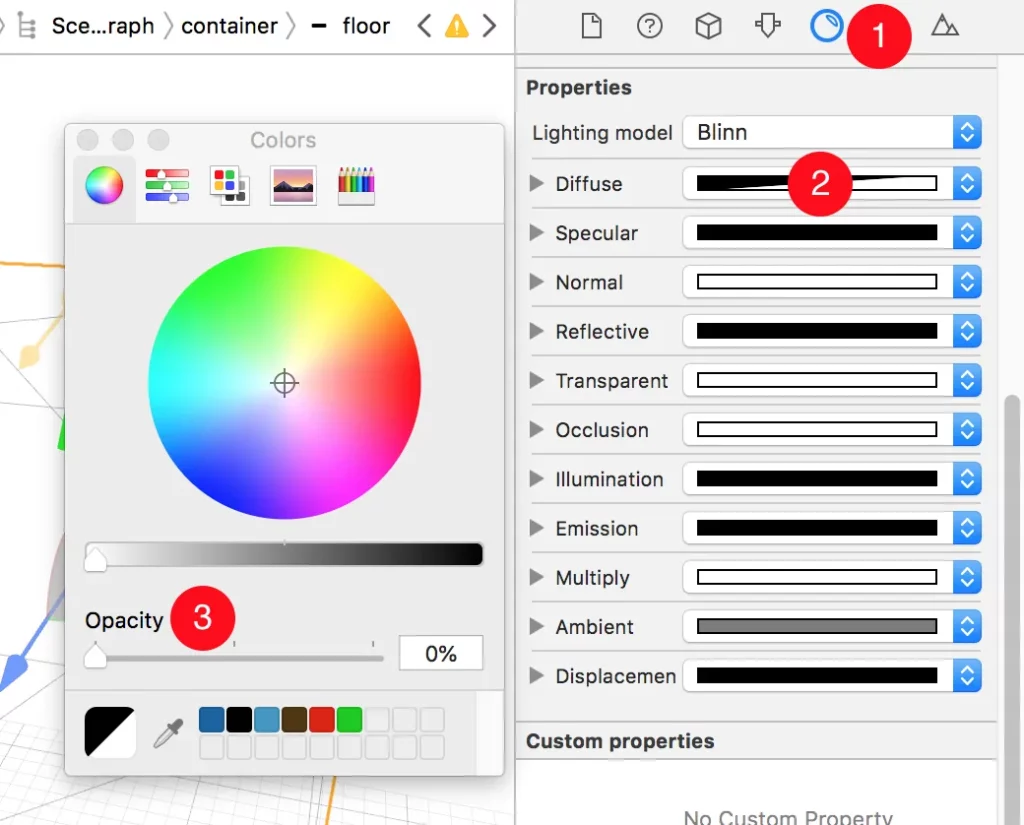
Now, we need to make the floor transparent so it won’t block the camera. Click on Materials tab [Figure E-1], then click on Diffuse color [Figure E-2] and finally set the opacity to 0 [Figure E-3].
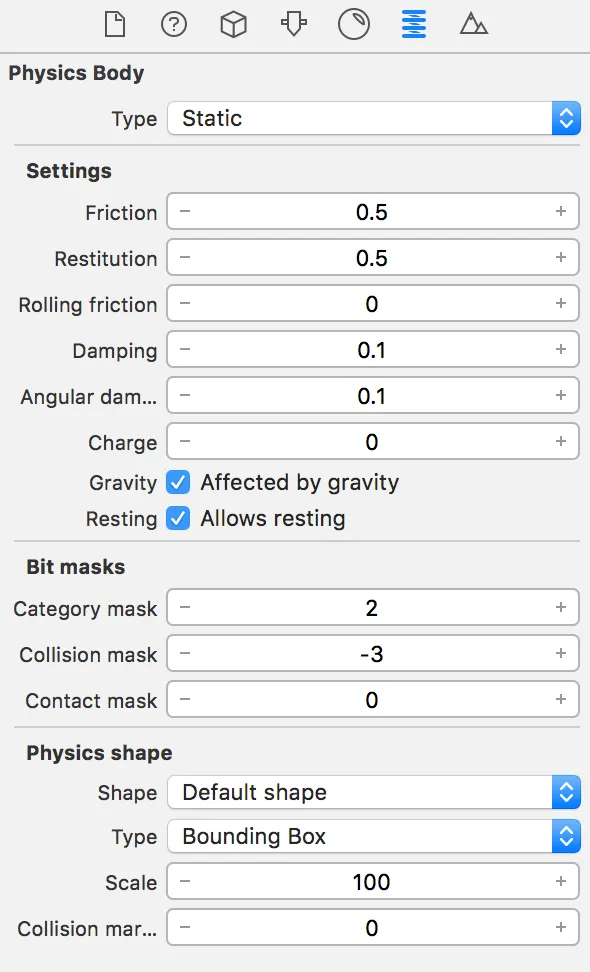
In the physics section, set the type to static. Static means the floor will act like a brick and stay there. Under bit masks, set the category mask to 2, and the contact mask to 0. In the physics shape, set the shape to default shape, the type to bounding box, and scale to 100.
Lighting
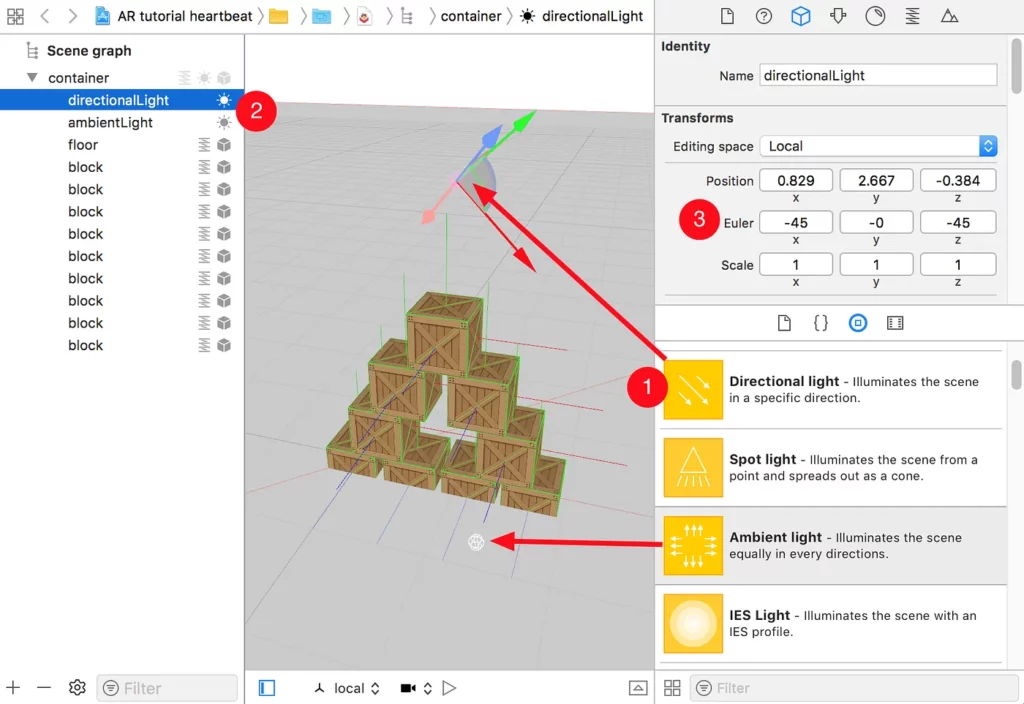
Let’s do the final part of the scene: Some lighting! From the Object Library, drag a directional and ambient light to the scene, and call them directionalLight and ambientLight [Figure F-1]. Put them in the container, as well [Figure F-2].
Directional lights only cast light in one direction, and ambient lights give lighting for the whole scene. Set the directional light’s Euler angles (rotation) to (-45, 0, -45) [Figure F-3]. Later, we’ll be manipulating the lights and setting their intensities (how bright they are) to the actual light intensity in the room.
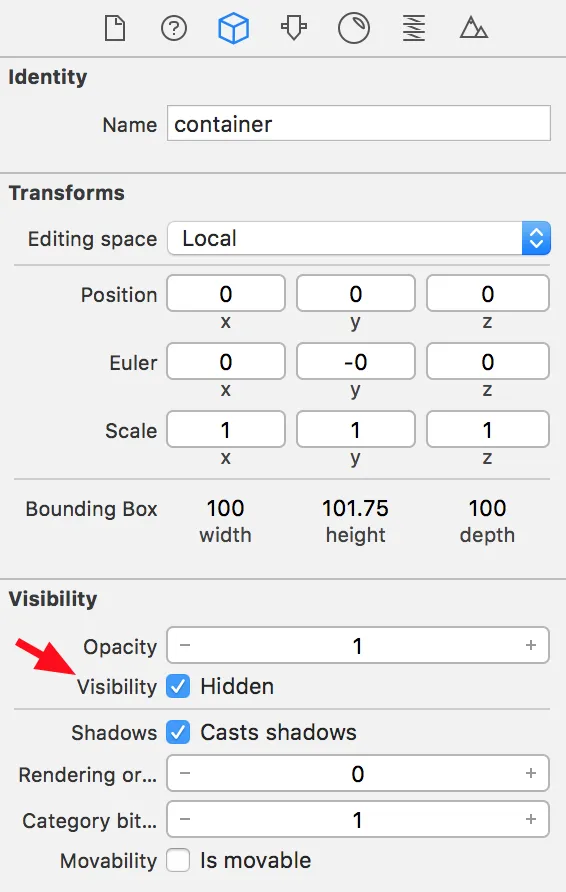
The last thing we have to do with the scene is hide the container. Select it, and in the inspector, under visibility, check hidden.
Adding plane detection
Now we’re done with the scene part. Head over to ViewController.swift on the Project Navigator on the left panel. You’ll see a few functions. Let me explain what’s going on here: In viewDidLoad, we load the scene. In viewWillAppear, we’ll start a new AR session, which means activating AR. Finally, in viewWillDisappear, we stop the session and deactivate AR.
In viewDidLoad, replace this line:
let scene = SCNScene(named: "art.scnassets/ship.scn")!With this:
let scene = SCNScene(named: "art.scnassets/scene.scn")!We did this because we had renamed our ship scene before.
We’re ready to do our first bit of code — plane detection (or placing the game). After the @IBOutlet variable (line 15), add these three variables:
var trackerNode: SCNNode?
var foundSurface = false
var tracking = true
These three variables help us check to see if we need to detect a surface or if we’ve already found one. The tracker node is the indicator for when we’ve found a surface. So, to check for a plane, add this function after the variables above:
func renderer(_ renderer: SCNSceneRenderer, updateAtTime time: TimeInterval) {
}
This function updates every frame, and will be perfect to check every time. Here’s the first chunk of code to be inserted in the renderer function:
guard tracking else { return } //1
let hitTest = self.sceneView.hitTest(CGPoint(x: self.view.frame.midX, y: self.view.frame.midY), types: .featurePoint) //2
guard let result = hitTest.first else { return }
let translation = SCNMatrix4(result.worldTransform)
let position = SCNVector3Make(translation.m41, translation.m42, translation.m43) //3
Here’s where we first check if we need to detect a surface. This is a guard statement, so if it’s false, it’ll do the actions in the brackets (return), which is to exit the function [1].
If it’s true, it’ll continue with the rest of the function. Next, we do a hit test to find a plane, and it asks for where in the screen to detect it, and what it needs to find. I inputted the middle of the screen, and to only find feature points [2]. Then, we try to get the first hit (position), and then convert that into a vector 3 position [3].
From there, we’ll continue by adding the tracker node (still in the renderer function block):
if trackerNode == nil { //1
  let plane = SCNPlane(width: 0.15, height: 0.15)
  plane.firstMaterial?.diffuse.contents = UIImage(named: "tracker.png")
  plane.firstMaterial?.isDoubleSided = true
  trackerNode = SCNNode(geometry: plane) //2
  trackerNode?.eulerAngles.x = -.pi * 0.5 //3
  self.sceneView.scene.rootNode.addChildNode(self.trackerNode!) //4
  foundSurface = true
}
self.trackerNode?.position = position //5
We check if the tracker node is non-existent [1]. If it isn’t, then we create a 15×15 cm plane and set its texture to our tracker image, and made the texture double-sided.
We then create the node with the plane [2], rotate it so it’s flat on the ground [3], add the tracker to our scene [4], and then set foundSurface to true.
Finally, we set the tracker’s position to the found position [5]. The last line is outside of the if statement, since we want the tracker to move around regardless of whether it has just been created or already exists.
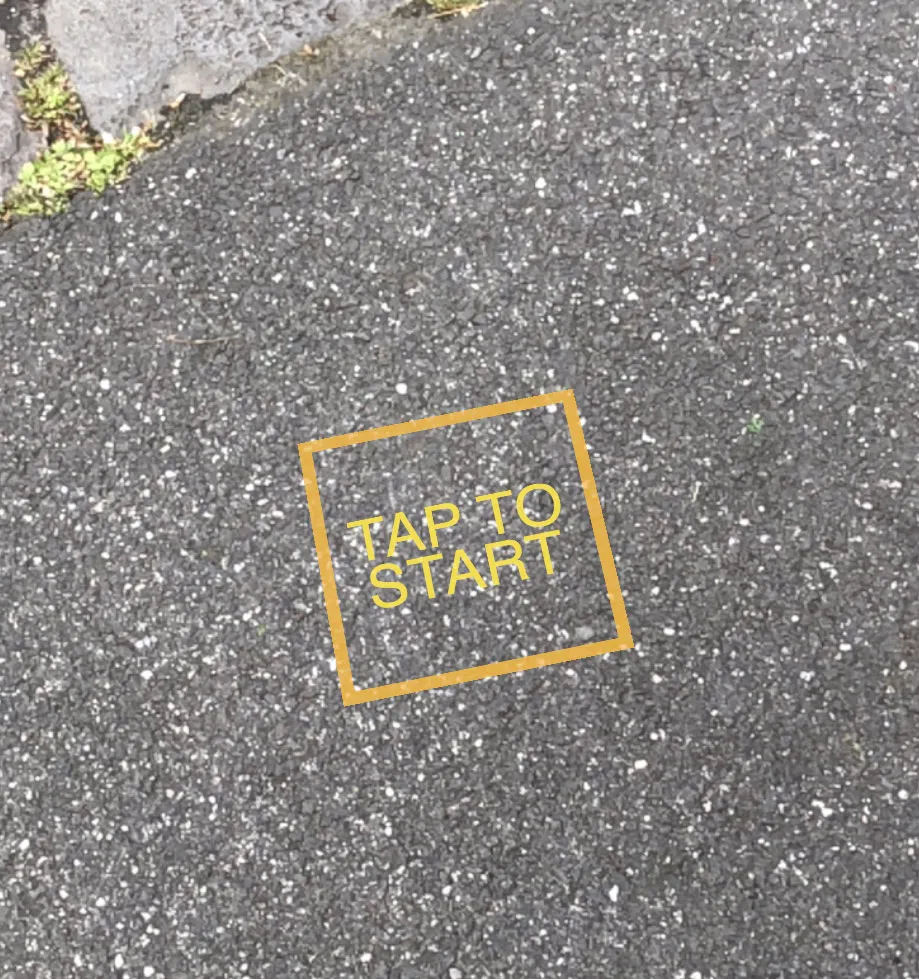
Let’s run the app. Make sure your device is connected to your Mac, and is your run destination, and hit cmd + R. If you move around a bit and point your device to the floor, you can see the tracker appear!
Making the Scene Appear
Now that we’ve done the plane detection, we want the app to actually do something once the user taps on the screen and starts the game. First of all, we need to add some variables after var tracking :
var directionalLightNode: SCNNode?
var ambientLightNode: SCNNode?
var container: SCNNode!
To register the touch, add this function below renderer(_:updateAtTime)
override func touchesBegan(_ touches: Set<UITouch>, with event: UIEvent?) {
}
This function checks to see if the user has tapped on the screen and places the game scene. Since we don’t want the app to keep placing the scene over and over again, we check if the game has started (tracking = true). Insert the code in the touchesBegan block:
if tracking {
  //Set up the scene
} else {
  //Handle the shooting
}
In the else part, we’ll handle the shooting, but that’s for later. Right now, we need to set up the scene. Insert the following code below if tracking:
guard foundSurface else { return } //1
let trackingPosition = trackerNode!.position //2
trackerNode?.removeFromParentNode()
container = sceneView.scene.rootNode.childNode(withName: "container", recursively: false)!
container.position = trackingPosition
container.isHidden = false //3
ambientLightNode = container.childNode(withName: "ambientLight", recursively: false)
directionalLightNode = container.childNode(withName: "directionalLight", recursively: false)
tracking = false //4
We first check if a surface has been found [1]. Next, we save the tracker’s position so we can use it to set our scene’s position [2]. Then, we remove the tracker. After that, we get the container, set its position to the tracked position, and unhide it [3]. Finally, we get the ambient and directional light nodes, and set tracking to false so the app will stop tracking and finding planes. [4]
Let’s run the app again. You can now tap once the tracker has found a surface, and it’ll place the blocks!
Adding Ambient Light Estimation
The next thing we can do is the ambient light estimation to make the blocks look more realistic. Like I mentioned before, ARKit has a feature to get an estimation of light from the surrounding area, measure it, and then give it to us to play with. The good thing about this is that it’s very simple. Go to ViewController. In the viewWillAppear function, you need to set it to be the delegate to be able to use ambient light estimation:
sceneView.session.delegate = selfAnd in the class definition of ViewController, add the protocol ARSessionDelegate. It should look like this:
class ViewController: UIViewController, ARSCNViewDelegate, ARSessionDelegate {Add the following function below the touchesBegan function:
func session(_ session: ARSession, didUpdate frame: ARFrame) {
  guard let lightEstimate = frame.lightEstimate else { return }
  guard !tracking else { return } //1
  ambientLightNode?.light?.intensity = lightEstimate.ambientIntensity * 0.4 //2
  directionalLightNode?.light?.intensity = lightEstimate.ambientIntensity
}
The function updates every frame, but comes with some more good stuff, one of which is our light estimation. We first get our light estimate and check if the game has already started [1].
Then, we change the ambient and directional light nodes’ intensity to the ambient intensity by using lightEstimate.ambientIntensity. You’ll realize that the ambient light’s intensity has been multiplied by 0.4 [2]. This is so the directional light can stand out and actually emit light that we can see, and is not drowned out by the ambient light.
If you run the app, place the blocks, and cover the camera with your hands, you can see that the lighting adjusts and the blocks become darker, too.
Shooting
We’ve done the plane detection, we’re able to place the blocks, but we can’t play around with these blocks. Let’s do the shooting then! Back in the elsepart of the if-else statement in touchesBegan is where we’ll shoot the balls. We first need to know where and which direction to shoot the balls:
guard let frame = sceneView.session.currentFrame else { return } //1
let camMatrix = SCNMatrix4(frame.camera.transform)
let direction = SCNVector3Make(-camMatrix.m31 * 5.0, -camMatrix.m32 * 10.0, -camMatrix.m33 * 5.0) //2
let position = SCNVector3Make(camMatrix.m41, camMatrix.m42, camMatrix.m43) //3
First, we get the current frame of the AR session [1]. Then, we get the AR camera and use its rotation as our force that we need to shoot the balls at [2]. You can see that the camera’s rotation has been negated and multiplied. It has been negated since rotation in Xcode goes counter clockwise instead of the usual clockwise. The multipliers just add more force for the ball to be propelled further away. Finally, we simply get the camera’s position [3].
We now have the required information to create the ball and launch it. Continue adding to the else block:
let ball = SCNSphere(radius: 0.05) //1
ball.firstMaterial?.diffuse.contents = UIColor.green
ball.firstMaterial?.emission.contents = UIColor.green //2
let ballNode = SCNNode(geometry: ball)
ballNode.position = position //3
ballNode.physicsBody = SCNPhysicsBody(type: .dynamic, shape: nil)
ballNode.physicsBody?.categoryBitMask = 3
ballNode.physicsBody?.contactTestBitMask = 1 //4
sceneView.scene.rootNode.addChildNode(ballNode)
ballNode.runAction(SCNAction.sequence([SCNAction.wait(duration: 10.0), SCNAction.removeFromParentNode()])) //5
ballNode.physicsBody?.applyForce(direction, asImpulse: true) //6
A sphere is created with a radius of 5 cm [1], with it being the color green. The emission part is so it can glow in the dark [2]!
From there, the ball is created with the sphere’s geometry, and its position is set to the current camera position [3]. A dynamic physics body is created, and the category and contact bit mask are 3 and 1 [4]. Like I mentioned before, this is for the collisions. We then add the ball and run an action where the ball is destroyed (removed) after ten seconds [5]. Finally, the ball is propelled away from the camera and off into the distance [6].
Run the app, and after placing the blocks, you can tap to shoot the balls!
Finishing Touches
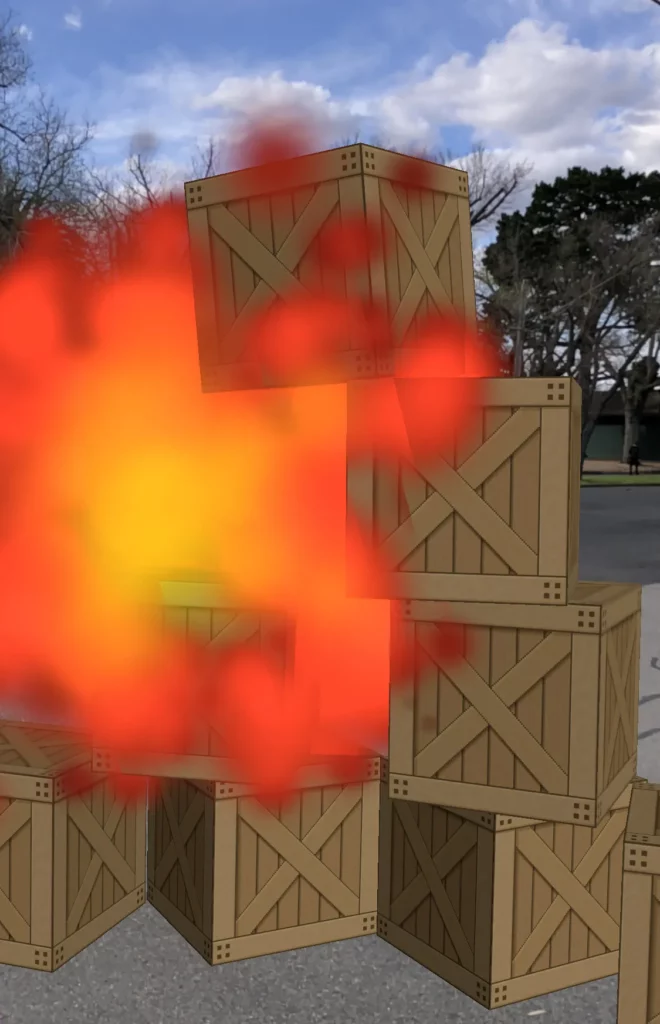
We could wrap up the tutorial here, but it would be great to add some finishing touches. Specifically, if the ball collides with the blocks, it should explode!
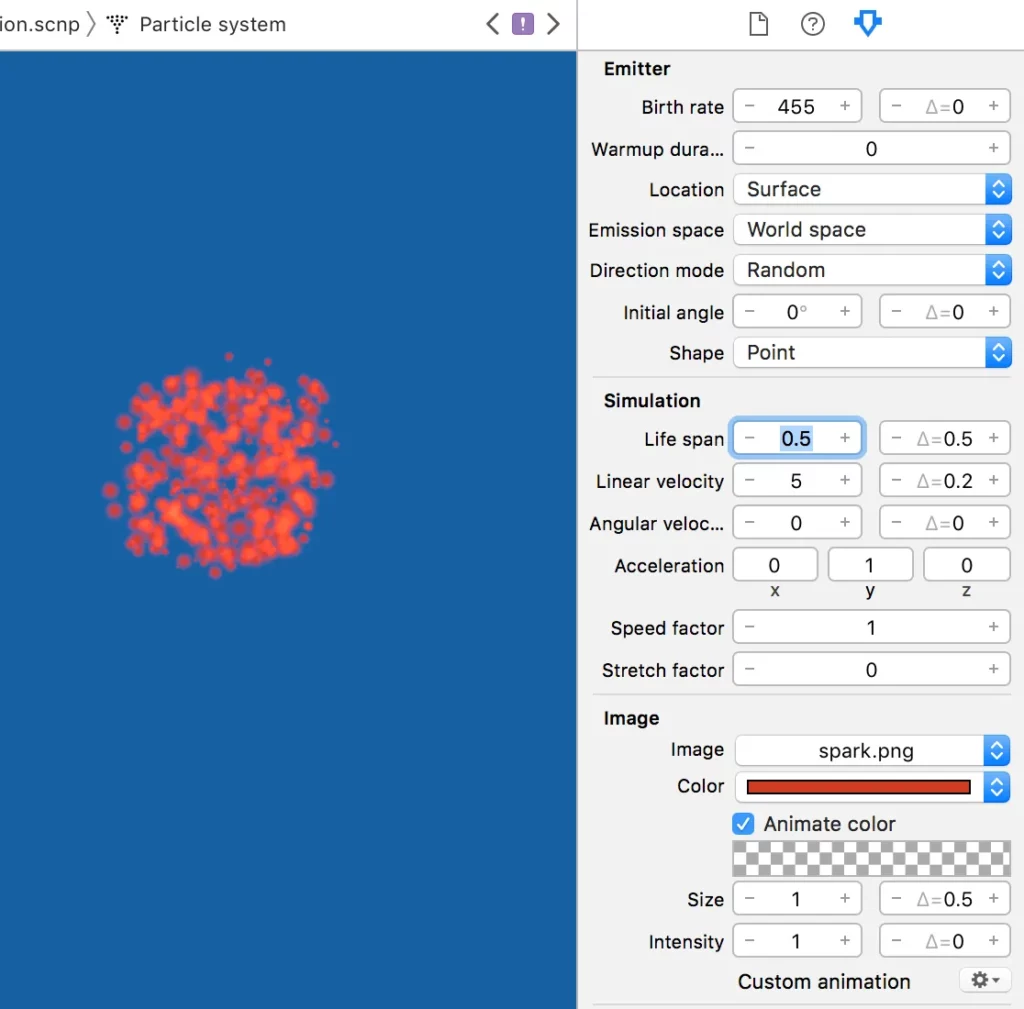
Let’s add a particle system first! Go to File > New > File (or cmd + n) and in the iOS section, select the SceneKit Particle System template. Click next, select Fire as your template, click next, name it Explosion.scnp and then create it.
If you go over to the file, you’ll see a fire. In the inspector, you’ll see all these parameters. I won’t go over particle system in this tutorial. You can play around with them until you have an explosion, or use the file included in the source file. So here’s what I did:
The next thing is to register the collisions. Back in the View Controller, where we place the blocks (in touchesBegan), add this line of code before we set tracking to false:
sceneView.scene.physicsWorld.contactDelegate = selfThis is needed so we can handle collisions. In the definition of the class, add SCNPhysicsContactDelegate just like we did with ARSessionDelegate. It should now look like this:
class ViewController: UIViewController, ARSCNViewDelegate, ARSessionDelegate, SCNPhysicsContactDelegate {To register the collisions, we need to use the physicsWorld function. Add this before viewDidLoad:
func physicsWorld(_ world: SCNPhysicsWorld, didBegin contact: SCNPhysicsContact) {
}
This is to handle when the collision has first begun. Since there’s only one contact/collision, there is no need to check which node hit what. So that means we can add the explosion…right now! Insert this code in physicsWorld:
let ball = contact.nodeA.physicsBody!.contactTestBitMask == 3 ? contact.nodeA : contact.nodeB //1
let explosion = SCNParticleSystem(named: "Explosion.scnp", inDirectory: nil)!
let explosionNode = SCNNode()
explosionNode.position = ball.presentation.position //2
sceneView.scene.rootNode.addChildNode(explosionNode)
explosionNode.addParticleSystem(explosion) //3
ball.removeFromParentNode() //4
We first have to get the ball by finding the node with the contact bit mask of 3 [1]. From there, we grab the particle system, and create an empty node with the ball’s position [2]. Some of you may be asking why we’re using ball.presentation.position instead of ball.position. You see, when a node has a physics body and is moving because of it, the node’s position doesn’t change. The presentation is the actual node you see, so the position will be as you see it.
From there, we can add the explosion node to the scene, then add the particle system to the explosion node [3]. Since we’re meant to give the impression that the balls explode, we have to then destroy them [4].
So now we have explosions! Run the app, and you’ll see that the balls explode.
Conclusion
So we’ve finished the app. We’ve covered quite a bit, and it was quite an exciting journey! You can download the finished product here.
Discuss this post on Hacker News and Reddit.
About Me
My name is Yuma Soerianto. I’m 11 years old and have made eight apps on the iOS App Store. I also have made a few Augmented Reality games — one of which, Let’s Stack AR!, was awarded the Game of the Day!
You can see what I’ve done at www.madebyyuma.com and on on Twitter @yumaSoerianto. Goodbye! ( •)>
Comments 0 Responses