
This tutorial builds a login system for an Android app. The app allows the users to register using a username and a password. A local server implemented in Python using Flask accepts the user data and inserts them into a MySQL database.
For securing the password, it’s encrypted using the MD5 hashing algorithm. After successful registration, the user will be able to log into the system by entering a server-verified username and password.
The sections covered in this tutorial are as follows:
- Creating the MySQL Database
- Creating a Table for a User’s Data
- Building the Flask Server
- Building the Android App Main Screen
- Creating the Registration Form
- Sending Registration Data to the Server
- Building the Login Form
- Sending Login Data to the Server
The GitHub project for this tutorial is available here.
Let’s get started.
Creating the MySQL Database
We’re going to use Python for creating the database. To do that, make sure MySQL is installed on your machine. If it isn’t installed, then you can download the community edition from this page and install it.
If you’re using Windows, then the installer is available here. Just download the version appropriate for your machine and carefully follow the installation instructions. While installing MySQL, you’ll be prompted to enter a username and a password for accessing the databases. It’s important to remember these details for later use.
After MySQL is up and running on your machine, the next step is to access it from Python. To do so, we’re going to use the MySQL module. You can use pip for installing it, if not installed, as follows:
Here’s the Python code used to create a database named chat_db.
import mysql.connector
import sys

try:
    db = mysql.connector.connect(host="localhost", user="root", passwd="ahmedgad")
except:
    sys.exit("Error connecting to the host. Please check your inputs.")

db_cursor = db.cursor()

try:
    db_cursor.execute(operation="CREATE DATABASE chat_db")
except mysql.connector.DatabaseError:
    sys.exit("Error creating the database. Check if database already exists!")

db_cursor.execute("SHOW DATABASES")
databases = db_cursor.fetchall()
print(databases)
The steps for creating the database are as follows:
- Connecting to MySQL.
- Returning a cursor to run operations over the database.
- Executing an operation for creating the database.
Connecting to MySQL
For connecting to MySQL, the mysql.connector.connect() method is used. It accepts 3 arguments:
- host: The URL of the server hosting the database. For local servers, just use localhost.
- user: This is the user name created while installing MySQL.
- passwd: Password of the user, also specified in the MySQL installation.
After successful connection to MySQL, a MySQL handle is returned in the db variable. The next step is to return a cursor for applying operations over the database. This is discussed in the next section.
Returning a Cursor
Connecting to the MySQL database isn’t everything required to start executing operations. A cursor, which is an instance of the MySQLCursor class, must be returned using the cursor() method. In this example, the cursor is returned in the db_cursor variable.
At this point, we’re ready to execute operations over the database.
Executing Operations
Using the execute() method, we can enter a MySQL statement that’s executed over the database. In the above example, a database named chat_db is created using the CREATE DATABASE statement.
After the statement is executed successfully, the SHOW DATABASES statement is executed to fetch all databases within the machine. In order to fetch the return output of the latest MySQL statement, the fetchall() method is used. Here’s the output. chat_db is available in the returned list, which indicates that it is created successfully.
The database has now been created, and we’re ready to create a table within it as explored in the next section.
Creating a Table for a User’s Data
In order to create a table within the previously-created database, here are the steps:
- Connecting to the database: This is done by specifying the host, username, password, and the database to be connected to.
- Returning a database cursor: Returned using the cursor() method, as discussed previously.
- Issuing a CREATE TABLE statement: A statement that specifies the table scheme.
The above steps are implemented in the code below. The table is named users and has the following 6 columns:
- id: primary key
- first_name
- last_name
- username
- password
- registration_date
After the table is successfully created, a DESCRIBE statement is issued to print the user’s table scheme as follows.
At this time, the database is created successfully. The next section creates the Flask server. which accepts the registration data from the Android app and inserts it within the database.
Building the Flask Server
The implementation of the Flask server is listed below. At first, the run() method is prepared to allow the server to listen to the 0.0.0.0 IPv4 address, which means the current IPv4 address of the machine. The port number is 5000. The threaded argument is set to True to allow the server to respond to multiple requests simultaneously.
The server has just a single route() decorator. It binds the homepage of the server to the chat() function. Because we’re working on a local server, it can be accessed using its IPv4 address. If the IPv4 address is, for example, 192.168.1.14, then the homepage is accessed using this URL: http://192.168.1.14:[PORT]/.
The word PORT should be replaced by the port number to which the server listens for incoming requests.
import flask
import mysql.connector
import sys
import json

app = flask.Flask(__name__)

@app.route('/', methods = ['GET', 'POST'])
def chat():
    msg_received = flask.request.get_json()
    msg_subject = msg_received["subject"]

    if msg_subject == "register":
        return register(msg_received)
    elif msg_subject == "login":
        return login(msg_received)
    else:
        return "Invalid request."

def register(msg_received):
    firstname = msg_received["firstname"]
    lastname = msg_received["lastname"]
    username = msg_received["username"]
    password = msg_received["password"]

    select_query = "SELECT * FROM users where username = " + "'" + username + "'"
    db_cursor.execute(select_query)
    records = db_cursor.fetchall()
    if len(records) != 0:
        return "Another user used the username. Please chose another username."

    insert_query = "INSERT INTO users (first_name, last_name, username, password) VALUES (%s, %s, %s, MD5(%s))"
    insert_values = (firstname, lastname, username, password)
    try:
        db_cursor.execute(insert_query, insert_values)
        chat_db.commit()
        return "success"
    except Exception as e:
        print("Error while inserting the new record :", repr(e))
        return "failure"

def login(msg_received):
    username = msg_received["username"]
    password = msg_received["password"]

    select_query = "SELECT first_name, last_name FROM users where username = " + "'" + username + "' and password = " + "MD5('" + password + "')"
    db_cursor.execute(select_query)
    records = db_cursor.fetchall()

    if len(records) == 0:
        return "failure"
    else:
        return "success"
try:
    chat_db = mysql.connector.connect(host="localhost", user="root", passwd="ahmedgad", database="chat_db")
except:
    sys.exit("Error connecting to the database. Please check your inputs.")
db_cursor = chat_db.cursor()
app.run(host="0.0.0.0", port=5000, debug=True, threaded=True)
The chat() function is called after visiting this URL. At first, it receives a JSON object received from the client with some data from the Android app. The Android app and the JSON object it sends will be implemented later. The main job of the chat() function is selecting the appropriate function to handle the request.
The JSON object is saved in the msg_received variable. The JSON object that’s expected by the Flask application has the following 5 fields:
- subject: A string that specifies the function to handle the request.
- firstname
- lastname
- username
- password
The JSON object has a field named subject that specifies the target of the request and helps to select the function that handles the request. If the subject is set equal to register, then the registration function register() will be called. When it is set to login, then the login() function is called.
Once a request with such a JSON object is received, a MySQL SELECT statement is prepared in the select_query variable. It checks whether there is a record that uses the username. If the username is found in the database, then the registration fails because it has to be unique for every user. If the username isn’t found, then a new record will be inserted into the database according to the values inside the JSON object.
The MySQL INSERT query is prepared in the insert_query variable. It’s important to note that the password isn’t saved as plain text in the database but encrypted using MD5. Because the INSERT query asks to make changes in the database, the commit() method must be called to save such changes.
After the query completes successfully, the Flask app returns the word success, which indicates the user has registered successfully. Otherwise, the word failure is returned.
For logging in after registration, a SELECT statement selects a record with the posted username and password. If the return of the SELECT statement isn’t empty, this indicates that the username and password are correct and the user logs in successfully. Therefore, the server returns the word success. Otherwise, the word failure is returned.
In order to run the server, just save it in a Python file and run it. Assuming the file is named flask_server.py, then you can, for example, run it from the CMD according to the following command:
Now that we’ve covered the Flask server implementation, the next step is to discuss the implementation of the Android app that initiates the request. The next section discusses how the registration form works.
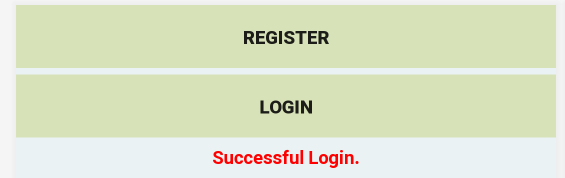
Building the Android App Main Screen
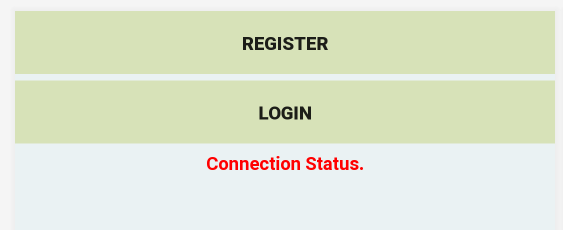
The XML layout of the main screen of the Android app is listed below. It has 2 Button views—one for registration and another for login. There is a TextView for displaying some informational text to the user. For example, it displays text if an error occurred in the connection, after registration completes successfully, and in several other contexts.
<?xml version="1.0" encoding="utf-8"?>
<LinearLayout xmlns:android="http://schemas.android.com/apk/res/android"
    android:layout_width="match_parent"
    android:layout_height="match_parent"
    android:background="#EAF2F3"
    android:orientation="vertical">

    <Button
        android:id="@+id/register"
        android:layout_width="match_parent"
        android:layout_height="wrap_content"
        android:layout_marginBottom="5dp"
        android:background="#D7E2B8"
        android:onClick="register"
        android:text="Register"
        android:textStyle="bold" />

    <Button
        android:id="@+id/login"
        android:layout_width="match_parent"
        android:layout_height="wrap_content"
        android:layout_marginBottom="5dp"
        android:background="#D7E2B8"
        android:onClick="login"
        android:text="Login"
        android:textStyle="bold" />

    <TextView
        android:id="@+id/responseText"
        android:layout_width="match_parent"
        android:layout_height="wrap_content"
        android:layout_marginBottom="5dp"
        android:text="Connection Status."
        android:textAlignment="center"
        android:textColor="#FF0000"
        android:textStyle="bold" />

</LinearLayout>
Here’s what the main screen looks like.
According to the XML file, the register() method is called when the register button is clicked. Similarly, the login() method is called after the login button is clicked. These 2 methods are implemented in the MainActivity Java code listed below. The code does nothing more than make sure the app has access to the internet and implements the login() and register() methods.
package gad.hiai.chat.hiaichat;

import android.Manifest;
import android.content.Context;
import android.content.Intent;
import android.support.v4.app.ActivityCompat;
import android.support.v7.app.AppCompatActivity;
import android.os.Bundle;
import android.view.View;
import android.widget.TextView;

public class MainActivity extends AppCompatActivity {
    public static Context mainActivityContext;

    static String postUrl = "http://192.168.16.102:5000";

    @Override
    protected void onCreate(Bundle savedInstanceState) {
        super.onCreate(savedInstanceState);

        setContentView(R.layout.activity_main);

        ActivityCompat.requestPermissions(MainActivity.this, new String[]{Manifest.permission.INTERNET}, 0);

        mainActivityContext = this;
    }

    public void login(View v) {
        Intent intent = new Intent(this, LoginActivity.class);
        startActivityForResult(intent, 2);
    }

    public void register(View v) {
        Intent intent = new Intent(this, RegisterActivity.class);
        startActivity(intent);
    }

    @Override
    protected void onActivityResult(int requestCode, int resultCode, Intent data) {
        super.onActivityResult(requestCode, resultCode, data);
        TextView responseText = findViewById(R.id.responseText);
        if (requestCode == 2) { // Login
            responseText.setText("Successful Login.");
        } else {
            responseText.setText("Invalid or no data entered. Please try again.");
        }
    }
}
Inside both of the login() and register() methods, a new intent is created for calling another activity, which does the work. The registration activity is named RegisterActivity and the login activity is named LoginActivity. The intents are started, and a result is returned to the main activity from the login intent to indicate whether the user logged in successfully or not.
After discussing the MainActivity, let’s discuss the RegisterActivity in the next section.
Registration Activity
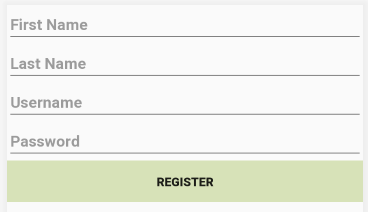
The layout of the RegisterActivity activity is listed below. It contains 4 EditText views for the first name, last name, username, and password. There’s a Button view that calls a method named register() when clicked to send the user inputs to the server. There’s also a TextView for displaying some informational messages to the users in case a problem occurred in the registration process.
<?xml version="1.0" encoding="utf-8"?>
<LinearLayout xmlns:android="http://schemas.android.com/apk/res/android"
    android:layout_width="match_parent"
    android:layout_height="match_parent"
    android:orientation="vertical">

    <EditText
        android:id="@+id/firstName"
        android:layout_width="match_parent"
        android:layout_height="wrap_content"
        android:digits="abcdefghijklmnopqrstuvwxyzABCDEFGHIJKLMNOPQRSTUVWXYZ"
        android:hint="First Name"
        android:singleLine="true"
        android:textStyle="bold" />

    <EditText
        android:id="@+id/lastName"
        android:layout_width="match_parent"
        android:layout_height="wrap_content"
        android:digits="abcdefghijklmnopqrstuvwxyzABCDEFGHIJKLMNOPQRSTUVWXYZ"
        android:hint="Last Name"
        android:singleLine="true"
        android:textStyle="bold" />

    <EditText
        android:id="@+id/username"
        android:layout_width="match_parent"
        android:layout_height="wrap_content"
        android:digits="abcdefghijklmnopqrstuvwxyzABCDEFGHIJKLMNOPQRSTUVWXYZ0123456789"
        android:hint="Username"
        android:singleLine="true"
        android:textStyle="bold" />

    <EditText
        android:id="@+id/password"
        android:layout_width="match_parent"
        android:layout_height="wrap_content"
        android:hint="Password"
        android:inputType="textPassword"
        android:singleLine="true"
        android:textStyle="bold" />

    <Button
        android:id="@+id/registerButton"
        android:layout_width="match_parent"
        android:layout_height="wrap_content"
        android:background="#D7E2B8"
        android:onClick="register"
        android:text="Register"
        android:textStyle="bold" />

    <TextView
        android:id="@+id/responseTextRegister"
        android:layout_width="match_parent"
        android:layout_height="wrap_content"
        android:text=""
        android:textAlignment="center"
        android:textColor="#FF0000"
        android:textStyle="bold" />
</LinearLayout>
The screen of the activity is shown below.
The implementation of the activity is shown below. The register() method gets the data from the EditText views and makes sure they aren’t empty. After that, a JSON object is prepared that holds these inputs. Note that there is a field named subject in the object that’s set to register. This is essential to help the server decide how to handle the request.
package gad.hiai.chat.hiaichat;

import android.support.v7.app.AppCompatActivity;
import android.os.Bundle;
import android.util.Log;
import android.view.View;
import android.widget.Button;
import android.widget.EditText;
import android.widget.TextView;
import android.widget.Toast;

import org.json.JSONException;
import org.json.JSONObject;

import java.io.IOException;

import okhttp3.Call;
import okhttp3.Callback;
import okhttp3.MediaType;
import okhttp3.OkHttpClient;
import okhttp3.Request;
import okhttp3.RequestBody;
import okhttp3.Response;

public class RegisterActivity extends AppCompatActivity {

    @Override
    protected void onCreate(Bundle savedInstanceState) {
        super.onCreate(savedInstanceState);
        setContentView(R.layout.activity_register);
    }

    public void register(View v) {
        EditText usernameView = findViewById(R.id.username);
        EditText firstNameView = findViewById(R.id.firstName);
        EditText lastNameView = findViewById(R.id.lastName);
        EditText passwordView = findViewById(R.id.password);

        String username = usernameView.getText().toString().trim();
        String firstName = firstNameView.getText().toString().trim();
        String lastName = lastNameView.getText().toString().trim();
        String password = passwordView.getText().toString().trim();

        if (firstName.length() == 0 || lastName.length() == 0 || username.length() == 0 || password.length() == 0) {
            Toast.makeText(getApplicationContext(), "Something is wrong. Please check your inputs.", Toast.LENGTH_LONG).show();
        } else {
            JSONObject registrationForm = new JSONObject();
            try {
                registrationForm.put("subject", "register");
                registrationForm.put("firstname", firstName);
                registrationForm.put("lastname", lastName);
                registrationForm.put("username", username);
                registrationForm.put("password", password);
            } catch (JSONException e) {
                e.printStackTrace();
            }

            RequestBody body = RequestBody.create(MediaType.parse("application/json; charset=utf-8"), registrationForm.toString());

            postRequest(MainActivity.postUrl, body);
        }
    }

    public void postRequest(String postUrl, RequestBody postBody) {
        OkHttpClient client = new OkHttpClient();

        final Request request = new Request.Builder()
                .url(postUrl)
                .post(postBody)
                .header("Accept", "application/json")
                .header("Content-Type", "application/json")
                .build();

        client.newCall(request).enqueue(new Callback() {
            @Override
            public void onFailure(Call call, IOException e) {
                call.cancel();
                Log.d("FAIL", e.getMessage());

                runOnUiThread(new Runnable() {
                    @Override
                    public void run() {
                        TextView responseText = findViewById(R.id.responseTextRegister);
                        responseText.setText("Failed to Connect to Server. Please Try Again.");
                    }
                });
            }

            @Override
            public void onResponse(Call call, final Response response) {
                final TextView responseTextRegister = findViewById(R.id.responseTextRegister);
                try {
                    final String responseString = response.body().string().trim();
                    runOnUiThread(new Runnable() {
                        @Override
                        public void run() {
                            if (responseString.equals("success")) {
                                responseTextRegister.setText("Registration completed successfully.");
                                finish();
                            } else if (responseString.equals("username")) {
                                responseTextRegister.setText("Username already exists. Please chose another username.");
                            } else {
                                responseTextRegister.setText("Something went wrong. Please try again later.");
                            }
                        }
                    });
                } catch (Exception e) {
                    e.printStackTrace();
                }
            }
        });
    }
}
After preparing the JSON object, the HTTP request is prepared using the OkHttp library. For more information about building the request, read my previous tutorial titled Image Classification on Android using a Keras Model Deployed in Flask.
There’s a method named postRequest() that posts the request to the server. The Android app waits for a response from the server. Once a response is received, the onResponse() method is called. The RegisterActivity finishes after the registration completes successfully.
Now that we’ve discussed setting up the RegisterActivity, in the next section we’ll look at the LoginActivity.
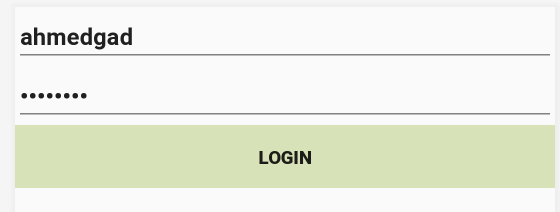
Login Activity
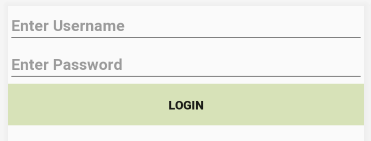
The layout of the LoginActivity is shown below. There are 2 EditText views for accepting the username and the password. A Button view calls a method named submit() for posting an HTTP request to the server. Finally, a TextView displays some informational messages to the user.
<?xml version="1.0" encoding="utf-8"?>
<LinearLayout xmlns:android="http://schemas.android.com/apk/res/android"
    xmlns:tools="http://schemas.android.com/tools"
    android:layout_width="match_parent"
    android:layout_height="match_parent"
    android:orientation="vertical"
    tools:context=".LoginActivity">

    <EditText
        android:id="@+id/loginUsername"
        android:layout_width="match_parent"
        android:layout_height="wrap_content"
        android:digits="abcdefghijklmnopqrstuvwxyzABCDEFGHIJKLMNOPQRSTUVWXYZ0123456789"
        android:hint="Enter Username"
        android:singleLine="true"
        android:textStyle="bold" />

    <EditText
        android:id="@+id/loginPassword"
        android:layout_width="match_parent"
        android:layout_height="wrap_content"
        android:hint="Enter Password"
        android:inputType="textPassword"
        android:singleLine="true"
        android:textStyle="bold" />

    <Button
        android:layout_width="match_parent"
        android:layout_height="wrap_content"
        android:background="#D7E2B8"
        android:onClick="submit"
        android:text="Login"
        android:textStyle="bold" />

    <TextView
        android:id="@+id/responseTextLogin"
        android:layout_width="match_parent"
        android:layout_height="wrap_content"
        android:text=""
        android:textAlignment="center"
        android:textColor="#FF0000"
        android:textStyle="bold" />

</LinearLayout>
The screen of the LoginActivity is shown below.
The implementation of the LoginActivity is shown below. Like how the HTTP post is prepared and sent while registering the user, the user inputs are prepared in a JSON object and sent to the server for verification. The response from the server can be either success or failure. This helps the Android app display an appropriate message to the user. Once the user is logged in successfully, the LoginActivity finishes to return back to the MainActivity.
package gad.hiai.chat.hiaichat;

import android.content.Intent;
import android.support.v7.app.AppCompatActivity;
import android.os.Bundle;
import android.util.Log;
import android.view.View;
import android.widget.EditText;
import android.widget.TextView;
import android.widget.Toast;

import org.json.JSONException;
import org.json.JSONObject;

import java.io.IOException;

import okhttp3.Call;
import okhttp3.Callback;
import okhttp3.MediaType;
import okhttp3.OkHttpClient;
import okhttp3.Request;
import okhttp3.RequestBody;
import okhttp3.Response;

public class LoginActivity extends AppCompatActivity {

    @Override
    protected void onCreate(Bundle savedInstanceState) {
        super.onCreate(savedInstanceState);
        setContentView(R.layout.activity_login);
    }

    public void submit(View v) {
        EditText usernameView = findViewById(R.id.loginUsername);
        EditText passwordView = findViewById(R.id.loginPassword);

        String username = usernameView.getText().toString().trim();
        String password = passwordView.getText().toString().trim();

        if (username.length() == 0 || password.length() == 0) {
            Toast.makeText(getApplicationContext(), "Something is wrong. Please check your inputs.", Toast.LENGTH_LONG).show();
            return;
        }

        JSONObject loginForm = new JSONObject();
        try {
            loginForm.put("subject", "login");
            loginForm.put("username", username);
            loginForm.put("password", password);
        } catch (JSONException e) {
            e.printStackTrace();
        }

        RequestBody body = RequestBody.create(MediaType.parse("application/json; charset=utf-8"), loginForm.toString());

        postRequest(MainActivity.postUrl, body);
    }

    public void postRequest(String postUrl, RequestBody postBody) {
        OkHttpClient client = new OkHttpClient();

        Request request = new Request.Builder()
                .url(postUrl)
                .post(postBody)
                .header("Accept", "application/json")
                .header("Content-Type", "application/json")
                .build();

        client.newCall(request).enqueue(new Callback() {
            @Override
            public void onFailure(Call call, IOException e) {
                // Cancel the post on failure.
                call.cancel();
                Log.d("FAIL", e.getMessage());

                // In order to access the TextView inside the UI thread, the code is executed inside runOnUiThread()
                runOnUiThread(new Runnable() {
                    @Override
                    public void run() {
                        TextView responseTextLogin = findViewById(R.id.responseTextLogin);
                        responseTextLogin.setText("Failed to Connect to Server. Please Try Again.");
                    }
                });
            }

            @Override
            public void onResponse(Call call, final Response response) throws IOException {
                // In order to access the TextView inside the UI thread, the code is executed inside runOnUiThread()
                runOnUiThread(new Runnable() {
                    @Override
                    public void run() {
                        TextView responseTextLogin = findViewById(R.id.responseTextLogin);
                        try {
                            String loginResponseString = response.body().string().trim();
                            Log.d("LOGIN", "Response from the server : " + loginResponseString);
                            if (loginResponseString.equals("success")) {
                            Log.d("LOGIN", "Successful Login");
                                finish();//finishing activity and return to the calling activity.
                            } else if (loginResponseString.equals("failure")) {
                                responseTextLogin.setText("Login Failed. Invalid username or password.");
                            }
                        } catch (Exception e) {
                            e.printStackTrace();
                            responseTextLogin.setText("Something went wrong. Please try again later.");
                        }
                    }
                });
            }
        });
    }
}
After creating the database, in addition to implementing the Flask server and the Android app, we’re ready to test the system.
Testing the System
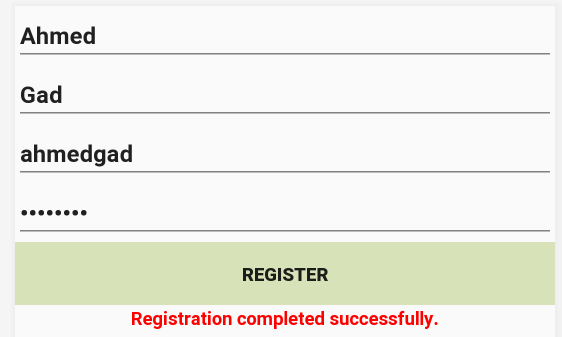
When the application starts, the user registers by clicking on the REGISTER button and entering the requested details. After clicking the form submission button, the registration completes (if the username wasn’t already taken).
After successful registration, the user can login with the username and password.
If the user enters a correct username and password, they’ll be redirected to the MainActivity after clicking on the LOGIN button—here, a message is displayed indicating that the user has logged in successfully.
Conclusion
This tutorial discussed building a login system for Android. The app allows users to register by entering a username and a password. A record for the users will be created in a MySQL database. Later, the users can login with such details. In a future tutorial, the app will be extended to allow adding, registering, and verifying an e-mail address.

Comments 0 Responses