
There’s a joke going around the dev community about serverless tech stacks using servers! Some even take this in an offensive way. But what’s missing from this joke are the advantages serverless computing has to offer.
Reduced development time and cost-effective operations are a couple of factors that we should be looking for, and Amplify as a serverless solution offers you that. Spending time and energy writing and wiring your application is worth more than continuously managing resources and worrying about them when it’s time to scale. Serverless is a pragmatic solution for many use cases in web and mobile development.
In this tutorial, you’ll be learning how to integrate a serverless computing service called AWS Amplify in a mobile app using React Native. AWS Amplify has a complete toolchain with authentication, a choice between the wiring and managing GraphQL or REST API, data storage, push notifications, and analytics.
Table of Contents
- What is AWS Amplify?
- Requirements
- Getting Started
- Configure Amplify User
- Initialize AWS Amplify
- Add a GraphQL API
- Publish API to AWS Cloud
- Integrating Expo app with Amplify SDK
- Adding a To-Do Input Field
- Adding a Mutation using GraphQL API
- Run Query to fetch data
- Conclusion
What is AWS Amplify?
Amazon Web Service is a well-known technology that provides cloud services. Since its launch in 2017, Amplify has come a long way in terms of providing a definitive toolchain. The first thing that attracts me personally is that it’s open source.
Next, there are a number of really helpful CLI plugins and services that you can enable with one click when integrating with a framework like React Native ( or any other). Services such as support for GraphQL and REST APIs, basic UI components to get you started, authentication HOCs, storage, hosting, and many more are available in its toolchain.
Requirements
Here is a complete list of plugins, packages, and services you’re going to need in order to gain something from this tutorial:
- NodeJS v8.x.x or higher installed along with npm/yarn
- watchman: The file change watcher for React Native projects
- AWS account
- Amplify CLI plugin
- Expo CLI (previously known as create-react-native-app)
Getting Started
After you have the first three requirements from the previous section, install the last two. Both of them are command line plugins to scaffold and configure our React Native + AWS Amplify project. Open a terminal window and execute the following command:
npm install -g @aws-amplify/cli expo-cliOnce both of the CLIs are installed, make sure you’re on the same version (at least the major one) as we are:
amplify --version
# Output
1.6.6

expo-cli --version
# Output
2.15.4
Next, let’s create a new React Native project using Expo CLI.
expo-cli init expo-amplify-demoYou’ll be prompted to answer a few questions. The first and most important one is choosing a workflow. Choose the default option— blank. Then it will prompt you to enter the name of your app. You can leave it as default or enter a name. You can use yarn to install dependencies by pressing Y. After a few moments, a new project directory will appear in the desired location. Traverse inside it before we proceed to the next step.
Configure Amplify User
Once you’re signed-in to AWS console, open up a terminal window and run the following command:
amplify configureThis will open up the AWS console dashboard. Go back to terminal and press enter to continue.
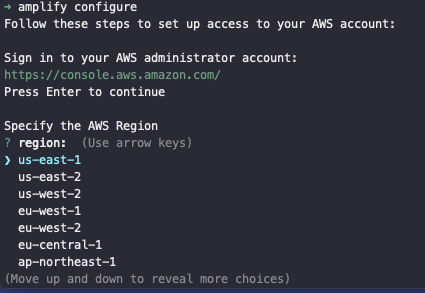
This will lead you through a bunch of questions in order to configure a user account to use Amplify with the React Native application. These questions are as following:
- Choose a region: us-east-2
- Specify the username of the new IAM user: expo-amplify-demo
On entering the username, press enter and the AWS console will open again in a browser window for you to add a user.
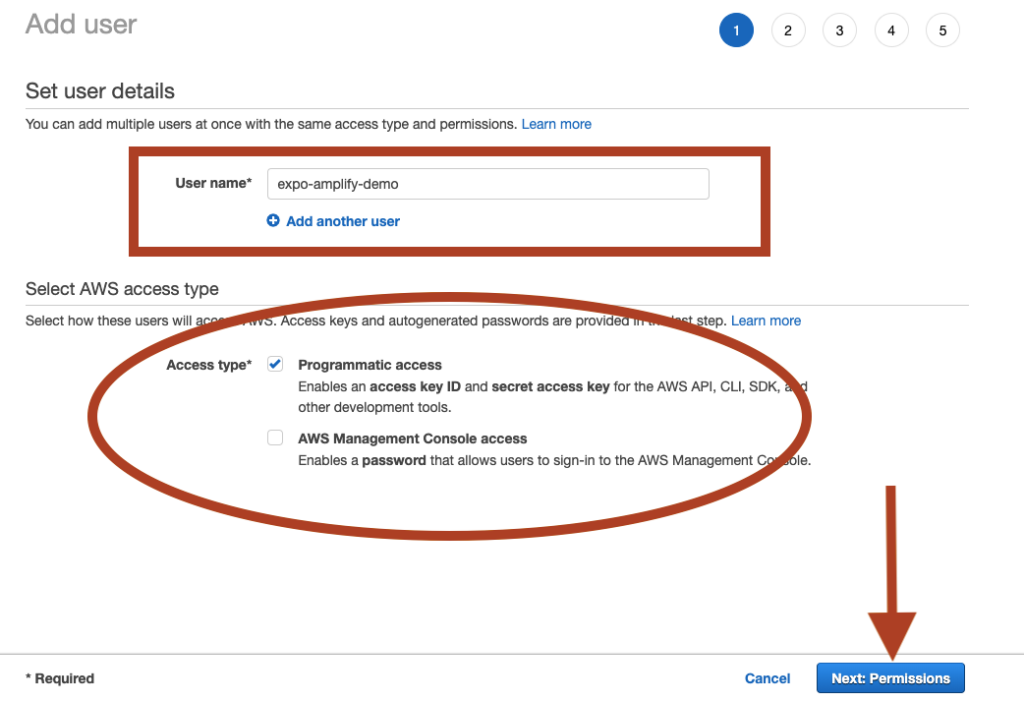
In the above screen, make sure that Programmatic access is checked. It allows the newly-created user to have access to create resources in the form of different APIs and tools, providing you with an access key and secret key. Then click on the button Next: Permissions.

In the above screen, you’ll notice that a policy has been selected by default. Let it be. This provides you full access to AWS services by enabling the AWS user ( the current user you are creating) to be an administrator. Then, click on Next: Tags.
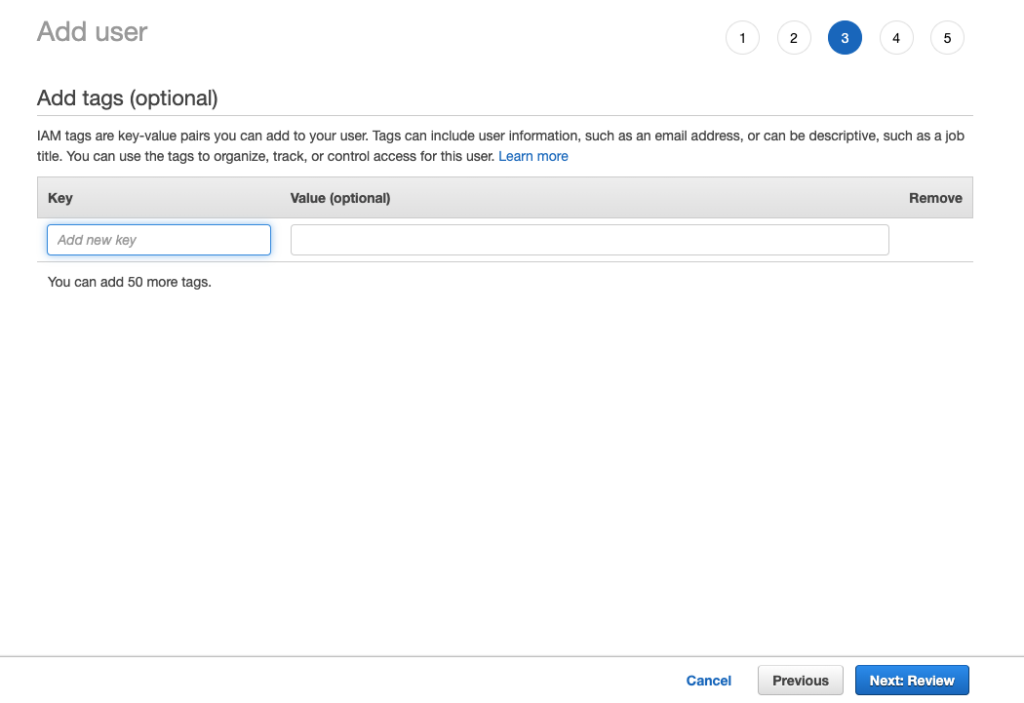
Leave this one blank, and click on Next: Review.
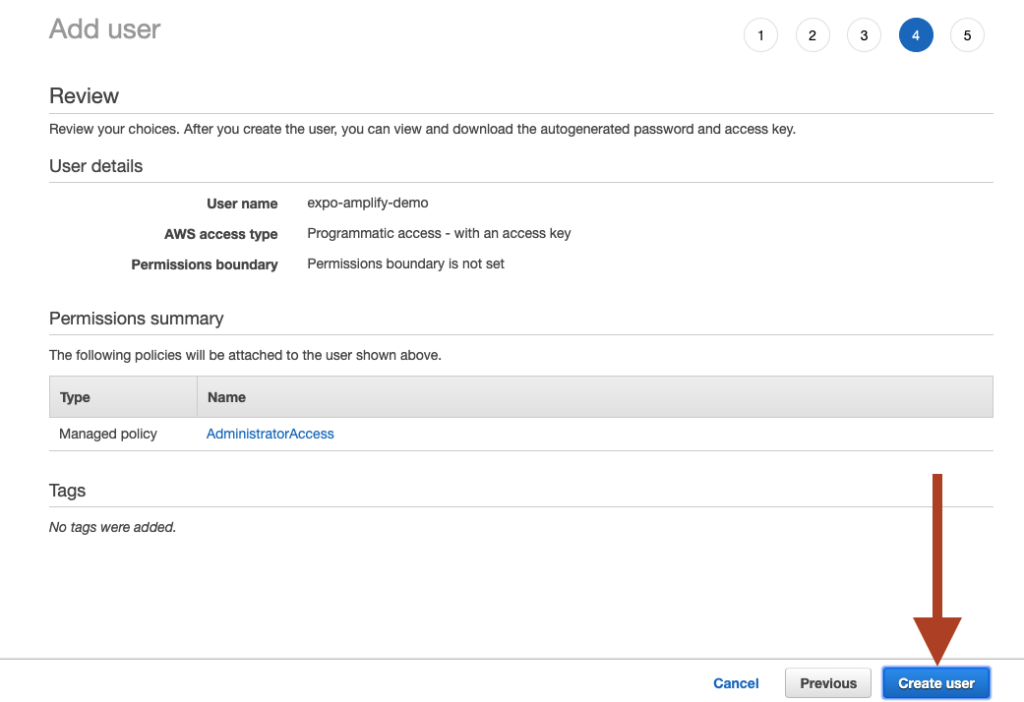
Click on Create user on the next page and you’ll be directed to a new page where you’ll find your Access Key and Secret Key. Don’t close this window yet.
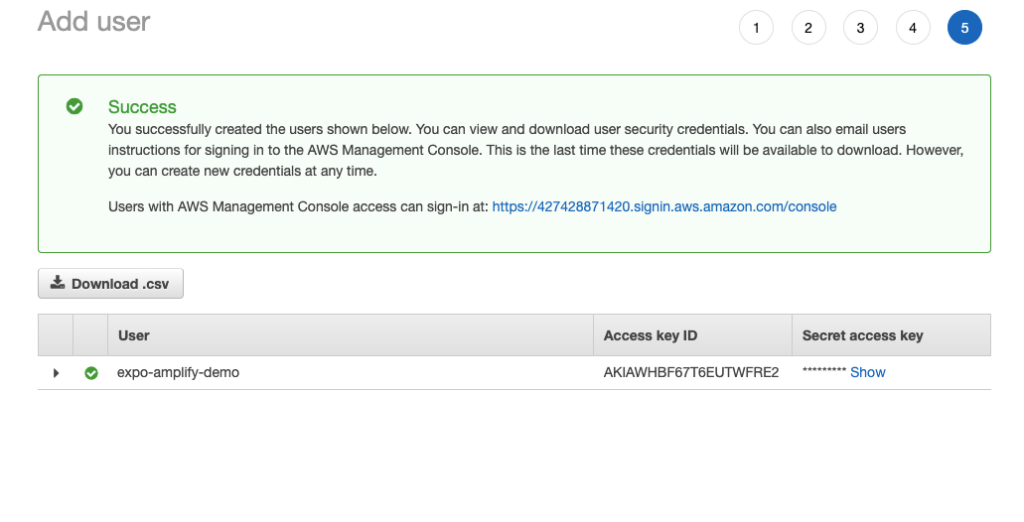
Go to your terminal window, press the Enter key and when prompted, enter your Access Key and the Secret Key sequentially. Lastly, it will ask you about the profile name. You can enter the project name or user name here. Pressing enter for the last time will create a new AWS user. This section is complete.
Initialize AWS Amplify
To integrate AWS Amplify with the React Native app run the following command and be ready to answer a few more questions 😄.
I know, I know. But imagine not having these questions. The amount of setup being performed right now just by answering a few questions and pressing enters a few times adds a lot of value and ultimately saves time.
Open a terminal window, and make sure you’re inside the React Native/Expo directory.
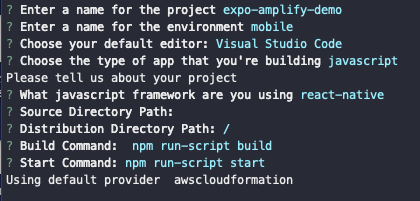
amplify initThis command will help you setup the Amplify SDK inside the React Native app. First, a few set of questions that are prompted can be seen below.
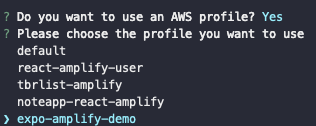
Next, you’ll be prompted with a question on whether to use an AWS profile or not. You have to choose Yes and then on to the next question, choose the user name that you created in the previous steps when configuring Amplify. If you’re setting up for the time, you’re probably going to have only one username in the list, unlike below.
After the Amplify SDK initialization process is complete, notice there are some new file changes inside the project directory. A new directory amplify/ and a new file aws-exports.js
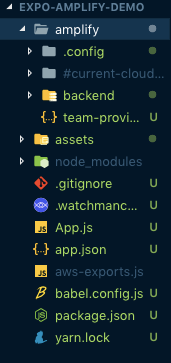
The amplify directory takes care of the configuration files required in order to setup and makes the Amplify SDK work with the current React Native app. These configuration files are further divided into two parts. One set of files is just for your local machine and the other is for AWS cloud.
Please remember, whenever you make changes related to Amplify SDK in your app, they are, by default, modifications made to the local part or development part. When you’re done making modifications and are ready to deploy your changes to the cloud, you can use special amplify commands such as push. After running this push command, any changes are only written in AWS cloud.
The file aws-exports.js contains details related to the Amplify cloud service and credentials for the SDK to be imported inside the React Native app. You will be using this file later on.
// WARNING: DO NOT EDIT. This file is automatically generated by AWS Amplify. It will be overwritten.

const awsmobile = {
	aws_project_region: "us-east-2"
}

export default awsmobile
Add a GraphQL API
In your React Native app, you’ll be have an API that performs CRUD operations. CRUD stands for Create, Read, Update, and Delete. The Amplify toolchain makes this process easier using its own backend and data storing capabilities. Amplify supports HTTP requests to REST and GraphQL endpoints. Using AWS AppSync, you can easily build data-driven applications in real-time with offline capabilities.
To set up an entire API for the app, all you have to do is execute the below command.
amplify add apiThis CLI execution automatically does a couple things. First, it creates a fully functional GraphQL API including data sources, resolvers with basic schema structure for queries, mutations, and subscriptions. It also downloads client-side code and configuration files that are required in order to run these operations by sending requests. The above command will prompt you to choose between what type of API you want to write in. Choose GraphQL, and enter a profile API name.
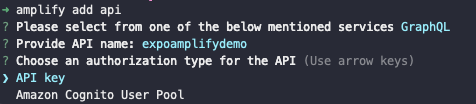
Next, it will again give you two options as to how you want to authenticate your AWS AppSync API. In a real-time application, you’ll have different users accessing the database and making requests to it. For that, you’ll always go with Amazon Cognito User Pool. This is a more pragmatic approach. That step needs an authentication process, which we’ll be covering in a future post. For the current demo, choose the option API Key.
Do note that this option is only for brief prototype sessions or the development process. Any AppSync API key expires after a seven day lifecycle.
For the next question Do you have an annotated GraphQL schema? the answer is N or no. Amplify comes with pre-defined schemas that can be changed later. Press Y for the next question: Do you want a guided schema creation?

Select single object with fields. Next, it will ask if you want to edit the GraphQL Schema. Say yes to that for now. This will open up a new file called schema.graphql which contains a schema of type Todo with a different set of fields. This step does create a new folder inside amplify/backend/api/ that contains the metadata information related to the GraphQL API.

Here’s the model inside the schema.graphql file:
type Todo @model {
	id: ID!
	name: String!
	description: String
}
If you’re not familiar with GraphQL models and its types here’s a brief overview.
A type in a GraphQL schema is a piece of data that’s stored in the database. Each type can have a different set of fields. You can think of a type as an object coming from the JavaScript background. For example, in the above schema for the Todo model is the type that has three fields: id, name and description. Also, @model is used for storing types in Amazon DynamoDB. This is the database used by Amazon when storing our app data.
Every type in a database generates a unique identity to each piece of information stored to further identify and persist in CRUD operations through HTTP requests. In this case, the id is generated by Amplify and has a value of a built-in type of id which, in GraphQL terminology, is known as a scalar type. You can read more about the different types identified in a GraphQL schema here.
The exclamation mark ! signifies that the field is required when storing the data and it must have a value. In the above schema, there are two required fields: id and name for the Todo type.
Save this file, go back to the terminal window and press enter. You’ll be prompted with a success message (probably in green). All the changes you have just made are now saved locally.
Publish API to AWS Cloud
To publish all the changes you’ve made (or left as default) in the local environment to AWS Cloud, run the command amplify push.
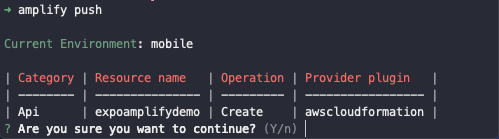
On running the command, as a prompt, you get a table in return with information about resources that you’ve used and modified or enabled. The name of these resources is described in the Category section. The Resource name in the above table is the API name you choose in the previous section.
The next column is the type of operation needed to send the API—currently, Create. The provider plugin column signifies that these resources are now being published to the cloud. Press Y to continue.
The Amplify CLI interface will now check for the schema and then compile it for any errors before publishing final changes to the cloud.

In the next step, you’ll be prompted to choose whether you want to generate code for your newly created GraphQL API. Press Y. Then choose JavaScript as the code generation language. If you’re debating between using TypeScript or flow, now is the time to pick one.
In the above image, for the last question, press Y. This will create a new folder inside the src directory that contains the GraphQL schema, query, mutations, and subscriptions as JavaScript files. On operating the API, these files are accessible for different operations later.
Press Y to the next question that asks you to update all GraphQL related operations. Also, let maximum statement depth be the default value of 2. It will take a few moments to update the resources on AWS cloud and will prompt you with a success message when done.

At the end of the success message, you’ll get a GraphQL API endpoint and a GraphQL API Key (which, as we learned previously, expires on the 7th day). You don’t have to save it somewhere on your desktop and panic. This information is added to the aws-exports.js file automatically for you.
Integrating Expo app with Amplify SDK
To make use of the Amplify SDK in the React Native app, install the following dependencies:
yarn add aws-amplify aws-amplify-react-nativeThe package aws-amplify allows you to make requests to the auth and API services provided by AWS. The other package aws-amplify-react-native is specific to React Native. It’s a library that contains a lot of useful project components. You can verify that both of these packages were installed by peeking into the package.json file > dependencies.
"dependencies": {
    "aws-amplify": "^1.1.26",
    "aws-amplify-react-native": "^2.1.10",
    "expo": "^32.0.0",
    "react": "16.5.0",
    "react-native": "https://github.com/expo/react-native/archive/sdk-32.0.0.tar.gz"
  },
Open App.js and add the configuration keys from aws-exports-.js and make the Amplify SDK aware of them.
// App.js
import React from "react"
import { StyleSheet, Text, View } from "react-native"

// ---------This is the part to add
import Amplify from "aws-amplify"
import config from "./aws-exports"

Amplify.configure(config)

// -----------------------------
That’s it for the integration part. Now let’s write some GraphQL interactions and make sure it works with our React Native app in real-time.
Adding a To-Do Input Field
To capture the user input, we’re going to use a component state. Add the below code before the render method inside the App component:
//App.js
state = {
	name: "",
	todos: []
}
In the above state, there’s a name field of the to-do item and an array called todos that will be used to fetch all the to-do items from the GraphQL API and display them on the UI. Note that there’s another field called description in the GraphQL schema, but since it isn’t required, we’re not going to use it here.
Next, import TextInput and TouchableOpacity to create an input field and native button. Here’s the complete code for App.js:
import React from "react"
import { StyleSheet, Text, View, TextInput, TouchableOpacity } from "react-native"

import Amplify from "aws-amplify"
import config from "./aws-exports"

Amplify.configure(config)

export default class App extends React.Component {
	state = {
		name: "",
		todos: []
	}

	onChangeText = (key, val) => {
		this.setState({ [key]: val })
	}

	addTodo = () => {}

	render() {
		return (
			<View style={styles.container}>
				<TextInput
					style={styles.input}
					value={this.state.name}
					onChangeText={val => this.onChangeText("name", val)}
					placeholder='Add a Todo'
				/>
				<TouchableOpacity onPress={this.addTodo} style={styles.buttonContainer}>
					<Text style={styles.buttonText}>Add +</Text>
				</TouchableOpacity>
			</View>
		)
	}
}

const styles = StyleSheet.create({
	container: {
		flex: 1,
		backgroundColor: "#fff",
		paddingHorizontal: 10,
		paddingTop: 50
	},
	input: {
		height: 50,
		borderBottomWidth: 2,
		borderBottomColor: "blue",
		marginVertical: 10
	},
	buttonContainer: {
		backgroundColor: "#34495e",
		marginTop: 10,
		marginBottom: 10,
		padding: 10,
		borderRadius: 5,
		alignItems: "center"
	},
	buttonText: {
		color: "#fff",
		fontSize: 24
	}
})
Go to the terminal window and run the command npm start to view this either in an iOS simulator or an Android emulator. You’ll get the following result:

Adding a Mutation using the GraphQL API
A mutation in GraphQL is all about handling operations like adding, deleting, or modifying data. Currently, the React Native application is basic, but it serves the purpose of making you familiar with Amplify as a toolchain and its integration with the cross-platform framework. To add a to-do item and to retrieve the same you need some business logic to communicate with the GraphQL backend. Let’s start with a mutation.
In the file App.js, import API and graphqlOperation from aws-amplify. Here, API is the category for AWS resource and the latter is the method to run either a mutation or the query. Inside the src/graphql/mutation.js file, you’ll find some mutation functions that we can make use of to create, delete, or update a note in the database. Also import createTodo from this file.
//App.js

// ...
import Amplify, { API, graphqlOperation } from "aws-amplify"
import config from "./aws-exports"
import { createTodo } from "./src/graphql/mutations"
// ...
Add a function addTodo before the render method which uses the API.graphqlOperation() method from the Amplify SDK. This method will input the mutation as the first argument and whatever the user inputs inside the app UI as the second argument.
// App.js

addTodo = async event => {
	const { name, todos } = this.state

	event.preventDefault()

	const input = {
		name
	}

	const result = await API.graphql(graphqlOperation(createTodo, { input }))

	const newTodo = result.data.createTodo
	const updatedTodo = [newTodo, ...todos]
	this.setState({ todos: updatedTodo, name: "" })
}
The above function takes name as the input where name is the text of a to-do item. Also, notice the use of async/await. This helps to fetch the result from the mutation and update the todos array in the state with the latest to-do item and previous or existing data in that array. After updating the state, clear the value of the input field name, and display it in the UI by setting it back to an empty string.
I urge you to add at least one list item. Otherwise, you won’t get any confirmation from the API regarding whether the data field has been added to the GraphQL backend or not.
Run Query to Fetch Data
If you want to read data (and render it in the UI of the app), the process is known as a query. To fetch all the data from the GraphQL API and display it on the device’s screen, let’s use the query from Amplify’s pre-generated GraphQL file inside src/graphql/queries.js (just like we did with mutation).
// eslint-disable
// this is an auto generated file. This will be overwritten

export const getTodo = `query GetTodo($id: ID!) {
  getTodo(id: $id) {
    id
    name
    description
  }
}
`
export const listTodos = `query ListTodos(
  $filter: ModelTodoFilterInput
  $limit: Int
  $nextToken: String
) {
  listTodos(filter: $filter, limit: $limit, nextToken: $nextToken) {
    items {
      id
      name
      description
    }
    nextToken
  }
}
`
Import listTodos inside App.js from the above file:
//App.js
import { listTodos } from "./src/graphql/queries"
We need to fetch the data at the moment when the component gets rendered. For this, let’s use a lifecycle method called componentDidMount. Since this is going to be an asynchronous operation, async/await is being used here, too. Just after the state is defined in the App component, add the following snippet of code:
// App.js
async componentDidMount() {
        try {
            const todos = await API.graphql(graphqlOperation(listTodos))
            console.log("todos: ", todos)
            this.setState({ todos: todos.data.listTodos.items })
        } catch (err) {
            console.log("error: ", err)
        }
    }
Refresh the app by saving the file and you’ll notice that on the UI screen nothing happens. That’s because we haven’t added the rendering logic to display this list of items. However, you can verify that data is being fetched using the console statement and by looking quickly at the Expo CLI.
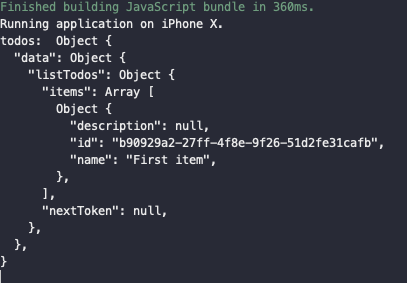
During the previous step, I did add an item to the list. The above screenshot is proof of this. Now let’s display this item on the device’s screen. Inside the render method, add this after the TouchableOpacity component. We’re going to use JavaScript’s map function to traverse the todos array:
// App.js

    {this.state.todos.map((todo, index) => (
                    <View key={index} style={styles.todo}>
                        <Text style={styles.name}>{todo.name}</Text>
                    </View>
                ))}

// Corresponding styles for above jsx

todo: {
        borderBottomWidth: 1,
        borderBottomColor: "#ddd",
        paddingVertical: 10
    },
    name: { fontSize: 16 }
On running npm start (or if it’s already running, just the save the App.js file) you’ll get the following output:

Conclusion
This tutorial is complete. I’m sure by now you’ve gained enough knowledge to build your own React Native app integrated with AWS Amplify and AppAsync. Also, did you notice the amount of code written inside App.js? It’s far less than a traditional app that uses self-backend techniques. This bare minimum demo can serve you a lot better.

Comments 0 Responses