
Cross-platform mobile app development had always been a dream for both iOS and Android app developers. Even with the existence of tools like Cordova and Ionic, this dream has long remained elusive, as these tools resulted in performance that was no where near native performance.
Many argue that React Native is the best framework for the same, but ever since the launch of Flutter, this has started to change.
Flutter is Google’s open-source UI toolkit based on the Dart programming language. It’s designed to allow devs to build natively-compiled mobile, web, and desktop apps from a single codebase, and it has loads of advantages over other cross-platform frameworks.
It’s well-documented, supported by IDEs, provides (close to) native performance, and has bunch of features like hot reload and hot restart that make core app development processes more convenient.
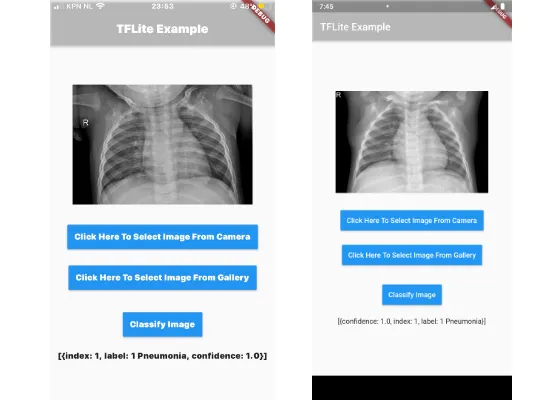
In this tutorial, we’ll build an app using Flutter that runs on both iOS and Android (using the exactly same codebase) and classifies images of chest CTs based on whether they show signs of pneumonia or not. We’ll do this using a TensorFlow Lite model.
Getting the model
For this example I used this dataset from Kaggle and trained on it using Teachable Machine.
It’ll have two files: model_unquant.tflite and labels.txt
Building the app
You can create your Flutter project either through VS Code’s command palette if you have the Flutter extension installed (recommended), or run the following command in the directory where you want to create your project:
flutter create -i swift -a kotlin tflite_example
This creates the Flutter project named tflite_example, using Swift for iOS and Kotlin for Android.
Next, we create a folder called “assets ” in the project directory and add the TFLite model files to it.
Configurations and Dependencies
Before building the actual app, we need to add our dependencies to the pubspec.yaml file by adding the following lines:
Now we need to add the model files to the project by adding the following in the same pubsbec.yaml file:
We’re almost done with the configurations now—we just need to make some changes in the android/app/build.gradle file. Under the android block add the following:
This prevents the model from being compressed when being compiled for the Android platform.
Writing code (finally)
Now comes the interesting part—writing the actual app. We begin by clearing out the current code in the main.dart file.
We need to import the required libraries and packages:
We import the image_picker to help us fetch images from the device, tflite to load the model and perform classification, and the standard material design and input/output packages.
Every Flutter app needs a main method that runs the app using a class of type StatelessWidget . We incorporate this by adding the following lines:
Here, we’ve created a main method called when the app is started. This main method then calls the MyApp class, which extends StatelessWidget, making the entire app a widget (everything is a widget in Flutter).
In the MyApp class, we build the Scaffold widget from the default Material library, which provides an app bar title and color and also a body property that holds the widget tree for the app.
In our case, the body property holds the MyImagePicker class, which we’ll define in a moment.
In Flutter, StatelessWidget classes are immutable, which means nothing inside them can change, so for an app to perform functions, stateful widgets are needed. These are created through a StatefulWidget class, which further creates an instance of a State class.
We now create a StatefulWidget and a State class:
This is the StatefulWidget class, which now instances theMyImagePickerState class. We’ll define this now:
Now that we’ve defined all the required classes, the main class MyApp , the stateful widget class MyImagePicker, and the state class MyImagePickerState , we’ll move on and write the core functionality of our app.
We need to declare three variables:
- imageURI: to save the image loaded from the device
- path: to store the path of the image loaded (used to perform classification)
- and result: to save the result of the classification from the TFLite model.
Now that we have the variables we need write functions to get image from the device and to preform classification. For these functions we’ll use Future which is an asynchronous programming tool in Flutter. A Future allows you to run work asynchronously to free up any other threads.
We write our first function by adding the following to the MyImagePickerState class:
In the above code, we declare a var of type ImagePicker (which we get from our dependency) with a source of type .camera . So when this function is called, the user takes a picture with the camera.
We then implement the setState() function, which notifies the framework that the internal state of the object has changed, and saves the image that’s been clicked to the imageURI variable, and the path of the image to the corresponding variable.
Similarly, we implement the function to get an image from the gallery:
So now that we have the functions to get the image from the device, we need to write one last function to perform classification on the selected image.
We do so by adding the following to the same class:
In this function, we first load the model using Tflite.loadModel() and then run the model on the image selected by the user using the path. We then store the result in the output variable. We use the path instead of the image itself, because the tflite package cannot run the model on File data types. In setState(), we store the output as a string to the result variable.
We finally have all the functions we need—now it’s time to build the layout.
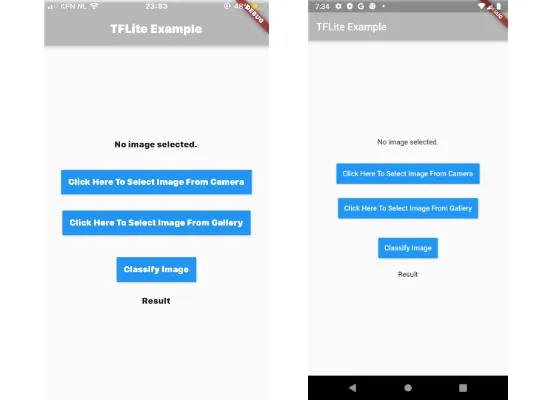
The layout is pretty self-explanatory—an image loaded from the device, two buttons to load the image from the camera or from the gallery, a button to perform classification, and a result text.
To build this layout, we add the following Widget build function in the MyImagePickerState class:
Similar to what we discussed before, the Scaffold widget provides a body property, which now contains our widget tree.
Firstly, we check to see if the imageURI variable has an image. If so, we display it; otherwise we add default text.
This is followed by three containers, which contain RaisedButton widgets for our buttons to load images and classify them. We add the text, color, and padding to the buttons and define which function to call when the button is pressed in the OnPressed() property.
At the end, we check to see if the results variable has the output and display it. Or if it’s empty, we again just show some default text.
We are now done and the code is complete. Go ahead and run the app using flutter run on your device or simulator and try it out.
Conclusion
That’s it, our app is done! It isn’t fully-designed, but it shows that cross-platform apps can utilize the power of on-device machine learning without any APIs, while running as fast as native apps (sometimes even faster).
You can find the complete source code here. Go ahead and make this app beautiful and try out what Flutter and TensorFlow Lite have to offer.

Comments 0 Responses