
Every time you want to search for an image similar to another one, you’re more or less left with one option: “Search Google for image”. Have you ever wondered what algorithms are making this happen? This is what we’ll explore in this blog post.
An Overview
There are numerous algorithms present today for this task, and depending on the use cases, the algorithms used can vary. Below are the major categories of image search engines:
- Meta-data Based: These engines hardly consider the substance of the picture. Rather, they depend on literary signs; for example, manual comments and labeling performed by people, alongside automated logical clues, i.e. the content that shows up close to the picture. One website that does this is AlphaCoders—search for images, and notice that in the search results, you’ll find images with the related search tags/keywords. Another example of this is the popular image-based site Flickr.
- Content-Based: This type of engine is commonly known as a Content-based Image Retrieval (CBIR) system. These systems depend exclusively on the substance of the picture — no meta-data is given. The picture’s features are examined and measured, with the goal of returning comparable pictures by the framework. Some real-world examples of this would be Tineye, Google Goggles, and Camfind
- Hybrid: There are multiple use cases where we need both the meta-data as well as the content to be considered. Very common examples include Instagram and Twitter.
Our Goal
In this post, we’re going to create our own CBIR system, where the focus is centered on understanding the content of a given input image. A widely-used technique used in these systems is to use image classification models from major frameworks like TensorFlow or Keras. These are preferred in larger applications because OpenCV has its own drawbacks, which will be more clear from our subsequent experiments. Also, these applications have sufficiently bigger datasets that require the processing power that deep learning techniques provide.
As such, these models aren’t well suited for significantly smaller datasets. Suppose you just have 3–4 images and you want to find the similarity among them. In such cases, working with these complex models isn’t necessary—this task can simply be handled by metrics like Structural Similarity Index (SSIM) and Mean Square Error (MSE). Although there are multiple other ways that are referenced at the end of this post, we’ll stick with these. Let’s talk about these metrics:
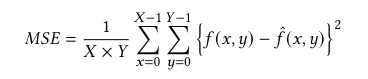
- MSE: Used to calculate picture compression quality. MSE gives the aggregate squared error between the compressed and original images. The higher MSE, the bigger the difference between the original and the compressed images.
- SSIM: SSIM is a metric that evaluates picture quality loss brought about by perceived changes in its structural information.

The formula above is based on three comparison measurements between the samples of 𝑥 and 𝑦: luminance (𝑙), contrast (𝑐), and structure (𝑠). The SSIM index is a decimal value in the range of [0,1]. A unity value indicates two identical sets of images, whereas a value of zero represents no structural similarity.
Enough theory, let’s start coding…
The formulas might look complex at first, but with the help of NumPy and sci-kit-learn, we can easily implement them.
Let’s install the libraries first:
Now, open your favorite IDE and import these libraries:
Look at that! SSIM is already a built-in method in scikit-image. Let’s first write our function to calculate MSE:
Pretty easy right? Here, we’re simply taking two image matrices and applying the formula for MSE, as shown in the code above.
Now we just need to do two more things before we start comparing our images—the first is to make their dimensions the same to avoid dimension error. So let’s resize them.
Next, we need to convert the images to grayscale. This simplifies the algorithm and diminishes computational resources needed. Converting to grayscale can be easily done in OpenCv:
Before proceeding to our comparison, let’s have a look at our folder structure and the dataset:
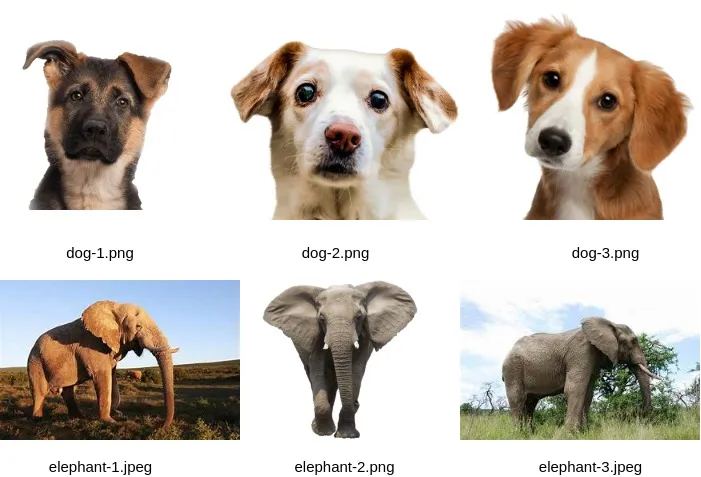
So now we’re good to go for comparing our images…
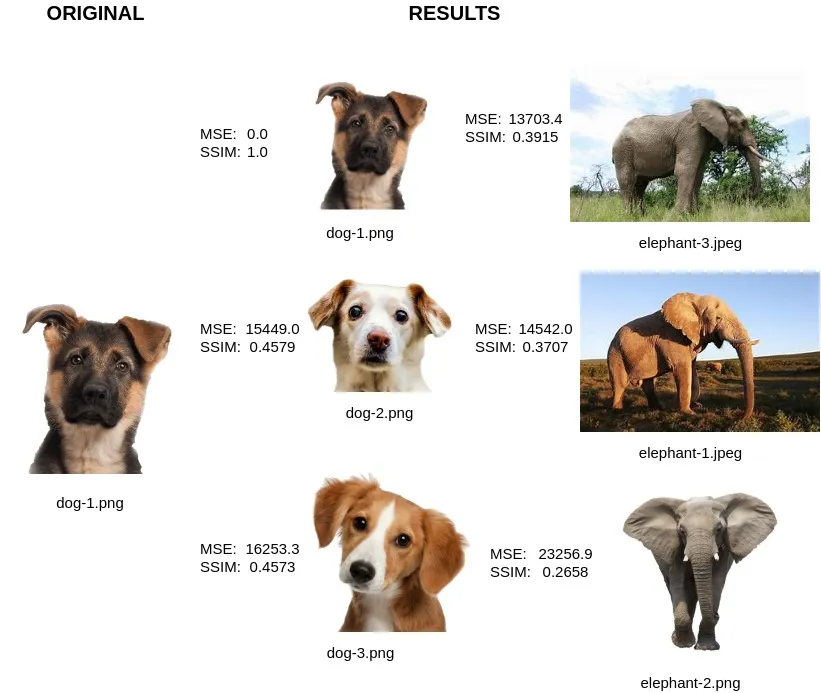
Let’s have a look at our output:
We did it!
The images in the RESULTS section have been ranked based on their SSIM values. And as one would expect (and hope), the other dog images are much more similar to our original queried image.
If you take a look at the MSE values, you’ll find the ‘elephant-3.jpeg’ and ‘elephant-1.jpeg’ have relatively lower MSE as compared to ‘dog-2.png’ and ‘dog-3.png’. What this means is that, according to the MSE metric, ‘elephant-3.jpeg’ and ‘elephant-1.jpeg’ have lesser variation from ‘dog-1.png’ and they are more similar to the queried image.
What we’re seeing here are the limitations of our approach, when it comes to using MSE as a metric. Because of this problem, there might be a need to return to TensorFlow or other deep learning methods for our task—this especially true with larger datasets and scaling applications.
Conclusion
In this article, we learned how we can compare image similarity when our dataset is too small to use deep learning methods. Also, we found that OpenCV is not quite the right tool for comparison when you’ve got a sufficiently large dataset.
Yeah, it’s not a search engine. But we’re also not done yet. This is going be our base algorithm, over which we’ll build our engine in the next part of this article. Until then, keep learning, and feel free to reach out to me for any kind of queries or feedback.
GitHub Repository:
Some other image comparison metrics:

Comments 0 Responses