
With 3D Motion Sense technology already out on Pixel 4, it looks like our way of interacting with phones is going to change soon. Touchless interactions have a promising future for sure, with Apple’s most ambitious product to date— AR glasses—already under development.
While the True Depth technology on the front iPhone camera does allow you to add eye-tracking features to your applications, it is only available on iPhone X and above.
Luckily, we can leverage Firebase’s ML Kit to help us. Specifically, ML Kit’s Face Detection API does a lot more than just face detection on the device. Some of the features that ML Kit’s Face Detection supports are:
- Face tracking — This extends the face detection technology into video sequences to track a face that’s appearing for a period of time, based on the motion and position. In no way does this imply facial recognition, however (identifying the specific face shown).
- Face orientations — The API returns the Euler angles X, Y, and Z to determine the position in real-world space. A face with a positive Euler X angle implies it’s upward-facing; a positive Euler Y angle indicates a face turned left; and a positive Euler Z angle is rotated counter-clockwise relative to the camera.
- Face classification — The face detector possesses the ability to classify a face as a smiling one as well as return the probabilities of the eyes being open or not.
Before we deep dive into the implementation, let’s list our goals for this tutorial.
Our Goals
- We’ll start off by creating a Tinder-like swiping card interface in our iOS application using Swift. Left-right swipe is a popular UI design seen in many applications now.
- Next up, we’ll set up our camera using the AVFoundation framework for frame processing.
- Finally, we’ll integrate ML Kit and use the above-mentioned face classification/orientation results to handle swiping without touching.
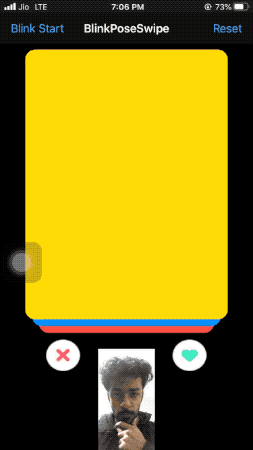
Our Final Destination
By the end of this tutorial, you’ll be able to wink or turn your head to perform a swipe. The following illustration is a result of what I was able to achieve after completing this application:
Creating a Tinder-Like Swiping Interface
Fire up Xcode to create a new Single View Application using UIKit. I’m not a big fan of storyboards, so I’ll be creating all of the views programmatically.
To start off, let’s create a custom view — TinderCard.swift—as shown below:
import UIKit

class TinderCardView : UIView {

    var swipeView : UIView!
    var delegate : SwipeCardsDelegate?

    var dataSource : DataModel? {
        didSet {
            swipeView.backgroundColor = dataSource?.bgColor
        }
    }

     override init(frame: CGRect) {
        super.init(frame: .zero)

        configureSwipeView()
        addPanGestureOnCards()
    }

    required init?(coder aDecoder: NSCoder) {
        fatalError("init(coder:) has not been implemented")
    }

    func configureSwipeView() {
        swipeView = UIView()
        swipeView.layer.cornerRadius = 15
        swipeView.clipsToBounds = true
        addSubview(swipeView)

        swipeView.translatesAutoresizingMaskIntoConstraints = false
        swipeView.leftAnchor.constraint(equalTo: leftAnchor).isActive = true
        swipeView.rightAnchor.constraint(equalTo: rightAnchor).isActive = true
        swipeView.bottomAnchor.constraint(equalTo: bottomAnchor).isActive = true
        swipeView.topAnchor.constraint(equalTo: topAnchor).isActive = true
    }

    func addPanGestureOnCards() {
        self.isUserInteractionEnabled = true
        addGestureRecognizer(UIPanGestureRecognizer(target: self, action: #selector(handlePanGesture)))
    }

    @objc func handlePanGesture(sender: UIPanGestureRecognizer){
        let card = sender.view as! TinderCardView
        let point = sender.translation(in: self)
        let centerOfParentContainer = CGPoint(x: self.frame.width / 2, y: self.frame.height / 2)
        card.center = CGPoint(x: centerOfParentContainer.x + point.x, y: centerOfParentContainer.y + point.y)

        switch sender.state {
        case .ended:
            if (card.center.x) > 300 {
                delegate?.swipeDidEnd(on: card)
                UIView.animate(withDuration: 0.2) {
                    card.center = CGPoint(x: centerOfParentContainer.x + point.x + 200, y: centerOfParentContainer.y + point.y + 75)
                    card.alpha = 0
                    self.layoutIfNeeded()
                }
                return
            }else if card.center.x < -50 {
                delegate?.swipeDidEnd(on: card)
                UIView.animate(withDuration: 0.2) {
                    card.center = CGPoint(x: centerOfParentContainer.x + point.x - 200, y: centerOfParentContainer.y + point.y + 75)
                    card.alpha = 0
                    self.layoutIfNeeded()
                }
                return
            }
            UIView.animate(withDuration: 0.2) {
                card.transform = .identity
                card.center = CGPoint(x: self.frame.width / 2, y: self.frame.height / 2)
                self.layoutIfNeeded()
            }
        case .changed:
            let rotation = tan(point.x / (self.frame.width * 2.0))
            card.transform = CGAffineTransform(rotationAngle: rotation)

        default:
            break
        }
    }
}
Besides setting up our swipeView on which we’re setting a unique color from the DataModel(more on this next), we’ve added the UIPanGestureRecognizer to the above custom view with a certain threshold, beyond which the swipe is taken into consideration and the custom delegate function(swipeDidEnd) is called to remove that card from the stack.
Data Model
The data model currently just holds a color property. You can further customize this by adding images and text to make it similar to actual Tinder cards:
Custom Protocols
We need to create a couple of protocols. One for the data source, and the other for handling the swipe gesture actions. Both of them are defined below:
The swipeDidEnd function that’s invoked on the delegate in the custom view we saw earlier triggers the stack container (which holds the stack of swipe cards). Let’s look at the StackContainerView.swift class:
import UIKit

class StackContainerView: UIView, SwipeCardsDelegate {

    var numberOfCardsToShow: Int = 0
    var cardsToBeVisible: Int = 3
    var cardViews : [TinderCardView] = []
    var remainingcards: Int = 0

    let horizontalInset: CGFloat = 10.0
    let verticalInset: CGFloat = 10.0

    var visibleCards: [TinderCardView] {
        return subviews as? [TinderCardView] ?? []
    }
    var dataSource: SwipeCardsDataSource? {
        didSet {
            reloadData()
        }
    }
    //MARK: - Init
    override init(frame: CGRect) {
        super.init(frame: .zero)

    }

    required init?(coder aDecoder: NSCoder) {
        fatalError("init(coder:) has not been implemented")
    }


    func reloadData() {
        removeAllCardViews()
        guard let datasource = dataSource else { return }
        setNeedsLayout()
        layoutIfNeeded()
        numberOfCardsToShow = datasource.numberOfCardsToShow()
        remainingcards = numberOfCardsToShow

        for i in 0..<min(numberOfCardsToShow,cardsToBeVisible) {
            addCardView(cardView: datasource.card(at: i), atIndex: i )

        }
    }

    //MARK: - Configurations
    private func addCardView(cardView: TinderCardView, atIndex index: Int) {
        cardView.delegate = self
        addCardFrame(index: index, cardView: cardView)
        cardViews.append(cardView)
        insertSubview(cardView, at: 0)
        remainingcards -= 1
    }

    func addCardFrame(index: Int, cardView: TinderCardView) {
        var cardViewFrame = bounds
        let horizontalInset = (CGFloat(index) * self.horizontalInset)
        let verticalInset = CGFloat(index) * self.verticalInset

        cardViewFrame.size.width -= 2 * horizontalInset
        cardViewFrame.origin.x += horizontalInset
        cardViewFrame.origin.y += verticalInset

        cardView.frame = cardViewFrame
    }

    private func removeAllCardViews() {
        for cardView in visibleCards {
            cardView.removeFromSuperview()
        }
        cardViews = []
    }

    func swipeDidEnd(on view: TinderCardView) {
        guard let datasource = dataSource else { return }
        view.removeFromSuperview()

        if remainingcards > 0 {
            let newIndex = datasource.numberOfCardsToShow() - remainingcards
            addCardView(cardView: datasource.card(at: newIndex), atIndex: 2)
            for (cardIndex, cardView) in visibleCards.reversed().enumerated() {
                UIView.animate(withDuration: 0.2, animations: {
                cardView.center = self.center
                  self.addCardFrame(index: cardIndex, cardView: cardView)
                    self.layoutIfNeeded()
                })
            }

        }else {
            for (cardIndex, cardView) in visibleCards.reversed().enumerated() {
                UIView.animate(withDuration: 0.2, animations: {
                    cardView.center = self.center
                    self.addCardFrame(index: cardIndex, cardView: cardView)
                    self.layoutIfNeeded()
                })
            }
        }
    }
}
The StackContainerView class above is responsible for holding the group of TinderCardViews. With every swipe, it checks the data source (that’s defined in the ViewController) for remaining cards (if there are any), and adds them to the bottom of the stack.
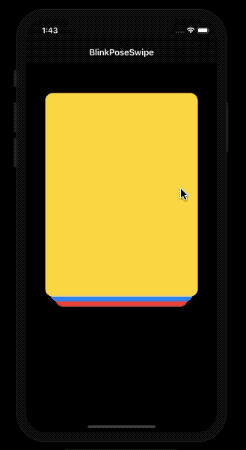
Before we plug in the above container view into our ViewController, here’s a glimpse of the Tinder-like card swiping interface in action:
Moving forward, we need to set up our ViewController with the above StackContainer and Buttons that could simulate the swiping gesture animation when pressed. Let’s do that in the next section.
Simulate a Swiping Gesture Programmatically
To simulate a swiping gesture upon a button click, we need to animate our Tinder card views horizontally, with an affine transformation to bring about the angle to mimic the action of swiping right or left in real life.
In the following ViewController.swift code, we’ll set up our like and dislike buttons and plug the data source onto the stack container custom view.
class ViewController: UIViewController{

    var modelData = [DataModel(bgColor: .systemYellow),
                         DataModel(bgColor: .systemBlue),
                         DataModel(bgColor: .systemRed),
                         DataModel(bgColor: .systemTeal),
                         DataModel(bgColor: .systemOrange),
                         DataModel(bgColor: .brown)]

    var stackContainer : StackContainerView!
    var buttonStackView: UIStackView!
    var leftButton : UIButton!, rightButton : UIButton!

    var cameraView : CameraView! // 1.

    override func loadView() {
        view = UIView()

        stackContainer = StackContainerView()
        view.addSubview(stackContainer)
        configureStackContainer()
        stackContainer.translatesAutoresizingMaskIntoConstraints = false

        configureNavigationBarButtonItem()
        addButtons() // 2.
        addCameraView() // 3.
    }

    override func viewDidLoad() {
        super.viewDidLoad()
        title = "BlinkPoseSwipe"
        stackContainer.dataSource = self
    }

    func configureStackContainer() {
        stackContainer.centerXAnchor.constraint(equalTo: view.centerXAnchor).isActive = true
        stackContainer.centerYAnchor.constraint(equalTo: view.centerYAnchor, constant: -60).isActive = true
        stackContainer.widthAnchor.constraint(equalToConstant: 300).isActive = true
        stackContainer.heightAnchor.constraint(equalToConstant: 400).isActive = true
    }

    func configureNavigationBarButtonItem() {
        navigationItem.rightBarButtonItem = UIBarButtonItem(title: "Reset", style: .plain, target: self, action: #selector(resetTapped))
        navigationItem.leftBarButtonItem = UIBarButtonItem(title: "Blink Start", style: .plain, target: self, action: #selector(startBlink)) // 4
    }

    @objc func resetTapped() {
        stackContainer.reloadData()
    }
}
To pass the modelData from the ViewController to the StackContainerView, we’ve conformed to the protocol by:
Subsequently, we need to implement the methods of the SwipeCardsDataSource protocol, as shown below:
Creating our Custom Buttons
The implementation of the addButtons function that’s invoked in the viewDidLoad method is as follows:
func addButtons(){

      leftButton = UIButton(type: .custom)
      leftButton.setImage(UIImage(named: "Nope"), for: .normal)

      leftButton.addTarget(self, action: #selector(onButtonPress(sender:)), for: .touchUpInside)
      leftButton.tag = 0

      rightButton = UIButton(type: .custom)
      rightButton.setImage(UIImage(named: "Like"), for: .normal)

      rightButton.addTarget(self, action: #selector(onButtonPress(sender:)), for: .touchUpInside)
      rightButton.tag = 1

      buttonStackView = UIStackView(arrangedSubviews: [leftButton, rightButton])
      buttonStackView.distribution = .fillEqually
      self.view.addSubview(buttonStackView)

      buttonStackView.leftAnchor.constraint(equalTo: view.leftAnchor).isActive = true
      buttonStackView.rightAnchor.constraint(equalTo: view.rightAnchor).isActive = true
      buttonStackView.topAnchor.constraint(equalTo: stackContainer.bottomAnchor, constant: 30).isActive = true
      buttonStackView.heightAnchor.constraint(equalToConstant: 50).isActive = true

      buttonStackView.translatesAutoresizingMaskIntoConstraints = false

}
The onButtonPress selector function is where we’ll simulate our swipe left and right gestures, as shown below:
The leftSwipeClicked and rightSwipeClicked functions are implemented in the TinderCardView class. The code for the leftSwipeClicked function is given below:
The right swipe is analogous to the above code. Instead of doing an affine transformation with the rotation angle set as -1, you need to do the same with the rotation angle set to + 1 to show the tilt towards the right side.
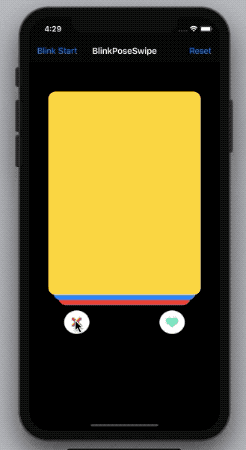
Let’s look at what we’ve achieved so far:
Now that our Tinder-like card swiping prototype is done, let’s move on to the camera section. If you’ve noticed from the previous section, we need to set up our CameraView class. We’ll do this at the bottom of the screen.
Setting Up the Camera Using AVFoundation
Before you set up your camera, add the NSCameraUsageDescription in the info.plist file to avoid a runtime crash later on.
Apple’s AVFoundation framework helps us do the following things:
- Set up our camera’s input device. We’ll use the front camera for this use case.
- Initialize the camera session.
- Capture a sample buffer from the output. We’ll pass the sample buffer from the live frames to ML Kit’s vision instance to detect faces and, subsequently, blinks and face positioning.
The code for the CameraView.swift class is given below:
final class CameraView: UIView {

    private lazy var videoDataOutput: AVCaptureVideoDataOutput = {
        let v = AVCaptureVideoDataOutput()
        v.alwaysDiscardsLateVideoFrames = true
        v.setSampleBufferDelegate(self, queue: videoDataOutputQueue)
        v.connection(with: .video)?.isEnabled = true
        return v
    }()

    private let videoDataOutputQueue: DispatchQueue = DispatchQueue(label: "VideoDataOutputQueue")

    private lazy var previewLayer: AVCaptureVideoPreviewLayer = {
        let l = AVCaptureVideoPreviewLayer(session: session)
        l.videoGravity = .resizeAspect
        return l
    }()

    private let captureDevice: AVCaptureDevice? = AVCaptureDevice.default(.builtInWideAngleCamera, for: .video, position: .front)
    private lazy var session: AVCaptureSession = {
        return AVCaptureSession()
    }()

    override init(frame: CGRect) {
        super.init(frame: frame)
    }

    required init?(coder: NSCoder) {
        fatalError("init(coder:) has not been implemented")
    }

    public func beginSession() {

            guard let captureDevice = captureDevice else { return }
            guard let deviceInput = try? AVCaptureDeviceInput(device: captureDevice) else { return }
            if session.canAddInput(deviceInput) {
                session.addInput(deviceInput)
            }

            if session.canAddOutput(videoDataOutput) {
                session.addOutput(videoDataOutput)
            }
            layer.masksToBounds = true
            layer.addSublayer(previewLayer)
            previewLayer.frame = bounds
            session.startRunning()
    }

    override func layoutSubviews() {
        super.layoutSubviews()
        previewLayer.frame = bounds
    }
}

extension CameraView: AVCaptureVideoDataOutputSampleBufferDelegate {

func captureOutput(_ output: AVCaptureOutput, didOutput sampleBuffer: CMSampleBuffer, from connection: AVCaptureConnection) {}

}
The beginSession function will be invoked from the ViewController when the Navigation Bar button is pressed.
Let’s add the CameraView we’ve just created into our ViewController’s view programmatically, as shown below:
Take note of the blinkDelegate delegate set on the CameraView. Let’s define the custom protocol BlinkSwiperDelegate, which consists of two methods:
We’ll invoke these methods whenever the respective blink is detected in order to perform a swipe on the TinderCardView.
Let’s move on to the last leg of this tutorial and integrate ML Kit in our iOS application and leverage its Face Detection API.
Integrating ML Kit in our IOS Application
In order to get started with the ML Kit integration, Firebase’s documentation is a good place to start. The following are the highlights of what you need to do when integrating Firebase in your application:
- Create a new Firebase project and register your app’s bundle ID.
- Download the GoogleService-Info.plist file and put it in your Xcode project.
- Add the relevant Firebase dependencies using Cocoapods or Swift Package Manager. In our case they are:
- Finally, initialize Firebase in your AppDelegate using FirebaseApp.configure().
Now that we’re done with the Firebase setup, import FirebaseMLVision into your CameraView.swift class. It’s time to perform face detection on live frames from the camera.
Initialize the following properties in your CameraView.swift class:
In order to detect the probabilities of eyes being open, and face orientations, it’s important that you set the classificationMode to all on the Vision face detector options.
In order to run the face detection, we need to pass the options in the faceDetector method. The image that’s passed to this faceDetector should be of the type VisionImage. The following code snippet shows the gist of ML Kit’s Face Detection in iOS.
Let’s retrieve the sample buffer from our AVFoundation’s captureOutput delegate method and pass it for face detection now:
imageOrientation and visionImageOrientation are two utility functions (available with the source code at the end) to determine the orientation of the image retrieved from the camera and to set it up in the metadata before invoking the face detector.
Performing Face Detection for Blinking and Face Orientation
The detectFacesOnDevice does the face detection for us on the VisionImage and returns the list of VisionFaces detected. Using these, we can find the bounding box of the face, leftEyeOpenProbability, rightEyeOpenProbability, and more. The following code snippet contains the full implementation of the function:
private func detectFacesOnDevice(in image: VisionImage, width: CGFloat, height: CGFloat) {

        let faceDetector = vision.faceDetector(options: options)

        faceDetector.process(image, completion: { features, error in
            if let error = error {
                print(error.localizedDescription)
                return
            }

            guard error == nil, let features = features, !features.isEmpty else {
                //print("On-Device face detector returned no results.")
                return
            }

            if let face = features.first{

                let leftEyeOpenProbability = face.leftEyeOpenProbability
                let rightEyeOpenProbability = face.rightEyeOpenProbability

                print("head euler angle is (face.headEulerAngleZ)")

                if leftEyeOpenProbability > 0.95 && rightEyeOpenProbability < 0.1
                {
                    if self.restingFace{
                        self.restingFace = false
                        self.blinkDelegate?.rightBlink()
                    }
                }
                else if rightEyeOpenProbability > 0.95 && leftEyeOpenProbability < 0.1
                {
                    if self.restingFace{
                        self.restingFace = false
                        self.blinkDelegate?.leftBlink()

                    }
                }
                else{
                    self.restingFace = true
                }
            }
        })
    }
In the above code, when a blink is detected, we trigger the relevant delegate function. Take note of the restingFace boolean property. It’s used to prevent triggering the delegate functions multiple times and lets the user return to the normal state (non-blinking) for the next swipe by a wink.
Alternatively, you can use the face position using headEulerAngleZ to perform a swipe by gesture— a positive value occurs when you tilt your head towards the left and should trigger swipe left. You can set a threshold value for the angle. The following snippet shows a condition that handles both a wink and a head pose:
The delegate functions rightBlink and leftBlink invoke the respective swipes programmatically as we saw in the previous section on simulating a swipe gesture.
That’s it! You should achieve a result similar to what you saw in the beginning.
The full source code for this application is available in this GitHub Repository. Just integrate Firebase, copy the GoogleService-Info.plist file into the project, and you should be good to go.
Where‘s Next?
Touchless gesture interaction using motion sensing has a promising future, and with augmented reality-powered glasses already in the works, the technology should continue to see a lot of investment.
Moving on from here, you can create your own gesture detection Core ML models to perform touchless swiping in your applications. Or you can re-use one of the already-made models available here.
That’s it for this one. Thanks for reading.

Comments 0 Responses