
The advent of machine learning on mobile has opened doors for a bunch of new opportunities. While it has allowed ML experts to tap into the mobile space, the other end of that equation is actually the show-stealer. Letting mobile application developers dabble in machine learning has actually made its with mobile application development so exciting.
The best thing is, that you needn’t be a machine learning expert in order to train or run models. Core ML, Apple’s machine learning framework, provides an easy-to-use API that lets you run inference (model predictions), fine-tune models, or re-train on the device.
Create ML, on the other hand, lets you create and train custom machine learning models (currently supported for images, objects, text, recommender systems, and linear regression) with a drag-and-drop macOS tool or in Swift Playgrounds.
If this didn’t amaze you, consider SwiftUI, the new declarative UI framework that caused a storm when it was announced to the iOS community during WWDC 2019. It alone has led to an influx of developers learning Swift and iOS dev, given how easy it is to quickly build user interfaces.
Only together would SwiftUI, Core ML, and Vision (Apple’s computer vision framework that preceded Core ML)give rise to smart AI-based applications. But that’s not all…you can leverage the power of machine learning to build fun games as well.
In the next few sections, we’ll build a camera-based iOS application that lets you hunt down the emojis in your house — something like a treasure hunt, which has to be among the popular indoor games we’re playing right now, as we find ourselves in quarantine.
Plan of Action
- We’ll use a MobileNet Core ML model to classify objects from the camera frames. If you want to read more about the MobileNet architecture, hop on over to this article for a detailed overview.
- For setting up the camera, we’ll use AVFoundation, Apple’s own audio-video framework. With the help of UIViewRepresentable, we’ll integrate it into our SwiftUI view.
- We’ll drive our Core ML model with the Vision framework, matching the model’s inference with the correct emoji (because every emoticon has a meaning).
- Our game will consist of a timer, against which the user points the camera at different objects around a given area to find the one that matches the emoji.
Getting Started
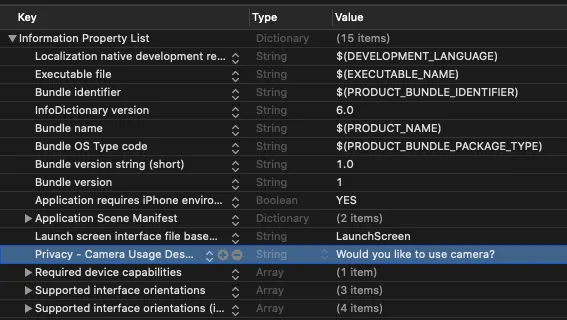
Launch Xcode and select SwiftUI as the UI template for the iOS application. Next, go to the info.plist file and add the camera privacy permissions with description.
Create a Custom Camera View with AVFoundation
SwiftUI doesn’t provide native support for AVFoundation. Luckily, we can leverage SwiftUI interoperability with UIKit. Before we do that, let’s set up a custom camera view controller first. We’ll eventually wrap this in a SwiftUI struct.
import AVFoundation
import UIKit

class CameraVC: UIViewController, AVCaptureVideoDataOutputSampleBufferDelegate {

    //custom delegate we've created
    var delegate: EmojiFoundDelegate?

    var captureSession: AVCaptureSession!
    var previewLayer: AVCaptureVideoPreviewLayer!

    private let videoDataOutput = AVCaptureVideoDataOutput()

    var emojiString = ""

    convenience init(emoji: String) {

        self.init()
        self.emojiString = emoji
    }

    override func viewDidLoad() {
        super.viewDidLoad()

        captureSession = AVCaptureSession()

        guard let videoCaptureDevice = AVCaptureDevice.default(for: .video) else { return }
        let videoInput: AVCaptureDeviceInput

        do {
            videoInput = try AVCaptureDeviceInput(device: videoCaptureDevice)
        } catch { return }

        if (captureSession.canAddInput(videoInput)) {
            captureSession.addInput(videoInput)
        }

        self.videoDataOutput.videoSettings = [(kCVPixelBufferPixelFormatTypeKey as NSString) : NSNumber(value: kCVPixelFormatType_32BGRA)] as [String : Any]

        self.videoDataOutput.alwaysDiscardsLateVideoFrames = true
        self.videoDataOutput.setSampleBufferDelegate(self, queue: DispatchQueue(label: "camera_frame_processing_queue"))
        self.captureSession.addOutput(self.videoDataOutput)

        previewLayer = AVCaptureVideoPreviewLayer(session: captureSession)
        previewLayer.frame = self.view.frame
        previewLayer.videoGravity = .resizeAspectFill
        view.layer.addSublayer(previewLayer)

        captureSession.startRunning()
    }

    override func viewWillAppear(_ animated: Bool) {
        super.viewWillAppear(animated)

        self.videoDataOutput.setSampleBufferDelegate(self, queue: DispatchQueue(label: "camera_frame_processing_queue"))

        if captureSession?.isRunning == false {
            captureSession.startRunning()
        }
    }

    override func viewWillDisappear(_ animated: Bool) {
        super.viewWillDisappear(animated)

        if captureSession?.isRunning == true {
            captureSession.stopRunning()
        }
    }

    override var prefersStatusBarHidden: Bool {
        return true
    }

    override var supportedInterfaceOrientations: UIInterfaceOrientationMask {
        return .portrait
    }
}
At large, the above code does four things:
- Creates a capture session.
- Obtains and configures the necessary capture devices. We’ll use the back camera.
- Sets up the inputs using the capture devices.
- Configures the output object which displays the camera frames.
Also, we’ve added a custom protocol: EmojiFoundDelegate, which’ll eventually inform the SwiftUI view when the emoji equivalent image is found. Here’s the code for the protocol:
You’ll also notice the protocol defined in the class declaration: AVCaptureVideoDataOutputSampleBufferDelegate. To conform to this, we need to implement the captureOutput(_:didOutputSampleBuffer:from) function wherein we can access the extracted frame buffers and pass them onto the Vision-Core ML request.
Process Camera Frames With Vision And CoreML
Now that our camera is set up, let’s extract the frames and process them in realtime. We’ll pass on the frames to the Vision request that runs the Core ML model.
Add the following piece of code in the CameraVC class that we defined above:
lazy var classificationRequest: VNCoreMLRequest = {
        do {
            let model = try VNCoreMLModel(for: MobileNet().model)

            let request = VNCoreMLRequest(model: model, completionHandler: { [weak self] request, error in
                self?.processClassifications(for: request, error: error)
            })
            request.imageCropAndScaleOption = .centerCrop
            return request
        } catch {
            fatalError("Failed to load Vision ML model: (error)")
        }
    }()

func captureOutput(
        _ output: AVCaptureOutput,
        didOutput sampleBuffer: CMSampleBuffer,
        from connection: AVCaptureConnection) {

        guard let frame = CMSampleBufferGetImageBuffer(sampleBuffer) else {
            debugPrint("unable to get image from sample buffer")
            return
        }

        self.updateClassifications(in: frame)
    }


func updateClassifications(in image: CVPixelBuffer) {

        DispatchQueue.global(qos: .userInitiated).async {
            let handler = VNImageRequestHandler(cvPixelBuffer: image, orientation: .right, options: [:])
            do {
                try handler.perform([self.classificationRequest])
            } catch {
                print("Failed to perform classification.n(error.localizedDescription)")
            }
        }
    }

func processClassifications(for request: VNRequest, error: Error?) {
    DispatchQueue.main.async {
        guard let results = request.results else {
            return
        }
        let classifications = results as! [VNClassificationObservation]

        if !classifications.isEmpty {
            if classifications.first!.confidence > 0.5{
                let identifier = classifications.first?.identifier ?? ""

                if identifier.contains(self.emojiString){
                    self.delegate?.emojiWasFound(result: true)
                }
            }
        }
    }
}
- We wrap our CoreML model (download the MobileNet version from here or you can find it in GitHub Repository at the end of the article) in a VNCoreMLRequest.
- The captureOutput the function converts the CGSampleBuffer retrieved from real-time camera frame into a CVPixelBuffer, which eventually gets passed onto the updateClassification function.
- The VNImageRequestHandler takes care of converting the input image into the constrains that the Core ML model requires — thereby freeing us of some boilerplate code.
- Inside the processClassifications function, we compare the image identified by the Core ML model with the emojiString (this is passed from the SwiftUI body interface that we’ll see shortly). Once there’s a match, we call the delegate to update the SwiftUI view.
Now that the tough part is over, let’s hop over to SwiftUI.
Building our SwiftUI Game
Our game consists of four states: emoji found, not found, emoji search, and game over. Since SwiftUI is a state-driven framework, we’ll create a @State enum type that switches between the aforementioned states and updates the user interface accordingly. Here’s the code for the enum and the struct that holds emoji data:
In the following code, we’ve set up a Timer for a given number of seconds (say 10 in our case), during which the user needs to hunt an image that resembles the emoji. Depending on whether user manages to do it or not, the UI is updated accordingly:
import SwiftUI

struct ContentView: View {

    @State var timeRemaining = 10
    @State var timer = Timer.publish (every: 1, on: .main, in: .common).autoconnect()

    @State var emojiStatus = EmojiSearch.searching

    var emojiObjects = [EmojiModel(emoji: "💻", emojiName: "laptop"),
                        EmojiModel(emoji: "😎", emojiName: "glasses"),
                        EmojiModel(emoji: "📚", emojiName: "book"),
                        EmojiModel(emoji: "✍️", emojiName: "pen"),
                        EmojiModel(emoji: "📲", emojiName: "iPod")
                       ]

    @State var currentLevel = 0
    @State var showNext = false

    var body: some View {

        ZStack {

            if showNext || emojiStatus == .found{
                Button(action: {

                    if self.currentLevel == self.emojiObjects.count - 1{
                        self.emojiStatus = .gameOver
                    }
                    else{
                        self.currentLevel = self.currentLevel + 1
                        self.timeRemaining = 10
                        self.emojiStatus = .searching
                        self.showNext = false
                        self.instantiateTimer()
                    }

                }) {
                    Text("NEXT")
                        .padding()
                        .background(Color.green)
                        .foregroundColor(Color.white)
                        .cornerRadius(6)
                }

            }
            else{
                CustomCameraRepresentable(emojiString: emojiObjects[currentLevel].emojiName, emojiFound: $emojiStatus)
            }
            VStack(alignment: .leading, spacing: 16){
                Spacer()
                if self.emojiStatus == .gameOver{
                    Button(action: {
                        self.currentLevel = 0
                        self.timeRemaining = 10
                        self.emojiStatus = .searching
                        self.showNext = false
                        self.instantiateTimer()

                    }) {
                        Text("GAME OVER. TAP to RETRY")
                            .padding()
                            .background(Color.green)
                            .foregroundColor(Color.white)
                            .cornerRadius(3)
                    }
                }
                else{
                    if self.emojiStatus == .searching{

                        Text("(timeRemaining)")
                            .font(.system(size:50, design: .rounded))
                            .fontWeight(.bold)
                            .foregroundColor(.yellow)
                            .onReceive(timer) { _ in

                                if self.emojiStatus == .found{
                                    self.cancelTimer()
                                    self.timeRemaining = 10

                                }
                                else {
                                    if self.timeRemaining > 0 {
                                        self.timeRemaining -= 1
                                    }
                                    else{
                                        self.emojiStatus = .notFound
                                        self.showNext = true
                                    }
                                }
                        }
                    }

                    emojiResultText()
                }
            }
        }
    }
}
The following two functions are invoked to reset the timer at each level:
Now, SwiftUI doesn’t really work the best with switch statements in the body — unless you wrap them in a generic parameter AnyView. Instead, we put the switch statement in a function emojiResultText, as shown below:
func emojiResultText() -> Text {
       switch emojiStatus {
       case .found:
        return Text("(emojiObjects[currentLevel].emoji) is FOUND")
            .font(.system(size:50, design: .rounded))
            .fontWeight(.bold)
       case .notFound:
            return Text("(emojiObjects[currentLevel].emoji) NOT FOUND")
            .font(.system(size:50, design: .rounded))
            .foregroundColor(.red)
            .fontWeight(.bold)
       default:
            return Text(emojiObjects[currentLevel].emoji)
            .font(.system(size:50, design: .rounded))
            .fontWeight(.bold)

        }
    }
Lastly, we need to create a wrapper struct for the CameraVC we created initially. The following code does that and passes the emojiString, which is eventually matched with the ML model’s classification results:
struct CustomCameraRepresentable: UIViewControllerRepresentable {

    var emojiString: String
    @Binding var emojiFound: EmojiSearch

    func makeUIViewController(context: Context) -> CameraVC {
        let controller = CameraVC(emoji: emojiString)
        controller.delegate = context.coordinator
        return controller
    }

    func updateUIViewController(_ cameraViewController: CameraVC, context: Context) {}

    func makeCoordinator() -> Coordinator {
        Coordinator(emojiFound: $emojiFound)
    }

    class Coordinator: NSObject, UINavigationControllerDelegate, EmojiFoundDelegate {

        @Binding var emojiFound: EmojiSearch

        init(emojiFound: Binding<EmojiSearch>) {
            _emojiFound = emojiFound
        }

        func emojiWasFound(result: Bool) {
            print("emojiWasFound (result)")
            emojiFound = .found
        }

    }
}
The @Binding property wrapper defined in the Coordinator class lets you update the SwiftUI State from the CustomCameraRepresentable struct. Basically the Coordinator class acts as a bridge between UIKit and SwiftUI — letting you update one from the other by using delegates and binding property wrapper(s).
Let’s look at some of the outputs from our SwiftUI game in action:
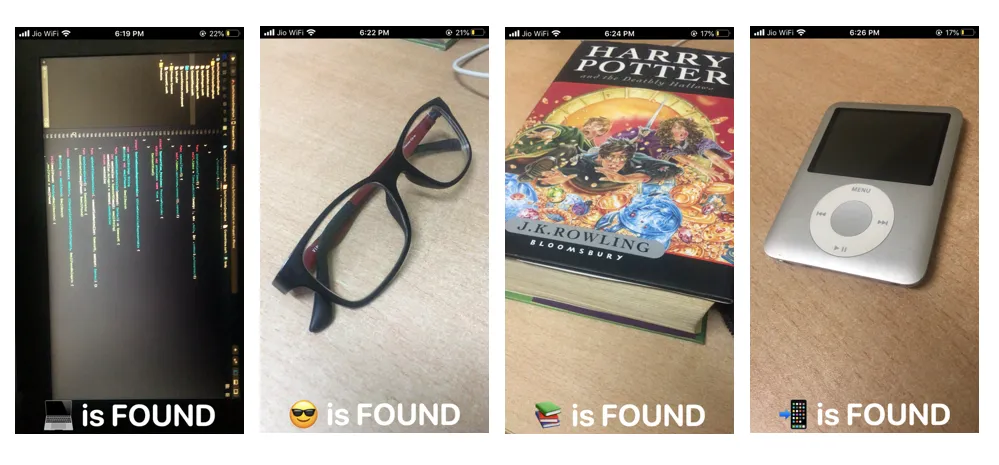
Here’s a screengrab of the application running on a bunch of different objects:
Conclusion
We were quickly able to build a small Emoji Hunter Game using SwiftUI, Core ML, and Vision. You can further improve on this experience by adding audio when the emoji-equivalent image is found. Also, by using this amazing library Smile, you can quickly search the keyword name of an emoji and vice-versa.
With WWDC 2020 just around the corner, it’ll be interesting to see how Apple surprises Core ML and SwiftUI developers. A simpler integration of AVFoundation with SwiftUI and expanding the set of Core ML model layers would help train more kinds of ML models on on-device.
For instance, RNN’s layers such as LSTM would open up possibilities for the stock market prediction-based applications (perhaps for entertainment purposes only right now. — don’t use them when making investment decisions). This is something the iOS community would keenly look forward to.
You can download the full project from this GitHub Repository.
That’s it for this one. I hope you enjoyed 😎

Comments 0 Responses