
This tutorial is the 10th part in the series, ML Kit for Mobile Developers. If you’re not quite caught up, you can start here:
Series Pit Stops
- Creating a Google Lens clone using Firebase ML Kit
- Creating a Credit Card Scanner using Firebase ML Kit
- Creating a Barcode Scanner using Firebase ML Kit
- Identifying Places in a provided Image using Firebase ML Kit
- Building a “Pokédex” clone using Firebase ML Kit and TensorFlow Lite
- Implementing Smart Replies in an app using Firebase ML Kit
- Recreating Google Translate using Firebase’s ML Kit and Cloud Translate API
- Building a real-time object detection app using Firebase ML Kit
- Creating an offline translation app using Firebase ML Kit
- Blink detection in Android using Firebase ML Kit (You are here)
Introducing Firebase ML Kit Face Detection API
ML Kit’s Face detection API is one of the APIs that I left out from the ML Kit series (until now), mainly because I couldn’t find a proper use-case of this API.
But recently, as I started working on AfterShoot, I came to realize that this API can be used to effectively detect blinks from a picture, which is what this blog is going to be about!
The Face Detection API mainly takes in an image and scans it for any human faces that are present, which is different than facial recognition (in which Big Brother is infamously watching you while you sleep). It’s also an on-device API, which means that all the ML inferencing happens on your device and no personal data is sent to a third-party vendor.
For each face it detects, the API returns the following parameters :
- Coordinates of a rectangular bounding box around that face
- Coordinates of a rectangular bounding box around the eyes, nose, and mouth for that face
- The probability that the face in the picture is smiling
- The likelihood that the eyes in that face are open or closed
- A face contour outlining the face, eyes, nose, and mouth
You can read more about the API here :
In this blog pose, we’ll be looking at how we can use this library to mainly track whether a person captured in the live camera preview has their eyes opened or closed.
This can be used in a car monitoring system, for instance, to detect if the driver is feeling sleepy or otherwise distracted. This system could then alert them if their eyes are closed for a prolonged period!
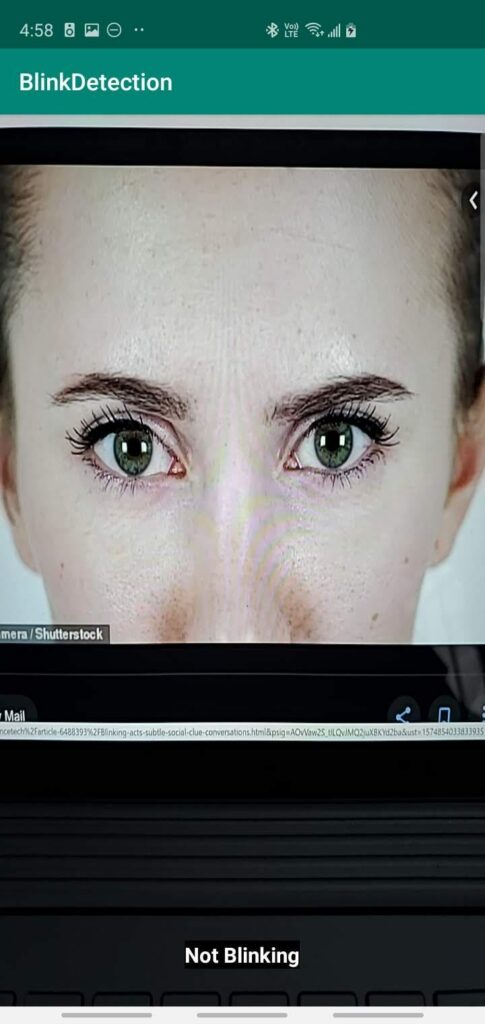
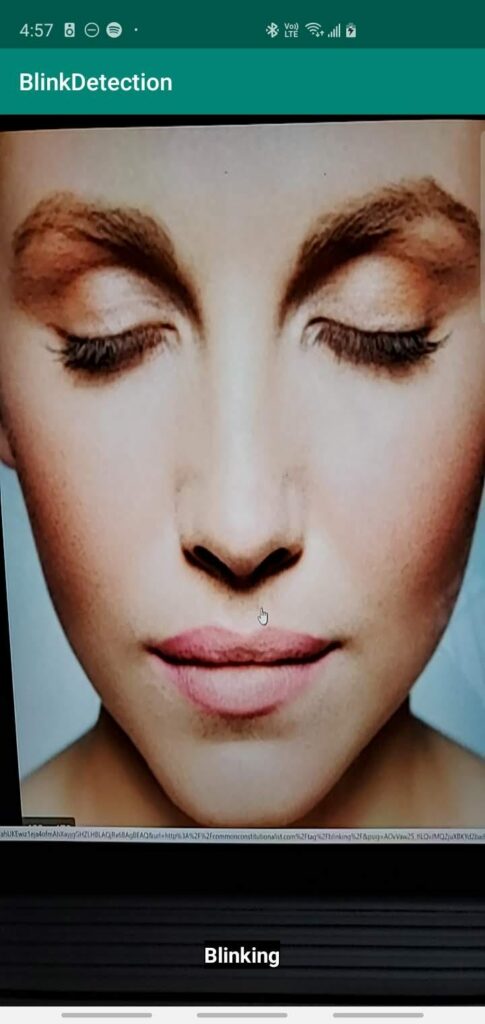
Before we go ahead, here are some screenshots from the app :

Step 1: Create a new Android Studio project and add the necessary dependencies
First, we need to create a new Android Studio project and add the relevant dependencies to it.
The first is a simple one — set up Firebase in your project. You can find a good tutorial here. To use this API, you’ll need to add the following dependency to your app:
dependencies {
  ..
  implementation 'com.google.firebase:firebase-ml-vision:24.0.1'
  ..
}
You might also want to add a camera library to your project to integrate camera features into your app easily. I recommend using CameraX.
I’ve covered using it in an earlier blog of mine, which I strongly suggest you give a read before proceeding further:
Step 2: Creating a basic layout and adding the camera preview
Next, we need to create a basic layout that shows the camera preview and text that tells us whether the person is blinking or not.
Here’s what it might look like :
To start the preview automatically as soon as the app starts, you can again read my blog on CameraX — I explain how to do it in Step 4.
The final code should look something like this :
<?xml version="1.0" encoding="utf-8"?>
<FrameLayout xmlns:android="http://schemas.android.com/apk/res/android"
    xmlns:app="http://schemas.android.com/apk/res-auto"
    xmlns:tools="http://schemas.android.com/tools"
    android:layout_width="match_parent"
    android:layout_height="match_parent"
    android:orientation="vertical"
    tools:context=".MainActivity">

    <TextureView
        android:id="@+id/view_finder"
        android:layout_width="match_parent"
        android:layout_height="match_parent" />

    <TextView
        android:id="@+id/tv_name"
        android:layout_width="wrap_content"
        android:layout_height="wrap_content"
        android:layout_gravity="bottom|center"
        android:layout_marginBottom="32dp"
        android:background="#000000"
        android:gravity="center"
        android:text="Point the camera at a person"
        android:textColor="#fff"
        android:textSize="20sp"
        android:textStyle="bold" />
</FrameLayout>
Step 3: Initialize Firebase Face Detector
Before we go ahead and start detecting faces, we need to initialize the Firebase Face Detector.
Now since this is an on-device API, it runs without an active internet connection and is available for free!
To initialize the detector, we first need to create an options object that outlines:
- The type of detector we’re going to use (Fast vs. Accurate)
- Whether we need to identify facial features (nose, eyes, and mouth)
- Whether to track face contours or not.
- And much more…
You can find all the available options here:
For the scope of this blog, we’ll be tracking the facial features (the eyes) in ACCURATE mode.
The code for doing this will look as follows:
class MainActivity : AppCompatActivity(){
...
val highAccuracyOpts = FirebaseVisionFaceDetectorOptions.Builder()
        .setPerformanceMode(FirebaseVisionFaceDetectorOptions.ACCURATE)
        .setLandmarkMode(FirebaseVisionFaceDetectorOptions.ALL_LANDMARKS)
        .setClassificationMode(FirebaseVisionFaceDetectorOptions.ALL_CLASSIFICATIONS)
        .build()

val faceDetector =FirebaseVision.getInstance().getVisionFaceDetector(highAccuracyOpts)
...
}
Step 4: Extending the CameraX image analyzer to process incoming frames
Next up, we need to create an image analyzer that contains the logic for processing the incoming camera frames, the code for the Analyzer will look something like this :
inner class ImageProcessor : ImageAnalysis.Analyzer {
private val TAG = javaClass.simpleName
override fun analyze(image: ImageProxy?, rotationDegrees: Int) {
image?.image?.let {
// Extract the mediaImage from the ImageProxy
val visionImage = FirebaseVisionImage.fromMediaImage(it, rotationDegrees)
faceDetector.detectInImage(visionImage)
.addOnSuccessListener { faces ->
// Returns an array containing all the detected faces
faces.forEach { face ->
// Loop through the array and detect features
Log.e(TAG, "Smiling probability ${face.smilingProbability}")
Log.e(TAG, "Left eye open probability ${face.leftEyeOpenProbability}")
Log.e(TAG, "Right eye open probability ${face.rightEyeOpenProbability}")
Log.e(TAG, "Tracking id ${face.trackingId}")
}
}
.addOnFailureListener {
it.printStackTrace()
}
}
}
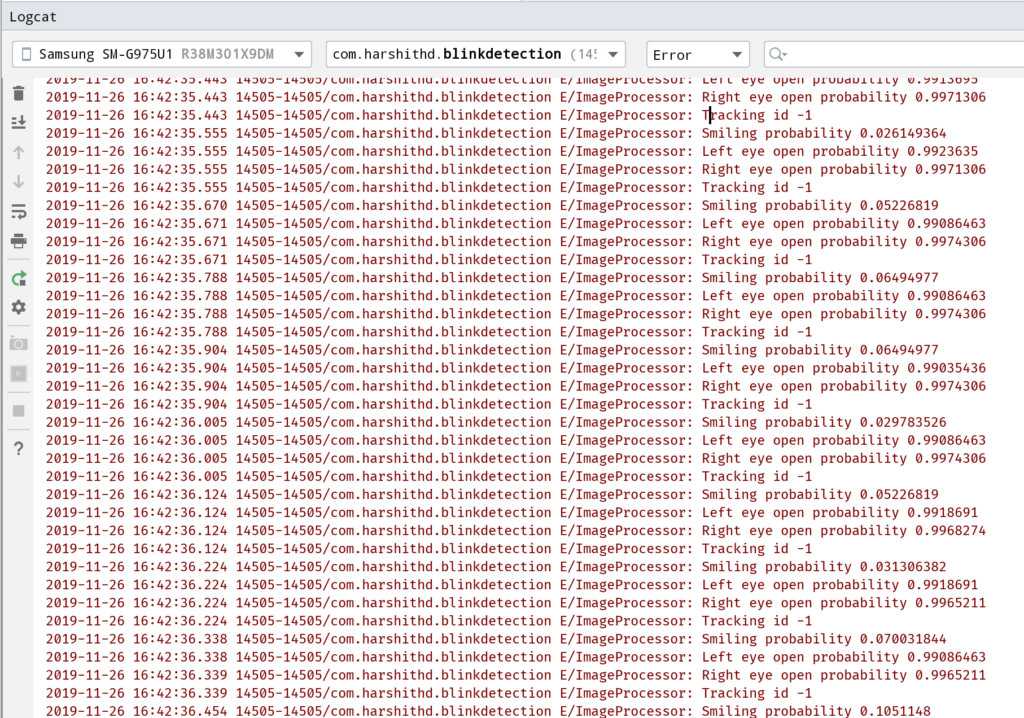
}The code above logs the features it detects in the faces. We’ll later extend this to add support for detecting blinks in the image.
Step 5: Adding the ML processing logic to the camera preview
To let our camera preview know that we want to perform inference on the captured frames, you can modify the startCamera() method as follows :
  private fun startCamera() {

        val analyzerConfig = ImageAnalysisConfig.Builder().apply {
            // In our analysis, we care more about the latest image than
            // analyzing *every* image
            setImageReaderMode(
                ImageAnalysis.ImageReaderMode.ACQUIRE_LATEST_IMAGE)
        }.build()

        val blinkDetector = ImageAnalysis(analyzerConfig).apply {
            analyzer = ImageProcessor()
        }

        ...

    }
To finish things up, we need to update the CameraX.bindToLifecycle() method as follows:
Once done, CameraX should start running the image analysis as you point it to various faces, and you should be able to see the logs being printed in your Android Studio Logcat Terminal.
Step 6: Modifying the app to detect blinks
Lastly, we need to use the information we receive from the model to make a call and determine if the person in the picture is blinking or not.
For the sake of this blog, I’ll assume that the person is blinking if the open eye probability of any one of the eyes is less than 0.4.
We’ll then write an if statement inside our loop which checks and validates this:
override fun analyze(image: ImageProxy?, rotationDegrees: Int) {
            image?.image?.let {
            val visionImage = FirebaseVisionImage.fromMediaImage(it, imageRotation)
            faceDetector.detectInImage(visionImage)
                  .addOnSuccessListener { faces ->
                       faces.forEach { face ->
                            // if the eye open probability is less than 0.4, the person is blinking
                            if (face.leftEyeOpenProbability < 0.4 || face.rightEyeOpenProbability < 0.4) {
                                label.text = "Blinking"
                            } else {
                                label.text = "Not Blinking"
                            }
                        }
                    }
                    .addOnFailureListener {
                        it.printStackTrace()
                    }
            }
        }
    }
And that’s it! Thanks to the advents in mobile ML, we’re able to add complicated machine learning features to our apps quickly without writing any ML-specific code!
If you’re intrigued by this and want to get started with machine learning as a mobile developer, this blog might be a good read :
Or this one:
The source code for the app outlined in this blog post can be found on my GitHub repository here :
Thanks for reading! If you enjoyed this story, please click the 👏 button and share it to help others find it! Feel free to leave a comment 💬 below.
Have feedback? Let’s connect on Twitter.

Comments 0 Responses