
What is a behavior script? While initially this term looks complicated, it’s actually a surprisingly simple Lens Studio feature that allows you to turn your static projects into dynamic, interactive experiences.
You can find them in pretty much any Lens; from the most complex 3D experience, to a simple blush face paint Lens; Behavior scripts serve many functions and cover a wide range of commands in Lens Studio.
Below, I talked with Nik (@nikhilodeon12) about his Lenses, which implement behavior scripts in creative ways, making simple face tune Lenses not so simple:
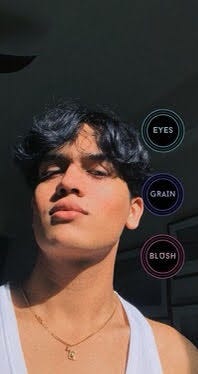
“For HELIODOR and other Lenses, I have made buttons to toggle grain, light eyes, as well as blush. I have made this toggle feature work for when the Lens is turned on, and I also made the buttons to be destroyed when recording a video or taking a snap.
Overall, the behavior scripts allow for end-users to customize the Lens to their skin tone or personal preference, which makes them feel more appreciated and happy to continue exploring your other Lenses as well!”
A very common form of the behavior script is the tap-to-enable format, which is commonly used to switch between different lookup tables (LUT) in their product. This is what you would call a “filter”- a color correcting texture that is overlaid onto the camera’s active texture. Follow below for a quick tutorial on how to import this into your own project, and become familiar with behavior scripting in only a few minutes.
LUT Tutorial
First, open a new project.
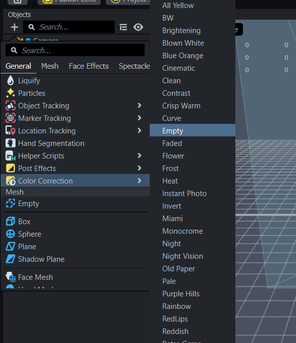
In the Objects panel, import an Empty Color Correction. This will be our holder for the “filter” effect. It will also be the object we apply the behavior script to.
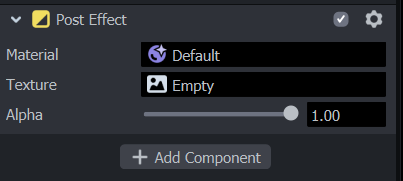
Next, in the Inspector panel, import your LUT under “texture”. This is a thin stripe of color gradients that you can edit with most photo editing programs, like Lightroom. This will direct how your colors are edited on-screen.
Once finished, we can move on to importing a behavior script. Remember—this doesn’t require any coding knowledge from you! It only takes a few clicks.
Back in the Objects panel, click the “+” button to view the drop down list of importable objects. Then, roll over the “Helper Scripts” tab, and select Behavior. Now, in the inspector panel, we can begin to customize our script, to make it perform a “tap-to-change” function.
First, make sure the Trigger function is set to “Touch Event”. This will let the script know that it needs to watch out for a tap if it wants to run. Then, set the Event Type to “Tap”.

If you want, a Screen Image can be imported into the project to function as a button. If you don’t want a button, you can move past this step. If you do, then select the Touch Target option, and set it to be your button’s screen image. This will restrict the behavior to only happen when that target is activated.
Lastly, for the actual function the script will perform: the “Set enable” behavior. To activate this, go to the Response Type portion of the Behavior, and select “Set Enable”. Then, on the Action portion, select “Toggle”. Toggle allows the user to flip back and forth between states of the filter being on and off.
Lastly, in the Target selection, add the LUT object we made in the previous section. This tells the script which object we’re effecting with the tap script. If you want to start the Lens with the LUT disabled, uncheck the grey box next to the LUT in the object panel.
Now that you know how to use a behavior script to perform a simple tap-activated script, what other ways can we use the Behavior tool to transform our Lens projects into interactive experiences? Get to brainstorming!

Comments 0 Responses